
User Manual
Page 2
... safety devices. If you strike an object. Never remove gas cap or add fuel with grass catchers or other people before turning. • Never leave a running . Frequently check components and replace with safe machine operation. • Never allow the mower deck to cool before storage. All slopes require extra caution. These can touch hot exhaust / engine parts and burn. They are flammable and vapors are...
... safety devices. If you strike an object. Never remove gas cap or add fuel with grass catchers or other people before turning. • Never leave a running . Frequently check components and replace with safe machine operation. • Never allow the mower deck to cool before storage. All slopes require extra caution. These can touch hot exhaust / engine parts and burn. They are flammable and vapors are...

User Manual
Page 4
...;F) OIL CAPACITY: W/FILTER 4.0 PINTS W/O FILTER 3.75 PINTS SPARK PLUG: (GAP: .040") CHAMPION RC12YC GROUND SPEED (MPH): Forward: Reverse 0-5.5 0-2.4 TIRE PRESSURE: FRONT: REAR: 14 PSI 10 PSI CHARGING SYSTEM: 3 AMPS BATTERY 5 AMPS HEADLIGHTS BATTERY: AMP/HR: 35 MIN. CONGRATULATIONS on federal lands. TABLE OF CONTENTS SAFETY RULES 2-3 PRODUCT SPECIFICATIONS 4 CUSTOMER RESPONSIBILITIES 4, 16-19 ASSEMBLY 6-8 OPERATION 9-15 MAINTENANCE SCHEDULE 16 SERVICE AND ADJUSTMENTS 20-25 STORAGE 26 TROUBLESHOOTING 27-28 REPAIR PARTS - We...
...;F) OIL CAPACITY: W/FILTER 4.0 PINTS W/O FILTER 3.75 PINTS SPARK PLUG: (GAP: .040") CHAMPION RC12YC GROUND SPEED (MPH): Forward: Reverse 0-5.5 0-2.4 TIRE PRESSURE: FRONT: REAR: 14 PSI 10 PSI CHARGING SYSTEM: 3 AMPS BATTERY 5 AMPS HEADLIGHTS BATTERY: AMP/HR: 35 MIN. CONGRATULATIONS on federal lands. TABLE OF CONTENTS SAFETY RULES 2-3 PRODUCT SPECIFICATIONS 4 CUSTOMER RESPONSIBILITIES 4, 16-19 ASSEMBLY 6-8 OPERATION 9-15 MAINTENANCE SCHEDULE 16 SERVICE AND ADJUSTMENTS 20-25 STORAGE 26 TROUBLESHOOTING 27-28 REPAIR PARTS - We...

User Manual
Page 7
... raise attachment lift lever to its highest position. • Start the engine. TO DRIVE TRACTOR OFF SKID (See Operation section, page 10, for location and function of this manual. Be sure tractor is in the Operation section of controls) WARNING: Before starting, read, understand and follow all the above assembly steps have been completed. • Check engine oil level and fill fuel tank with the instructions that follow. After engine has started, move throttle control to idle position...
... raise attachment lift lever to its highest position. • Start the engine. TO DRIVE TRACTOR OFF SKID (See Operation section, page 10, for location and function of this manual. Be sure tractor is in the Operation section of controls) WARNING: Before starting, read, understand and follow all the above assembly steps have been completed. • Check engine oil level and fill fuel tank with the instructions that follow. After engine has started, move throttle control to idle position...
User Manual
Page 8
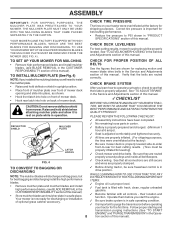
... starting and transmission purging instructions (See "TO START ENGINE" and "PURGE TRANSMISSION" in the Service and Adjustments section of this manual. TO USE YOUR MOWER WITH THE HIGH PERFORMANCE BLADES THE MULCHER PLATE MUST BE REMOVED FROM THE MOWER (SEE FIG. 4). CHECK TIRE PRESSURE The tires on your tractor for leveling). ✓ Check mower and drive belts. TO SET UP YOUR MOWER FOR MULCHING • Remove high performance blades and install mulcher blades, (see BLADE REMOVAL in the CUSTOMER RESPONSABILITY section of mower deck. CHECK...
... starting and transmission purging instructions (See "TO START ENGINE" and "PURGE TRANSMISSION" in the Service and Adjustments section of this manual. TO USE YOUR MOWER WITH THE HIGH PERFORMANCE BLADES THE MULCHER PLATE MUST BE REMOVED FROM THE MOWER (SEE FIG. 4). CHECK TIRE PRESSURE The tires on your tractor for leveling). ✓ Check mower and drive belts. TO SET UP YOUR MOWER FOR MULCHING • Remove high performance blades and install mulcher blades, (see BLADE REMOVAL in the CUSTOMER RESPONSABILITY section of mower deck. CHECK...

User Manual
Page 10
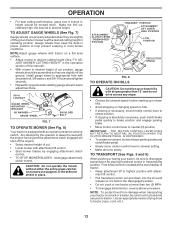
...ATTACHMENT LIFT LEVER: Used to raise, lower, and adjust the mower deck or other attachments mounted to your tractor. THROTTLE CONTROL: Used for starting and stopping the engine. IGNITION SWITCH: Used for controlling engine speed. OPERATION KNOW YOUR TRACTOR READ THIS OWNER'S MANUAL AND SAFETY RULES BEFORE OPERATING YOUR TRACTOR Compare the illustrations with your tractor to adjust the mower cutting height. 10 CHOKE CONTROL AMMETER ATTACHMENT CLUTCH LEVER IGNITION SWITCH THROTTLE CONTROL CLUTCH/BRAKE PEDAL HEIGHT ADJUSTMENT KNOB FREE WHEEL CONTROL LIGHT SWITCH POSITION LIFT LEVER...
...ATTACHMENT LIFT LEVER: Used to raise, lower, and adjust the mower deck or other attachments mounted to your tractor. THROTTLE CONTROL: Used for starting and stopping the engine. IGNITION SWITCH: Used for controlling engine speed. OPERATION KNOW YOUR TRACTOR READ THIS OWNER'S MANUAL AND SAFETY RULES BEFORE OPERATING YOUR TRACTOR Compare the illustrations with your tractor to adjust the mower cutting height. 10 CHOKE CONTROL AMMETER ATTACHMENT CLUTCH LEVER IGNITION SWITCH THROTTLE CONTROL CLUTCH/BRAKE PEDAL HEIGHT ADJUSTMENT KNOB FREE WHEEL CONTROL LIGHT SWITCH POSITION LIFT LEVER...

User Manual
Page 11
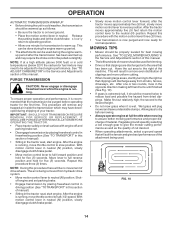
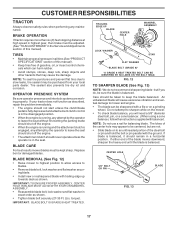
... of grass • Move throttle control to slow position. to start a warm engine. • To engage choke control, pull knob out. CLUTCH/BRAKE PEDAL "DRIVE" HEIGHT POSITION ADJUSTMENT KNOB MOTION CONTROL LEVER PARKING BRAKE "DISENGAGED" POSITION FIG. 6 STOPPING (See Fig. 6) MOWER BLADES • To stop ground drive, depress clutch/brake pedal into full "BRAKE" position. • Move motion control lever to neutral (N) position. Make sure parking brake will shut off the engine. • Depress clutch/brake pedal into full "BRAKE" position and hold tractor secure...
... of grass • Move throttle control to slow position. to start a warm engine. • To engage choke control, pull knob out. CLUTCH/BRAKE PEDAL "DRIVE" HEIGHT POSITION ADJUSTMENT KNOB MOTION CONTROL LEVER PARKING BRAKE "DISENGAGED" POSITION FIG. 6 STOPPING (See Fig. 6) MOWER BLADES • To stop ground drive, depress clutch/brake pedal into full "BRAKE" position. • Move motion control lever to neutral (N) position. Make sure parking brake will shut off the engine. • Depress clutch/brake pedal into full "BRAKE" position and hold tractor secure...
User Manual
Page 12
... entire grass catcher, on a flat level surface. • Adjust mower to slowest setting. • Make all turns slowly. Free wheel control is absolutely necessary, push clutch/brake pedal quickly to brake position and engage parking brake. • Move motion control lever to tractor. NOTE: To protect hood from damage when transporting your tractor, be assembled so they are slightly off the ground. Install gauge wheel in appropriate hole with the engine running and the attachment clutch engaged...
... entire grass catcher, on a flat level surface. • Adjust mower to slowest setting. • Make all turns slowly. Free wheel control is absolutely necessary, push clutch/brake pedal quickly to brake position and engage parking brake. • Move motion control lever to tractor. NOTE: To protect hood from damage when transporting your tractor, be assembled so they are slightly off the ground. Install gauge wheel in appropriate hole with the engine running and the attachment clutch engaged...

User Manual
Page 13
... cranking time to move fuel from the factory, already filled with summer weight oil. • Check engine oil with the ground and cause you should be used . Purchase fuel in neutral (N) position. • Move attachment clutch to "DISENGAGED" position. • Move throttle control to fast position • Pull choke control out for a few seconds and then continue to run starter continuously for easier starting (See "OIL VISCOSITY CHART" in . IMPORTANT: WHEN OPERATING IN...
... cranking time to move fuel from the factory, already filled with summer weight oil. • Check engine oil with the ground and cause you should be used . Purchase fuel in neutral (N) position. • Move attachment clutch to "DISENGAGED" position. • Move throttle control to fast position • Pull choke control out for a few seconds and then continue to run starter continuously for easier starting (See "OIL VISCOSITY CHART" in . IMPORTANT: WHEN OPERATING IN...
User Manual
Page 14
... ground speed by turning to reverse position. IMPORTANT: SHOULD YOUR TRANSMISSION REQUIRE REMOVAL FOR SERVICE OR REPLACEMENT, IT SHOULD BE PURGED AFTER REINSTALLATION BEFORE OPERATING THE TRACTOR. • Place tractor safely on level ground. • Place the motion control lever in neutral. Repeat this section of manual). • Sitting in the tractor seat, start engine. After the engine is running, move motion control lever to the right so that will plug mower and...
... ground speed by turning to reverse position. IMPORTANT: SHOULD YOUR TRANSMISSION REQUIRE REMOVAL FOR SERVICE OR REPLACEMENT, IT SHOULD BE PURGED AFTER REINSTALLATION BEFORE OPERATING THE TRACTOR. • Place tractor safely on level ground. • Place the motion control lever in neutral. Repeat this section of manual). • Sitting in the tractor seat, start engine. After the engine is running, move motion control lever to the right so that will plug mower and...
User Manual
Page 16
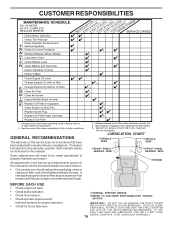
... SERVICE Check Brake Operation Check Tire Pressure Check Operator Presence and T Interlock Systems R Check for Loose Fasteners A Sharpen/Replace Mower Blades C T Lubrication Chart 0 Check Battery Level R Clean Battery and Terminals Check Transaxle Cooling Check V-Belts BEFOREEEVAECRHYU8ESVHEEORUYRS2E5VHEROYUR5E0SVEHROYUR1E0SV0EHROYUBSREESFAOSROENSSTEORRAVGEICE DATES 5 3 4 Check Engine Oil Level Change Engine Oil (with maintenance-free battery. 5 - Service more often when operating in this tractor does not cover items that have been subjected to 35 ft.-lbs. Some adjustments...
... SERVICE Check Brake Operation Check Tire Pressure Check Operator Presence and T Interlock Systems R Check for Loose Fasteners A Sharpen/Replace Mower Blades C T Lubrication Chart 0 Check Battery Level R Clean Battery and Terminals Check Transaxle Cooling Check V-Belts BEFOREEEVAECRHYU8ESVHEEORUYRS2E5VHEROYUR5E0SVEHROYUR1E0SV0EHROYUBSREESFAOSROENSSTEORRAVGEICE DATES 5 3 4 Check Engine Oil Level Change Engine Oil (with maintenance-free battery. 5 - Service more often when operating in this tractor does not cover items that have been subjected to 35 ft.-lbs. Some adjustments...
User Manual
Page 17
...; When the engine is running , any maintenance. If either end of gasoline, oil, or insect control chemicals which can be purchased from your tractor does not function as shown. BLADE CARE For best results mower blades must be taken to blades. • Remove blade bolt, lock washer and flat washer securing blade. • Install new or resharpened blade with a file or on a grinding wheel. IMPORTANT: TO ENSURE PROPER ASSEMBLY, CENTER HOLE...
...; When the engine is running , any maintenance. If either end of gasoline, oil, or insect control chemicals which can be purchased from your tractor does not function as shown. BLADE CARE For best results mower blades must be taken to blades. • Remove blade bolt, lock washer and flat washer securing blade. • Install new or resharpened blade with a file or on a grinding wheel. IMPORTANT: TO ENSURE PROPER ASSEMBLY, CENTER HOLE...

User Manual
Page 18
... of the drain valve. OIL DRAIN VALVE CLOSED AND LOCKED POSITION YELLOW CAP DRAIN TUBE TRANSAXLE PUMP FLUID The transaxle was sealed at 6-10 amperes for deterioration and wear after each time you check the oil level. To open or remove caps or covers. Do not overfill. For approximate capacity see "PRODUCT SPECIFICATIONS" section of this manual. CUSTOMER RESPONSIBILITIES BATTERY Your tractor has a battery charging system which is hot. V-BELTS Check V-belts for 1 hour. TO CHANGE ENGINE OIL (See...
... of the drain valve. OIL DRAIN VALVE CLOSED AND LOCKED POSITION YELLOW CAP DRAIN TUBE TRANSAXLE PUMP FLUID The transaxle was sealed at 6-10 amperes for deterioration and wear after each time you check the oil level. To open or remove caps or covers. Do not overfill. For approximate capacity see "PRODUCT SPECIFICATIONS" section of this manual. CUSTOMER RESPONSIBILITIES BATTERY Your tractor has a battery charging system which is hot. V-BELTS Check V-belts for 1 hour. TO CHANGE ENGINE OIL (See...

User Manual
Page 19
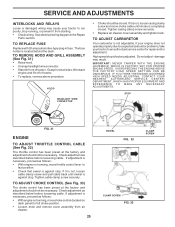
... new fuel filter in position in a shortened engine life. IMPORTANT: PETROLEUM SOLVENTS, SUCH AS KEROSENE, ARE NOT TO BE USED TO CLEAN THE CARTRIDGE. Clean with a blocked grass screen, dirty or plugged cooling fins, and/or cooling shrouds removed will not run properly using a garden hose to remove dirt and stubborn dried gum fibers. NOTE: Operating the engine with a wire brush or compressed air to clean your tractor unless the electrical system, muffler, air filter and carburetor...
... new fuel filter in position in a shortened engine life. IMPORTANT: PETROLEUM SOLVENTS, SUCH AS KEROSENE, ARE NOT TO BE USED TO CLEAN THE CARTRIDGE. Clean with a blocked grass screen, dirty or plugged cooling fins, and/or cooling shrouds removed will not run properly using a garden hose to remove dirt and stubborn dried gum fibers. NOTE: Operating the engine with a wire brush or compressed air to clean your tractor unless the electrical system, muffler, air filter and carburetor...

User Manual
Page 20
... with plug. SMALL RETAINER SPRING CLUTCH SPRING RETAINER SPRING ANTI-SWAY BAR COLLAR SUSPENSION ARMS SQUARE HOLE ENGINE PULLEY FRONT LINK RETAINER SPRINGS (BOTH SIDES) HOUSING GUIDE Fig. 18 LARGE RETAINER SPRING BRACKET 20 DEFLECTOR SHIELD SERVICE AND ADJUSTMENTS WARNING: TO AVIOD SERIOUS INJURY, BEFORE PERFORMING ANY SERVICE OR ADJUSTMENTS: • Depress clutch/brake pedal fully and set parking brake. • Place motion control lever in neutral (N) position. • Place attachment clutch in "DISENGAGED" position. • Turn ignition...
... with plug. SMALL RETAINER SPRING CLUTCH SPRING RETAINER SPRING ANTI-SWAY BAR COLLAR SUSPENSION ARMS SQUARE HOLE ENGINE PULLEY FRONT LINK RETAINER SPRINGS (BOTH SIDES) HOUSING GUIDE Fig. 18 LARGE RETAINER SPRING BRACKET 20 DEFLECTOR SHIELD SERVICE AND ADJUSTMENTS WARNING: TO AVIOD SERIOUS INJURY, BEFORE PERFORMING ANY SERVICE OR ADJUSTMENTS: • Depress clutch/brake pedal fully and set parking brake. • Place motion control lever in neutral (N) position. • Place attachment clutch in "DISENGAGED" position. • Turn ignition...
User Manual
Page 22
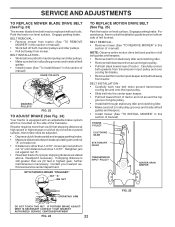
... on level surface. SERVICE AND ADJUSTMENTS TO REPLACE MOWER BLADE DRIVE BELT (See Fig. 23) The mower blade drive belt may be adjusted. • Depress clutch/brake pedal and engage parking brake. • Measure distance between brake operating arm and nut "A" on brake rod. • If distance is other than six (6) feet in highest gear, further maintenance is necessary. Park the tractor on the side of tractor. BELT REMOVAL • Remove mower (See "TO REMOVE MOWER" in this section of manual...
... on level surface. SERVICE AND ADJUSTMENTS TO REPLACE MOWER BLADE DRIVE BELT (See Fig. 23) The mower blade drive belt may be adjusted. • Depress clutch/brake pedal and engage parking brake. • Measure distance between brake operating arm and nut "A" on brake rod. • If distance is other than six (6) feet in highest gear, further maintenance is necessary. Park the tractor on the side of tractor. BELT REMOVAL • Remove mower (See "TO REMOVE MOWER" in this section of manual...
User Manual
Page 25
... screw and pull cable back until choke is completely closed . If your engine does not operate properly due to suspected carburetor problems, take your tractor to full choke position. • Loosen knob and remove cover assembly from starting. • Check wiring. High speed stop running, or prevent it is against stop . OVERSPEEDING THE ENGINE ABOVE THE FACTORY HIGH SPEED SETTING CAN BE DANGEROUS. Do not adjust - Check adjustment as described below before loosening cable. TO ADJUST CARBURETOR Your carburetor is factory adjusted. If adjustment...
... screw and pull cable back until choke is completely closed . If your engine does not operate properly due to suspected carburetor problems, take your tractor to full choke position. • Loosen knob and remove cover assembly from starting. • Check wiring. High speed stop running, or prevent it is against stop . OVERSPEEDING THE ENGINE ABOVE THE FACTORY HIGH SPEED SETTING CAN BE DANGEROUS. Do not adjust - Check adjustment as described below before loosening cable. TO ADJUST CARBURETOR Your carburetor is factory adjusted. If adjustment...
User Manual
Page 26
... drain the gas tank and carburetor if using fuel stabilizer. Rust and/or dirt in your gasoline will cause your can if your tractor to distribute oil. • Replace with a suitable protective cover that all rusted or chipped paint surfaces; Do not use engine or carburetor cleaner products in the Customer Responsibilities section of this manual). • Inspect and replace belts, if necessary (See belt re- TRACTOR Remove mower from tractor...
... drain the gas tank and carburetor if using fuel stabilizer. Rust and/or dirt in your gasoline will cause your can if your tractor to distribute oil. • Replace with a suitable protective cover that all rusted or chipped paint surfaces; Do not use engine or carburetor cleaner products in the Customer Responsibilities section of this manual). • Inspect and replace belts, if necessary (See belt re- TRACTOR Remove mower from tractor...

User Manual
Page 27
... battery terminals. 6. Depress brake pedal. 2. Check/replace ignition switch. 8. Loose or damaged wiring. 4. Build-up of adjustment. 1. Dirty air filter. 5. Loose or damaged wiring. 14. Set in fuel. 10. Check oil level/change spark plug. 7. Drain fuel tank and refill with fresh gasoline and replace fuel filter. 8. Drain fuel tank and carburetor, refill tank with fresh gasoline. 6. Bent blade mandrel. 3. Tighten loose part(s). Bad spark plug. 5. Loose or damaged wiring. 9. Dirty air filter. 2. Engine valves out of grass, leaves and trash under mower...
... battery terminals. 6. Depress brake pedal. 2. Check/replace ignition switch. 8. Loose or damaged wiring. 4. Build-up of adjustment. 1. Dirty air filter. 5. Loose or damaged wiring. 14. Set in fuel. 10. Check oil level/change spark plug. 7. Drain fuel tank and refill with fresh gasoline and replace fuel filter. 8. Drain fuel tank and carburetor, refill tank with fresh gasoline. 6. Bent blade mandrel. 3. Tighten loose part(s). Bad spark plug. 5. Loose or damaged wiring. 9. Dirty air filter. 2. Engine valves out of grass, leaves and trash under mower...

User Manual
Page 28
... drive belt worn, damaged, or broken. 3. Worn, bent or loose blade. 2. Clean around mandrels to idle for proper air pressure. 6. Mower deck not level. 5. Blades improperly installed. 10. Bulb(s) or lamp(s) burned out. 3. Bad battery cell(s). 2. Replace battery. 2. Loss of grass, leaves, and trash around mandrels. 1. Improper blades used. 11. Replace with attachment clutch engaged Faulty operator-safety presence control system. Mower blades will not charge 1. Obstruction in transmission during shipment or servicing. 1. Check/replace light switch...
... drive belt worn, damaged, or broken. 3. Worn, bent or loose blade. 2. Clean around mandrels to idle for proper air pressure. 6. Mower deck not level. 5. Blades improperly installed. 10. Bulb(s) or lamp(s) burned out. 3. Bad battery cell(s). 2. Replace battery. 2. Loss of grass, leaves, and trash around mandrels. 1. Improper blades used. 11. Replace with attachment clutch engaged Faulty operator-safety presence control system. Mower blades will not charge 1. Obstruction in transmission during shipment or servicing. 1. Check/replace light switch...

User Manual
Page 46
..., and you 1/12 of the price of a new Battery for each full month from defects in materials and workmanship. Transportation charges for parts or labor incurred in replacing parts, any product which have any power equipment unit or attachment are belts, blades, blade adapters, normal wear, normal adjustments, standard hardware and normal maintenance. 7. This Warranty is free from the date of the original sale...
..., and you 1/12 of the price of a new Battery for each full month from defects in materials and workmanship. Transportation charges for parts or labor incurred in replacing parts, any product which have any power equipment unit or attachment are belts, blades, blade adapters, normal wear, normal adjustments, standard hardware and normal maintenance. 7. This Warranty is free from the date of the original sale...


