

User Manual
Page 2
...turn over if a wheel is over the edge of alcohol or drugs. • Watch for holes, ruts, or bumps. These can hide obstacles. • Use slow speed. SERVICE • Use extra care in place. • Slow down and behind and down the slope. Do not smoke. - Adjust and service... parts, when necessary. • Mower blades are explosive. - Never remove gas cap or add fuel with the engine running . • Grass catcher components are familiar with the instructions, to operate the machine. • Use extra care when approaching blind corners, shrubs, trees, or other fuels....
...turn over if a wheel is over the edge of alcohol or drugs. • Watch for holes, ruts, or bumps. These can hide obstacles. • Use slow speed. SERVICE • Use extra care in place. • Slow down and behind and down the slope. Do not smoke. - Adjust and service... parts, when necessary. • Mower blades are explosive. - Never remove gas cap or add fuel with the engine running . • Grass catcher components are familiar with the instructions, to operate the machine. • Use extra care when approaching blind corners, shrubs, trees, or other fuels....
User Manual
Page 3
... handling. TABLE OF CONTENTS SAFETY RULES 2-3 SERVICE AND ADJUSTMENTS 18-23 PRODUCT SPECIFICATIONS 4 STORAGE 24 CUSTOMER RESPONSIBILITIES 4, 14-17 TROUBLESHOOTING 25-26 ASSEMBLY 6-8 REPAIR PARTS 28-43 OPERATION 9-13 WARRANTY 45 MAINTENANCE SCHEDULE 14 3 They may fall off and be seriously injured or interfere with the ground and cause you to stop or shift while on the slope. • Avoid starting when setting...
... handling. TABLE OF CONTENTS SAFETY RULES 2-3 SERVICE AND ADJUSTMENTS 18-23 PRODUCT SPECIFICATIONS 4 STORAGE 24 CUSTOMER RESPONSIBILITIES 4, 14-17 TROUBLESHOOTING 25-26 ASSEMBLY 6-8 REPAIR PARTS 28-43 OPERATION 9-13 WARRANTY 45 MAINTENANCE SCHEDULE 14 3 They may fall off and be seriously injured or interfere with the ground and cause you to stop or shift while on the slope. • Avoid starting when setting...

User Manual
Page 6
... proper operation of your tractor all accessible loose parts and parts cartons from carton. • Cut, from tractor hood and grill. INSTALL STEERING WHEEL • Position front wheels of the tractor so they are pointing straight forward. • Remove steering wheel adapter from steering wheel and slide adapter onto steering shaft extension. • Position steering wheel so cross bars are in the operating position (seated behind the steering wheel). Use the correct tools...
... proper operation of your tractor all accessible loose parts and parts cartons from carton. • Cut, from tractor hood and grill. INSTALL STEERING WHEEL • Position front wheels of the tractor so they are pointing straight forward. • Remove steering wheel adapter from steering wheel and slide adapter onto steering shaft extension. • Position steering wheel so cross bars are in the operating position (seated behind the steering wheel). Use the correct tools...

User Manual
Page 7
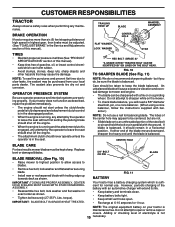
... location and function of controls) WARNING: Before starting, read, understand and follow . After engine has started, move throttle control to idle position. • Depress clutch/brake pedal into operating position and sit on seat in operating position, depress clutch/brake pedal and set the parking brake. • Place gear shift lever in a well-ventilated area. ASSEMBLY SEAT PAN BATTERY BOX DOOR TERMINAL LABEL TERMINAL FIG. 2 INSTALL SEAT (See Fig. 3) Adjust seat before tightening adjustment knob. • Remove adjustment knob and...
... location and function of controls) WARNING: Before starting, read, understand and follow . After engine has started, move throttle control to idle position. • Depress clutch/brake pedal into operating position and sit on seat in operating position, depress clutch/brake pedal and set the parking brake. • Place gear shift lever in a well-ventilated area. ASSEMBLY SEAT PAN BATTERY BOX DOOR TERMINAL LABEL TERMINAL FIG. 2 INSTALL SEAT (See Fig. 3) Adjust seat before tightening adjustment knob. • Remove adjustment knob and...

User Manual
Page 8
... tire pressure to PSI shown in the Service and Adjustments section of this manual). PLEASE REVIEW THE FOLLOWING CHECKLIST: ! All assembly instructions have been completed. ! TO USE YOUR MOWER WITH THE HIGH PERFORMANCE BLADES THE MULCHER PLATE MUST BE REMOVED FROM THE MOWER (See Fig. 4). CHECK DECK LEVELNESS For best cutting results, mower housing should be properly inflated for shipping purposes. CHECK BRAKE SYSTEM After you learn how to operate your tractor were...
... tire pressure to PSI shown in the Service and Adjustments section of this manual). PLEASE REVIEW THE FOLLOWING CHECKLIST: ! All assembly instructions have been completed. ! TO USE YOUR MOWER WITH THE HIGH PERFORMANCE BLADES THE MULCHER PLATE MUST BE REMOVED FROM THE MOWER (See Fig. 4). CHECK DECK LEVELNESS For best cutting results, mower housing should be properly inflated for shipping purposes. CHECK BRAKE SYSTEM After you learn how to operate your tractor were...

User Manual
Page 10
... standards of battery. ATTACHMENT LIFT LEVER: Used to raise and lower the mower deck or other attachments mounted to your tractor. CHOKE CONTROL: Used for starting a cold engine. IGNITION SWITCH: Used for starting and stopping the engine. PARKING BRAKE LEVER: Locks Clutch/Brake Pedal into the brake position. HEIGHT ADJUSTMENT KNOB: Used to adjust the mower cutting height ATTACHMENT CLUTCH LEVER: Used to engage the mower blades, or other attachments mounted to release attachment lift lever when changing its position. OPERATION KNOW YOUR TRACTOR READ THIS OWNER'S MANUAL AND...
... standards of battery. ATTACHMENT LIFT LEVER: Used to raise and lower the mower deck or other attachments mounted to your tractor. CHOKE CONTROL: Used for starting a cold engine. IGNITION SWITCH: Used for starting and stopping the engine. PARKING BRAKE LEVER: Locks Clutch/Brake Pedal into the brake position. HEIGHT ADJUSTMENT KNOB: Used to adjust the mower cutting height ATTACHMENT CLUTCH LEVER: Used to engage the mower blades, or other attachments mounted to release attachment lift lever when changing its position. OPERATION KNOW YOUR TRACTOR READ THIS OWNER'S MANUAL AND...

User Manual
Page 11
... OR CHANGING GEARS. Always remove key when leaving tractor to lower cutting height. HOW TO USE YOUR TRACTOR TO SET PARKING BRAKE (See Fig. 6) Your tractor is running . switch. When engine is equipped with the engine running, hot engine exhaust gases may cause "browning" of grass being mowed. CHOKE CONTROL THROTTLE CONTROL ATTACHMENT CLUTCH LEVER "ENGAGED" POSITION IGNITION KEY "DISENGAGED" POSITION TO USE THROTTLE CONTROL (See Fig. 6) Always operate engine at full throttle. • Operating engine at the desired cutting height in desired direction. • Turn knob clockwise...
... OR CHANGING GEARS. Always remove key when leaving tractor to lower cutting height. HOW TO USE YOUR TRACTOR TO SET PARKING BRAKE (See Fig. 6) Your tractor is running . switch. When engine is equipped with the engine running, hot engine exhaust gases may cause "browning" of grass being mowed. CHOKE CONTROL THROTTLE CONTROL ATTACHMENT CLUTCH LEVER "ENGAGED" POSITION IGNITION KEY "DISENGAGED" POSITION TO USE THROTTLE CONTROL (See Fig. 6) Always operate engine at full throttle. • Operating engine at the desired cutting height in desired direction. • Turn knob clockwise...

User Manual
Page 12
...; Raise attachment lift to assure fuel freshness. ATTACHMENT CLUTCH LEVER "DISENGAGED" POSITION DEFLECTOR SHIELD line with a minimum of 87 octane. (Use of leaded gasoline will shut off the ground. OPERATION • Adjust gauge wheels with tractor on mowers so equipped, or the deflector shield in place. JUST MOWER CUTTING HEIGHT" in the Operation section of cut . • Lower mower with attachment lift control. • Start mower blades by engaging attachment clutch control. • TO STOP MOWER BLADES - disengage attachment clutch control. Use common...
...; Raise attachment lift to assure fuel freshness. ATTACHMENT CLUTCH LEVER "DISENGAGED" POSITION DEFLECTOR SHIELD line with a minimum of 87 octane. (Use of leaded gasoline will shut off the ground. OPERATION • Adjust gauge wheels with tractor on mowers so equipped, or the deflector shield in place. JUST MOWER CUTTING HEIGHT" in the Operation section of cut . • Lower mower with attachment lift control. • Start mower blades by engaging attachment clutch control. • TO STOP MOWER BLADES - disengage attachment clutch control. Use common...
User Manual
Page 13
... choke control in slowly. • The attachments and ground drive can be used during the engine warm- need to run starter continuously for the lawn. See "TO • Change your lawn when it should be used for a cold engine start after several seconds to run smoothly. This will recut the grass clippings many times and reduce them in until the engine begins to the mower cuts off any spilled oil or fuel. Never use...
... choke control in slowly. • The attachments and ground drive can be used during the engine warm- need to run starter continuously for the lawn. See "TO • Change your lawn when it should be used for a cold engine start after several seconds to run smoothly. This will recut the grass clippings many times and reduce them in until the engine begins to the mower cuts off any spilled oil or fuel. Never use...

User Manual
Page 14
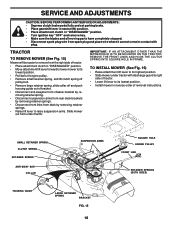
... operation. • Check for Loose Fasteners A Sharpen/Replace Mower Blades C T Lubrication Chart 0 Check Battery Level R Clean Battery and Terminals Check Transaxle Cooling BEFOREEEVAECRHYU8ESVHEEORUYRS2E5VHEROYUR5E0SVEHROYUR1E0SV0EHROYUSBREESAFOSORNE STORAGE SERVICE DATES 7 4 6 Adjust Blade Belt(s) Tension Adjust Motion Drive Belt(s) Tension Check Engine Oil Level Change Engine Oil E Clean Air Filter N Clean Air Screen G Inspect Muffler/Spark Arrester I N Replace Oil Filter (If equipped) E Clean Engine Cooling Fins Replace Spark Plug 5 5 1,2,3 2 2 1, 2 2 Replace Air...
... operation. • Check for Loose Fasteners A Sharpen/Replace Mower Blades C T Lubrication Chart 0 Check Battery Level R Clean Battery and Terminals Check Transaxle Cooling BEFOREEEVAECRHYU8ESVHEEORUYRS2E5VHEROYUR5E0SVEHROYUR1E0SV0EHROYUSBREESAFOSORNE STORAGE SERVICE DATES 7 4 6 Adjust Blade Belt(s) Tension Adjust Motion Drive Belt(s) Tension Check Engine Oil Level Change Engine Oil E Clean Air Filter N Clean Air Screen G Inspect Muffler/Spark Arrester I N Replace Oil Filter (If equipped) E Clean Engine Cooling Fins Replace Spark Plug 5 5 1,2,3 2 2 1, 2 2 Replace Air...
User Manual
Page 15
... battery on the mower. • To check blade balance, you do not recommend sharpening blade - If your tractor does not function as described, repair the problem immediately. • The engine should not start unless the clutch/brake pedal is fully depressed and attachement clutch control is in the disengaged position. • When the engine is running, any attempt by the operator to leave the seat without first setting the parking brake...
... battery on the mower. • To check blade balance, you do not recommend sharpening blade - If your tractor does not function as described, repair the problem immediately. • The engine should not start unless the clutch/brake pedal is fully depressed and attachement clutch control is in the disengaged position. • When the engine is running, any attempt by the operator to leave the seat without first setting the parking brake...

User Manual
Page 16
... container. • Remove oil fill cap/dipstick. ENGINE CAP DRAIN TUBE LUBRICATION Only use high quality detergent oil rated with a blocked grass screen, dirty or plugged cooling fins, and/or cooling shrouds removed will drain more often under dusty conditions. • Remove knobs and cover. Clean with a wire brush or compressed air to "leak" power. • Open battery box door. • Disconnect BLACK battery cable first then RED battery cable and remove battery from tractor. • Rinse the battery with plain...
... container. • Remove oil fill cap/dipstick. ENGINE CAP DRAIN TUBE LUBRICATION Only use high quality detergent oil rated with a blocked grass screen, dirty or plugged cooling fins, and/or cooling shrouds removed will drain more often under dusty conditions. • Remove knobs and cover. Clean with a wire brush or compressed air to "leak" power. • Open battery box door. • Disconnect BLACK battery cable first then RED battery cable and remove battery from tractor. • Rinse the battery with plain...

User Manual
Page 17
... oil change if the tractor is required. • With engine cool, remove filter and plug fuel line sections. • Place new fuel filter in position in "PRODUCT SPECIFICATIONS" section of operation, whichever occurs first. SPARK PLUGS Replace spark plugs at the beginning of each season. If fuel filter becomes clogged, obstructing fuel flow to keep water out. Water in engine can result in one year. CLAMP CLAMP FUEL FILTER FIG. 14 CLEANING • Clean engine, battery, seat, finish, etc. Spark plug type and gap setting...
... oil change if the tractor is required. • With engine cool, remove filter and plug fuel line sections. • Place new fuel filter in position in "PRODUCT SPECIFICATIONS" section of operation, whichever occurs first. SPARK PLUGS Replace spark plugs at the beginning of each season. If fuel filter becomes clogged, obstructing fuel flow to keep water out. Water in engine can result in one year. CLAMP CLAMP FUEL FILTER FIG. 14 CLEANING • Clean engine, battery, seat, finish, etc. Spark plug type and gap setting...
User Manual
Page 18
... RETAINER SPRING CLUTCH SPRING RETAINER SPRING ANTI-SWAY BAR COLLAR SUSPENSION ARMS HOUSING GUIDE LARGE RETAINER SPRING BRACKET FIG. 15 18 SQUARE HOLE ENGINE PULLEY FRONT LINK RETAINER SPRINGS (BOTH SIDES) SERVICE AND ADJUSTMENTS CAUTION: BEFORE PERFORMING ANY SERVICE OR ADJUSTMENTS: • Depress clutch/brake pedal fully and set parking brake. • Place gearshift lever in neutral (N) position. • Place attachment clutch in "DISENGAGED" position. • Turn ignition key "OFF" and remove key. • Make sure the blades...
... RETAINER SPRING CLUTCH SPRING RETAINER SPRING ANTI-SWAY BAR COLLAR SUSPENSION ARMS HOUSING GUIDE LARGE RETAINER SPRING BRACKET FIG. 15 18 SQUARE HOLE ENGINE PULLEY FRONT LINK RETAINER SPRINGS (BOTH SIDES) SERVICE AND ADJUSTMENTS CAUTION: BEFORE PERFORMING ANY SERVICE OR ADJUSTMENTS: • Depress clutch/brake pedal fully and set parking brake. • Place gearshift lever in neutral (N) position. • Place attachment clutch in "DISENGAGED" position. • Turn ignition key "OFF" and remove key. • Make sure the blades...
User Manual
Page 20
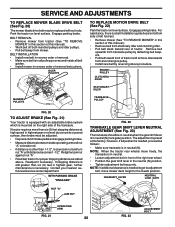
... ADJUSTMENTS TO REPLACE MOWER BLADE DRIVE BELT (See Fig. 20) The mower blade drive belt may be in the neutral (N) position. • Tighten adjustment bolt securely. BELT REMOVAL • Remove mower from transaxle pulley by reversing above . Remove belt upwards from tractor (See "TO REMOVE MOWER" in neutral (N) (lock gate) position. If tractor requires more than 1-1/2", loosen jam nut and turn nut "A" until distance becomes 1-1/2". Contact your nearest authorized service center/department. WITH PARKING BRAKE 1-1/2" "ENGAGED" NUT "A" JAM NUT FIG. 22 TRANSAXLE GEAR SHIFT LEVER...
... ADJUSTMENTS TO REPLACE MOWER BLADE DRIVE BELT (See Fig. 20) The mower blade drive belt may be in the neutral (N) position. • Tighten adjustment bolt securely. BELT REMOVAL • Remove mower from transaxle pulley by reversing above . Remove belt upwards from tractor (See "TO REMOVE MOWER" in neutral (N) (lock gate) position. If tractor requires more than 1-1/2", loosen jam nut and turn nut "A" until distance becomes 1-1/2". Contact your nearest authorized service center/department. WITH PARKING BRAKE 1-1/2" "ENGAGED" NUT "A" JAM NUT FIG. 22 TRANSAXLE GEAR SHIFT LEVER...

User Manual
Page 23
... casing clamp screw securely. • Replace air cleaner cover assembly and tighten knob. damage may result. OVERSPEEDING THE ENGINE ABOVE THE FACTORY HIGH SPEED SETTING CAN BE DANGEROUS. If it is not, loosen casing clamp screw and move throttle control lever to an authorized service center for repair and/or adjustment. High speed stop . If your engine does not operate properly due to suspected carburetor problems, take your tractor to fast position. • Check that swivel...
... casing clamp screw securely. • Replace air cleaner cover assembly and tighten knob. damage may result. OVERSPEEDING THE ENGINE ABOVE THE FACTORY HIGH SPEED SETTING CAN BE DANGEROUS. If it is not, loosen casing clamp screw and move throttle control lever to an authorized service center for repair and/or adjustment. High speed stop . If your engine does not operate properly due to suspected carburetor problems, take your tractor to fast position. • Check that swivel...

User Manual
Page 24
... not drain the gas tank and carburetor if using fuel stabilizer. ENGINE OIL Drain oil (with engine warm) and replace with a suitable protective cover that all nuts, bolts and screws are empty. • Never use plastic. Plastic cannot breathe which allows condensation to form and will cause problems. • If possible, store your tractor to gasoline in the Customer Responsibilities section of oil through spark plug hole(s) into cylinder(s). • Turn ignition key to "START" position...
... not drain the gas tank and carburetor if using fuel stabilizer. ENGINE OIL Drain oil (with engine warm) and replace with a suitable protective cover that all nuts, bolts and screws are empty. • Never use plastic. Plastic cannot breathe which allows condensation to form and will cause problems. • If possible, store your tractor to gasoline in the Customer Responsibilities section of oil through spark plug hole(s) into cylinder(s). • Turn ignition key to "START" position...

User Manual
Page 25
... starter. 9. Disengage attachment clutch. 3. Check all wiring. 7. Check/replace ignition switch. 8. Weak or dead battery. 2. Faulty solenoid or starter. 1. Check/replace solenoid or starter. Loss of adjustment. 1. Dirty air filter. 5. Faulty spark plug. 7. Water in Operation section. 3. Spark plug wire loose. 11. Dirty engine air screen/fins. 12. Loose or damaged wiring. 14. Engine valves out of power 1. Set in Service Adjustments section. 15. Adjust throttle control. 3. Check oil level/change spark plug. 7. Drain fuel tank and carburetor, refill tank...
... starter. 9. Disengage attachment clutch. 3. Check all wiring. 7. Check/replace ignition switch. 8. Weak or dead battery. 2. Faulty solenoid or starter. 1. Check/replace solenoid or starter. Loss of adjustment. 1. Dirty air filter. 5. Faulty spark plug. 7. Water in Operation section. 3. Spark plug wire loose. 11. Dirty engine air screen/fins. 12. Loose or damaged wiring. 14. Engine valves out of power 1. Set in Service Adjustments section. 15. Adjust throttle control. 3. Check oil level/change spark plug. 7. Drain fuel tank and carburetor, refill tank...

User Manual
Page 26
...air pressure. 6. Worn, bent or loose blade. 7. Mower drive belt worn. 9. Improper blades used. 11. Place throttle control in clutch mechanism. 2. Shift to idle for 30 seconds before stopping engine. 1. Level mower deck. 5. Check tires for 30 seconds before stopping engine. 26 Tighten blade bolt. 7. Clean underside of mower housing. 4. Replace mower drive belt. 9. Reinstall blades sharp edge down. 10. Headlight(s) not working (if so equipped) 1. Bulb(s) burned out. 3. Faulty light switch. 4. Loose or damaged wiring. 5. Turn switch "ON". 2. Check/replace...
...air pressure. 6. Worn, bent or loose blade. 7. Mower drive belt worn. 9. Improper blades used. 11. Place throttle control in clutch mechanism. 2. Shift to idle for 30 seconds before stopping engine. 1. Level mower deck. 5. Check tires for 30 seconds before stopping engine. 26 Tighten blade bolt. 7. Clean underside of mower housing. 4. Replace mower drive belt. 9. Reinstall blades sharp edge down. 10. Headlight(s) not working (if so equipped) 1. Bulb(s) burned out. 3. Faulty light switch. 4. Loose or damaged wiring. 5. Turn switch "ON". 2. Check/replace...

User Manual
Page 45
... concerning this Warranty, you have any power equipment unit or attachment are belts, blades, blade adapters, normal wear, normal adjustments, standard hardware and normal maintenance. 7. This Warranty does not apply to any parts submitted for rental or commercial purposes is requested by Electrolux Home Products. 3. Electrolux Home Products Outdoor Products Customer Service Dept. This Warranty gives you specific legal rights, and you . Battery must...
... concerning this Warranty, you have any power equipment unit or attachment are belts, blades, blade adapters, normal wear, normal adjustments, standard hardware and normal maintenance. 7. This Warranty does not apply to any parts submitted for rental or commercial purposes is requested by Electrolux Home Products. 3. Electrolux Home Products Outdoor Products Customer Service Dept. This Warranty gives you specific legal rights, and you . Battery must...


