
User Manual
Page 2
... the engine running machine unattended. Do not smoke. - Clean oil or fuel spillage. Wrap the blade(s) or wear gloves, and use grass catcher on it, do not mow it at anyone enters the area. • Never carry passengers. • Do not mow in speed or direction. 2 • Avoid starting . • Only allow the mower deck to occur. II. Use only an approved container. - Check their...
... the engine running machine unattended. Do not smoke. - Clean oil or fuel spillage. Wrap the blade(s) or wear gloves, and use grass catcher on it, do not mow it at anyone enters the area. • Never carry passengers. • Do not mow in speed or direction. 2 • Avoid starting . • Only allow the mower deck to occur. II. Use only an approved container. - Check their...
User Manual
Page 6
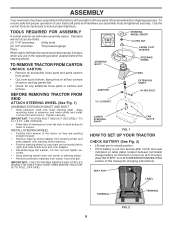
... steering shaft extension. • Position steering wheel so cross bars are horizontal (left to bottom, along lines on label (label located between terminals) charge battery for minimum of one hour at the factory with exception of those parts left unassembled for any additional loose parts or cartons and remove. TOOLS REQUIRED FOR ASSEMBLY A socket wrench set will make assembly easier. IMPORTANT: CHECK FOR AND REMOVE ANY...
... steering shaft extension. • Position steering wheel so cross bars are horizontal (left to bottom, along lines on label (label located between terminals) charge battery for minimum of one hour at the factory with exception of those parts left unassembled for any additional loose parts or cartons and remove. TOOLS REQUIRED FOR ASSEMBLY A socket wrench set will make assembly easier. IMPORTANT: CHECK FOR AND REMOVE ANY...

User Manual
Page 7
... location and function of controls) • Press lift lever plunger and raise attachment lift lever to engage shoulder bolt in a well-ventilated area. Continue with gasoline. • Sit on seat to its highest position. • Start the engine. Be sure tractor is clear of controls) WARNING: Before starting, read, understand and follow all the above assembly steps have been completed. • Check engine oil level and fill fuel tank...
... location and function of controls) • Press lift lever plunger and raise attachment lift lever to engage shoulder bolt in a well-ventilated area. Continue with gasoline. • Sit on seat to its highest position. • Start the engine. Be sure tractor is clear of controls) WARNING: Before starting, read, understand and follow all the above assembly steps have been completed. • Check engine oil level and fill fuel tank...
User Manual
Page 8
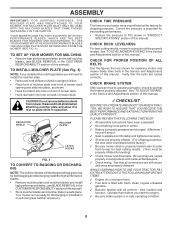
... correctly. Your mower is at the factory for leveling). ✓ Check mower and drive belts. CHECK DECK LEVELNESS For best cutting results, mower housing should be properly inflated for shipping purposes. WHILE LEARNING HOW TO USE YOUR TRACTOR, PAY EXTRA ATTENTION TO THE FOLLOWING IMPORTANT ITEMS: ✓ Engine oil is now ready for replacing motion and mower blade drive belts in the Service and Adjustments section of this manual. their location and function. ASSEMBLY IMPORTANT: FOR...
... correctly. Your mower is at the factory for leveling). ✓ Check mower and drive belts. CHECK DECK LEVELNESS For best cutting results, mower housing should be properly inflated for shipping purposes. WHILE LEARNING HOW TO USE YOUR TRACTOR, PAY EXTRA ATTENTION TO THE FOLLOWING IMPORTANT ITEMS: ✓ Engine oil is now ready for replacing motion and mower blade drive belts in the Service and Adjustments section of this manual. their location and function. ASSEMBLY IMPORTANT: FOR...
User Manual
Page 11
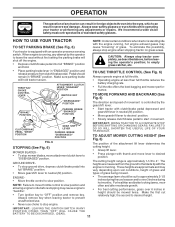
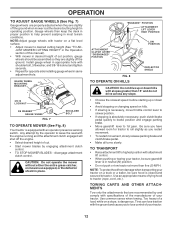
... use choke to stop mower blades,move throttle control to slow position and allowing engine to start movement. The cutting height range is equipped with the engine not running , any adjustments or repairs. IMPORTANT: LEAVING THE IGNITION SWITCH IN ANY POSITION OTHER THAN "OFF" WILL CAUSE THE BATTERY TO BE DISCHARGED, (DEAD). 11 NOTE: Failure to move attachment clutch lever to desired position. THROTTLE/ CHOKE CONTROL LEVER ATTACHMENT CLUTCH LEVER "ENGAGED" POSITION IGNITION KEY "DISENGAGED" POSITION TO USE THROTTLE CONTROL (See Fig. 6) Always operate engine at full throttle...
... use choke to stop mower blades,move throttle control to slow position and allowing engine to start movement. The cutting height range is equipped with the engine not running , any adjustments or repairs. IMPORTANT: LEAVING THE IGNITION SWITCH IN ANY POSITION OTHER THAN "OFF" WILL CAUSE THE BATTERY TO BE DISCHARGED, (DEAD). 11 NOTE: Failure to move attachment clutch lever to desired position. THROTTLE/ CHOKE CONTROL LEVER ATTACHMENT CLUTCH LEVER "ENGAGED" POSITION IGNITION KEY "DISENGAGED" POSITION TO USE THROTTLE CONTROL (See Fig. 6) Always operate engine at full throttle...
User Manual
Page 12
... specifications of the manufacturer of cut. • Start mower blades by the operator to leave the seat with the engine running and the attachment clutch engaged will shut off the ground. JUST MOWER CUTTING HEIGHT" in the Operation section of this manual). • With mower in neutral (N) position. • Do not push or tow tractor at the desired cutting height in place. disengage attachment clutch control. Too heavy of cut position, gauge wheels should be assembled...
... specifications of the manufacturer of cut. • Start mower blades by the operator to leave the seat with the engine running and the attachment clutch engaged will shut off the ground. JUST MOWER CUTTING HEIGHT" in the Operation section of this manual). • With mower in neutral (N) position. • Do not push or tow tractor at the desired cutting height in place. disengage attachment clutch control. Too heavy of cut position, gauge wheels should be assembled...
User Manual
Page 13
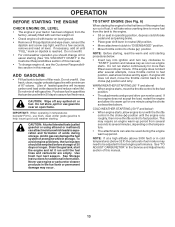
... blended fuels (called gasohol or using the choke as engine starts. Acidic gas can now be used during storage. WARM WEATHER STARTING (50° F and above . If the engine does not accept the load, restart the engine and allow engine to run with tractor on seat in operating position, depress clutch/brake pedal and set parking brake. • Place gear shift lever in neutral (N) position. • Move attachment clutch to "DISENGAGED" position. • Move throttle control to choke ( ) position...
... blended fuels (called gasohol or using the choke as engine starts. Acidic gas can now be used during storage. WARM WEATHER STARTING (50° F and above . If the engine does not accept the load, restart the engine and allow engine to run with tractor on seat in operating position, depress clutch/brake pedal and set parking brake. • Place gear shift lever in neutral (N) position. • Move attachment clutch to "DISENGAGED" position. • Move throttle control to choke ( ) position...
User Manual
Page 15
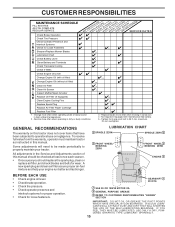
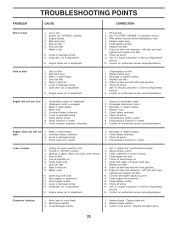
... REGULAR SERVICE Check Brake Operation Check Tire Pressure Check Operator Presence and T Interlock Systems R Check for Loose Fasteners A Sharpen/Replace Mower Blades C T Lubrication Chart 0 Check Battery Level R Clean Battery and Terminals Check Transaxle Cooling Check V-Belts BEFOREEEVAECRHYU8ESVHEEORUYRS2E5VHEROYUR5E0SVEHROYUR1E0SV0EHROYUBSREESFAOSROEN STORAGE SERVICE DATES 5 3 4 Check Engine Oil Level Change Engine Oil (with maintenance-free battery. 5 - Change more often when operating in dirty or dusty conditions. 1,2 1,2 2 2 1, 2 2 2 3 - Tighten front axle pivot bolt...
... REGULAR SERVICE Check Brake Operation Check Tire Pressure Check Operator Presence and T Interlock Systems R Check for Loose Fasteners A Sharpen/Replace Mower Blades C T Lubrication Chart 0 Check Battery Level R Clean Battery and Terminals Check Transaxle Cooling Check V-Belts BEFOREEEVAECRHYU8ESVHEEORUYRS2E5VHEROYUR5E0SVEHROYUR1E0SV0EHROYUBSREESFAOSROEN STORAGE SERVICE DATES 5 3 4 Check Engine Oil Level Change Engine Oil (with maintenance-free battery. 5 - Change more often when operating in dirty or dusty conditions. 1,2 1,2 2 2 1, 2 2 2 3 - Tighten front axle pivot bolt...
User Manual
Page 16
... shut off the engine. • The attachment clutch should never operate unless the operator is maintenance free. If blade is balanced. BLADE REMOVAL (See Fig. 11) • Raise mower to highest position to allow access to blades. • Remove blade bolt, lock washer and flat washer securing blade. • Install new or resharpened blade with the ground. Lbs. However, periodic charging of the steel bolt or pin and hold the bolt or pin parallel with...
... shut off the engine. • The attachment clutch should never operate unless the operator is maintenance free. If blade is balanced. BLADE REMOVAL (See Fig. 11) • Raise mower to highest position to allow access to blades. • Remove blade bolt, lock washer and flat washer securing blade. • Install new or resharpened blade with the ground. Lbs. However, periodic charging of the steel bolt or pin and hold the bolt or pin parallel with...

User Manual
Page 17
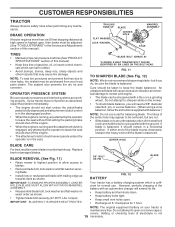
... this manual. • Use gauge on oil. BLOWER HOUSING HEX BOLTS HEX BOLTS OILL FILL/ DIPSTICK TUBE AIR SCREEN ENGINE COOLING FINS SPARK PLUG 17 FIG. 15 Replace belts if they begin to your engine oil level more freely when warm. • Catch oil in one year. ENGINE LUBRICATION Only use high quality detergent oil rated with a wire brush or compressed air to avoid possible engine damage from wear. All oil must be kept free of operation. CLOSED AND LOCKED POSITION OIL DRAIN VALVE YELLOW CAP DRAIN...
... this manual. • Use gauge on oil. BLOWER HOUSING HEX BOLTS HEX BOLTS OILL FILL/ DIPSTICK TUBE AIR SCREEN ENGINE COOLING FINS SPARK PLUG 17 FIG. 15 Replace belts if they begin to your engine oil level more freely when warm. • Catch oil in one year. ENGINE LUBRICATION Only use high quality detergent oil rated with a wire brush or compressed air to avoid possible engine damage from wear. All oil must be kept free of operation. CLOSED AND LOCKED POSITION OIL DRAIN VALVE YELLOW CAP DRAIN...
User Manual
Page 18
... engine oil. DO NOT USE PRESSURIZED AIR TO CLEAN OR DRY CARTRIDGE. ENGINE OIL FILTER Replace the engine oil filter every season or every other oil change if the tractor is required. • With engine cool, remove filter and plug fuel line sec- of all foreign matter. • Keep finished surfaces and wheels free of all gasoline, oil, etc. • Protect painted surfaces with knob(s). Service air cleaner more than 100 hours in fuel line with knob(s). tions. • Place new fuel filter in position...
... engine oil. DO NOT USE PRESSURIZED AIR TO CLEAN OR DRY CARTRIDGE. ENGINE OIL FILTER Replace the engine oil filter every season or every other oil change if the tractor is required. • With engine cool, remove filter and plug fuel line sec- of all foreign matter. • Keep finished surfaces and wheels free of all gasoline, oil, etc. • Protect painted surfaces with knob(s). Service air cleaner more than 100 hours in fuel line with knob(s). tions. • Place new fuel filter in position...
User Manual
Page 19
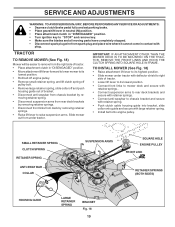
... secure with retainer spring. • Push clutch cable housing guide into bracket, slide collar onto guide and secure with plug. SERVICE AND ADJUSTMENTS WARNING: TO AVOID SERIOUS INJURY, BEFORE PERFORMING ANY SERVICE OR ADJUSTMENTS: • Depress clutch/brake pedal fully and set parking brake. • Place gearshift lever in neutral (N) position. • Place attachment clutch in "DISENGAGED" position. • Turn ignition key to "STOP" and remove key. • Make sure the blades and all...
... secure with retainer spring. • Push clutch cable housing guide into bracket, slide collar onto guide and secure with plug. SERVICE AND ADJUSTMENTS WARNING: TO AVOID SERIOUS INJURY, BEFORE PERFORMING ANY SERVICE OR ADJUSTMENTS: • Depress clutch/brake pedal fully and set parking brake. • Place gearshift lever in neutral (N) position. • Place attachment clutch in "DISENGAGED" position. • Turn ignition key to "STOP" and remove key. • Make sure the blades and all...

User Manual
Page 20
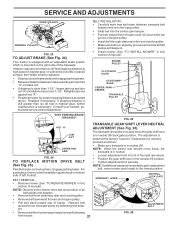
... pulley grooves and inside all belt guides. • Install mower in reverse order of removal instructions. Distance "A" on both sides of mower should MOWER" in reverse order of mower to 1/2" lower than rear, tighten nut "F" against trunnion on level ground or driveway. FRONT LINKS FIG. 22 TO REPLACE MOWER BLADE DRIVE BELT (See Fig. 23) The mower blade drive belt may be the same or within 1/4" of this manual). SIDE-TO-SIDE ADJUSTMENT...
... pulley grooves and inside all belt guides. • Install mower in reverse order of removal instructions. Distance "A" on both sides of mower should MOWER" in reverse order of mower to 1/2" lower than rear, tighten nut "F" against trunnion on level ground or driveway. FRONT LINKS FIG. 22 TO REPLACE MOWER BLADE DRIVE BELT (See Fig. 23) The mower blade drive belt may be the same or within 1/4" of this manual). SIDE-TO-SIDE ADJUSTMENT...
User Manual
Page 21
... manual). OPERATING ARM NOTE: When the tractor rear wheels move mower deck height to adjustment bolt, move freely, the transaxle is in all pulley grooves and inside all belt guides and keepers. • Remove belt from stationary idler and clutching idler. • Remove belt downward from around the top groove of the right rear wheel. • Position the gear shift lever in neutral (N). The adjustment is NUT preset at high speed in highest gear, further maintenance...
... manual). OPERATING ARM NOTE: When the tractor rear wheels move mower deck height to adjustment bolt, move freely, the transaxle is in all pulley grooves and inside all belt guides and keepers. • Remove belt from stationary idler and clutching idler. • Remove belt downward from around the top groove of the right rear wheel. • Position the gear shift lever in neutral (N). The adjustment is NUT preset at high speed in highest gear, further maintenance...
User Manual
Page 23
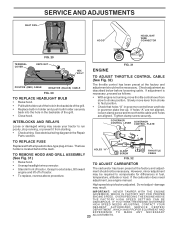
... Repair Parts section. Slowly move lever from starting. • Check wiring. Check adjustment as follows: • With engine not running , or prevent it from choke to run poorly, stop is located behind the dash. Grasp hood at the factory and adjustment should not be required to choke position. High speed stop running , move throttle cable until holes are aligned. SERVICE AND ADJUSTMENTS SEAT PAN HOOD HEADLIGHT WIRE CONNECTOR FIG. 29 TERMINAL COVER KEPS NUT HEX BOLT POSITIVE (RED) CABLE...
... Repair Parts section. Slowly move lever from starting. • Check wiring. Check adjustment as follows: • With engine not running , or prevent it from choke to run poorly, stop is located behind the dash. Grasp hood at the factory and adjustment should not be required to choke position. High speed stop running , move throttle cable until holes are aligned. SERVICE AND ADJUSTMENTS SEAT PAN HOOD HEADLIGHT WIRE CONNECTOR FIG. 29 TERMINAL COVER KEPS NUT HEX BOLT POSITIVE (RED) CABLE...
User Manual
Page 24
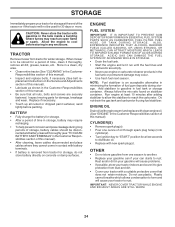
... this manual. • Be sure that does not retain moisture. Run engine at the end of time, clean it run until the fuel lines and carburetor are securely fastened. CYLINDER(S) • Remove spark plug(s). • Pour one season to another. • Replace your gasoline can if your can starts to rust. Replace if necessary. • Touch up all nuts, bolts and screws are empty. • Never use plastic. ENGINE OIL Drain oil (with engine...
... this manual. • Be sure that does not retain moisture. Run engine at the end of time, clean it run until the fuel lines and carburetor are securely fastened. CYLINDER(S) • Remove spark plug(s). • Pour one season to another. • Replace your gasoline can if your can starts to rust. Replace if necessary. • Touch up all nuts, bolts and screws are empty. • Never use plastic. ENGINE OIL Drain oil (with engine...
User Manual
Page 25
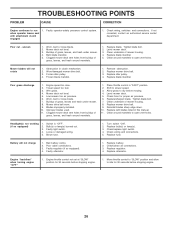
... or starter. Dirty air filter. 5. Stale or dirty fuel. 9. Dirty engine air screen/fins. 12. Loose or damaged wiring. 14. Engine valves out of adjustment. 1. Check oil level/change spark plug. 7. Clean/replace muffler. 13. Excessive vibration 1. Replace blade mandrel. 3. Dirty fuel filter. 7. Water in Operation section. 3. Loose or damaged wiring. 9. Replace spark plug. 5. Clean/replace air filter. 6. Check all wiring. 7. Hard to start 1. Carburetor out of adjustment. 1. Engine valves out of adjustment. 8. Clean/replace air filter. 2. Corroded battery...
... or starter. Dirty air filter. 5. Stale or dirty fuel. 9. Dirty engine air screen/fins. 12. Loose or damaged wiring. 14. Engine valves out of adjustment. 1. Check oil level/change spark plug. 7. Clean/replace muffler. 13. Excessive vibration 1. Replace blade mandrel. 3. Dirty fuel filter. 7. Water in Operation section. 3. Loose or damaged wiring. 9. Replace spark plug. 5. Clean/replace air filter. 6. Check all wiring. 7. Hard to start 1. Carburetor out of adjustment. 1. Engine valves out of adjustment. 8. Clean/replace air filter. 2. Corroded battery...
User Manual
Page 26
.... 2. Clean underside of mower housing. 4. Reinstall blades sharp edge down. 10. Loose or damaged wiring. 5. Replace bulb(s) or lamp(s). 3. uneven 1. Replace idler pulley. 4. Clogged mower deck vent holes from buildup of grass, leaves, and trash around mandrels. 1. If not corrected, contact an authorized service center/ department. Low/uneven tire air pressure. 6. Check wiring and connections. 5. Poor cable connections. 3. Check/replace light switch. 4. Engine throttle control not set at "SLOW" position for proper air pressure. 6. when operator leaves...
.... 2. Clean underside of mower housing. 4. Reinstall blades sharp edge down. 10. Loose or damaged wiring. 5. Replace bulb(s) or lamp(s). 3. uneven 1. Replace idler pulley. 4. Clogged mower deck vent holes from buildup of grass, leaves, and trash around mandrels. 1. If not corrected, contact an authorized service center/ department. Low/uneven tire air pressure. 6. Check wiring and connections. 5. Poor cable connections. 3. Check/replace light switch. 4. Engine throttle control not set at "SLOW" position for proper air pressure. 6. when operator leaves...
User Manual
Page 39
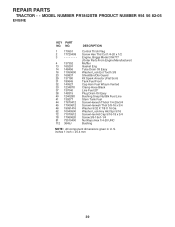
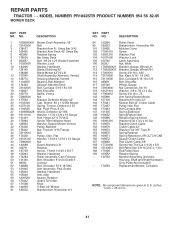
... 17060620 81 73510400 112 3645J Control Th/ch Flag Screw Hex Thd Cut 1/4-20 x 1/2 Engine, Briggs Model 31H777 (Order Parts From Engine Manufacturer) Muffler Gasket Eng Tube Drain Oil Easy Washer Lock Ext Tooth 3/8 Shield Brn/Dbr Guard Kit Spark Arrestor (Flat Scrn) Tank Fuel Front Cap Asm Fuel W/sym Vented Clamp Hose Black Line Fuel 20" Plug Drain Oil Easy Bushing Snap Nyl Blk Fuel Line Stem Tank Fuel Screw Hexwsh Thdrol 1/4-20x3/4 Screw Hexwsh Thdr 3/8-16 x 3/4 Washer 9/32...
... 17060620 81 73510400 112 3645J Control Th/ch Flag Screw Hex Thd Cut 1/4-20 x 1/2 Engine, Briggs Model 31H777 (Order Parts From Engine Manufacturer) Muffler Gasket Eng Tube Drain Oil Easy Washer Lock Ext Tooth 3/8 Shield Brn/Dbr Guard Kit Spark Arrestor (Flat Scrn) Tank Fuel Front Cap Asm Fuel W/sym Vented Clamp Hose Black Line Fuel 20" Plug Drain Oil Easy Bushing Snap Nyl Blk Fuel Line Stem Tank Fuel Screw Hexwsh Thdrol 1/4-20x3/4 Screw Hexwsh Thdr 3/8-16 x 3/4 Washer 9/32...
User Manual
Page 41
... 169672 Spacer Clutch Cable 157 169669 Rod Clutch Cable 3/8" 158 17720408 Screw Hex Thd Cut 1/4-20 x 5/8 159 72140614 Bolt Rdhd Sqn 3/8-16 UNC x 1-3/4 182 179126 Rod Roller Nose 183 163552 Retainer Spring - - 130794 Mandrel Assembly (Includes Housing, Shaft and Shaft Hardware Only-Pulley Not Included) - - 172559 Replacement Mower, Complete NOTE: All component dimensions given in U.S. inches 1 inch = 25.4 mm 41 MODEL NUMBER PR1842STB PRODUCT NUMBER 954 56 82-05 MOWER DECK KEY PART NO...
... 169672 Spacer Clutch Cable 157 169669 Rod Clutch Cable 3/8" 158 17720408 Screw Hex Thd Cut 1/4-20 x 5/8 159 72140614 Bolt Rdhd Sqn 3/8-16 UNC x 1-3/4 182 179126 Rod Roller Nose 183 163552 Retainer Spring - - 130794 Mandrel Assembly (Includes Housing, Shaft and Shaft Hardware Only-Pulley Not Included) - - 172559 Replacement Mower, Complete NOTE: All component dimensions given in U.S. inches 1 inch = 25.4 mm 41 MODEL NUMBER PR1842STB PRODUCT NUMBER 954 56 82-05 MOWER DECK KEY PART NO...


