
User Manual
Page 2
.... Reduced traction could cause sliding. • Do not try to be picked up and down the slope. • Only allow the mower deck to plow leaves or other people before and while backing. • Beawareofthemowerdischargedirectionanddonotpoint it . Children are a major factor related to operate ... a closed area. • Keep nuts and bolts, especially blade attachment bolts, tight and keep equipment in a large percentage of riding mower-related Tragic accidents can cause build-up . Allow machine to occur. Tall grass can cut. injuries. Use only an approved container. -...
.... Reduced traction could cause sliding. • Do not try to be picked up and down the slope. • Only allow the mower deck to plow leaves or other people before and while backing. • Beawareofthemowerdischargedirectionanddonotpoint it . Children are a major factor related to operate ... a closed area. • Keep nuts and bolts, especially blade attachment bolts, tight and keep equipment in a large percentage of riding mower-related Tragic accidents can cause build-up . Allow machine to occur. Tall grass can cut. injuries. Use only an approved container. -...

User Manual
Page 3
... on the slope. • Avoid starting when setting up and down a hill in reverse unless absolutely necessary. SAFETY RULES Safe Operation Practices for Ride-On Mowers • Be sure the area is dangerous. Tall grass can lose traction with specifications of the manufacturer of other reproductive harm. Look for this symbol...
... on the slope. • Avoid starting when setting up and down a hill in reverse unless absolutely necessary. SAFETY RULES Safe Operation Practices for Ride-On Mowers • Be sure the area is dangerous. Tall grass can lose traction with specifications of the manufacturer of other reproductive harm. Look for this symbol...
User Manual
Page 8
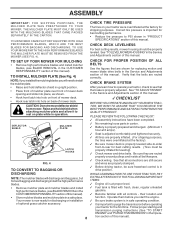
...✓ Check wiring. PERFORMANCE BLADES, WHICH ARE THE BEST BLADES FOR BAGGING AND DISCHARGING. CHECK DECK LEVELNESS For best cutting results, mower housing should be sure freewheel control is properly leveled side-to-side/ front-to install the mulcher plate. TO INSTALL MULCHER PLATE (... securely. ✓ All tires are routed properly around pulleys and inside all controls - CAUTION: Do not remove deflector shield from mower. PLEASE REVIEW THE FOLLOWING CHECKLIST: ✓ All assembly instructions have been completed. DISCHARGING WHILE LEARNING HOW TO USE YOUR TRACTOR, ...
...✓ Check wiring. PERFORMANCE BLADES, WHICH ARE THE BEST BLADES FOR BAGGING AND DISCHARGING. CHECK DECK LEVELNESS For best cutting results, mower housing should be sure freewheel control is properly leveled side-to-side/ front-to install the mulcher plate. TO INSTALL MULCHER PLATE (... securely. ✓ All tires are routed properly around pulleys and inside all controls - CAUTION: Do not remove deflector shield from mower. PLEASE REVIEW THE FOLLOWING CHECKLIST: ✓ All assembly instructions have been completed. DISCHARGING WHILE LEARNING HOW TO USE YOUR TRACTOR, ...

User Manual
Page 9
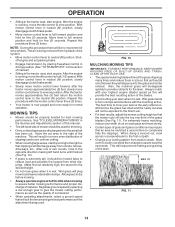
BATTERY CAUTION OR WARNING REVERSE FORWARD FAST SLOW ENGINE ON ENGINE OFF OIL PRESSURE LIGHTS ON OVER TEMP LIGHT FUEL CHOKE MOWER HEIGHT PARKING BRAKE LOCKED UNLOCKED MOWER LIFT ATTACHMENT REVERSE CLUTCH ENGAGED NEUTRAL HIGH P LOW PARKING BRAKE 15 15 15 IGNITION ATTACHMENT CLUTCH DISENGAGED KEEP AREA CLEAR SLOPE HAZARDS (SEE SAFETY RULES SECTION) DANGER, KEEP HANDS AND FEET AWAY 9 FREE WHEEL (Automatic Models only) Learn and understand their meaning. OPERATION These symbols may appear on your tractor or in literature supplied with the product.
BATTERY CAUTION OR WARNING REVERSE FORWARD FAST SLOW ENGINE ON ENGINE OFF OIL PRESSURE LIGHTS ON OVER TEMP LIGHT FUEL CHOKE MOWER HEIGHT PARKING BRAKE LOCKED UNLOCKED MOWER LIFT ATTACHMENT REVERSE CLUTCH ENGAGED NEUTRAL HIGH P LOW PARKING BRAKE 15 15 15 IGNITION ATTACHMENT CLUTCH DISENGAGED KEEP AREA CLEAR SLOPE HAZARDS (SEE SAFETY RULES SECTION) DANGER, KEEP HANDS AND FEET AWAY 9 FREE WHEEL (Automatic Models only) Learn and understand their meaning. OPERATION These symbols may appear on your tractor or in literature supplied with the product.

User Manual
Page 10
ATTACHMENT CLUTCH LEVER: Used to engage the mower blades, or other attachments mounted to your tractor. LIGHT SWITCH POSITION: Turns the headlights on and off . Indicates charging (+) or discharging (-) of the American National ... SAFETY RULES BEFORE OPERATING YOUR TRACTOR Compare the illustrations with your tractor to familiarize yourself with the engine off . Used to raise and lower the mower deck or other attachments mounted to your tractor. LIFT LEVER PLUNGER: Used to adjust the...
ATTACHMENT CLUTCH LEVER: Used to engage the mower blades, or other attachments mounted to your tractor. LIGHT SWITCH POSITION: Turns the headlights on and off . Indicates charging (+) or discharging (-) of the American National ... SAFETY RULES BEFORE OPERATING YOUR TRACTOR Compare the illustrations with your tractor to familiarize yourself with the engine off . Used to raise and lower the mower deck or other attachments mounted to your tractor. LIFT LEVER PLUNGER: Used to adjust the...

User Manual
Page 11
...". • Turn knob clockwise ( ) to raise cutting height. • Turn knob counterclockwise ( ) to "DISENGAGED" position. STOPPING (See Fig. 6) MOWER BLADES • To stop ground drive, depress clutch/brake pedal into the eyes, which can result in neutral (N) position. • Release parking brake. ... engine at less than full throttle reduces the battery charging rate. • Full throttle offers the best bagging and mower perfor- GROUND DRIVE - • To stop mower blades,move motion control lever to 4". ENGINE • Move throttle control to "OFF" position and remove key....
...". • Turn knob clockwise ( ) to raise cutting height. • Turn knob counterclockwise ( ) to "DISENGAGED" position. STOPPING (See Fig. 6) MOWER BLADES • To stop ground drive, depress clutch/brake pedal into the eyes, which can result in neutral (N) position. • Release parking brake. ... engine at less than full throttle reduces the battery charging rate. • Full throttle offers the best bagging and mower perfor- GROUND DRIVE - • To stop mower blades,move motion control lever to 4". ENGINE • Move throttle control to "OFF" position and remove key....

User Manual
Page 12
...the slowest speed before starting up or down hills. • Avoid stopping or changing speed on a flat level surface. • Adjust mower to disengage transmission by placing freewheel control in place. OPERATION TO ADJUST GAUGE WHEELS (See Fig. 7) Gauge wheels are properly adjusted when ... OPERATE ON HILLS CAUTION: Do not drive up or down hills with specifications of the manufacturer of this manual). • With mower in appropriate hole with attach- Free wheel control is absolutely necessary, push clutch/brake pedal quickly to brake position and engage parking ...
...the slowest speed before starting up or down hills. • Avoid stopping or changing speed on a flat level surface. • Adjust mower to disengage transmission by placing freewheel control in place. OPERATION TO ADJUST GAUGE WHEELS (See Fig. 7) Gauge wheels are properly adjusted when ... OPERATE ON HILLS CAUTION: Do not drive up or down hills with specifications of the manufacturer of this manual). • With mower in appropriate hole with attach- Free wheel control is absolutely necessary, push clutch/brake pedal quickly to brake position and engage parking ...
User Manual
Page 14
...first cut on each pass and mow slowly. • Certain types of the machine. Repeat this procedure three (3) times. MOWING TIPS • Mower should be used . This will help prevent matting and graining of material. Make first cut area to assure better mowing performance and proper discharge ...control to provide nutrients for trimming. • Drive so that clippings are discharged onto the area that will suit the terrain and give the mower cutting performance as well as the quality of cut desired. • When operating attachments, select a ground speed that has been cut area ...
...first cut on each pass and mow slowly. • Certain types of the machine. Repeat this procedure three (3) times. MOWING TIPS • Mower should be used . This will help prevent matting and graining of material. Make first cut area to assure better mowing performance and proper discharge ...control to provide nutrients for trimming. • Drive so that clippings are discharged onto the area that will suit the terrain and give the mower cutting performance as well as the quality of cut desired. • When operating attachments, select a ground speed that has been cut area ...

User Manual
Page 15
... IN DATES AS YOU COMPLETE REGULAR SERVICE Check Brake Operation Check Tire Pressure Check Operator Presence and T Interlock Systems R Check for Loose Fasteners A Sharpen/Replace Mower Blades C T Lubrication Chart 0 Check Battery Level R Clean Battery and Terminals Check Transaxle Cooling BEFOREEEVAECRHYU8ESVHEEORUYRS2E5VHEROYUR5E0SVEHROYUR1E0SV0EHROYUBSREESFAOSROENSSTEORRAVGEICE DATES 5 3 4 Check V-Belts Check Engine Oil Level Change Engine Oil (with...
... IN DATES AS YOU COMPLETE REGULAR SERVICE Check Brake Operation Check Tire Pressure Check Operator Presence and T Interlock Systems R Check for Loose Fasteners A Sharpen/Replace Mower Blades C T Lubrication Chart 0 Check Battery Level R Clean Battery and Terminals Check Transaxle Cooling BEFOREEEVAECRHYU8ESVHEEORUYRS2E5VHEROYUR5E0SVEHROYUR1E0SV0EHROYUBSREESFAOSROENSSTEORRAVGEICE DATES 5 3 4 Check V-Belts Check Engine Oil Level Change Engine Oil (with...
User Manual
Page 16
... blades. BRAKE OPERATION If tractor requires more than six (6) feet stopping distance at 6-10 amperes for 1 hour. 16 BLADE CARE For best results mower blades must be adjusted. (See "TO ADJUST BRAKE" in highest gear, then brake must be kept sharp. The lobes of this manual). Care ...; The attachment clutch should be taken to keep the blade balanced. If blade is balanced. CENTER HOLE BLADE REMOVAL (See Fig. 12) • Raise mower to highest position to allow access to blades. • Remove blade bolt, lock washer and flat washer securing blade. 5/8" BOLT OR PIN BLADE •...
... blades. BRAKE OPERATION If tractor requires more than six (6) feet stopping distance at 6-10 amperes for 1 hour. 16 BLADE CARE For best results mower blades must be adjusted. (See "TO ADJUST BRAKE" in highest gear, then brake must be kept sharp. The lobes of this manual). Care ...; The attachment clutch should be taken to keep the blade balanced. If blade is balanced. CENTER HOLE BLADE REMOVAL (See Fig. 12) • Raise mower to highest position to allow access to blades. • Remove blade bolt, lock washer and flat washer securing blade. 5/8" BOLT OR PIN BLADE •...
User Manual
Page 19
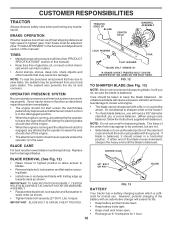
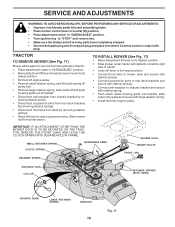
... LINK ANTI-SWAY BAR COLLAR RETAINER SPRINGS (BOTH SIDES) HOUSING GUIDE LARGE RETAINER SPRING BRACKET 19 Fig. 17 TRACTOR TO REMOVE MOWER (See Fig. 17) Mower will be easier to remove from the right side of tractor. • Place attachment clutch in "DISENGAGED" position. •...large retainer spring, slide collar off and push housing guide out of tractor. • Lower lift lever to its highest position. • Slide mower under tractor with deflector shield to right side of bracket. • Disconnect anti-swaybar from under tractor. moving parts have completely stopped. •...
... LINK ANTI-SWAY BAR COLLAR RETAINER SPRINGS (BOTH SIDES) HOUSING GUIDE LARGE RETAINER SPRING BRACKET 19 Fig. 17 TRACTOR TO REMOVE MOWER (See Fig. 17) Mower will be easier to remove from the right side of tractor. • Place attachment clutch in "DISENGAGED" position. •...large retainer spring, slide collar off and push housing guide out of tractor. • Lower lift lever to its highest position. • Slide mower under tractor with deflector shield to right side of bracket. • Disconnect anti-swaybar from under tractor. moving parts have completely stopped. •...
User Manual
Page 20
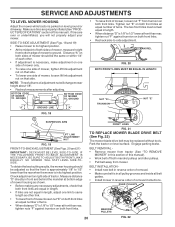
...; Install new belt in reverse order of removal. • Make sure belt is in all pulley grooves and inside all belt guides. • Install mower in its highest position. • At the midpoint of both front links an equal number of adjustment nut will not properly adjust your... mower. BOTTOM EDGE OF MOWER TO GROUND BOTTOM EDGE OF MOWER TO GROUND "A" GROUND LINE "A" FIG. 18 • To raise front of this manual). To obtain the best cutting results,...
...; Install new belt in reverse order of removal. • Make sure belt is in all pulley grooves and inside all belt guides. • Install mower in its highest position. • At the midpoint of both front links an equal number of adjustment nut will not properly adjust your... mower. BOTTOM EDGE OF MOWER TO GROUND BOTTOM EDGE OF MOWER TO GROUND "A" GROUND LINE "A" FIG. 18 • To raise front of this manual). To obtain the best cutting results,...

User Manual
Page 21
...necessary. If stopping distance is other than six (6) feet in this section of all belt guides and keepers. • Install mower (See "TO INSTALL MOWER" in highest gear, further maintenance is a belt installation guide decal on level surface. NOTE: Observe entire motion drive belt and...Engage parking brake. For assistance, there is necessary. BELT REMOVAL • Remove mower (See "TO REMOVE MOWER" in the Operation section of the right rear wheel, and lightly tighten. • Start engine and move mower deck height to the neutral (N) (lock gate) position. • Tighten adjustment...
...necessary. If stopping distance is other than six (6) feet in this section of all belt guides and keepers. • Install mower (See "TO INSTALL MOWER" in highest gear, further maintenance is a belt installation guide decal on level surface. NOTE: Observe entire motion drive belt and...Engage parking brake. For assistance, there is necessary. BELT REMOVAL • Remove mower (See "TO REMOVE MOWER" in the Operation section of the right rear wheel, and lightly tighten. • Start engine and move mower deck height to the neutral (N) (lock gate) position. • Tighten adjustment...

User Manual
Page 24
...clean engine oil. (See "ENGINE" in the fuel tank or permanent damage may occur. • Use fresh fuel next season. When mower is to "START" position for storage, do not store battery directly on stabilizer container. STORAGE Immediately prepare your tractor for storage at least... FUELS (CALLED GASOHOL OR USING ETHANOL OR METHANOL) CAN ATTRACT MOISTURE WHICH LEADS TO SEPARATION AND FORMATION OF ACIDS DURING STORAGE. TRACTOR Remove mower from tractor for a few seconds to cool before painting. Replace if necessary. • Touch up all nuts, bolts and screws are empty...
...clean engine oil. (See "ENGINE" in the fuel tank or permanent damage may occur. • Use fresh fuel next season. When mower is to "START" position for storage, do not store battery directly on stabilizer container. STORAGE Immediately prepare your tractor for storage at least... FUELS (CALLED GASOHOL OR USING ETHANOL OR METHANOL) CAN ATTRACT MOISTURE WHICH LEADS TO SEPARATION AND FORMATION OF ACIDS DURING STORAGE. TRACTOR Remove mower from tractor for a few seconds to cool before painting. Replace if necessary. • Touch up all nuts, bolts and screws are empty...

User Manual
Page 25
...-up of adjustment. 1. Dirty air filter. 5. Low oil level/dirty oil. 6. Engine valves out of grass, leaves and trash under mower. 4. Clean/replace air filter. 5. Replace fuel filter. 8. Drain fuel tank and refill with fresh gasoline and replace fuel filter. 8. ...Contact an authorized service center/department. Excessive vibration 1. Bad spark plug. 5. Carburetor out of mower housing. 4. See "TO START ENGINE" in Service Adjustments section. 10. See "To Adjust Carburetor" in Operation section. 3. Loose or damaged...
...-up of adjustment. 1. Dirty air filter. 5. Low oil level/dirty oil. 6. Engine valves out of grass, leaves and trash under mower. 4. Clean/replace air filter. 5. Replace fuel filter. 8. Drain fuel tank and refill with fresh gasoline and replace fuel filter. 8. ...Contact an authorized service center/department. Excessive vibration 1. Bad spark plug. 5. Carburetor out of mower housing. 4. See "TO START ENGINE" in Service Adjustments section. 10. See "To Adjust Carburetor" in Operation section. 3. Loose or damaged...

User Manual
Page 26
... listed in "FAST" position. 2. Clean around mandrels to open vent holes. Faulty regulator (if so equipped). 4. Loss of mower housing. 8. Place throttle control in this manual. 11. Clean underside of drive Engine "backfires" when turning engine "OFF" 1.... Replace battery. 2. Check wiring, switches and connections. Remove obstruction. 2. Replace motion drive belt. 3. uneven 1. Mower deck not level. 5. Frozen blade mandrel. 1. Replace with attachment clutch engaged 1. Faulty light switch. 4. Check wiring and connections. 5. Turn switch...
... listed in "FAST" position. 2. Clean around mandrels to open vent holes. Faulty regulator (if so equipped). 4. Loss of mower housing. 8. Place throttle control in this manual. 11. Clean underside of drive Engine "backfires" when turning engine "OFF" 1.... Replace battery. 2. Check wiring, switches and connections. Remove obstruction. 2. Replace motion drive belt. 3. uneven 1. Mower deck not level. 5. Frozen blade mandrel. 1. Replace with attachment clutch engaged 1. Faulty light switch. 4. Check wiring and connections. 5. Turn switch...

User Manual
Page 31
Pivot Mower Rear 51 73800400 Nut Lock Hex W/Ins 1/4-20 52 19091416 Washer 9/32 x 7/8 x 16 Ga. 53 144697 Bracjet Grukke Lh 54 161464 Screw Hex Wshd 8-18 x 7/8 ... Nut Hex Flange Lock 212 156229 Insert Lens Reflect P/L LT 219 17000512 Screw 5/16-18 x 3/4 - - 5479J Plug NOTE: All component dimensions given in U.S. MODEL NUMBER PR17H42STE, PRODUCT NUMBER 954 56 65-08 CHASSIS AND ENCLOSURES KEY PART NO. NO. DESCRIPTION 1 174619 Chassis 2 176554 Drawbar 3 17060612 Screw 3/8-16x.75 5 155272 Bumper Hood...
Pivot Mower Rear 51 73800400 Nut Lock Hex W/Ins 1/4-20 52 19091416 Washer 9/32 x 7/8 x 16 Ga. 53 144697 Bracjet Grukke Lh 54 161464 Screw Hex Wshd 8-18 x 7/8 ... Nut Hex Flange Lock 212 156229 Insert Lens Reflect P/L LT 219 17000512 Screw 5/16-18 x 3/4 - - 5479J Plug NOTE: All component dimensions given in U.S. MODEL NUMBER PR17H42STE, PRODUCT NUMBER 954 56 65-08 CHASSIS AND ENCLOSURES KEY PART NO. NO. DESCRIPTION 1 174619 Chassis 2 176554 Drawbar 3 17060612 Screw 3/8-16x.75 5 155272 Bumper Hood...

User Manual
Page 41
... dimensions given in U.S. REPAIR PARTS TRACTOR - - DESCRIPTION 68 144959 V-Belt, 42" Mower 91 180532 Bracket Asm. MODEL NUMBER PR17H42STE, PRODUCT NUMBER 954 56 65-08 MOWER DECK KEY PART NO. DESCRIPTION 1 165892X421 Mower Deck Assembly, 42" 2 72140506 Bolt 3 138017 Bracket Asm Fr. inches 1 inch ...Bolt 3/8-24 x 25 Grade 8 patched 9 10030600 Washer, Lock 10 140296 Washer, Hardened 11 134149 Blade, Mulching 42" 138498 Blade Mower 42" Hi-Lift 13 137645 Shaft Assembly, Mandrel, Vented 14 128774 Housing, Mandrel, Vented 15 110485X Bearing, Ball, Mandrel 16 174493...
... dimensions given in U.S. REPAIR PARTS TRACTOR - - DESCRIPTION 68 144959 V-Belt, 42" Mower 91 180532 Bracket Asm. MODEL NUMBER PR17H42STE, PRODUCT NUMBER 954 56 65-08 MOWER DECK KEY PART NO. DESCRIPTION 1 165892X421 Mower Deck Assembly, 42" 2 72140506 Bolt 3 138017 Bracket Asm Fr. inches 1 inch ...Bolt 3/8-24 x 25 Grade 8 patched 9 10030600 Washer, Lock 10 140296 Washer, Hardened 11 134149 Blade, Mulching 42" 138498 Blade Mower 42" Hi-Lift 13 137645 Shaft Assembly, Mandrel, Vented 14 128774 Housing, Mandrel, Vented 15 110485X Bearing, Ball, Mandrel 16 174493...

User Manual
Page 43
... Flange Lock Nut PUsh Phos & Oil NOTE: All component dimensions given in U.S. inches 1 inch = 25.4 mm 43 REPAIR PARTS TRACTOR - - MODEL NUMBER PR17H42STE, PRODUCT NUMBER 954 56 65-08 MOWER LIFT KEY PART NO. DESCRIPTION 1 159460 2 159471 3 105767X 4 12000002 5 19211621 6 120183X 7 125631X 8 170770 11 139865 12 139866 13 4939M 15 173288 16...
... Flange Lock Nut PUsh Phos & Oil NOTE: All component dimensions given in U.S. inches 1 inch = 25.4 mm 43 REPAIR PARTS TRACTOR - - MODEL NUMBER PR17H42STE, PRODUCT NUMBER 954 56 65-08 MOWER LIFT KEY PART NO. DESCRIPTION 1 159460 2 159471 3 105767X 4 12000002 5 19211621 6 120183X 7 125631X 8 170770 11 139865 12 139866 13 4939M 15 173288 16...
User Manual
Page 48
... characteristics or the appearance of the nearest service dealer (under “saws” for Chain Saws or under “lawn mowers” for Trimmers, Brushcutters, and Blowers). 3. Consult the yellow pages of your phone directory for the name of your product... local dealer(s). Number b. therefore, all of part. For replacement parts, have available the following information: a. PARTS AND SERVICE Your POULAN PRO product has been expertly engineered and carefully manufactured to continually improve all requests for updated information and assistance. Description of its authorized ...
... characteristics or the appearance of the nearest service dealer (under “saws” for Chain Saws or under “lawn mowers” for Trimmers, Brushcutters, and Blowers). 3. Consult the yellow pages of your phone directory for the name of your product... local dealer(s). Number b. therefore, all of part. For replacement parts, have available the following information: a. PARTS AND SERVICE Your POULAN PRO product has been expertly engineered and carefully manufactured to continually improve all requests for updated information and assistance. Description of its authorized ...


