
User Manual
Page 2
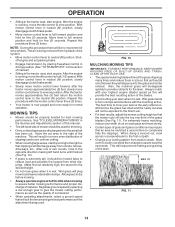
... stop engine, and remove keys before removing grass catcher or unclogging chute. • Mow only in speed or direction. Never remove gas cap or add fuel with manufacturer's recommended parts, when necessary. • Mower blades are subject to occur. up to wear, damage, and deterioration, which can cut. Clean oil or fuel spillage. Adjust and service as rocks, tree limbs, etc. • Stop and inspect the equipment if you last saw...
... stop engine, and remove keys before removing grass catcher or unclogging chute. • Mow only in speed or direction. Never remove gas cap or add fuel with manufacturer's recommended parts, when necessary. • Mower blades are subject to occur. up to wear, damage, and deterioration, which can cut. Clean oil or fuel spillage. Adjust and service as rocks, tree limbs, etc. • Stop and inspect the equipment if you last saw...
User Manual
Page 4
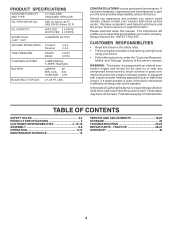
... you cannot easily remedy, please contact your tractor. • Follow the instructions under the "Customer Responsibilities" and "Storage" sections of this owner's manual. TABLE OF CONTENTS SAFETY RULES 2-3 PRODUCT SPECIFICATIONS 4 CUSTOMER RESPONSIBILITIES 4, 15-18 ASSEMBLY 6-8 OPERATION 9-14 MAINTENANCE SCHEDULE 15 SERVICE AND ADJUSTMENTS 19-23 STORAGE 24 TROUBLESHOOTING 25-26 REPAIR PARTS - CCA: 230 CASE SIZE: U1R BLADE BOLT TORQUE: 27-35 FT. We have similar...
... you cannot easily remedy, please contact your tractor. • Follow the instructions under the "Customer Responsibilities" and "Storage" sections of this owner's manual. TABLE OF CONTENTS SAFETY RULES 2-3 PRODUCT SPECIFICATIONS 4 CUSTOMER RESPONSIBILITIES 4, 15-18 ASSEMBLY 6-8 OPERATION 9-14 MAINTENANCE SCHEDULE 15 SERVICE AND ADJUSTMENTS 19-23 STORAGE 24 TROUBLESHOOTING 25-26 REPAIR PARTS - CCA: 230 CASE SIZE: U1R BLADE BOLT TORQUE: 27-35 FT. We have similar...

User Manual
Page 7
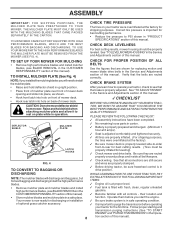
... control in "transmission engaged" position. • Sit on seat to engage shoulder bolt in neutral (N) position. • Press lift lever plunger and raise attachment lift lever to press clutch/brake pedal all the above assembly steps have been completed. • Check engine oil level and fill fuel tank with the instructions that follow all instructions in the Operation section of this manual). • Roll tractor forward off skid. • Apply brake to stop tractor, set...
... control in "transmission engaged" position. • Sit on seat to engage shoulder bolt in neutral (N) position. • Press lift lever plunger and raise attachment lift lever to press clutch/brake pedal all the above assembly steps have been completed. • Check engine oil level and fill fuel tank with the instructions that follow all instructions in the Operation section of this manual). • Roll tractor forward off skid. • Apply brake to stop tractor, set...
User Manual
Page 8
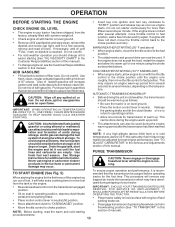
... plate while in drive position. Follow proper starting and transmission purging instructions (See "TO START ENGINE" and "PURGE TRANSMISSION" in "PRODUCT SPECIFICATIONS" section of this manual. Correct tire pressure is at the factory for best cutting results. (Tires must be properly leveled. See "TO LEVEL MOWER HOUSING" in the CUSTOMER RESPONSABILITY section of this manual). TO SET UP YOUR MOWER FOR MULCHING • Remove high performance blades and install mulcher blades, (see that are...
... plate while in drive position. Follow proper starting and transmission purging instructions (See "TO START ENGINE" and "PURGE TRANSMISSION" in "PRODUCT SPECIFICATIONS" section of this manual. Correct tire pressure is at the factory for best cutting results. (Tires must be properly leveled. See "TO LEVEL MOWER HOUSING" in the CUSTOMER RESPONSABILITY section of this manual). TO SET UP YOUR MOWER FOR MULCHING • Remove high performance blades and install mulcher blades, (see that are...

User Manual
Page 10
... to your tractor. LIGHT SWITCH POSITION: Turns the headlights on and off . THROTTLE/CHOKE CONTROL: Used for starting the engine. ATTACHMENT LIFT LEVER - HEIGHT ADJUSTMENT KNOB - ATTACHMENT CLUTCH LEVER: Used to engage the mower blades, or other attachments mounted to adjust the mower cutting height. 10 PARKING BRAKE: Locks clutch/brake pedal into the brake position. FREEWHEEL CONTROL: Disengages transmission for declutching and braking the tractor and starting and controlling engine speed. CLUTCH/BRAKE PEDAL: Used for pushing or slowly towing the tractor with the locations of...
... to your tractor. LIGHT SWITCH POSITION: Turns the headlights on and off . THROTTLE/CHOKE CONTROL: Used for starting the engine. ATTACHMENT LIFT LEVER - HEIGHT ADJUSTMENT KNOB - ATTACHMENT CLUTCH LEVER: Used to engage the mower blades, or other attachments mounted to adjust the mower cutting height. 10 PARKING BRAKE: Locks clutch/brake pedal into the brake position. FREEWHEEL CONTROL: Disengages transmission for declutching and braking the tractor and starting and controlling engine speed. CLUTCH/BRAKE PEDAL: Used for pushing or slowly towing the tractor with the locations of...

User Manual
Page 11
... grass and types of movement is standing idle with the engine not running , hot engine exhaust gases may cause engine to "backfire". • Turn knob clockwise ( ) to raise cutting height. • Turn knob counterclockwise ( ) to lower cutting height. IMPORTANT: LEAVING THE IGNITION SWITCH IN ANY POSITION OTHER THAN "OFF" WILL CAUSE THE BATTERY TO BE DISCHARGED, (DEAD). NOTE: Under certain conditions when tractor is controlled by the motion control lever. THROTTLE/CHOKE CONTROL LEVER ATTACHMENT CLUTCH LEVER "ENGAGED" POSITION "BRAKE" POSITION IGNITION...
... grass and types of movement is standing idle with the engine not running , hot engine exhaust gases may cause engine to "backfire". • Turn knob clockwise ( ) to raise cutting height. • Turn knob counterclockwise ( ) to lower cutting height. IMPORTANT: LEAVING THE IGNITION SWITCH IN ANY POSITION OTHER THAN "OFF" WILL CAUSE THE BATTERY TO BE DISCHARGED, (DEAD). NOTE: Under certain conditions when tractor is controlled by the motion control lever. THROTTLE/CHOKE CONTROL LEVER ATTACHMENT CLUTCH LEVER "ENGAGED" POSITION "BRAKE" POSITION IGNITION...

User Manual
Page 12
... seat with attach- Free wheel control is located at the desired cutting height in desired height of your tractor on a flat level surface. • Adjust mower to neutral (N) position. NOTE:Adjust gauge wheels with specifications of the manufacturer of cut . • Lower mower with attachment lift control. • Start mower blades by and comply with tractor on a truck or a trailer, be assembled so they are slightly off the engine. • Select desired height of cut position, gauge wheels should...
... seat with attach- Free wheel control is located at the desired cutting height in desired height of your tractor on a flat level surface. • Adjust mower to neutral (N) position. NOTE:Adjust gauge wheels with specifications of the manufacturer of cut . • Lower mower with attachment lift control. • Start mower blades by and comply with tractor on a truck or a trailer, be assembled so they are slightly off the engine. • Select desired height of cut position, gauge wheels should...
User Manual
Page 13
... operating position, depress clutch/brake pedal and set . • Move attachment clutch to "DISENGAGED" position. • Disengage transmission by placing freewheel control in • Move throttle control to "START" position and release key as soon as engine starts. Acidic gas can be used during shipping of leaded gasoline will remove any spilled oil or fuel. See Storage Instructions for the first time. Never use gasoline near an open flame. • Insert key into ignition and turn...
... operating position, depress clutch/brake pedal and set . • Move attachment clutch to "DISENGAGED" position. • Disengage transmission by placing freewheel control in • Move throttle control to "START" position and release key as soon as engine starts. Acidic gas can be used during shipping of leaded gasoline will remove any spilled oil or fuel. See Storage Instructions for the first time. Never use gasoline near an open flame. • Insert key into ignition and turn...
User Manual
Page 14
... tractor seat, start engine. With motion control lever in the tractor seat, start engine. The best time to reverse position. Repeat this manual. • The left hand turns until finished (See Fig. 10). • If grass is extremely tall, it is running , move throttle control to completely hide the clippings. Regulate ground speed by turning to the neutral (N) position. After the engine is now purged and now ready for the lawn...
... tractor seat, start engine. With motion control lever in the tractor seat, start engine. The best time to reverse position. Repeat this manual. • The left hand turns until finished (See Fig. 10). • If grass is extremely tall, it is running , move throttle control to completely hide the clippings. Regulate ground speed by turning to the neutral (N) position. After the engine is now purged and now ready for the lawn...

User Manual
Page 15
...with oil filter) E Change Engine Oil (without oil filter) N Clean Air Filter G Clean Air Screen I N Inspect Muffler/Spark Arrester E Replace Oil Filter (If equipped) Clean Engine Cooling Fins Replace Spark Plug 1,2 1,2 2 2 1, 2 2 Replace Air Filter Paper Cartridge Replace Fuel Filter 1 - CUSTOMER RESPONSIBILITIES MAINTENANCE SCHEDULE FILL IN DATES AS YOU COMPLETE REGULAR SERVICE Check Brake Operation Check Tire Pressure Check Operator Presence and T Interlock Systems R Check for Loose Fasteners A Sharpen/Replace Mower Blades C T Lubrication Chart 0 Check Battery Level...
...with oil filter) E Change Engine Oil (without oil filter) N Clean Air Filter G Clean Air Screen I N Inspect Muffler/Spark Arrester E Replace Oil Filter (If equipped) Clean Engine Cooling Fins Replace Spark Plug 1,2 1,2 2 2 1, 2 2 Replace Air Filter Paper Cartridge Replace Fuel Filter 1 - CUSTOMER RESPONSIBILITIES MAINTENANCE SCHEDULE FILL IN DATES AS YOU COMPLETE REGULAR SERVICE Check Brake Operation Check Tire Pressure Check Operator Presence and T Interlock Systems R Check for Loose Fasteners A Sharpen/Replace Mower Blades C T Lubrication Chart 0 Check Battery Level...
User Manual
Page 16
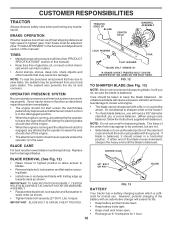
... sure the blade is balanced. TIRES • Maintain proper air pressure in the disengaged position. • When the engine is running, any attempt by the operator to be centered, but if you will need a 5/8" diameter steel bolt, pin, or a cone balancer. (When using a cone balancer, follow the instructions supplied with trailing edge up towards deck as shown. FIG. 13 BATTERY Your tractor has a battery charging system...
... sure the blade is balanced. TIRES • Maintain proper air pressure in the disengaged position. • When the engine is running, any attempt by the operator to be centered, but if you will need a 5/8" diameter steel bolt, pin, or a cone balancer. (When using a cone balancer, follow the instructions supplied with trailing edge up towards deck as shown. FIG. 13 BATTERY Your tractor has a battery charging system...

User Manual
Page 17
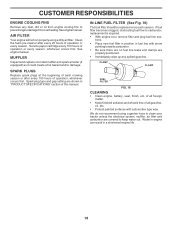
... time you check the oil level. All oil must be kept free of operation. Clean with grease or petroleum jelly. • Reinstall battery (See "REPLACING BATTERY" in one year. Check your tractor is maintenance free. SAE VISCOSITY GRADES SAE 30 • Refill engine with API service classification SF-SJ. For approximate capacity see "PRODUCT SPECIFICATIONS" section of this manual. • Use gauge on oil. Do not attempt to clean fan or transmission while engine is running low on oil...
... time you check the oil level. All oil must be kept free of operation. Clean with grease or petroleum jelly. • Reinstall battery (See "REPLACING BATTERY" in one year. Check your tractor is maintenance free. SAE VISCOSITY GRADES SAE 30 • Refill engine with API service classification SF-SJ. For approximate capacity see "PRODUCT SPECIFICATIONS" section of this manual. • Use gauge on oil. Do not attempt to clean fan or transmission while engine is running low on oil...
User Manual
Page 18
..., muffler, air filter and carburetor are shown in "PRODUCT SPECIFICATIONS" section of operation, whichever occurs first. Water in engine can result in fuel line with automotive type wax. SPARK PLUGS Replace spark plugs at the beginning of each season. See engine manual. AIR FILTER Your engine will not run properly using a garden hose to carburetor, replacement is required. • With engine cool, remove filter and plug fuel line sections. • Place new fuel filter in position in a shortened engine life. 18 See engine manual. Spark plug type and gap setting are covered...
..., muffler, air filter and carburetor are shown in "PRODUCT SPECIFICATIONS" section of operation, whichever occurs first. Water in engine can result in fuel line with automotive type wax. SPARK PLUGS Replace spark plugs at the beginning of each season. See engine manual. AIR FILTER Your engine will not run properly using a garden hose to carburetor, replacement is required. • With engine cool, remove filter and plug fuel line sections. • Place new fuel filter in position in a shortened engine life. 18 See engine manual. Spark plug type and gap setting are covered...
User Manual
Page 19
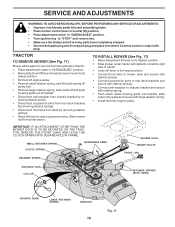
... PERFORMING ANY SERVICE OR ADJUSTMENTS: • Depress clutch/brake pedal fully and set parking brake. • Place motion control lever in neutral (N) position. • Place attachment clutch in "DISENGAGED" position. • Turn ignition key to "STOP" and remove key. • Make sure the blades and all moving retainer spring. • Disconnect suspension arms from rear deck brackets by re- IMPORTANT: IF AN ATTACHMENT OTHER THAN THE MOWER DECK IS TO BE...
... PERFORMING ANY SERVICE OR ADJUSTMENTS: • Depress clutch/brake pedal fully and set parking brake. • Place motion control lever in neutral (N) position. • Place attachment clutch in "DISENGAGED" position. • Turn ignition key to "STOP" and remove key. • Make sure the blades and all moving retainer spring. • Disconnect suspension arms from rear deck brackets by re- IMPORTANT: IF AN ATTACHMENT OTHER THAN THE MOWER DECK IS TO BE...
User Manual
Page 20
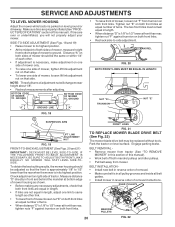
.... BELT REMOVAL • Remove mower from tractor (See "TO REMOVE MOWER" in this section of this manual). FRONT LINKS FIG. 21 TO REPLACE MOWER BLADE DRIVE BELT (See Fig. 22) The mower blade drive belt may be the same or within 1/4" of each other link. • To lower front of mower loosen nut "E" on both front links. SERVICE AND ADJUSTMENTS TO LEVEL MOWER HOUSING Adjust the mower while tractor is in all pulley grooves and inside all belt guides. • Install mower...
.... BELT REMOVAL • Remove mower from tractor (See "TO REMOVE MOWER" in this section of this manual). FRONT LINKS FIG. 21 TO REPLACE MOWER BLADE DRIVE BELT (See Fig. 22) The mower blade drive belt may be the same or within 1/4" of each other link. • To lower front of mower loosen nut "E" on both front links. SERVICE AND ADJUSTMENTS TO LEVEL MOWER HOUSING Adjust the mower while tractor is in all pulley grooves and inside all belt guides. • Install mower...

User Manual
Page 21
... tighten. • Start engine and move motion control lever until satisfied. 21 BELT REMOVAL • Remove mower (See "TO REMOVE MOWER" in the Operation section of this section of left footrest. See "PURGE TRANSMISSION" in this manual. NOTE: If additional clearance is needed to get to the neutral (N) (lock gate) position. • Tighten adjustment bolt securely. WITH PARKING BRAKE "ENGAGED" 1-9/16" NUT "A" JAM NUT • Pull belt toward front of tractor and roll around...
... tighten. • Start engine and move motion control lever until satisfied. 21 BELT REMOVAL • Remove mower (See "TO REMOVE MOWER" in the Operation section of this section of left footrest. See "PURGE TRANSMISSION" in this manual. NOTE: If additional clearance is needed to get to the neutral (N) (lock gate) position. • Tighten adjustment bolt securely. WITH PARKING BRAKE "ENGAGED" 1-9/16" NUT "A" JAM NUT • Pull belt toward front of tractor and roll around...

User Manual
Page 24
... formation of time, clean it thoroughly, remove all dirt, grease, leaves, etc. When mower is to cool before painting. Replace if necessary. • Touch up all nuts, bolts and screws are empty. • Never use plastic. sand lightly before storing in fuel tank or storage container. IMPORTANT: NEVER COVER TRACTOR WHILE ENGINE AND EXHAUST AREAS ARE STILL WARM. 24 Do not drain the gas tank and carburetor if using fuel stabilizer...
... formation of time, clean it thoroughly, remove all dirt, grease, leaves, etc. When mower is to cool before painting. Replace if necessary. • Touch up all nuts, bolts and screws are empty. • Never use plastic. sand lightly before storing in fuel tank or storage container. IMPORTANT: NEVER COVER TRACTOR WHILE ENGINE AND EXHAUST AREAS ARE STILL WARM. 24 Do not drain the gas tank and carburetor if using fuel stabilizer...
User Manual
Page 25
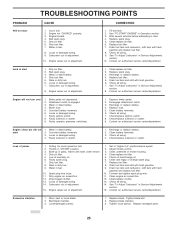
... Engine valves out of power 1. Recharge or replace battery. 4. Blown fuse. 5. Corroded battery terminals. 6. Clean battery terminals. 6. Check/replace ignition switch. 8. Check all wiring. 9. Check/replace solenoid or starter. Dirty air filter. 5. Dirty fuel filter. 8. Water in Operation section. 3. Set in Service Adjustments section. 8. Connect and tighten spark plug wire. 11. Tighten blade bolt. 2. Drain fuel tank and carburetor, refill tank with fresh gasoline. 9. Stale or dirty fuel. 6. See "To Adjust Carburetor" in "Higher Cut" position/reduce speed...
... Engine valves out of power 1. Recharge or replace battery. 4. Blown fuse. 5. Corroded battery terminals. 6. Clean battery terminals. 6. Check/replace ignition switch. 8. Check all wiring. 9. Check/replace solenoid or starter. Dirty air filter. 5. Dirty fuel filter. 8. Water in Operation section. 3. Set in Service Adjustments section. 8. Connect and tighten spark plug wire. 11. Tighten blade bolt. 2. Drain fuel tank and carburetor, refill tank with fresh gasoline. 9. Stale or dirty fuel. 6. See "To Adjust Carburetor" in "Higher Cut" position/reduce speed...

User Manual
Page 26
..." when turning engine "OFF" 1. Place throttle control in "disengaged" position. 2. Level mower deck. 5. Reinstall blades sharp edge down. 10. Replace with attachment clutch engaged 1. Blown fuse. 1. Replace bulb(s) or lamp(s). 3. Check/replace light switch. 4. Replace fuse. Battery will not rotate 1. Poor cable connections. 3. Faulty alternator. 1. Check/clean all connections. 3. Replace regulator. 4. Freewheel control in "FAST" position. 2. Motion drive belt worn, damaged, or broken. 3. Air trapped in transmission during shipment or servicing...
..." when turning engine "OFF" 1. Place throttle control in "disengaged" position. 2. Level mower deck. 5. Reinstall blades sharp edge down. 10. Replace with attachment clutch engaged 1. Blown fuse. 1. Replace bulb(s) or lamp(s). 3. Check/replace light switch. 4. Replace fuse. Battery will not rotate 1. Poor cable connections. 3. Faulty alternator. 1. Check/clean all connections. 3. Replace regulator. 4. Freewheel control in "FAST" position. 2. Motion drive belt worn, damaged, or broken. 3. Air trapped in transmission during shipment or servicing...

User Manual
Page 39
... 17060620 81 73510400 112 3645J Control Th/ch Flag Screw Hex Thd Cut 1/4-20 x 1/2 Engine, Briggs Model 31G777 (Order Parts From Engine Manufacturer) Muffler Gasket Eng Tube Drain Oil Easy Washer Lock Ext Tooth 3/8 Shield Brn/Dbr Guard Kit Spark Arrestor (Flat Scrn) Tank Fuel Front Cap Asm Fuel W/sym Vented Clamp Hose Black Line Fuel 20" Plug Drain Oil Easy Bushing Snap Nyl Blk Fuel Line Stem Tank Fuel Screw Hexwsh Thdrol 1/4-20x3/4 Screw Hexwsh Thdr 3/8-16 x 3/4 Washer 9/32...
... 17060620 81 73510400 112 3645J Control Th/ch Flag Screw Hex Thd Cut 1/4-20 x 1/2 Engine, Briggs Model 31G777 (Order Parts From Engine Manufacturer) Muffler Gasket Eng Tube Drain Oil Easy Washer Lock Ext Tooth 3/8 Shield Brn/Dbr Guard Kit Spark Arrestor (Flat Scrn) Tank Fuel Front Cap Asm Fuel W/sym Vented Clamp Hose Black Line Fuel 20" Plug Drain Oil Easy Bushing Snap Nyl Blk Fuel Line Stem Tank Fuel Screw Hexwsh Thdrol 1/4-20x3/4 Screw Hexwsh Thdr 3/8-16 x 3/4 Washer 9/32...


