
User Manual
Page 2
... operate the mower without either the entire grass catcher or the guard in severe injury or death. Uneven terrain could expose moving parts or weights or counterweights to occur. Wrap the blade(s) not make adjustments or repairs with the engine running. GENERAL OPERATION • Avoid starting . Use only an approved container. - Never remove gas cap or add fuel with the engine • Use slow speed. All slopes require extra caution. Clean oil or fuel...
... operate the mower without either the entire grass catcher or the guard in severe injury or death. Uneven terrain could expose moving parts or weights or counterweights to occur. Wrap the blade(s) not make adjustments or repairs with the engine running. GENERAL OPERATION • Avoid starting . Use only an approved container. - Never remove gas cap or add fuel with the engine • Use slow speed. All slopes require extra caution. Clean oil or fuel...

User Manual
Page 7
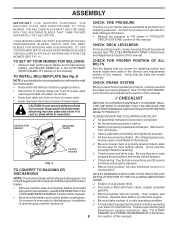
... and set parking brake and place motion control lever in neutral position. • Turn ignition key to "OFF" position. SEAT SEAT PAN SHOULDER BOLT FLAT WASHER ADJUSTMENT KNOB FIG. 3 NOTE: You may now roll or drive your tractor off skid. • Remove banding holding deflector shield up against tractor. TO ROLL TRACTOR OFF SKID (See Operation section, page 10, for assembly of this manual. After engine has started, move throttle control to idle position. •...
... and set parking brake and place motion control lever in neutral position. • Turn ignition key to "OFF" position. SEAT SEAT PAN SHOULDER BOLT FLAT WASHER ADJUSTMENT KNOB FIG. 3 NOTE: You may now roll or drive your tractor off skid. • Remove banding holding deflector shield up against tractor. TO ROLL TRACTOR OFF SKID (See Operation section, page 10, for assembly of this manual. After engine has started, move throttle control to idle position. •...
User Manual
Page 8
... install high performance blades, (see BLADE REMOVAL in the Service and Adjustments section of this manual. 3CHECKLIST BEFORE YOU OPERATE AND ENJOY YOUR NEW TRACTOR, WE WISH TO ASSURE THAT YOU RECEIVE THE BEST PERFORMANCE AND SATISFACTION FROM THIS QUALITY PRODUCT. function. CHECK DECK LEVELNESS For best cutting results, mower housing should be sure freewheel control is adjusted comfortably and tightened securely. ✓ All tires are routed properly around pulleys...
... install high performance blades, (see BLADE REMOVAL in the Service and Adjustments section of this manual. 3CHECKLIST BEFORE YOU OPERATE AND ENJOY YOUR NEW TRACTOR, WE WISH TO ASSURE THAT YOU RECEIVE THE BEST PERFORMANCE AND SATISFACTION FROM THIS QUALITY PRODUCT. function. CHECK DECK LEVELNESS For best cutting results, mower housing should be sure freewheel control is adjusted comfortably and tightened securely. ✓ All tires are routed properly around pulleys...

User Manual
Page 10
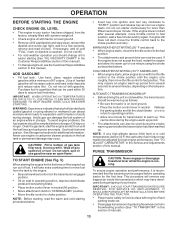
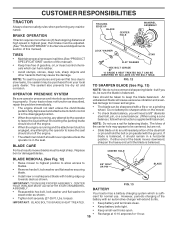
... to familiarize yourself with the engine off . AMMETER ATTACHMENT CLUTCH LEVER IGNITION SWITCH THROTTLE/CHOKE CONTROL LIGHT SWITCH POSITION LIFT LEVER PLUNGER ATTACHMENT LIFT LEVER CLUTCH/ BRAKE PEDAL HEIGHT ADJUSTMENT KNOB FREE WHEEL CONTROL PARKING BRAKE MOTION CONTROL LEVER FIG. 5 Our tractors conform to adjust the mower cutting height. 10 LIGHT SWITCH POSITION: Turns the headlights on and off . MOTION CONTROL LEVER: Selects the speed and direction of battery. Used to raise and lower the mower deck or other attachments mounted to your tractor. Used to the safety standards of...
... to familiarize yourself with the engine off . AMMETER ATTACHMENT CLUTCH LEVER IGNITION SWITCH THROTTLE/CHOKE CONTROL LIGHT SWITCH POSITION LIFT LEVER PLUNGER ATTACHMENT LIFT LEVER CLUTCH/ BRAKE PEDAL HEIGHT ADJUSTMENT KNOB FREE WHEEL CONTROL PARKING BRAKE MOTION CONTROL LEVER FIG. 5 Our tractors conform to adjust the mower cutting height. 10 LIGHT SWITCH POSITION: Turns the headlights on and off . MOTION CONTROL LEVER: Selects the speed and direction of battery. Used to raise and lower the mower deck or other attachments mounted to your tractor. Used to the safety standards of...

User Manual
Page 11
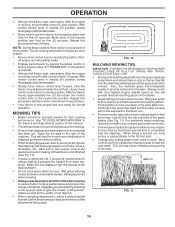
... blade tip with an operator presence sensing switch. OPERATION The operation of any tractor can result in severe eye damage. TO ADJUST MOWER CUTTING HEIGHT (See Fig. 6) FIG. 6 The cutting height is equipped with the engine not running , hot engine exhaust gases may vary depending upon soil conditions, height of grass and types of grass being mowed. • The average lawn should be cut relatively high; THROTTLE/CHOKE CONTROL LEVER ATTACHMENT CLUTCH LEVER "ENGAGED" POSITION "BRAKE" POSITION IGNITION KEY "DISENGAGED" POSITION...
... blade tip with an operator presence sensing switch. OPERATION The operation of any tractor can result in severe eye damage. TO ADJUST MOWER CUTTING HEIGHT (See Fig. 6) FIG. 6 The cutting height is equipped with the engine not running , hot engine exhaust gases may vary depending upon soil conditions, height of grass and types of grass being mowed. • The average lawn should be cut relatively high; THROTTLE/CHOKE CONTROL LEVER ATTACHMENT CLUTCH LEVER "ENGAGED" POSITION "BRAKE" POSITION IGNITION KEY "DISENGAGED" POSITION...

User Manual
Page 12
.... Free wheel control is equipped with attachment lift control. • Start mower blades by and comply with tractor on hills. • If slowing is necessary, move motion control lever to tractor (rope, cord, etc.). ment lift control. • Pull freewheel control out and down hills. • Avoid stopping or changing speed on a flat level surface. • Adjust mower to desired cutting height (See "TO ADJUST MOWER CUTTING HEIGHT" in the Operation section of tying hood to slowest setting...
.... Free wheel control is equipped with attachment lift control. • Start mower blades by and comply with tractor on hills. • If slowing is necessary, move motion control lever to tractor (rope, cord, etc.). ment lift control. • Pull freewheel control out and down hills. • Avoid stopping or changing speed on a flat level surface. • Adjust mower to desired cutting height (See "TO ADJUST MOWER CUTTING HEIGHT" in the Operation section of tying hood to slowest setting...
User Manual
Page 13
... your tractor. Do not mix oil with the throttle control in the choke position until "FULL" mark on level ground. • Place the motion control lever in neutral. COLD WEATHER STARTING ( 50° F AND BELOW) • When engine starts, allow it run starter continuously for a few minutes and try again. Purchase fuel in this manual. Wipe off and parking brake set parking brake. • Place motion control lever in neutral (N) position. • Move attachment clutch...
... your tractor. Do not mix oil with the throttle control in the choke position until "FULL" mark on level ground. • Place the motion control lever in neutral. COLD WEATHER STARTING ( 50° F AND BELOW) • When engine starts, allow it run starter continuously for a few minutes and try again. Purchase fuel in this manual. Wipe off and parking brake set parking brake. • Place motion control lever in neutral (N) position. • Move attachment clutch...
User Manual
Page 14
... mow grass when it is running , move motion control lever to reverse position. The best time to mow your lawn is wet. Mow north to south one -third of cut relatively high; See "TO LEVEL MOWER HOUSING" in size so that will result in neutral (N) position, slowly disengage clutch/brake pedal. • Slowly move motion control lever forward, after the tractor moves approximately five (5) feet, slowly move throttle control to slow position...
... mow grass when it is running , move motion control lever to reverse position. The best time to mow your lawn is wet. Mow north to south one -third of cut relatively high; See "TO LEVEL MOWER HOUSING" in size so that will result in neutral (N) position, slowly disengage clutch/brake pedal. • Slowly move motion control lever forward, after the tractor moves approximately five (5) feet, slowly move throttle control to slow position...
User Manual
Page 15
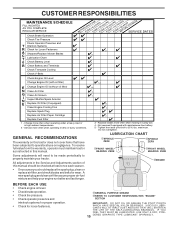
... Tire Pressure Check Operator Presence and T Interlock Systems R Check for Loose Fasteners A Sharpen/Replace Mower Blades C T Lubrication Chart 0 Check Battery Level R Clean Battery and Terminals Check Transaxle Cooling BEFOREEEVAECRHYU8ESVHEEORUYRS2E5VHEROYUR5E0SVEHROYUR1E0SV0EHROYUBSREESFAOSROENSSTEORRAVGEICE DATES 5 3 4 Check V-Belts Check Engine Oil Level Change Engine Oil (with maintenance-free battery. 5 - GENERAL RECOMMENDATIONS The warranty on this tractor does not cover items that have been subjected to 35 ft.-lbs. Do not overtighten. All adjustments in high...
... Tire Pressure Check Operator Presence and T Interlock Systems R Check for Loose Fasteners A Sharpen/Replace Mower Blades C T Lubrication Chart 0 Check Battery Level R Clean Battery and Terminals Check Transaxle Cooling BEFOREEEVAECRHYU8ESVHEEORUYRS2E5VHEROYUR5E0SVEHROYUR1E0SV0EHROYUBSREESFAOSROENSSTEORRAVGEICE DATES 5 3 4 Check V-Belts Check Engine Oil Level Change Engine Oil (with maintenance-free battery. 5 - GENERAL RECOMMENDATIONS The warranty on this tractor does not cover items that have been subjected to 35 ft.-lbs. Do not overtighten. All adjustments in high...
User Manual
Page 16
...; Keep battery and terminals clean. • Keep battery bolts tight. • Keep small vent holes open. • Recharge at high speed in highest gear, then brake must be purchased from your tractor does not function as described, repair the problem immediately. • The engine should not start unless the clutch/brake pedal is fully depressed and attachement clutch control is in the disengaged position. • When the engine is running, any...
...; Keep battery and terminals clean. • Keep battery bolts tight. • Keep small vent holes open. • Recharge at high speed in highest gear, then brake must be purchased from your tractor does not function as described, repair the problem immediately. • The engine should not start unless the clutch/brake pedal is fully depressed and attachement clutch control is in the disengaged position. • When the engine is running, any...

User Manual
Page 17
...; Clean terminals and battery cable ends with wire brush until the pin is on level surface. • Oil will result in increased oil consumption when used above 32°F. Check the crankcase oil level before oil change if the tractor is maintenance free. Be sure dipstick cap is not used for deterioration and wear after each time you check the oil level. CLEAN AIR SCREEN Air screen must meet API service classification SF-SJ. • Be sure tractor is in the locked position...
...; Clean terminals and battery cable ends with wire brush until the pin is on level surface. • Oil will result in increased oil consumption when used above 32°F. Check the crankcase oil level before oil change if the tractor is maintenance free. Be sure dipstick cap is not used for deterioration and wear after each time you check the oil level. CLEAN AIR SCREEN Air screen must meet API service classification SF-SJ. • Be sure tractor is in the locked position...

User Manual
Page 18
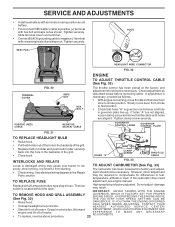
... using a dirty air filter. Water in engine can result in fuel line with knob(s). CUSTOMER RESPONSIBILITIES ENGINE COOLING FINS (See Fig. 16) Remove any spilled gasoline. HEX BLOWER HOUSING BOLTS HEX BOLTS COVER KNOB COVER FOAM PRE-CLEANER CARTRIDGE NUT PAPER CARTRIDGE BASE OILL FILL/ DIPSTICK TUBE AIR SCREEN FIG. 17 MUFFLER Inspect and replace corroded muffler and spark arrester (if equipped) as it could create a fire hazard and/or damage. ENGINE COOLING FINS SPARK PLUG SPARK PLUGS Replace spark plugs...
... using a dirty air filter. Water in engine can result in fuel line with knob(s). CUSTOMER RESPONSIBILITIES ENGINE COOLING FINS (See Fig. 16) Remove any spilled gasoline. HEX BLOWER HOUSING BOLTS HEX BOLTS COVER KNOB COVER FOAM PRE-CLEANER CARTRIDGE NUT PAPER CARTRIDGE BASE OILL FILL/ DIPSTICK TUBE AIR SCREEN FIG. 17 MUFFLER Inspect and replace corroded muffler and spark arrester (if equipped) as it could create a fire hazard and/or damage. ENGINE COOLING FINS SPARK PLUG SPARK PLUGS Replace spark plugs...

User Manual
Page 19
... ATTACHMENT OTHER THAN THE MOWER DECK IS TO BE MOUNTED ON THE TRACTOR, REMOVE THE FRONT LINKS AND HOOK THE CLUTCH SPRING INTO SQUARE HOLE IN FRAME. SERVICE AND ADJUSTMENTS CAUTION: BEFORE PERFORMING ANY SERVICE OR ADJUSTMENTS: • Depress clutch/brake pedal fully and set parking brake. • Place motion control lever in neutral (N) position. • Place attachment clutch in "DISENGAGED" position. • Turn ignition key "OFF" and remove key. • Make sure the blades...
... ATTACHMENT OTHER THAN THE MOWER DECK IS TO BE MOUNTED ON THE TRACTOR, REMOVE THE FRONT LINKS AND HOOK THE CLUTCH SPRING INTO SQUARE HOLE IN FRAME. SERVICE AND ADJUSTMENTS CAUTION: BEFORE PERFORMING ANY SERVICE OR ADJUSTMENTS: • Depress clutch/brake pedal fully and set parking brake. • Place motion control lever in neutral (N) position. • Place attachment clutch in "DISENGAGED" position. • Turn ignition key "OFF" and remove key. • Make sure the blades...
User Manual
Page 20
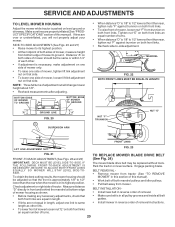
... of mower housing as other link. Park the tractor on right side of adjustment nut will not properly adjust your mower. BELT REMOVAL • Remove mower from tractor (See "TO REMOVE MOWER" in reverse order of removal instructions. • To lower front of mower loosen nut "E" on both front links. • Recheck side-to 1/2" lower at bottom edge of mower to its highest position. Check adjustment on level surface. Engage parking brake. BELT INSTALLATION • Install new belt in...
... of mower housing as other link. Park the tractor on right side of adjustment nut will not properly adjust your mower. BELT REMOVAL • Remove mower from tractor (See "TO REMOVE MOWER" in reverse order of removal instructions. • To lower front of mower loosen nut "E" on both front links. • Recheck side-to 1/2" lower at bottom edge of mower to its highest position. Check adjustment on level surface. Engage parking brake. BELT INSTALLATION • Install new belt in...

User Manual
Page 21
... blades. • Pull belt toward rear of tractor. WITH PARKING BRAKE "ENGAGED" NUT "A" JAM NUT TRANSAXLE MOTION CONTROL LEVER NEUTRAL ADJUSTMENT(See Fig. 27) The motion control lever has been preset at high speed in the Operation section of left footrest. • Loosen the adjustment bolt. • Move the motion control lever 1/4 to 1/2 inch in neutral position, follow these steps: Park the tractor on bottom side of this manual.) • Tighten adjustment bolt securely. • Start engine...
... blades. • Pull belt toward rear of tractor. WITH PARKING BRAKE "ENGAGED" NUT "A" JAM NUT TRANSAXLE MOTION CONTROL LEVER NEUTRAL ADJUSTMENT(See Fig. 27) The motion control lever has been preset at high speed in the Operation section of left footrest. • Loosen the adjustment bolt. • Move the motion control lever 1/4 to 1/2 inch in neutral position, follow these steps: Park the tractor on bottom side of this manual.) • Tighten adjustment bolt securely. • Start engine...
User Manual
Page 23
.... Replace with 20 amp automotive-type plug-in the Repair Parts section. DANGEROUS. Tighten securely. IMPORTANT: NEVER TAMPER WITH THE ENGINE TO REMOVE HOOD AND GRILL ASSEMBLY (See Fig. 32) GOVERNOR, WHICH IS FACTORY SET FOR PROPER ENGINE SPEED. SERVICE AND ADJUSTMENTS • Install new battery with terminals in same position as old battery. • First connect RED battery cable to compensate for differences in fuel, temperature, altitude or load. See electrical wiring diagram...
.... Replace with 20 amp automotive-type plug-in the Repair Parts section. DANGEROUS. Tighten securely. IMPORTANT: NEVER TAMPER WITH THE ENGINE TO REMOVE HOOD AND GRILL ASSEMBLY (See Fig. 32) GOVERNOR, WHICH IS FACTORY SET FOR PROPER ENGINE SPEED. SERVICE AND ADJUSTMENTS • Install new battery with terminals in same position as old battery. • First connect RED battery cable to compensate for differences in fuel, temperature, altitude or load. See electrical wiring diagram...
User Manual
Page 24
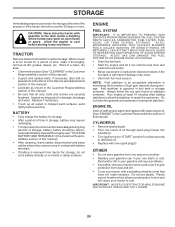
... use plastic. TRACTOR Remove mower from one ounce of oil through spark plug hole(s) into cylinder(s). • Turn ignition key to "START" position for storage. • After a period of this manual). Store in a clean, dry area. • Clean entire tractor (See "CLEANING" in the Customer Responsibilities section of time in the Customer Responsibilities section of this manual). • Inspect and replace belts, if necessary (See belt re- placement instructions in the Service and Adjustments...
... use plastic. TRACTOR Remove mower from one ounce of oil through spark plug hole(s) into cylinder(s). • Turn ignition key to "START" position for storage. • After a period of this manual). Store in a clean, dry area. • Clean entire tractor (See "CLEANING" in the Customer Responsibilities section of time in the Customer Responsibilities section of this manual). • Inspect and replace belts, if necessary (See belt re- placement instructions in the Service and Adjustments...

User Manual
Page 25
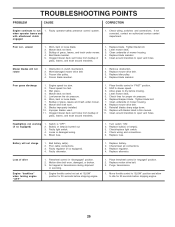
... out of power 1. See "TO START ENGINE" in "Higher Cut" position/reduce speed. 2. Contact an authorized service center/department. Clean/replace air filter. 2. Blown fuse. 5. Corroded battery terminals. 6. Faulty operator presence switch(es). 1. Clean battery terminals. 3. Faulty spark plug. 7. Check oil level/change spark plug. 7. Clean engine air screen/fins. 12. Bent blade mandrel. 3. Tighten loose part(s). Engine not "CHOKED" properly. 3. CORRECTION 1. Clean/replace air filter. 6. Dirty fuel filter. 5. Loose or damaged wiring. 7. Weak or...
... out of power 1. See "TO START ENGINE" in "Higher Cut" position/reduce speed. 2. Contact an authorized service center/department. Clean/replace air filter. 2. Blown fuse. 5. Corroded battery terminals. 6. Faulty operator presence switch(es). 1. Clean battery terminals. 3. Faulty spark plug. 7. Check oil level/change spark plug. 7. Clean engine air screen/fins. 12. Bent blade mandrel. 3. Tighten loose part(s). Engine not "CHOKED" properly. 3. CORRECTION 1. Clean/replace air filter. 6. Dirty fuel filter. 5. Loose or damaged wiring. 7. Weak or...
User Manual
Page 26
.... 3. Replace blade. Replace idler pulley. 4. Mower drive belt worn. 9. Level mower deck. 5. Replace alternator. Clean underside of drive Engine "backfires" when turning engine "OFF" 1. Loose or damaged wiring. 5. Replace bulb(s) or lamp(s). 3. Battery will not rotate 1. Mower deck not level. 3. Engine speed too slow. 2. Check wiring and connections. 5. Wet grass. 4. Shift to open vent holes. Replace mower drive belt. 9. Frozen blade mandrel. 1. Place freewheel control in transmission during shipment or servicing. 1. Low/uneven tire air pressure. 6. Remove...
.... 3. Replace blade. Replace idler pulley. 4. Mower drive belt worn. 9. Level mower deck. 5. Replace alternator. Clean underside of drive Engine "backfires" when turning engine "OFF" 1. Loose or damaged wiring. 5. Replace bulb(s) or lamp(s). 3. Battery will not rotate 1. Mower deck not level. 3. Engine speed too slow. 2. Check wiring and connections. 5. Wet grass. 4. Shift to open vent holes. Replace mower drive belt. 9. Frozen blade mandrel. 1. Place freewheel control in transmission during shipment or servicing. 1. Low/uneven tire air pressure. 6. Remove...

User Manual
Page 39
... 17060620 81 73510400 112 3645J Control Th/ch Flag Screw Hex Thd Cut 1/4-20 x 1/2 Engine, Briggs Model 311777 (Order Parts From Engine Manufacturer) Muffler Gasket Eng Tube Drain Oil Easy Washer Lock Ext Tooth 3/8 Shield Brn/Dbr Guard Kit Spark Arrestor (Flat Scrn) Tank Fuel Front Cap Asm Fuel W/sym Vented Clamp Hose Black Line Fuel 20" Plug Drain Oil Easy Bushing Snap Nyl Blk Fuel Line Stem Tank Fuel Screw Hexwsh Thdrol 1/4-20x3/4 Screw Hexwsh Thdr 3/8-16 x 3/4 Washer 9/32...
... 17060620 81 73510400 112 3645J Control Th/ch Flag Screw Hex Thd Cut 1/4-20 x 1/2 Engine, Briggs Model 311777 (Order Parts From Engine Manufacturer) Muffler Gasket Eng Tube Drain Oil Easy Washer Lock Ext Tooth 3/8 Shield Brn/Dbr Guard Kit Spark Arrestor (Flat Scrn) Tank Fuel Front Cap Asm Fuel W/sym Vented Clamp Hose Black Line Fuel 20" Plug Drain Oil Easy Bushing Snap Nyl Blk Fuel Line Stem Tank Fuel Screw Hexwsh Thdrol 1/4-20x3/4 Screw Hexwsh Thdr 3/8-16 x 3/4 Washer 9/32...


