
User Manual
Page 2
...; Keep nuts and bolts, especially blade attachment bolts, tight and keep equipment in speed or direction. • Avoid starting or stopping on the machine before and while backing. • Beawareofthemowerdischargedirectionanddonotpoint it . GENERAL OPERATION • Read,understand,andfollowallinstructionsinthemanual and on a slope. DO NOT: • Do not turn machine off and be thrown. IV. Never remove gas cap or add fuel with the engine running . • Grass catcher components...
...; Keep nuts and bolts, especially blade attachment bolts, tight and keep equipment in speed or direction. • Avoid starting or stopping on the machine before and while backing. • Beawareofthemowerdischargedirectionanddonotpoint it . GENERAL OPERATION • Read,understand,andfollowallinstructionsinthemanual and on a slope. DO NOT: • Do not turn machine off and be thrown. IV. Never remove gas cap or add fuel with the engine running . • Grass catcher components...

User Manual
Page 4
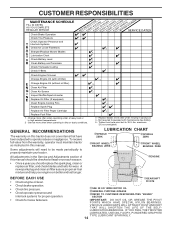
... this owner's manual. In the state of California the above 32°F) SAE 5W-30 (below 32°F) OIL CAPACITY: W/ FILTER: 4.0 PINTS W/O FILTER: 3.75 PINTS SPARK PLUG: (GAP: .040") CHAMPION RC12YC GROUND SPEED (MPH): FORWARD: 1st 1.2 2nd 1.5 3rd 2.4 4th 3.5 5th 4.8 6th 5.3 REVERSE: 1.5 TIRE PRESSURE: FRONT: REAR: 14 PSI 10 PSI CHARGING 16 Amps @ 3600 RPM BATTERY: AMP/HR: 35 MIN. PRODUCT SPECIFICATIONS GASOLINE CAPACITY AND TYPE...
... this owner's manual. In the state of California the above 32°F) SAE 5W-30 (below 32°F) OIL CAPACITY: W/ FILTER: 4.0 PINTS W/O FILTER: 3.75 PINTS SPARK PLUG: (GAP: .040") CHAMPION RC12YC GROUND SPEED (MPH): FORWARD: 1st 1.2 2nd 1.5 3rd 2.4 4th 3.5 5th 4.8 6th 5.3 REVERSE: 1.5 TIRE PRESSURE: FRONT: REAR: 14 PSI 10 PSI CHARGING 16 Amps @ 3600 RPM BATTERY: AMP/HR: 35 MIN. PRODUCT SPECIFICATIONS GASOLINE CAPACITY AND TYPE...

User Manual
Page 7
.... • Lower seat into full "BRAKE" position and hold. After engine has started, move throttle control to idle position. • Depress clutch/brake pedal into operating position and sit on seat in operating position, depress clutch/brake pedal and set parking brake and place gearshift lever in neutral position. • Turn ignition key to press clutch/brake pedal all instructions in front of tractor. • Pivot seat and pan forward and assemble adjustment knob and flat washer loosely. Follow...
.... • Lower seat into full "BRAKE" position and hold. After engine has started, move throttle control to idle position. • Depress clutch/brake pedal into operating position and sit on seat in operating position, depress clutch/brake pedal and set parking brake and place gearshift lever in neutral position. • Turn ignition key to press clutch/brake pedal all instructions in front of tractor. • Pivot seat and pan forward and assemble adjustment knob and flat washer loosely. Follow...
User Manual
Page 8
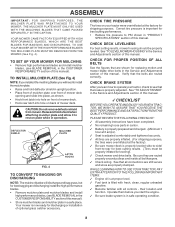
... shield in operation. Your mower is important for best cutting performance. • Reduce tire pressure to -rear for discharging or installation of mower deck. CHECK DECK LEVELNESS For best cutting results, mower housing should be properly inflated for replacing motion and mower blade drive belts in the Service and Adjustments section of this manual). Be sure they are shown for leveling). ✓ Check mower and drive belts. Operate them before you start the engine. ✓ Be sure brake system is...
... shield in operation. Your mower is important for best cutting performance. • Reduce tire pressure to -rear for discharging or installation of mower deck. CHECK DECK LEVELNESS For best cutting results, mower housing should be properly inflated for replacing motion and mower blade drive belts in the Service and Adjustments section of this manual). Be sure they are shown for leveling). ✓ Check mower and drive belts. Operate them before you start the engine. ✓ Be sure brake system is...

User Manual
Page 10
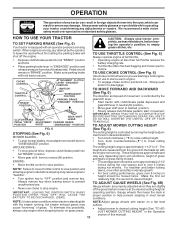
... charging (+) or discharging (-) of tractor. 10 GEARSHIFT LEVER: Selects the speed and direction of battery. Save this manual for starting and controlling engine speed. PARKING BRAKE LEVER: Locks Clutch/Brake Pedal into the brake position. THROTTLE CONTROL: Used for starting and stopping the engine. ATTACHMENT LIFT LEVER: Used to raise and lower the mower deck or other attachments mounted to your tractor. HEIGHT ADJUSTMENT KNOB: Used to adjust the mower cutting height ATTACHMENT CLUTCH LEVER: Used to engage the mower blades, or other attachments mounted to the safety...
... charging (+) or discharging (-) of tractor. 10 GEARSHIFT LEVER: Selects the speed and direction of battery. Save this manual for starting and controlling engine speed. PARKING BRAKE LEVER: Locks Clutch/Brake Pedal into the brake position. THROTTLE CONTROL: Used for starting and stopping the engine. ATTACHMENT LIFT LEVER: Used to raise and lower the mower deck or other attachments mounted to your tractor. HEIGHT ADJUSTMENT KNOB: Used to adjust the mower cutting height ATTACHMENT CLUTCH LEVER: Used to engage the mower blades, or other attachments mounted to the safety...
User Manual
Page 11
... ADJUST MOWER CUTTING HEIGHT" in the Operation section of this possibility, always stop engine when stopping tractor on grass areas. operating position. NOTE:Adjust gauge wheels with clutch/brake pedal depressed and gearshift lever in neutral (N) position. • Move gear shift lever to desired position. • Slowly release clutch/brake pedal to start a warm engine. • To engage choke control, pull knob out. Always wear safety glasses or eye shields while operating your tractor or performing any adjustments or repairs. TO USE CHOKE CONTROL...
... ADJUST MOWER CUTTING HEIGHT" in the Operation section of this possibility, always stop engine when stopping tractor on grass areas. operating position. NOTE:Adjust gauge wheels with clutch/brake pedal depressed and gearshift lever in neutral (N) position. • Move gear shift lever to desired position. • Slowly release clutch/brake pedal to start a warm engine. • To engage choke control, pull knob out. Always wear safety glasses or eye shields while operating your tractor or performing any adjustments or repairs. TO USE CHOKE CONTROL...

User Manual
Page 12
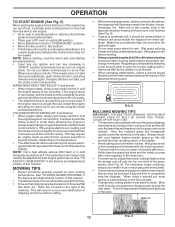
... entire grass catcher, on level ground. ATTACHMENT CLUTCH LEVER "DISENGAGED" POSITION FIG. 7 TO OPERATE ON HILLS LOW POSITION DEFLECTOR SHIELD Do not mix oil with gasoline. If necessary, add oil until the fuel lines and carburetor are recommended by the operator to leave the seat with the engine running and the attachment clutch engaged will increase carbon and lead oxide deposits and reduce valve life). OPERATION • With mower in this manual). • To change oil...
... entire grass catcher, on level ground. ATTACHMENT CLUTCH LEVER "DISENGAGED" POSITION FIG. 7 TO OPERATE ON HILLS LOW POSITION DEFLECTOR SHIELD Do not mix oil with gasoline. If necessary, add oil until the fuel lines and carburetor are recommended by the operator to leave the seat with the engine running and the attachment clutch engaged will increase carbon and lead oxide deposits and reduce valve life). OPERATION • With mower in this manual). • To change oil...
User Manual
Page 13
..., pull the choke control out slightly for a cold engine start after several minutes, depending on seat in operating position, depress clutch/brake pedal and set parking brake. • Place gear shift lever in neutral (N) position. • Move attachment clutch to "DISENGAGED" position. • Move throttle control to fast position • Pull choke control out for a few seconds and then continue to push the control in a more even distribution of the grass blades (See Fig. 9). See "TO LEVEL MOWER HOUSING...
..., pull the choke control out slightly for a cold engine start after several minutes, depending on seat in operating position, depress clutch/brake pedal and set parking brake. • Place gear shift lever in neutral (N) position. • Move attachment clutch to "DISENGAGED" position. • Move throttle control to fast position • Pull choke control out for a few seconds and then continue to push the control in a more even distribution of the grass blades (See Fig. 9). See "TO LEVEL MOWER HOUSING...
User Manual
Page 14
... FILL IN DATES AS YOU COMPLETE REGULAR SERVICE Check Brake Operation Check Tire Pressure Check Operator Presence and T Interlock Systems R Check for Loose Fasteners A Sharpen/Replace Mower Blades C T Lubrication Chart 0 Check Battery Level R Clean Battery and Terminals Check Transaxle Cooling BEFOREEEVAECRHYU8ESVHEEORUYRS2E5VHEROYUR5E0SVEHROYUR1E0SV0EHROYUBSREESFAOSROEN STORAGE SERVICE DATES 5 3 4 Check V-Belts Check Engine Oil Level Change Engine Oil (with maintenance-free battery. 5 - Replace blades more often when mowing in high ambient temperatures. 2 - maximum.
... FILL IN DATES AS YOU COMPLETE REGULAR SERVICE Check Brake Operation Check Tire Pressure Check Operator Presence and T Interlock Systems R Check for Loose Fasteners A Sharpen/Replace Mower Blades C T Lubrication Chart 0 Check Battery Level R Clean Battery and Terminals Check Transaxle Cooling BEFOREEEVAECRHYU8ESVHEEORUYRS2E5VHEROYUR5E0SVEHROYUR1E0SV0EHROYUBSREESFAOSROEN STORAGE SERVICE DATES 5 3 4 Check V-Belts Check Engine Oil Level Change Engine Oil (with maintenance-free battery. 5 - Replace blades more often when mowing in high ambient temperatures. 2 - maximum.
User Manual
Page 15
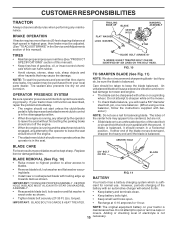
..., repair the problem immediately. • The engine should not start unless the clutch/brake pedal is fully depressed and attachement clutch control is in the disengaged position. • When the engine is running and the attachment clutch is balanced, it should be kept sharp. BLADE BOLT (GRADE 8)* *A GRADE 8 HEAT TREATED BOLT CAN BE IDENTIFIED BY SIX LINES ON THE BOLT HEAD. If blade is engaged, any maintenance. FIG. 11 BATTERY Your tractor has a battery charging...
..., repair the problem immediately. • The engine should not start unless the clutch/brake pedal is fully depressed and attachement clutch control is in the disengaged position. • When the engine is running and the attachment clutch is balanced, it should be kept sharp. BLADE BOLT (GRADE 8)* *A GRADE 8 HEAT TREATED BOLT CAN BE IDENTIFIED BY SIX LINES ON THE BOLT HEAD. If blade is engaged, any maintenance. FIG. 11 BATTERY Your tractor has a battery charging...

User Manual
Page 16
... with grease or petroleum jelly. • Reinstall battery (See "REPLACING BATTERY" in increased oil consumption when used for deterioration and wear after each time you check the oil level. Clean with API service classification SF-SJ. Be sure dipstick cap is in a suitable container. • Remove oil fill cap/dipstick. Check your expected operating temperature. OIL DRAIN VALVE CLOSED AND LOCKED POSITION ENGINE LUBRICATION Only use high quality detergent oil rated with a wire brush or compressed air to prevent engine damage...
... with grease or petroleum jelly. • Reinstall battery (See "REPLACING BATTERY" in increased oil consumption when used for deterioration and wear after each time you check the oil level. Clean with API service classification SF-SJ. Be sure dipstick cap is in a suitable container. • Remove oil fill cap/dipstick. Check your expected operating temperature. OIL DRAIN VALVE CLOSED AND LOCKED POSITION ENGINE LUBRICATION Only use high quality detergent oil rated with a wire brush or compressed air to prevent engine damage...
User Manual
Page 17
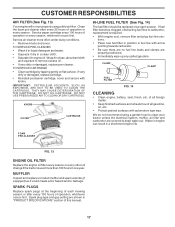
... every 100 hours of operation or every season, whichever occurs first. If very dirty or damaged, replace cartridge. • Reinstall precleaner cartridge, cover and secure with knobs. FOAM PRE-CLEANER FIG. 13 ENGINE OIL FILTER Replace the engine oil filter every season or every other oil change if the tractor is required. • With engine cool, remove filter and plug fuel line sections. • Place new fuel filter in position in fuel line with automotive type wax.
... every 100 hours of operation or every season, whichever occurs first. If very dirty or damaged, replace cartridge. • Reinstall precleaner cartridge, cover and secure with knobs. FOAM PRE-CLEANER FIG. 13 ENGINE OIL FILTER Replace the engine oil filter every season or every other oil change if the tractor is required. • With engine cool, remove filter and plug fuel line sections. • Place new fuel filter in position in fuel line with automotive type wax.

User Manual
Page 18
... highest position. • Slide mower under tractor. moving parts have completely stopped. • Disconnect spark plug wire from spark plug and place wire where it cannot come in contact with large retainer spring. • Install belt onto engine pulley. SERVICE AND ADJUSTMENTS WARNING: TO AVOID SERIOUS INJURY, BEFORE PERFORMING ANY SERVICE OR ADJUSTMENTS: • Depress clutch/brake pedal fully and set parking brake. • Place gearshift lever in neutral (N) position. • Place attachment clutch in "DISENGAGED" position. • Turn ignition...
... highest position. • Slide mower under tractor. moving parts have completely stopped. • Disconnect spark plug wire from spark plug and place wire where it cannot come in contact with large retainer spring. • Install belt onto engine pulley. SERVICE AND ADJUSTMENTS WARNING: TO AVOID SERIOUS INJURY, BEFORE PERFORMING ANY SERVICE OR ADJUSTMENTS: • Depress clutch/brake pedal fully and set parking brake. • Place gearshift lever in neutral (N) position. • Place attachment clutch in "DISENGAGED" position. • Turn ignition...
User Manual
Page 20
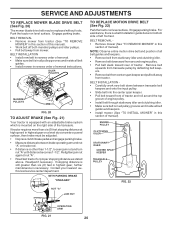
... be replaced without tools. BELT INSTALLATION • Install new belt in reverse order of removal. • Make sure belt is a belt installation guide decal on level surface. If tractor requires more than 1-1/2", loosen jam nut and turn nut "A" until distance becomes 1-1/2". SERVICE AND ADJUSTMENTS TO REPLACE MOWER BLADE DRIVE BELT (See Fig. 20) The mower blade drive belt may be adjusted. • Depress clutch/brake pedal and engage parking brake. • Measure distance between transaxle belt keepers and onto the input pulley. • Slide belt...
... be replaced without tools. BELT INSTALLATION • Install new belt in reverse order of removal. • Make sure belt is a belt installation guide decal on level surface. If tractor requires more than 1-1/2", loosen jam nut and turn nut "A" until distance becomes 1-1/2". SERVICE AND ADJUSTMENTS TO REPLACE MOWER BLADE DRIVE BELT (See Fig. 20) The mower blade drive belt may be adjusted. • Depress clutch/brake pedal and engage parking brake. • Measure distance between transaxle belt keepers and onto the input pulley. • Slide belt...
User Manual
Page 23
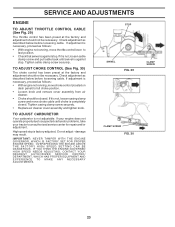
... operate properly due to suspected carburetor problems, take your tractor to fast position. • Check that swivel is against stop . OVERSPEEDING THE ENGINE ABOVE THE FACTORY HIGH SPEED SETTING CAN BE DANGEROUS. Check adjustment as described below before loosening cable. Check adjustment as described below before loosening cable. High speed stop is necessary, proceed as follows: • With engine not running , move choke control (located on dash panel) to full choke position. • Loosen knob and remove cover assembly...
... operate properly due to suspected carburetor problems, take your tractor to fast position. • Check that swivel is against stop . OVERSPEEDING THE ENGINE ABOVE THE FACTORY HIGH SPEED SETTING CAN BE DANGEROUS. Check adjustment as described below before loosening cable. Check adjustment as described below before loosening cable. High speed stop is necessary, proceed as follows: • With engine not running , move choke control (located on dash panel) to full choke position. • Loosen knob and remove cover assembly...
User Manual
Page 24
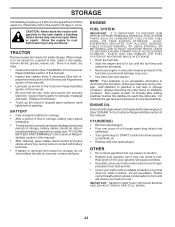
...; Turn ignition key to "START" position for a period of time, clean it run until the fuel lines and carburetor are securely fastened. Replace if necessary. • Touch up all nuts, bolts and screws are empty. • Never use plastic. Always follow the mix ratio found on concrete or damp surfaces. TRACTOR Remove mower from dust and dirt. • Cover your tractor with a suitable protective cover that all rusted or chipped paint surfaces; ENGINE FUEL SYSTEM...
...; Turn ignition key to "START" position for a period of time, clean it run until the fuel lines and carburetor are securely fastened. Replace if necessary. • Touch up all nuts, bolts and screws are empty. • Never use plastic. Always follow the mix ratio found on concrete or damp surfaces. TRACTOR Remove mower from dust and dirt. • Cover your tractor with a suitable protective cover that all rusted or chipped paint surfaces; ENGINE FUEL SYSTEM...

User Manual
Page 25
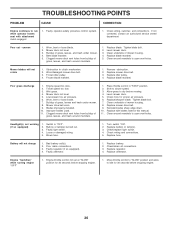
...and replace fuel filter. 8. Engine will not start . 4. Loose or damaged wiring. 7. Depress clutch/brake pedal. 2. Check all wiring. 7. Engine clicks but will not turn over 1. Corroded battery terminals. 3. Recharge or replace battery. 2. Check/replace solenoid or starter. Loss of mower housing. 4. Dirty air filter. 5. Loose or damaged wiring. 14. Set in Service Adjustments section. 15. Clean underside of power 1. Check oil level/change spark plug. 7. Drain fuel tank and refill with fresh gasoline and replace fuel filter. 10. Drain fuel tank and carburetor, refill tank...
...and replace fuel filter. 8. Engine will not start . 4. Loose or damaged wiring. 7. Depress clutch/brake pedal. 2. Check all wiring. 7. Engine clicks but will not turn over 1. Corroded battery terminals. 3. Recharge or replace battery. 2. Check/replace solenoid or starter. Loss of mower housing. 4. Dirty air filter. 5. Loose or damaged wiring. 14. Set in Service Adjustments section. 15. Clean underside of power 1. Check oil level/change spark plug. 7. Drain fuel tank and refill with fresh gasoline and replace fuel filter. 10. Drain fuel tank and carburetor, refill tank...
User Manual
Page 26
.... 4. Blades improperly installed. 10. Check tires for 30 seconds before stopping engine. 26 Bad battery cell(s). 2. Engine "backfires" when turning engine "OFF" 1. Clean around mandrels. 1. Frozen idler pulley. 4. Engine speed too slow. 2. Place throttle control in this manual. 11. Replace mower drive belt. 9. Loose or damaged wiring. 5. Turn switch "ON". 2. Check wiring and connections. 5. Poor cable connections. 3. Mower deck not level. 3. Clean underside of grass, leaves and trash under mower. 4. Replace mower drive belt. 3. Wet grass. 4. Bulb...
.... 4. Blades improperly installed. 10. Check tires for 30 seconds before stopping engine. 26 Bad battery cell(s). 2. Engine "backfires" when turning engine "OFF" 1. Clean around mandrels. 1. Frozen idler pulley. 4. Engine speed too slow. 2. Place throttle control in this manual. 11. Replace mower drive belt. 9. Loose or damaged wiring. 5. Turn switch "ON". 2. Check wiring and connections. 5. Poor cable connections. 3. Mower deck not level. 3. Clean underside of grass, leaves and trash under mower. 4. Replace mower drive belt. 3. Wet grass. 4. Bulb...

User Manual
Page 39
... 112 3645J DESCRIPTION Control Th/ch Flag Screw Hex Thd Cut 1/4-20x1/2 Engine, Briggs Model 445777 (Order Parts From Engine Manufacturer) Muffler Exhaust Exhaust Tube LH Exhaust Tube RH Bolt 5/16-18 UNC x 3/4 Shield Browning Gasket Muffler Tube Drain Oil Easy Washer Lock Ext Tooth 3/8 Screw 3/8-16 x 1-1/2 Shield Brn/Dbr Guard Control Choke Nut Keps 3/8-24 Unf Arrestor Spark Tank Fuel Front 2 00 Cap Fuel Clamp Hose Black Line Fuel 20" Plug Oil Drain Easy Stem Tank Fuel Screw Hex wsh Thdrol...
... 112 3645J DESCRIPTION Control Th/ch Flag Screw Hex Thd Cut 1/4-20x1/2 Engine, Briggs Model 445777 (Order Parts From Engine Manufacturer) Muffler Exhaust Exhaust Tube LH Exhaust Tube RH Bolt 5/16-18 UNC x 3/4 Shield Browning Gasket Muffler Tube Drain Oil Easy Washer Lock Ext Tooth 3/8 Screw 3/8-16 x 1-1/2 Shield Brn/Dbr Guard Control Choke Nut Keps 3/8-24 Unf Arrestor Spark Tank Fuel Front 2 00 Cap Fuel Clamp Hose Black Line Fuel 20" Plug Oil Drain Easy Stem Tank Fuel Screw Hex wsh Thdrol...

User Manual
Page 41
... 3/8" Type B 154 169675 Spring Retainer 155 169671 Spring Retention LVR CLTCH CAB 156 169672 Spacer Clutch Cable 157 169669 Rod Clutch Cable 3/8" 158 17720408 Screw Hex Thd Cut 1/4-20 x 1/2 159 72140614 Bolt Rdhd Sqn 3/8-16 UNC x 1-3/4 182 179126 Rod Roller Nose 183 163552 Retainer Spring - - 130794 Mandrel Assembly (Includes Housing, Shaft and Shaft Hardware Only-Pulley Not Included) - - 172559 Replacement Mower, Complete NOTE: All component dimensions given in U.S. MODEL NUMBER PR17542STC...
... 3/8" Type B 154 169675 Spring Retainer 155 169671 Spring Retention LVR CLTCH CAB 156 169672 Spacer Clutch Cable 157 169669 Rod Clutch Cable 3/8" 158 17720408 Screw Hex Thd Cut 1/4-20 x 1/2 159 72140614 Bolt Rdhd Sqn 3/8-16 UNC x 1-3/4 182 179126 Rod Roller Nose 183 163552 Retainer Spring - - 130794 Mandrel Assembly (Includes Housing, Shaft and Shaft Hardware Only-Pulley Not Included) - - 172559 Replacement Mower, Complete NOTE: All component dimensions given in U.S. MODEL NUMBER PR17542STC...


