
User Manual
Page 2
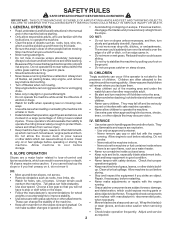
...Mow up to plow leaves or other fuels. Do not make adjustments or repairs with safe machine operation. • Never allow the mower deck to occur. Never refuel the machine indoors. - Frequently check components and replace with safety devices. They may obscure vision. ...steep slopes. SERVICE • Use extra care in good condition. • Never tamper with manufacturer's recommended parts, when necessary. • Mower blades are a major factor related to operate the machine. • Use extra care when approaching blind corners, shrubs, trees, or other ...
...Mow up to plow leaves or other fuels. Do not make adjustments or repairs with safe machine operation. • Never allow the mower deck to occur. Never refuel the machine indoors. - Frequently check components and replace with safety devices. They may obscure vision. ...steep slopes. SERVICE • Use extra care in good condition. • Never tamper with manufacturer's recommended parts, when necessary. • Mower blades are a major factor related to operate the machine. • Use extra care when approaching blind corners, shrubs, trees, or other ...
User Manual
Page 3
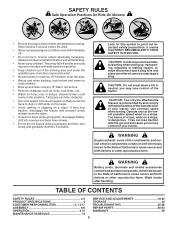
... for holes, ruts, or bumps. They may lose control of California to cause cancer and birth defects or other reproductive harm. Look for Ride-On Mowers • Be sure the area is dangerous. Too heavy of other people before and while backing. • Never carry children. YOUR SAFETY IS INVOLVED. CAUTION...
... for holes, ruts, or bumps. They may lose control of California to cause cancer and birth defects or other reproductive harm. Look for Ride-On Mowers • Be sure the area is dangerous. Too heavy of other people before and while backing. • Never carry children. YOUR SAFETY IS INVOLVED. CAUTION...

User Manual
Page 8
...USE YOUR TRACTOR, PAY EXTRA ATTENTION TO THE FOLLOWING IMPORTANT ITEMS: ✓ Engine oil is at the factory). ✓ Be sure mower deck is properly adjusted. PLEASE REVIEW THE FOLLOWING CHECKLIST: ✓ All assembly instructions have been completed. ✓ No remaining loose ...properly inflated. (For shipping purposes, the tires were overinflated at proper level. ✓ Fuel tank is important for leveling). ✓ Check mower and drive belts. Correct tire pressure is filled with fresh, clean, regular unleaded gasoline. ✓ Become familiar with all belt keepers. &#...
...USE YOUR TRACTOR, PAY EXTRA ATTENTION TO THE FOLLOWING IMPORTANT ITEMS: ✓ Engine oil is at the factory). ✓ Be sure mower deck is properly adjusted. PLEASE REVIEW THE FOLLOWING CHECKLIST: ✓ All assembly instructions have been completed. ✓ No remaining loose ...properly inflated. (For shipping purposes, the tires were overinflated at proper level. ✓ Fuel tank is important for leveling). ✓ Check mower and drive belts. Correct tire pressure is filled with fresh, clean, regular unleaded gasoline. ✓ Become familiar with all belt keepers. &#...

User Manual
Page 9
BATTERY CAUTION OR WARNING REVERSE FORWARD FAST SLOW ENGINE ON ENGINE OFF OIL PRESSURE CLUTCH LIGHTS ON OVER TEMP LIGHT FUEL CHOKE MOWER HEIGHT DIFFERENTIAL PARKING BRAKE LOCK LOCKED UNLOCKED MOWER LIFT REVERSE NEUTRAL HIGH LOW P PARKING BRAKE 15 15 15 ATTACHMENT ATTACHMENT CLUTCH ENGAGED CLUTCH DISENGAGED KEEP AREA CLEAR SLOPE HAZARDS (SEE...
BATTERY CAUTION OR WARNING REVERSE FORWARD FAST SLOW ENGINE ON ENGINE OFF OIL PRESSURE CLUTCH LIGHTS ON OVER TEMP LIGHT FUEL CHOKE MOWER HEIGHT DIFFERENTIAL PARKING BRAKE LOCK LOCKED UNLOCKED MOWER LIFT REVERSE NEUTRAL HIGH LOW P PARKING BRAKE 15 15 15 ATTACHMENT ATTACHMENT CLUTCH ENGAGED CLUTCH DISENGAGED KEEP AREA CLEAR SLOPE HAZARDS (SEE...

User Manual
Page 10
... the engine. AMMETER: Indicates charging (+) or discharging (-) of tractor. 10 ATTACHMENT LIFT LEVER: Used to raise and lower the mower deck or other attachments mounted to the safety standards of various controls and adjustments. CLUTCH/BRAKE PEDAL: Used for starting and controlling ...engine. GEARSHIFT LEVER: Selects the speed and direction of battery. HEIGHT ADJUSTMENT KNOB: Used to adjust the mower cutting height ATTACHMENT CLUTCH LEVER: Used to engage the mower blades, or other attachments mounted to release attachment lift lever when changing its position.
... the engine. AMMETER: Indicates charging (+) or discharging (-) of tractor. 10 ATTACHMENT LIFT LEVER: Used to raise and lower the mower deck or other attachments mounted to the safety standards of various controls and adjustments. CLUTCH/BRAKE PEDAL: Used for starting and controlling ...engine. GEARSHIFT LEVER: Selects the speed and direction of battery. HEIGHT ADJUSTMENT KNOB: Used to adjust the mower cutting height ATTACHMENT CLUTCH LEVER: Used to engage the mower blades, or other attachments mounted to release attachment lift lever when changing its position.

User Manual
Page 11
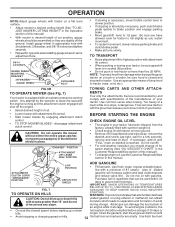
... relatively high; CLUTCH/BRAKE PEDAL "DRIVE" POSITION HEIGHT GEAR SHIFT LEVER ADJUSTMENT KNOB PARKING BRAKE "DISENGAGED" POSITION FIG. 6 STOPPING (See Fig. 6) MOWER BLADES - • To stop tractor completely, as described above, before stopping may cause "browning" of grass being mowed. FAILURE TO DO SO WILL... USE YOUR TRACTOR TO SET PARKING BRAKE (See Fig. 6) Your tractor is equipped with an operator presence sensing CAUTION: Always stop mower blades,move throttle control to slow position and and types of grass. Do not use choke to stop engine when stopping tractor on ...
... relatively high; CLUTCH/BRAKE PEDAL "DRIVE" POSITION HEIGHT GEAR SHIFT LEVER ADJUSTMENT KNOB PARKING BRAKE "DISENGAGED" POSITION FIG. 6 STOPPING (See Fig. 6) MOWER BLADES - • To stop tractor completely, as described above, before stopping may cause "browning" of grass being mowed. FAILURE TO DO SO WILL... USE YOUR TRACTOR TO SET PARKING BRAKE (See Fig. 6) Your tractor is equipped with an operator presence sensing CAUTION: Always stop mower blades,move throttle control to slow position and and types of grass. Do not use choke to stop engine when stopping tractor on ...
User Manual
Page 12
...brake position and engage parking brake. • Move gearshift lever to tractor (rope, cord, etc.). CAUTION: Do not operate the mower without either the entire grass catcher, on mowers so equipped, or the deflector shield in storage. Drain the gas tank, start the engine and let it run until "FULL"... wipe clean, reinsert the dipstick and screw cap tight, wait for a few seconds, remove and read oil level. FIG. 6B TO OPERATE MOWER (See Fig. 7) Your tractor is reached. WARNING: Experience indicates that are recommended by engaging attachment clutch control. • TO STOP...
...brake position and engage parking brake. • Move gearshift lever to tractor (rope, cord, etc.). CAUTION: Do not operate the mower without either the entire grass catcher, on mowers so equipped, or the deflector shield in storage. Drain the gas tank, start the engine and let it run until "FULL"... wipe clean, reinsert the dipstick and screw cap tight, wait for a few seconds, remove and read oil level. FIG. 6B TO OPERATE MOWER (See Fig. 7) Your tractor is reached. WARNING: Experience indicates that are recommended by engaging attachment clutch control. • TO STOP...
User Manual
Page 13
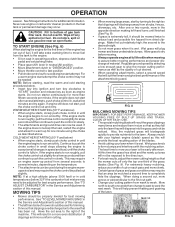
...grass several seconds to provide nutrients for a few minutes and try again. See Storage Instructions for one -third of material. See "TO LEVEL MOWER HOUSING" in slowly. • The attachments and ground drive can be used . Have the cut relatively high; Never use gasoline near an ...times and reduce them in size so that has been cut , mow temperatures (below ) MULCHING MOWING TIPS IMPORTANT: FOR BEST PERFORMANCE, KEEP MOWER HOUSING FREE OF BUILT-UP GRASS AND TRASH. NOTE: Before starting, read the warm and cold starting the engine for best mowing performance....
...grass several seconds to provide nutrients for a few minutes and try again. See Storage Instructions for one -third of material. See "TO LEVEL MOWER HOUSING" in slowly. • The attachments and ground drive can be used . Have the cut relatively high; Never use gasoline near an ...times and reduce them in size so that has been cut , mow temperatures (below ) MULCHING MOWING TIPS IMPORTANT: FOR BEST PERFORMANCE, KEEP MOWER HOUSING FREE OF BUILT-UP GRASS AND TRASH. NOTE: Before starting, read the warm and cold starting the engine for best mowing performance....
User Manual
Page 14
.... • Check brake operation. • Check tire pressure. • Check operator presence and interlock systems for proper operation. • Check for Loose Fasteners A Sharpen/Replace Mower Blades C T Lubrication Chart 0 Check Battery Level R Clean Battery and Terminals Check Transaxle Cooling BEFOREEEVAECRHYU8ESVHEEORUYRS2E5VHEROYUR5E0SVEHROYUR1E0SV0EHROYUBSREESFAOSROEN STORAGE SERVICE DATES 5 3 4 Check V-Belts Check Engine Oil Level Change Engine...
.... • Check brake operation. • Check tire pressure. • Check operator presence and interlock systems for proper operation. • Check for Loose Fasteners A Sharpen/Replace Mower Blades C T Lubrication Chart 0 Check Battery Level R Clean Battery and Terminals Check Transaxle Cooling BEFOREEEVAECRHYU8ESVHEEORUYRS2E5VHEROYUR5E0SVEHROYUR1E0SV0EHROYUBSREESFAOSROEN STORAGE SERVICE DATES 5 3 4 Check V-Belts Check Engine Oil Level Change Engine...

User Manual
Page 15
...blades. • Remove hex bolt, lock washer and flat washer securing blade. • Install new or resharpened blade with a file or on the mower. • To check blade balance, you do not recommend sharpening blade - Replace bent or damaged blades. 5/8" BOLT OR PIN BLADE BLADE REMOVAL ... six (6) feet stopping distance at 6-10 amperes for balancing blade. Lbs. but are working properly. CENTER HOLE BLADE CARE For best results mower blades must be adjusted. (See "TO ADJUST BRAKE" in the disengaged position. • When the engine is running and the attachment clutch...
...blades. • Remove hex bolt, lock washer and flat washer securing blade. • Install new or resharpened blade with a file or on the mower. • To check blade balance, you do not recommend sharpening blade - Replace bent or damaged blades. 5/8" BOLT OR PIN BLADE BLADE REMOVAL ... six (6) feet stopping distance at 6-10 amperes for balancing blade. Lbs. but are working properly. CENTER HOLE BLADE CARE For best results mower blades must be adjusted. (See "TO ADJUST BRAKE" in the disengaged position. • When the engine is running and the attachment clutch...

User Manual
Page 18
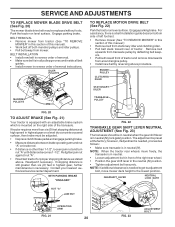
...• Raise lift lever to right side of bracket. • Disconnect anti-swaybar from under tractor with plug. TRACTOR TO REMOVE MOWER (SEE FIG. 15) Mower will be easier to remove from the right side of tractor. • Place attachment clutch in contact with deflector shield to raise ... spark plug wire from spark plug and place wire where it cannot come in "DISENGAGED" position. • Move attachment lift lever forward to lower mower to its lowest position. • Roll belt off engine pulley. • Remove small retainer spring, and lift clutch spring off pulley bolt. &#...
...• Raise lift lever to right side of bracket. • Disconnect anti-swaybar from under tractor with plug. TRACTOR TO REMOVE MOWER (SEE FIG. 15) Mower will be easier to remove from the right side of tractor. • Place attachment clutch in contact with deflector shield to raise ... spark plug wire from spark plug and place wire where it cannot come in "DISENGAGED" position. • Move attachment lift lever forward to lower mower to its lowest position. • Roll belt off engine pulley. • Remove small retainer spring, and lift clutch spring off pulley bolt. &#...

User Manual
Page 19
...adjust one link to same length as shown. • Before making any necessary adjustments, check that side. • To lower one side of mower, loosen lift link adjustment nut on both front links. • Recheck side-to 1/2" lower at front than rear, tighten nut "F" against trunnion ... both front links an equal number of turns. • When distance "D" is 1/8" to -side adjustment. SERVICE AND ADJUSTMENTS TO LEVEL MOWER HOUSING Adjust the mower while tractor is parked on both front links. Measure distance "D" directly in front and behind the mandrel at front than rear, tighten nuts...
...adjust one link to same length as shown. • Before making any necessary adjustments, check that side. • To lower one side of mower, loosen lift link adjustment nut on both front links. • Recheck side-to 1/2" lower at front than rear, tighten nut "F" against trunnion ... both front links an equal number of turns. • When distance "D" is 1/8" to -side adjustment. SERVICE AND ADJUSTMENTS TO LEVEL MOWER HOUSING Adjust the mower while tractor is parked on both front links. Measure distance "D" directly in front and behind the mandrel at front than rear, tighten nuts...
User Manual
Page 20
... manual.) • Remove belt from stationary idler and clutching idler. • Pull belt slack toward front of tractor and remove downwards from mower. BELT INSTALLATION • Install new belt in reverse order of removal. • Make sure belt is needed , proceed as stated above ... nearest authorized service center/department. NOTE: If additional clearance is in all pulley grooves and inside all belt guides. • Install mower in reverse order of removal instructions. GEARSHIFT LEVER NEUTRAL LOCK GATE OPERATING ARM FIG. 21 20 FIG. 23 ADJUSTMENT BOLT SERVICE AND ADJUSTMENTS...
... manual.) • Remove belt from stationary idler and clutching idler. • Pull belt slack toward front of tractor and remove downwards from mower. BELT INSTALLATION • Install new belt in reverse order of removal. • Make sure belt is needed , proceed as stated above ... nearest authorized service center/department. NOTE: If additional clearance is in all pulley grooves and inside all belt guides. • Install mower in reverse order of removal instructions. GEARSHIFT LEVER NEUTRAL LOCK GATE OPERATING ARM FIG. 21 20 FIG. 23 ADJUSTMENT BOLT SERVICE AND ADJUSTMENTS...

User Manual
Page 24
When mower is to be stored for winter storage. placement instructions in the Service and Adjustments section of this manual). • Lubricate as shown in the Customer ...; Replace with clean engine oil. (See "ENGINE" in the Customer Responsibilities section of this manual. • Be sure that does not retain moisture. TRACTOR Remove mower from tractor for a period of time in the tank inside a building where fumes may occur. • Use fresh fuel next season. BATTERY • Fully charge...
When mower is to be stored for winter storage. placement instructions in the Service and Adjustments section of this manual). • Lubricate as shown in the Customer ...; Replace with clean engine oil. (See "ENGINE" in the Customer Responsibilities section of this manual. • Be sure that does not retain moisture. TRACTOR Remove mower from tractor for a period of time in the tank inside a building where fumes may occur. • Use fresh fuel next season. BATTERY • Fully charge...
User Manual
Page 25
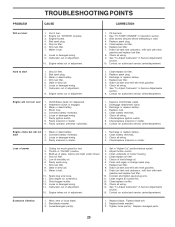
... fuel. 8. Replace fuel filter. 5. Low oil level/dirty oil. 6. Depress clutch/brake pedal. 2. Clean underside of grass, leaves and trash under mower. 4. Contact an authorized service center/department. Build-up of mower housing. 4. Check all wiring. 7. Water in Service Adjustments section. 15. Replace spark plug. 5. Engine valves out of power 1. Disengage attachment...
... fuel. 8. Replace fuel filter. 5. Low oil level/dirty oil. 6. Depress clutch/brake pedal. 2. Clean underside of grass, leaves and trash under mower. 4. Contact an authorized service center/department. Build-up of mower housing. 4. Check all wiring. 7. Water in Service Adjustments section. 15. Replace spark plug. 5. Engine valves out of power 1. Disengage attachment...
User Manual
Page 26
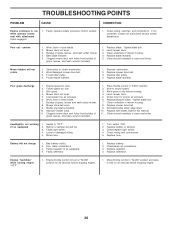
...Faulty alternator. 1. Replace regulator. 4. Bent blade mandrel. 5. Replace blade mandrel. 5. Low/uneven tire air pressure. 6. Mower drive belt worn. 9. Clogged mower deck vent holes from buildup of grass, leaves, and trash around mandrels. 1. Shift to dry before mowing. 4. Clean underside...listed in clutch mechanism. 2. Check wiring, switches and connections. Clean around mandrels to open vent holes. Worn/damaged mower drive belt. 3. Mower deck not level. 5. Tighten blade bolt. 7. Clean around mandrels to open vent holes. Switch is "OFF". 2....
...Faulty alternator. 1. Replace regulator. 4. Bent blade mandrel. 5. Replace blade mandrel. 5. Low/uneven tire air pressure. 6. Mower drive belt worn. 9. Clogged mower deck vent holes from buildup of grass, leaves, and trash around mandrels. 1. Shift to dry before mowing. 4. Clean underside...listed in clutch mechanism. 2. Check wiring, switches and connections. Clean around mandrels to open vent holes. Worn/damaged mower drive belt. 3. Mower deck not level. 5. Tighten blade bolt. 7. Clean around mandrels to open vent holes. Switch is "OFF". 2....

User Manual
Page 31
MODEL NUMBER PR17542STA CHASSIS AND ENCLOSURES KEY PART NO. NO. Pivot Mower Rear 51 73800400 Nut Lock Hex W/Ins 1/4-20 52 19091416 Washer 9/32 x 7/8 x 16 Ga. 53 144697 Bracjet Grukke Lh 54 161464 Screw Hex Wshd 8-18 x 7/8 ...
MODEL NUMBER PR17542STA CHASSIS AND ENCLOSURES KEY PART NO. NO. Pivot Mower Rear 51 73800400 Nut Lock Hex W/Ins 1/4-20 52 19091416 Washer 9/32 x 7/8 x 16 Ga. 53 144697 Bracjet Grukke Lh 54 161464 Screw Hex Wshd 8-18 x 7/8 ...

User Manual
Page 33
MODEL NUMBER PR17542STA DRIVE KEY PART NO. DESCRIPTION 63 175410 Engine Pulley 64 71170764 Bolt Hex 65 10040700 Washer Lock Hvy Hlcl Spr 7/16 66 154778 Keeper Belt Engine Foolproof 69 142432 Screw Hex wsh HiLo 1/4 x 1/2 unc 70 134683 Guide Belt Mower Drive RH 74 137057 Spacer Axle 75 121749X Washer 25/32...
MODEL NUMBER PR17542STA DRIVE KEY PART NO. DESCRIPTION 63 175410 Engine Pulley 64 71170764 Bolt Hex 65 10040700 Washer Lock Hvy Hlcl Spr 7/16 66 154778 Keeper Belt Engine Foolproof 69 142432 Screw Hex wsh HiLo 1/4 x 1/2 unc 70 134683 Guide Belt Mower Drive RH 74 137057 Spacer Axle 75 121749X Washer 25/32...
User Manual
Page 41
... Shaft and Shaft Hardware Only-Pulley Not Included) - - 172559 Replacement Mower, Complete NOTE: All component dimensions given in U.S. MODEL NUMBER PR17542STA KEY PART NO. inches 1 inch = 25.4 mm 41 NO. REPAIR PARTS MOWER DECK TRACTOR - - Noseroller LH 94 132264 Roller, Nose 95 180533 Bracket...Bolt 3/8-24 x 25 Grade 8 patched 9 10030600 Washer, Lock 10 140296 Washer, Hardened 11 134149 Blade, Mulching 42" 138498 Blade Mower 42" Hi-Lift 13 137645 Shaft Assembly, Mandrel, Vented 14 128774 Housing, Mandrel, Vented 15 110485X Bearing, Ball, Mandrel 16 174493...
... Shaft and Shaft Hardware Only-Pulley Not Included) - - 172559 Replacement Mower, Complete NOTE: All component dimensions given in U.S. MODEL NUMBER PR17542STA KEY PART NO. inches 1 inch = 25.4 mm 41 NO. REPAIR PARTS MOWER DECK TRACTOR - - Noseroller LH 94 132264 Roller, Nose 95 180533 Bracket...Bolt 3/8-24 x 25 Grade 8 patched 9 10030600 Washer, Lock 10 140296 Washer, Hardened 11 134149 Blade, Mulching 42" 138498 Blade Mower 42" Hi-Lift 13 137645 Shaft Assembly, Mandrel, Vented 14 128774 Housing, Mandrel, Vented 15 110485X Bearing, Ball, Mandrel 16 174493...

User Manual
Page 43
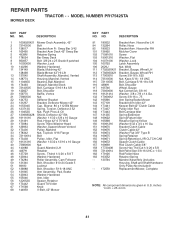
MODEL NUMBER PR17542STA MOWER LIFT KEY PART NO. DESCRIPTION 1 159460 2 159471 3 105767X 4 12000002 5 19211621 6 120183X 7 125631X 8 170770 11 139865 12 139866 13 4939M 15 173288 16 73350800 17 175689 ...
MODEL NUMBER PR17542STA MOWER LIFT KEY PART NO. DESCRIPTION 1 159460 2 159471 3 105767X 4 12000002 5 19211621 6 120183X 7 125631X 8 170770 11 139865 12 139866 13 4939M 15 173288 16 73350800 17 175689 ...


