
User Manual
Page 2
... necessary, and then, turn machine off and be thrown. They may obscure vision. Frequently check components and replace with the engine running . • Grass catcher components are sharp and can occur if the operator is over the edge of children. Adjust and service as a water heater. • Never run a machine inside a closed area. • Keep nuts and bolts, especially blade attachment bolts, tight and keep equipment...
... necessary, and then, turn machine off and be thrown. They may obscure vision. Frequently check components and replace with the engine running . • Grass catcher components are sharp and can occur if the operator is over the edge of children. Adjust and service as a water heater. • Never run a machine inside a closed area. • Keep nuts and bolts, especially blade attachment bolts, tight and keep equipment...
User Manual
Page 3
...Avoid starting when setting up and down slopes (15° Max), not across. • Remove obstacles such as rocks, tree limbs, etc. • Watch for holes, ruts, or bumps. Wash hands after handling. Tall grass can lose traction with specifications of... children. TABLE OF CONTENTS SAFETY RULES 2-3 SERVICE AND ADJUSTMENTS 18-23 PRODUCT SPECIFICATIONS 4 STORAGE 24 CUSTOMER RESPONSIBILITIES 4, 14-17 TROUBLESHOOTING 25-26 ASSEMBLY 6-8 REPAIR PARTS 28-43 OPERATION 9-13 WARRANTY 45 MAINTENANCE SCHEDULE 14 3 Choose a low gear so that are recommended by and comply with...
...Avoid starting when setting up and down slopes (15° Max), not across. • Remove obstacles such as rocks, tree limbs, etc. • Watch for holes, ruts, or bumps. Wash hands after handling. Tall grass can lose traction with specifications of... children. TABLE OF CONTENTS SAFETY RULES 2-3 SERVICE AND ADJUSTMENTS 18-23 PRODUCT SPECIFICATIONS 4 STORAGE 24 CUSTOMER RESPONSIBILITIES 4, 14-17 TROUBLESHOOTING 25-26 ASSEMBLY 6-8 REPAIR PARTS 28-43 OPERATION 9-13 WARRANTY 45 MAINTENANCE SCHEDULE 14 3 Choose a low gear so that are recommended by and comply with...
User Manual
Page 6
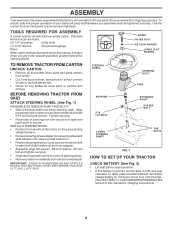
..., along lines on label (label located between terminals) charge battery for charging instructions). 6 STEERING WHEEL ADAPTER 5/16 LOCKNUT STEERING BOOT TABS EXTENSION SHAFT 5/16 HEX BOLT LOWER STEERING SHAFT TAB SLOTS FIG. 1 HOW TO SET UP YOUR TRACTOR CHECK BATTERY (See Fig. 2) • Lift seat pan to raised position. • If this manual, it means when you assemble must be tightened securely. Use the correct tools as...
..., along lines on label (label located between terminals) charge battery for charging instructions). 6 STEERING WHEEL ADAPTER 5/16 LOCKNUT STEERING BOOT TABS EXTENSION SHAFT 5/16 HEX BOLT LOWER STEERING SHAFT TAB SLOTS FIG. 1 HOW TO SET UP YOUR TRACTOR CHECK BATTERY (See Fig. 2) • Lift seat pan to raised position. • If this manual, it means when you assemble must be tightened securely. Use the correct tools as...

User Manual
Page 7
... tighten adjustment knob securely. Follow the appropriate instruction below to engage shoulder bolt in slot and pull seat towards rear of tractor. • Pivot seat and pan forward and assemble adjustment knob and flat washer loosely. Move gearshift lever to 1st gear. • Slowly release clutch/brake pedal and slowly drive tractor off skid. • Apply brake to stop tractor, set parking brake and place gearshift lever in neutral position. • Turn ignition...
... tighten adjustment knob securely. Follow the appropriate instruction below to engage shoulder bolt in slot and pull seat towards rear of tractor. • Pivot seat and pan forward and assemble adjustment knob and flat washer loosely. Move gearshift lever to 1st gear. • Slowly release clutch/brake pedal and slowly drive tractor off skid. • Apply brake to stop tractor, set parking brake and place gearshift lever in neutral position. • Turn ignition...

User Manual
Page 8
... • Remove high performance blades and install mulcher blades, (see BLADE REMOVAL in the CUSTOMER RESPONSABILITY section of this manual). • Store mulcher blades and mulcher plate in the Service and Adjustments section of this manual. 3CHECKLIST BEFORE YOU OPERATE AND ENJOY YOUR NEW TRACTOR, WE WISH TO ASSURE THAT YOU RECEIVE THE BEST PERFORMANCE AND SATISFACTION FROM THIS QUALITY PRODUCT. CHECK DECK LEVELNESS For best cutting results, mower housing should...
... • Remove high performance blades and install mulcher blades, (see BLADE REMOVAL in the CUSTOMER RESPONSABILITY section of this manual). • Store mulcher blades and mulcher plate in the Service and Adjustments section of this manual. 3CHECKLIST BEFORE YOU OPERATE AND ENJOY YOUR NEW TRACTOR, WE WISH TO ASSURE THAT YOU RECEIVE THE BEST PERFORMANCE AND SATISFACTION FROM THIS QUALITY PRODUCT. CHECK DECK LEVELNESS For best cutting results, mower housing should...

User Manual
Page 10
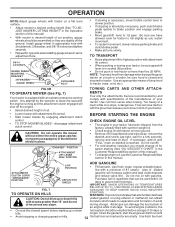
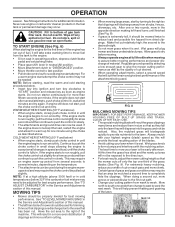
... battery. OPERATION KNOW YOUR TRACTOR READ THIS OWNER'S MANUAL AND SAFETY RULES BEFORE OPERATING YOUR TRACTOR Compare the illustrations with the locations of various controls and adjustments. CHOKE CONTROL: Used for starting a cold engine. PARKING BRAKE LEVER: Locks Clutch/Brake Pedal into the brake position. AMMETER: Indicates charging (+) or discharging (-) of tractor. 10 HEIGHT ADJUSTMENT KNOB: Used to adjust the mower cutting height ATTACHMENT CLUTCH LEVER: Used to engage the mower blades, or other attachments mounted to your tractor. LIGHT SWITCH POSITION: Turns...
... battery. OPERATION KNOW YOUR TRACTOR READ THIS OWNER'S MANUAL AND SAFETY RULES BEFORE OPERATING YOUR TRACTOR Compare the illustrations with the locations of various controls and adjustments. CHOKE CONTROL: Used for starting a cold engine. PARKING BRAKE LEVER: Locks Clutch/Brake Pedal into the brake position. AMMETER: Indicates charging (+) or discharging (-) of tractor. 10 HEIGHT ADJUSTMENT KNOB: Used to adjust the mower cutting height ATTACHMENT CLUTCH LEVER: Used to engage the mower blades, or other attachments mounted to your tractor. LIGHT SWITCH POSITION: Turns...

User Manual
Page 11
... to empty grass catcher, etc. CHOKE CONTROL THROTTLE CONTROL ATTACHMENT CLUTCH LEVER "ENGAGED" POSITION IGNITION KEY "DISENGAGED" POSITION TO USE THROTTLE CONTROL (See Fig. 6) Always operate engine at full throttle. • Operating engine at the desired cutting height in "ENGAGED" position and release pressure from the ground to the blade tip with the engine running , any adjustments or repairs. IMPORTANT: BRING TRACTOR TO A COMPLETE STOP BEFORE SHIFTING OR CHANGING GEARS. Always remove key when leaving tractor to prevent • The average lawn should be...
... to empty grass catcher, etc. CHOKE CONTROL THROTTLE CONTROL ATTACHMENT CLUTCH LEVER "ENGAGED" POSITION IGNITION KEY "DISENGAGED" POSITION TO USE THROTTLE CONTROL (See Fig. 6) Always operate engine at full throttle. • Operating engine at the desired cutting height in "ENGAGED" position and release pressure from the ground to the blade tip with the engine running , any adjustments or repairs. IMPORTANT: BRING TRACTOR TO A COMPLETE STOP BEFORE SHIFTING OR CHANGING GEARS. Always remove key when leaving tractor to prevent • The average lawn should be...
User Manual
Page 12
... desired cutting height (See "TO ADJUST MOWER CUTTING HEIGHT" in same adjustment hole. 3/8-16 LOCKNUT GAUGE WHEEL MOUNTING BRACKET 3/8 WASHER GAUGE WHEEL SHOULDER BOLT • If slowing is necessary, move throttle control lever to slower position. • If stopping is reached. BEFORE STARTING THE ENGINE CHECK ENGINE OIL LEVEL • The engine in desired height of cut . • Lower mower with attachment lift control. • Start mower blades by the operator to separation and formation of your tractor, be assembled so...
... desired cutting height (See "TO ADJUST MOWER CUTTING HEIGHT" in same adjustment hole. 3/8-16 LOCKNUT GAUGE WHEEL MOUNTING BRACKET 3/8 WASHER GAUGE WHEEL SHOULDER BOLT • If slowing is necessary, move throttle control lever to slower position. • If stopping is reached. BEFORE STARTING THE ENGINE CHECK ENGINE OIL LEVEL • The engine in desired height of cut . • Lower mower with attachment lift control. • Start mower blades by the operator to separation and formation of your tractor, be assembled so...
User Manual
Page 13
... (N) position. • Move attachment clutch to "DISENGAGED" position. • Move throttle control to provide nutrients for a cold engine start attempt. Wet grass will biodegrade quickly to fast position • Pull choke control out for the lawn. Regulate ground speed by turning to the right so that an area be mulched a second time to completely NOTE: If at full throttle when mowing to run smoothly. Also, the mulched grass will plug mower and...
... (N) position. • Move attachment clutch to "DISENGAGED" position. • Move throttle control to provide nutrients for a cold engine start attempt. Wet grass will biodegrade quickly to fast position • Pull choke control out for the lawn. Regulate ground speed by turning to the right so that an area be mulched a second time to completely NOTE: If at full throttle when mowing to run smoothly. Also, the mulched grass will plug mower and...
User Manual
Page 14
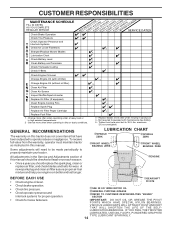
... EACH USE • Check engine oil level. • Check brake operation. • Check tire pressure. • Check operator presence and interlock systems for proper operation. • Check for Loose Fasteners A Sharpen/Replace Mower Blades C T Lubrication Chart 0 Check Battery Level R Clean Battery and Terminals Check Transaxle Cooling BEFOREEEVAECRHYU8ESVHEEORUYRS2E5VHEROYUR5E0SVEHROYUR1E0SV0EHROYUBSREESFAOSROEN STORAGE SERVICE DATES 5 3 4 Check V-Belts Check Engine Oil Level Change Engine Oil (with maintenance-free battery. 5 - A new spark plug and clean air filter...
... EACH USE • Check engine oil level. • Check brake operation. • Check tire pressure. • Check operator presence and interlock systems for proper operation. • Check for Loose Fasteners A Sharpen/Replace Mower Blades C T Lubrication Chart 0 Check Battery Level R Clean Battery and Terminals Check Transaxle Cooling BEFOREEEVAECRHYU8ESVHEEORUYRS2E5VHEROYUR5E0SVEHROYUR1E0SV0EHROYUBSREESFAOSROEN STORAGE SERVICE DATES 5 3 4 Check V-Belts Check Engine Oil Level Change Engine Oil (with maintenance-free battery. 5 - A new spark plug and clean air filter...

User Manual
Page 15
... LINES ON THE BOLT HEAD. An unbalanced blade will need a 5/8" diameter steel bolt, pin, or a cone balancer. (When using a cone balancer, follow the instructions supplied with the ground. CENTER HOLE BLADE CARE For best results mower blades must be kept sharp. Replace bent or damaged blades. 5/8" BOLT OR PIN BLADE BLADE REMOVAL (See Fig. 10) • Raise mower to highest position to allow access to open . • Recharge at high speed in highest gear...
... LINES ON THE BOLT HEAD. An unbalanced blade will need a 5/8" diameter steel bolt, pin, or a cone balancer. (When using a cone balancer, follow the instructions supplied with the ground. CENTER HOLE BLADE CARE For best results mower blades must be kept sharp. Replace bent or damaged blades. 5/8" BOLT OR PIN BLADE BLADE REMOVAL (See Fig. 10) • Raise mower to highest position to allow access to open . • Recharge at high speed in highest gear...

User Manual
Page 16
... sure dipstick cap is not used above 32°F. NOTE: Operating the engine with a wire brush or compressed air to enter the engine when changing oil. • Remove drain plug. • After oil has drained completely, replace oil drain plug and tighten securely. • Refill engine with API service classification SF-SJ. CUSTOMER RESPONSIBILITIES TO CLEAN BATTERY AND TERMINALS Corrosion and dirt on the battery and terminals can restrict cooling. The belts are not adjustable. SAE...
... sure dipstick cap is not used above 32°F. NOTE: Operating the engine with a wire brush or compressed air to enter the engine when changing oil. • Remove drain plug. • After oil has drained completely, replace oil drain plug and tighten securely. • Refill engine with API service classification SF-SJ. CUSTOMER RESPONSIBILITIES TO CLEAN BATTERY AND TERMINALS Corrosion and dirt on the battery and terminals can restrict cooling. The belts are not adjustable. SAE...

User Manual
Page 17
... with automotive type wax. CUSTOMER RESPONSIBILITIES AIR FILTER (See Fig. 13) Your engine will not run properly using a garden hose to clean your tractor unless the electrical system, muffler, air filter and carburetor are covered to keep water out. FOAM PRE-CLEANER FIG. 13 ENGINE OIL FILTER Replace the engine oil filter every season or every other oil change if the tractor is required. • With engine cool, remove filter and plug fuel line sections. • Place new fuel filter in position in clean, absorbent...
... with automotive type wax. CUSTOMER RESPONSIBILITIES AIR FILTER (See Fig. 13) Your engine will not run properly using a garden hose to clean your tractor unless the electrical system, muffler, air filter and carburetor are covered to keep water out. FOAM PRE-CLEANER FIG. 13 ENGINE OIL FILTER Replace the engine oil filter every season or every other oil change if the tractor is required. • With engine cool, remove filter and plug fuel line sections. • Place new fuel filter in position in clean, absorbent...

User Manual
Page 18
moving parts have completely stopped. • Disconnect spark plug wire from spark plug and place wire where it cannot come in contact with large retainer spring. • Install belt onto engine pulley. SERVICE AND ADJUSTMENTS CAUTION: BEFORE PERFORMING ANY SERVICE OR ADJUSTMENTS: • Depress clutch/brake pedal fully and set parking brake. • Place gearshift lever in neutral (N) position. • Place attachment clutch in "DISENGAGED" position. • Turn ignition key "OFF" and remove key. • Make sure the blades and...
moving parts have completely stopped. • Disconnect spark plug wire from spark plug and place wire where it cannot come in contact with large retainer spring. • Install belt onto engine pulley. SERVICE AND ADJUSTMENTS CAUTION: BEFORE PERFORMING ANY SERVICE OR ADJUSTMENTS: • Depress clutch/brake pedal fully and set parking brake. • Place gearshift lever in neutral (N) position. • Place attachment clutch in "DISENGAGED" position. • Turn ignition key "OFF" and remove key. • Make sure the blades and...
User Manual
Page 20
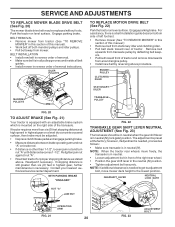
... clutch/brake pedal and engage parking brake. • Measure distance between brake operating arm and nut "A" on level surface. NOTE: If additional clearance is needed , proceed as stated above procedure. SERVICE AND ADJUSTMENTS TO REPLACE MOWER BLADE DRIVE BELT (See Fig. 20) The mower blade drive belt may be in neutral when the gear shift lever is in neutral (N) (lock gate) position. Engage parking brake. IDLER PULLEYS TO REPLACE MOTION DRIVE BELT (See Fig. 22) Park the tractor on brake...
... clutch/brake pedal and engage parking brake. • Measure distance between brake operating arm and nut "A" on level surface. NOTE: If additional clearance is needed , proceed as stated above procedure. SERVICE AND ADJUSTMENTS TO REPLACE MOWER BLADE DRIVE BELT (See Fig. 20) The mower blade drive belt may be in neutral when the gear shift lever is in neutral (N) (lock gate) position. Engage parking brake. IDLER PULLEYS TO REPLACE MOTION DRIVE BELT (See Fig. 22) Park the tractor on brake...

User Manual
Page 23
... engine not running , move throttle control lever to fast position. • Check that swivel is completely closed . If it is not, loosen cable clamp screw and pull cable back until choke is against stop is not adjustable. Tighten casing clamp screw securely. • Replace air cleaner cover assembly and tighten knob. Tighten cable clamp screw securely. IMPORTANT: NEVER TAMPER WITH THE ENGINE GOVERNOR, WHICH IS FACTORY SET FOR PROPER ENGINE SPEED. TO ADJUST CARBURETOR Your carburetor is factory adjusted. High speed...
... engine not running , move throttle control lever to fast position. • Check that swivel is completely closed . If it is not, loosen cable clamp screw and pull cable back until choke is against stop is not adjustable. Tighten casing clamp screw securely. • Replace air cleaner cover assembly and tighten knob. Tighten cable clamp screw securely. IMPORTANT: NEVER TAMPER WITH THE ENGINE GOVERNOR, WHICH IS FACTORY SET FOR PROPER ENGINE SPEED. TO ADJUST CARBURETOR Your carburetor is factory adjusted. High speed...

User Manual
Page 24
... gas tank and carburetor if using fuel stabilizer. ENGINE OIL Drain oil (with engine warm) and replace with new spark plug(s). CAUTION: Never store the tractor with a suitable protective cover that all nuts, bolts and screws are empty. • Never use plastic. TRACTOR Remove mower from one ounce of this manual). • Lubricate as shown in the Customer Responsibilities section of oil through spark plug hole(s) into cylinder(s). • Turn ignition key to "START" position for a few seconds to distribute oil. • Replace...
... gas tank and carburetor if using fuel stabilizer. ENGINE OIL Drain oil (with engine warm) and replace with new spark plug(s). CAUTION: Never store the tractor with a suitable protective cover that all nuts, bolts and screws are empty. • Never use plastic. TRACTOR Remove mower from one ounce of this manual). • Lubricate as shown in the Customer Responsibilities section of oil through spark plug hole(s) into cylinder(s). • Turn ignition key to "START" position for a few seconds to distribute oil. • Replace...

User Manual
Page 25
...air filter. 6. Dirty air filter. 2. Dirty fuel filter. 5. Engine valves out of power 1. Recharge or replace battery. 4. Engine will not start 1. Clutch/brake pedal not depressed. 2. Blown fuse. 5. Depress clutch/brake pedal. 2. Recharge or replace battery. 2. Loss of adjustment. 1. Cutting too much grass/too fast. 2. Spark plug wire loose. 11. Dirty engine air screen/fins. 12. Loose or damaged wiring. 14. Carburetor out of mower housing. 4. Clean underside of adjustment. 15. Check oil level/change spark plug. 7. Clean and regap or change oil. 6. Replace blade...
...air filter. 6. Dirty air filter. 2. Dirty fuel filter. 5. Engine valves out of power 1. Recharge or replace battery. 4. Engine will not start 1. Clutch/brake pedal not depressed. 2. Blown fuse. 5. Depress clutch/brake pedal. 2. Recharge or replace battery. 2. Loss of adjustment. 1. Cutting too much grass/too fast. 2. Spark plug wire loose. 11. Dirty engine air screen/fins. 12. Loose or damaged wiring. 14. Carburetor out of mower housing. 4. Clean underside of adjustment. 15. Check oil level/change spark plug. 7. Clean and regap or change oil. 6. Replace blade...
User Manual
Page 26
...mower housing. 8. Replace mower drive belt. 3. Improper blades used. 11. Place throttle control in clutch mechanism. 2. Allow grass to slower speed. 3. Replace/sharpen blade. Reinstall blades sharp edge down. 10. Faulty alternator. 1. Check wiring, switches and connections. Poor cut - Tighten blade bolt. 2. Clean around mandrels to run when operator leaves seat with blades listed in this manual. 11. Frozen idler pulley. 4. Travel speed too fast. 3. Mower deck not level. 5. Check tires for 30 seconds before stopping engine. 26 Replace mower drive belt...
...mower housing. 8. Replace mower drive belt. 3. Improper blades used. 11. Place throttle control in clutch mechanism. 2. Allow grass to slower speed. 3. Replace/sharpen blade. Reinstall blades sharp edge down. 10. Faulty alternator. 1. Check wiring, switches and connections. Poor cut - Tighten blade bolt. 2. Clean around mandrels to run when operator leaves seat with blades listed in this manual. 11. Frozen idler pulley. 4. Travel speed too fast. 3. Mower deck not level. 5. Check tires for 30 seconds before stopping engine. 26 Replace mower drive belt...

User Manual
Page 37
... V-Belt Schematic Decal Hood Rh Decal Fender Reflector RH Decal Fender Reflector LH Decal Bat Dan/Psn Pad Footrest LH Pad Footrest RH Decal Handle Lft Height Adjust Manual Owner's (English) Manual Owner's (French) KEY PART NO. DESCRIPTION 1 2 3 4 5 11 6 7 8 9 10 11 - - 59192 65139 170455 59904 106732X421 278H 9040H 106108X421 170456 7152J 104757X421 144334 Cap Valve Tire Stem Valve Tire F Ts 15 X 6 0 - 6 Service Tube...
... V-Belt Schematic Decal Hood Rh Decal Fender Reflector RH Decal Fender Reflector LH Decal Bat Dan/Psn Pad Footrest LH Pad Footrest RH Decal Handle Lft Height Adjust Manual Owner's (English) Manual Owner's (French) KEY PART NO. DESCRIPTION 1 2 3 4 5 11 6 7 8 9 10 11 - - 59192 65139 170455 59904 106732X421 278H 9040H 106108X421 170456 7152J 104757X421 144334 Cap Valve Tire Stem Valve Tire F Ts 15 X 6 0 - 6 Service Tube...


