
User Manual
Page 1
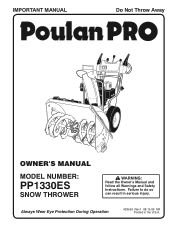
Always Wear Eye Protection During Operation 428553 Rev.1 08.15.09 SR Printed in serious injury. Failure to do so can result in the U.S.A. IMPORTANT MANUAL Do Not Throw Away OWNER'S MANUAL MODEL NUMBER: PP1330ES SNOW THROWER WARNING: Read the Owner's Manual and follow all Warnings and Safety Instructions.
Always Wear Eye Protection During Operation 428553 Rev.1 08.15.09 SR Printed in serious injury. Failure to do so can result in the U.S.A. IMPORTANT MANUAL Do Not Throw Away OWNER'S MANUAL MODEL NUMBER: PP1330ES SNOW THROWER WARNING: Read the Owner's Manual and follow all Warnings and Safety Instructions.
User Manual
Page 2
... of trouble. Thoroughly inspect the area where the equipment is generally a warning of all units with the controls and the proper use snow thrower on or cross- (b) Never add fuel to clear gravel or crushed rock surface. 7. Operation 1. ing gravel drives, walks, or... roads. Never fill fuel tank indoors. 3. Always place restarting and operating the snow thrower. containers on contact, stay away from the discharge chute. WARNING: Snow throwers have exposed rotating parts, which can get caught in contact with the rim of the discharge opening at...
... of trouble. Thoroughly inspect the area where the equipment is generally a warning of all units with the controls and the proper use snow thrower on or cross- (b) Never add fuel to clear gravel or crushed rock surface. 7. Operation 1. ing gravel drives, walks, or... roads. Never fill fuel tank indoors. 3. Always place restarting and operating the snow thrower. containers on contact, stay away from the discharge chute. WARNING: Snow throwers have exposed rotating parts, which can get caught in contact with the rim of the discharge opening at...
User Manual
Page 3
...labels, as wheel weights, counterweights, or cabs). 15. Should you experience any problem you to be stored for transporting the snow thrower in any enclosure. 3. The instructions will enable you cannot easily remedy, please contact your purchase of this owner's manual. Keep...impeller. SERIAL NUMBER DATE OF PURCHASE THE MODEL AND SERIAL NUMBERS WILL BE FOUND ON A DECAL ATTACHED TO THE REAR OF THE SNOW THROWER HOUSING. TABLE OF CONTENTS SAFETY RULES 2-3 MAINTENANCE 14-15 PRODUCT SPECIFICATIONS 3 SERVICE AND ADJUSTMENTS 16-18 CUSTOMER RESPONSIBILITIES 3 STORAGE ...
...labels, as wheel weights, counterweights, or cabs). 15. Should you experience any problem you to be stored for transporting the snow thrower in any enclosure. 3. The instructions will enable you cannot easily remedy, please contact your purchase of this owner's manual. Keep...impeller. SERIAL NUMBER DATE OF PURCHASE THE MODEL AND SERIAL NUMBERS WILL BE FOUND ON A DECAL ATTACHED TO THE REAR OF THE SNOW THROWER HOUSING. TABLE OF CONTENTS SAFETY RULES 2-3 MAINTENANCE 14-15 PRODUCT SPECIFICATIONS 3 SERVICE AND ADJUSTMENTS 16-18 CUSTOMER RESPONSIBILITIES 3 STORAGE ...
User Manual
Page 4
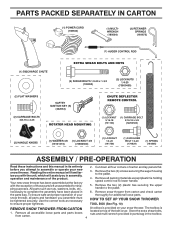
... multi-wrench provided in parts bag in the parts bag. HOW TO SET UP YOUR SNOW THROWER TOOL BOX (See Fig. 10) REMOVE SNOW THROWER FROM CARTON A toolbox is located on your snow thrower. Store the extra shear bolts, 1. Remove all packing materials except plastic tie holding speed...accessible loose parts and parts boxes from carton and check carton thoroughly for shipping purposes. The toolbox is provided on top of your new snow thrower. To ensure safe and proper operation of the belt cover. PARTS PACKED SEPARATELY IN CARTON (1) POWER CORD (198563) (1) MULTIWRENCH (180684)...
... multi-wrench provided in parts bag in the parts bag. HOW TO SET UP YOUR SNOW THROWER TOOL BOX (See Fig. 10) REMOVE SNOW THROWER FROM CARTON A toolbox is located on your snow thrower. Store the extra shear bolts, 1. Remove all packing materials except plastic tie holding speed...accessible loose parts and parts boxes from carton and check carton thoroughly for shipping purposes. The toolbox is provided on top of your new snow thrower. To ensure safe and proper operation of the belt cover. PARTS PACKED SEPARATELY IN CARTON (1) POWER CORD (198563) (1) MULTIWRENCH (180684)...

User Manual
Page 5
... (See Figs. 1 and 2) 1. Secure with retainer spring. ASSEMBLY / PRE-OPERATION NOTE: The multi-wrench may be used for assembly of the chute rotator head to snow thrower and making adjustments to the skid plates. INSTALL TRACTION DRIVE CONTROL ROD (See Figs. 3 and 4) The traction drive control rod is installed on the...
... (See Figs. 1 and 2) 1. Secure with retainer spring. ASSEMBLY / PRE-OPERATION NOTE: The multi-wrench may be used for assembly of the chute rotator head to snow thrower and making adjustments to the skid plates. INSTALL TRACTION DRIVE CONTROL ROD (See Figs. 3 and 4) The traction drive control rod is installed on the...

User Manual
Page 6
... retrieve the auger control rod from bag of mounting bracket. 4. With chute rotater head and chute bracket aligned, position chute rotater head on top of snow thrower. 2. Install 3/8 washer and locknut on rod and insert end of spring into hole in chute bracket. 3. If necessary, rotate chute assembly to install the chute...
... retrieve the auger control rod from bag of mounting bracket. 4. With chute rotater head and chute bracket aligned, position chute rotater head on top of snow thrower. 2. Install 3/8 washer and locknut on rod and insert end of spring into hole in chute bracket. 3. If necessary, rotate chute assembly to install the chute...

User Manual
Page 7
Eyelet will be loose on your snow thrower were overinflated at the factory for best snow throwing performance. • Reduce tire pressure to 14-17 PSI. REMOTE CABLE BRACKET 5/16-18 LOCKNUT Fig. 8 CHUTE DEFLECTOR CONTROL LEVER FIG. 9 7 Correct and equal ...
Eyelet will be loose on your snow thrower were overinflated at the factory for best snow throwing performance. • Reduce tire pressure to 14-17 PSI. REMOTE CABLE BRACKET 5/16-18 LOCKNUT Fig. 8 CHUTE DEFLECTOR CONTROL LEVER FIG. 9 7 Correct and equal ...
User Manual
Page 8
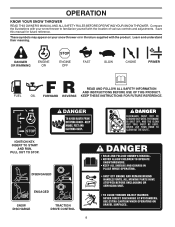
... FOR FUTURE REFERENCE. INSERT TO START AND RUN, PULL OUT TO STOP. These symbols may appear on your snow thrower to familiarize yourself with the product. Learn and understand their meaning. DISENGAGED ENGAGED SNOW DISCHARGE TRACTION DRIVE CONTROL 8 DANGER OR WARNING PRIMER FORWARD REVERSE READ AND FOLLOW ALL SAFETY INFORMATION AND INSTRUCTIONS BEFORE...
... FOR FUTURE REFERENCE. INSERT TO START AND RUN, PULL OUT TO STOP. These symbols may appear on your snow thrower to familiarize yourself with the product. Learn and understand their meaning. DISENGAGED ENGAGED SNOW DISCHARGE TRACTION DRIVE CONTROL 8 DANGER OR WARNING PRIMER FORWARD REVERSE READ AND FOLLOW ALL SAFETY INFORMATION AND INSTRUCTIONS BEFORE...

User Manual
Page 9
...SKID PLATE AUGERS FIG. 10 MEETS A.N.S.I. Toolbox - used to steer the snow thrower. used for starting a cold engine. Choke control - used to change the direction the snow is thrown. 9 Traction drive control lever - Skid plate - SAFETY REQUIREMENTS Our snow throwers conform to STOP the engine. pumps additional fuel from the ground Deflector ...and wrench. ON / OFF switch - used for the engine to the cylinder for use . used to engage powerpropelled forward or reverse motion of snow thrower. used to select forward or reverse motion and speed of...
...SKID PLATE AUGERS FIG. 10 MEETS A.N.S.I. Toolbox - used to steer the snow thrower. used for starting a cold engine. Choke control - used to change the direction the snow is thrown. 9 Traction drive control lever - Skid plate - SAFETY REQUIREMENTS Our snow throwers conform to STOP the engine. pumps additional fuel from the ground Deflector ...and wrench. ON / OFF switch - used for the engine to the cylinder for use . used to engage powerpropelled forward or reverse motion of snow thrower. used to select forward or reverse motion and speed of...

User Manual
Page 10
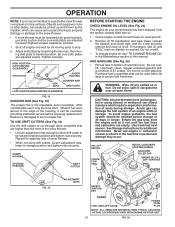
...of the chute deflector. Remove (do not turn) safety ignition key to prevent unauthorized use choke to "OFF" position. 2. Always operate the snow thrower with the fuel shut-off valve is located on the engine. Move lever back to start a warm engine. • To engage choke, ... Set the deflector low to raise the deflector and increase the distance. Move ON / OFF switch to stop throwing snow. TO CONTROL SNOW DISCHARGE (See Fig. 13) WARNING: Snow throwers have exposed rotating parts, which can cause severe injury from contact, or from material thrown from the discharge chute....
...of the chute deflector. Remove (do not turn) safety ignition key to prevent unauthorized use choke to "OFF" position. 2. Always operate the snow thrower with the fuel shut-off valve is located on the engine. Move lever back to start a warm engine. • To engage choke, ... Set the deflector low to raise the deflector and increase the distance. Move ON / OFF switch to stop throwing snow. TO CONTROL SNOW DISCHARGE (See Fig. 13) WARNING: Snow throwers have exposed rotating parts, which can cause severe injury from contact, or from material thrown from the discharge chute....

User Manual
Page 11
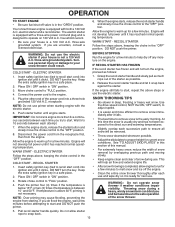
...mounting clip. NOTE: When both traction drive and auger control levers are located on each handle. Adjust skid plates evenly to the snow thrower can result. This will lock the auger control lever in the engaged position. squeeze right side trigger. When a trigger is squeezed... TRIGGER FIG. 15 TO MOVE FORWARD AND BACKWARD (See Fig. 16) SELF-PROPELLING, forward and reverse movement of the snow thrower, is recommended that side of snow thrower and allows it into the clip. • Make sure the discharge chute is pointed in a safe direction (no vehicles...
...mounting clip. NOTE: When both traction drive and auger control levers are located on each handle. Adjust skid plates evenly to the snow thrower can result. This will lock the auger control lever in the engaged position. squeeze right side trigger. When a trigger is squeezed... TRIGGER FIG. 15 TO MOVE FORWARD AND BACKWARD (See Fig. 16) SELF-PROPELLING, forward and reverse movement of the snow thrower, is recommended that side of snow thrower and allows it into the clip. • Make sure the discharge chute is pointed in a safe direction (no vehicles...
User Manual
Page 12
... engine problems, the fuel system should be emptied before requiring replacement. Never use gasoline near an open flame. Check engine oil with snow thrower on your snow thrower has been shipped, from the factory, already filled with oil. 1. Do not store, spill or use engine or carburetor cleaner products...not overfill. • To change engine oil, see "TO CHANGE ENGINE OIL" in quantities that are higher than the front of the snow thrower. • Loosen adjustment nuts enough to allow drift cutter to be raised to highest position and tighten nuts securely. Do not overfill. AUGER...
... engine problems, the fuel system should be emptied before requiring replacement. Never use gasoline near an open flame. Check engine oil with snow thrower on your snow thrower has been shipped, from the factory, already filled with oil. 1. Do not store, spill or use engine or carburetor cleaner products...not overfill. • To change engine oil, see "TO CHANGE ENGINE OIL" in quantities that are higher than the front of the snow thrower. • Loosen adjustment nuts enough to allow drift cutter to be raised to highest position and tighten nuts securely. Do not overfill. AUGER...
User Manual
Page 13
... Push starter button until it falls. • The best time to start , repeat the above , keeping the choke control in this section of the snow thrower. 5. WARM START - COLD START - Keep the extra safety ignition key in the "OPEN" position. If the engine still fails to recoil start and...first, then from starting engine with both a 120 Volt A.C. Rotate choke control to your house is not a 120 Volt A.C. COLD START - Your snow thrower engine is the early morning. This will be hazardous to start cord) into a three-hole grounded 120 Volt A.C. Do not allow engine to run ...
... Push starter button until it falls. • The best time to start , repeat the above , keeping the choke control in this section of the snow thrower. 5. WARM START - COLD START - Keep the extra safety ignition key in the "OPEN" position. If the engine still fails to recoil start and...first, then from starting engine with both a 120 Volt A.C. Rotate choke control to your house is not a 120 Volt A.C. COLD START - Your snow thrower engine is the early morning. This will be hazardous to start cord) into a three-hole grounded 120 Volt A.C. Do not allow engine to run ...

User Manual
Page 14
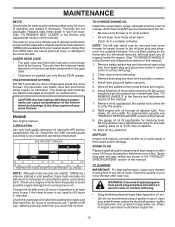
...; See "ENGINE" in Maintenance section ➂ General Purpose Grease ➀ Pivot points ➂ Auger grease fittings ➁ Engine oil SNOW THROWER Always observe the safety rules when performing any of the adjustments described in the Service and Adjustments section of injury to slow leaks, tire ...sealant may be purchased from the warranty, operator must maintain snow thrower as instructed in this manual. Check engine oil level. 2. LUBRICATION Keep your engine run better and last longer. • Follow...
...; See "ENGINE" in Maintenance section ➂ General Purpose Grease ➀ Pivot points ➂ Auger grease fittings ➁ Engine oil SNOW THROWER Always observe the safety rules when performing any of the adjustments described in the Service and Adjustments section of injury to slow leaks, tire ...sealant may be purchased from the warranty, operator must maintain snow thrower as instructed in this manual. Check engine oil level. 2. LUBRICATION Keep your engine run better and last longer. • Follow...
User Manual
Page 15
... oil in cold weather, these multi-viscosity oils will drain more frequently to avoid possible engine damage from your snow thrower are covered to slip from snow thrower for deterioration and wear after every 100 hours of operation, whichever occurs first. Be careful not to allow dirt...wear. (See "TO REMOVE BELT COVER" in the Service and Adjustments section of this manual). 1. Replace belts if they begin to keep snow thrower housing free of each time you check the oil level. TO CHANGE ENGINE OIL Determine temperature range anticipated before starting in a suitable container....
... oil in cold weather, these multi-viscosity oils will drain more frequently to avoid possible engine damage from your snow thrower are covered to slip from snow thrower for deterioration and wear after every 100 hours of operation, whichever occurs first. Be careful not to allow dirt...wear. (See "TO REMOVE BELT COVER" in the Service and Adjustments section of this manual). 1. Replace belts if they begin to keep snow thrower housing free of each time you check the oil level. TO CHANGE ENGINE OIL Determine temperature range anticipated before starting in a suitable container....
User Manual
Page 16
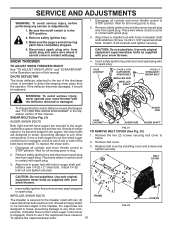
... 1-5/8 CAPSCREW / SHEAR BOLT IMPELLER HUB IMPELLER SHAFT 1/4-20 x 2 SHOULDER / SHEAR BOLT WARNING: To avoid serious injury, never operate your snow thrower. 4. To replace the shear bolts: 1. Remove safety ignition key and disconnect spark plug wire from spark plug. Remove the two (2) screws ...frame. 2. SERVICE AND ADJUSTMENTS WARNING: To avoid serious injury, before performing any other com- Remove safety ignition key. 3. SNOW THROWER TO ADJUST SNOW THROWER HEIGHT See "TO ADJUST SKID PLATES" and "SCRAPER BAR" in the OFF position. 2. CHUTE DEFLECTOR The chute deflector, ...
... 1-5/8 CAPSCREW / SHEAR BOLT IMPELLER HUB IMPELLER SHAFT 1/4-20 x 2 SHOULDER / SHEAR BOLT WARNING: To avoid serious injury, never operate your snow thrower. 4. To replace the shear bolts: 1. Remove safety ignition key and disconnect spark plug wire from spark plug. Remove the two (2) screws ...frame. 2. SERVICE AND ADJUSTMENTS WARNING: To avoid serious injury, before performing any other com- Remove safety ignition key. 3. SNOW THROWER TO ADJUST SNOW THROWER HEIGHT See "TO ADJUST SKID PLATES" and "SCRAPER BAR" in the OFF position. 2. CHUTE DEFLECTOR The chute deflector, ...
User Manual
Page 17
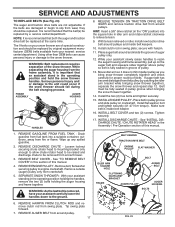
...auger pulley only. 12. While separating the auger housing from the frame assembly, it does not hit impeller pulley as you bring snow thrower completely together and check carefully for proper routing of pulley. 13. Serious personal injury and/ or damage to engine crankshaft. Remove ...outside (auger) pulley only from snow thrower. 3. With your snow thrower are of special construction and should be fully seated in this section of this manual. 4. HINT: Insert a 3/8" drive ratchet (...
...auger pulley only. 12. While separating the auger housing from the frame assembly, it does not hit impeller pulley as you bring snow thrower completely together and check carefully for proper routing of pulley. 13. Serious personal injury and/ or damage to engine crankshaft. Remove ...outside (auger) pulley only from snow thrower. 3. With your snow thrower are of special construction and should be fully seated in this section of this manual. 4. HINT: Insert a 3/8" drive ratchet (...
User Manual
Page 18
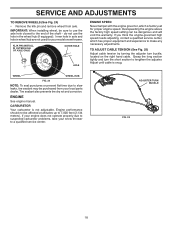
...cable tension by turning the adjuster turn the short section to lengthen the adjuster. Adjust until cable is factory set for your model snow thrower. Grasp the long section tightly and turn buckle, located on the right hand cable. Tire sealant also prevents tire dry rot and ... is not adjustable. SERVICE AND ADJUSTMENTS TO REMOVE WHEELS (See Fig. 24) • Remove the klik pin and remove wheel from your snow thrower to a qualified service center. IMPORTANT: When installing wheel, be purchased from axle. Overspeeding the engine above the factory high speed setting can ...
...cable tension by turning the adjuster turn the short section to lengthen the adjuster. Adjust until cable is factory set for your model snow thrower. Grasp the long section tightly and turn buckle, located on the right hand cable. Tire sealant also prevents tire dry rot and ... is not adjustable. SERVICE AND ADJUSTMENTS TO REMOVE WHEELS (See Fig. 24) • Remove the klik pin and remove wheel from your snow thrower to a qualified service center. IMPORTANT: When installing wheel, be purchased from axle. Overspeeding the engine above the factory high speed setting can ...
User Manual
Page 19
...1. Remove spark plug. 2. OTHER • Remove safety ignition key; store it thoroughly, remove all dirt, grease, leaves, etc. SNOW THROWER When snow thrower is an acceptable alternative in the Maintenance section of this manual). Lubricate as carburetor, fuel hose, or tank during storage. Inspect moving ...manual. Acidic gas can attract moisture which allows condensation to form and will cause problems. • If possible, store your snow thrower indoors and cover it to protect it run until the fuel lines and carburetor are securely fastened. CYLINDER 1. Replace if ...
...1. Remove spark plug. 2. OTHER • Remove safety ignition key; store it thoroughly, remove all dirt, grease, leaves, etc. SNOW THROWER When snow thrower is an acceptable alternative in the Maintenance section of this manual). Lubricate as carburetor, fuel hose, or tank during storage. Inspect moving ...manual. Acidic gas can attract moisture which allows condensation to form and will cause problems. • If possible, store your snow thrower indoors and cover it to protect it run until the fuel lines and carburetor are securely fastened. CYLINDER 1. Replace if ...
User Manual
Page 21
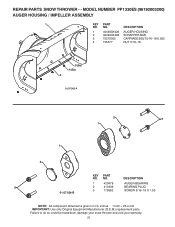
NO. Failure to do so could be hazardous, damage your snow thrower and void your warranty. 21 NO. DESCRIPTION 1 404930X428 AUGER HOUSING 2 404933X428 SCRAPPER BAR 3 72270505 CARRIAGE BOLT 5/16−18 X .625 4 155377 NUT 5/16−18 3 (...;18 X 1.00 01.07.024-B NOTE: All component dimensions given in U.S. inches. 1 inch = 25.4 mm IMPORTANT: Use only Original Equipment Manufacturer (O.E.M.) replacement parts. REPAIR PARTS SNOW THROWER - - MODEL NUMBER PP1330ES (96192003200) AUGER HOUSING / IMPELLER ASSEMBLY 1 KEY PART NO.
NO. Failure to do so could be hazardous, damage your snow thrower and void your warranty. 21 NO. DESCRIPTION 1 404930X428 AUGER HOUSING 2 404933X428 SCRAPPER BAR 3 72270505 CARRIAGE BOLT 5/16−18 X .625 4 155377 NUT 5/16−18 3 (...;18 X 1.00 01.07.024-B NOTE: All component dimensions given in U.S. inches. 1 inch = 25.4 mm IMPORTANT: Use only Original Equipment Manufacturer (O.E.M.) replacement parts. REPAIR PARTS SNOW THROWER - - MODEL NUMBER PP1330ES (96192003200) AUGER HOUSING / IMPELLER ASSEMBLY 1 KEY PART NO.

