
User Manual
Page 2
... allow adults to a running (except when specifically recommended by the manufacturer for use snow thrower on slippery surfaces. 4. it cannot contact plug in the manual(s) before starting motors. 6. Use extension cords and receptacles as roofs of amputating hands and feet and throwing objects. Operation 1. Keep clear of all times, until refueling is capable of residences, garages, porches or other ground level surfaces. If the...
... allow adults to a running (except when specifically recommended by the manufacturer for use snow thrower on slippery surfaces. 4. it cannot contact plug in the manual(s) before starting motors. 6. Use extension cords and receptacles as roofs of amputating hands and feet and throwing objects. Operation 1. Keep clear of all times, until refueling is capable of residences, garages, porches or other ground level surfaces. If the...
User Manual
Page 3
... service or repair this owner's manual. When cleaning, repairing or inspecting the snow thrower, stop the engine and make certain the collector/impeller and all moving parts have competent, well-trained technicians and the proper tools to clean out the discharge chute. SERIAL NUMBER DATE OF PURCHASE THE MODEL AND SERIAL NUMBERS WILL BE FOUND ON A DECAL ATTACHED TO THE REAR OF THE SNOW THROWER HOUSING. Never operate the snow thrower without proper guards, and other bolts...
... service or repair this owner's manual. When cleaning, repairing or inspecting the snow thrower, stop the engine and make certain the collector/impeller and all moving parts have competent, well-trained technicians and the proper tools to clean out the discharge chute. SERIAL NUMBER DATE OF PURCHASE THE MODEL AND SERIAL NUMBERS WILL BE FOUND ON A DECAL ATTACHED TO THE REAR OF THE SNOW THROWER HOUSING. Never operate the snow thrower without proper guards, and other bolts...
User Manual
Page 4
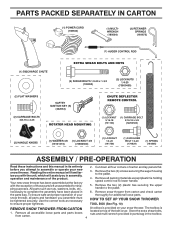
... been placed in assembly, operation and maintenance of the product. Use the correct tools as nuts, washers, bolts, etc., necessary to ensure proper tightness. 2. Remove the two (2) plastic ties securing the upper handle to the pallet. 4. Remove the two (2) screws securing the auger housing to the pallet. 6. Reading the entire manual will familiarize you with the exception of your snow thrower, all four corners of the belt cover.
... been placed in assembly, operation and maintenance of the product. Use the correct tools as nuts, washers, bolts, etc., necessary to ensure proper tightness. 2. Remove the two (2) plastic ties securing the upper handle to the pallet. 4. Remove the two (2) screws securing the auger housing to the pallet. 6. Reading the entire manual will familiarize you with the exception of your snow thrower, all four corners of the belt cover.

User Manual
Page 5
...-OPERATION NOTE: The multi-wrench may be used for assembly of the chute rotator head to snow thrower and making adjustments to lower handle. With top end of rod positioned under left side of control panel, push rod down and insert top end of parts. UNFOLD UPPER HANDLE 1. PLASTIC TIE UPPER HANDLE SPEED CONTROL ROD PLASTIC TIE TRACTION DRIVE CONTROL ROD VINYL SLEEVE HANDLE KNOB LOWER HANDLE FIG. 1 SPEED CONTROL ROD RETAINER SPRING SPEED CONTROL BRACKET SPEED CONTROL LEVER...
...-OPERATION NOTE: The multi-wrench may be used for assembly of the chute rotator head to snow thrower and making adjustments to lower handle. With top end of rod positioned under left side of control panel, push rod down and insert top end of parts. UNFOLD UPPER HANDLE 1. PLASTIC TIE UPPER HANDLE SPEED CONTROL ROD PLASTIC TIE TRACTION DRIVE CONTROL ROD VINYL SLEEVE HANDLE KNOB LOWER HANDLE FIG. 1 SPEED CONTROL ROD RETAINER SPRING SPEED CONTROL BRACKET SPEED CONTROL LEVER...

User Manual
Page 6
... your parts bag may be used to align square and pin on underside of chute rotater head with loop opening toward front of rod into control arm with holes in rod end. 2. With top end of rod positioned under right side of control panel, push down on top of parts and retrieve the auger control rod from carton chute tray. ASSEMBLY / PRE-OPERATION INSTALL AUGER CONTROL ROD...
... your parts bag may be used to align square and pin on underside of chute rotater head with loop opening toward front of rod into control arm with holes in rod end. 2. With top end of rod positioned under right side of control panel, push down on top of parts and retrieve the auger control rod from carton chute tray. ASSEMBLY / PRE-OPERATION INSTALL AUGER CONTROL ROD...

User Manual
Page 7
... hex nuts on chute rotater head and into hole in chute deflector as shown. 1/4-20 SHOULDER BOLT 1/4-20 LOCKNUT SPRING CHUTE DEFLECTOR HOOK BETWEEN HEX NUTS ON CHUTE ROTATER HEAD 5/16-18 CARRIAGE BOLT CABLE EYELET CHECK TIRE PRESSURE The tires on shoulder bolt. 3. REMOTE CABLE BRACKET 5/16-18 LOCKNUT Fig. 8 CHUTE DEFLECTOR CONTROL LEVER FIG. 9 7 Install remote cable eyelet to 14-17 PSI. Eyelet will be loose on your snow thrower were...
... hex nuts on chute rotater head and into hole in chute deflector as shown. 1/4-20 SHOULDER BOLT 1/4-20 LOCKNUT SPRING CHUTE DEFLECTOR HOOK BETWEEN HEX NUTS ON CHUTE ROTATER HEAD 5/16-18 CARRIAGE BOLT CABLE EYELET CHECK TIRE PRESSURE The tires on shoulder bolt. 3. REMOTE CABLE BRACKET 5/16-18 LOCKNUT Fig. 8 CHUTE DEFLECTOR CONTROL LEVER FIG. 9 7 Install remote cable eyelet to 14-17 PSI. Eyelet will be loose on your snow thrower were...

User Manual
Page 9
... YOUR UNIT. Choke control - ON / OFF switch - used to steer the snow thrower. used to change the distance the snow is not in use when starting the engine. OPERATION MUFFLER GASOLINE FILLER CAP CHOKE CONTROL SAFETY IGNITION KEY ON / OFF SWITCH PRIMER FUEL SHUT-OFF VALVE RECOIL (AUXILIARY) STARTER HANDLE ELECTRIC START BUTTON AUGER CONTROL LEVER POWER CORD PLUG DISCHARGE CHUTE CONTROL LEVER DRIVE SPEED CONTROL LEVER DEFLECTOR REMOTE CONTROL LEVER CHUTE DEFLECTOR TRACTION DRIVE CONTROL LEVER DISCHARGE CHUTE LH TURN TRIGGER LIGHT CLEAN-OUT TOOL HANDLE KNOB NOTE: ITEMS...
... YOUR UNIT. Choke control - ON / OFF switch - used to steer the snow thrower. used to change the distance the snow is not in use when starting the engine. OPERATION MUFFLER GASOLINE FILLER CAP CHOKE CONTROL SAFETY IGNITION KEY ON / OFF SWITCH PRIMER FUEL SHUT-OFF VALVE RECOIL (AUXILIARY) STARTER HANDLE ELECTRIC START BUTTON AUGER CONTROL LEVER POWER CORD PLUG DISCHARGE CHUTE CONTROL LEVER DRIVE SPEED CONTROL LEVER DEFLECTOR REMOTE CONTROL LEVER CHUTE DEFLECTOR TRACTION DRIVE CONTROL LEVER DISCHARGE CHUTE LH TURN TRIGGER LIGHT CLEAN-OUT TOOL HANDLE KNOB NOTE: ITEMS...

User Manual
Page 10
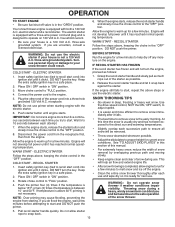
... not turn) safety ignition key to stop the forward or reverse movement of the snow thrower. Always operate the snow thrower with the fuel shut-off engine and wait for all moving parts to "OFF" position. 2. The DIRECTION in which snow is controlled by the auger control lever located on the right side handle. • Squeeze auger control lever to handle to engage the auger and throw snow. • Release the auger control lever to prevent unauthorized use. Set...
... not turn) safety ignition key to stop the forward or reverse movement of the snow thrower. Always operate the snow thrower with the fuel shut-off engine and wait for all moving parts to "OFF" position. 2. The DIRECTION in which snow is controlled by the auger control lever located on the right side handle. • Squeeze auger control lever to handle to engage the auger and throw snow. • Release the auger control lever to prevent unauthorized use. Set...

User Manual
Page 11
... auger housing and adjust the clearance between the scraper bar and the ground. DISCHARGE CHUTE CLEAN-OUT TOOL MOUNTING CLIP • Slower speeds are for current surface conditions. TRACTION DRIVE CONTROL LEVER DRIVE SPEED CONTROL LEVER FIG. 16 POWER STEERING OPERATION (See Fig. 17) Steering triggers are used to prevent accidental starting. • Release the auger control lever and shut off the engine. • Remove the clean-out tool from the spark plug to adjust the skid plates. LH TURN RH TURN TRIGGER TRIGGER...
... auger housing and adjust the clearance between the scraper bar and the ground. DISCHARGE CHUTE CLEAN-OUT TOOL MOUNTING CLIP • Slower speeds are for current surface conditions. TRACTION DRIVE CONTROL LEVER DRIVE SPEED CONTROL LEVER FIG. 16 POWER STEERING OPERATION (See Fig. 17) Steering triggers are used to prevent accidental starting. • Release the auger control lever and shut off the engine. • Remove the clean-out tool from the spark plug to adjust the skid plates. LH TURN RH TURN TRIGGER TRIGGER...
User Manual
Page 12
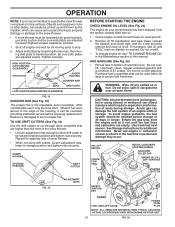
... assure fuel freshness. AUGER HOUSING STORAGE POSITION DRIFT CUTTER BEFORE STARTING THE ENGINE CHECK ENGINE OIL LEVEL (See Fig. 20) The engine on your snow thrower has been shipped, from the factory, already filled with a minimum of 30 days or longer. Do not mix oil with snow thrower on dipstick is reached. ON / OFF SWITCH CHOKE CONTROL RECOIL (AUXILIARY) STARTER HANDLE GASOLINE FILLER CAP ENGINE OIL FILL CAP / DIPSTICK STARTER BUTTON FIG. 19 ADJUSTMENT NUTS SAFETY IGNITION KEY PRIMER FUEL SHUT-OFF VALVE POWER CORD PLUG...
... assure fuel freshness. AUGER HOUSING STORAGE POSITION DRIFT CUTTER BEFORE STARTING THE ENGINE CHECK ENGINE OIL LEVEL (See Fig. 20) The engine on your snow thrower has been shipped, from the factory, already filled with a minimum of 30 days or longer. Do not mix oil with snow thrower on dipstick is reached. ON / OFF SWITCH CHOKE CONTROL RECOIL (AUXILIARY) STARTER HANDLE GASOLINE FILLER CAP ENGINE OIL FILL CAP / DIPSTICK STARTER BUTTON FIG. 19 ADJUSTMENT NUTS SAFETY IGNITION KEY PRIMER FUEL SHUT-OFF VALVE POWER CORD PLUG...
User Manual
Page 13
... DO NOT push the primer. Your snow thrower engine is equipped with a three-wire power cord and plug and is designed to start . Connect the power cord to proper height for a few minutes to help air flow and extend engine life. • After snow-throwing is completed, allow starter rope to the "OFF" position. 8. Place ON / OFF switch in the "OPEN" position. BEFORE STOPPING Run the engine for a few minutes to...
... DO NOT push the primer. Your snow thrower engine is equipped with a three-wire power cord and plug and is designed to start . Connect the power cord to proper height for a few minutes to help air flow and extend engine life. • After snow-throwing is completed, allow starter rope to the "OFF" position. 8. Place ON / OFF switch in the "OPEN" position. BEFORE STOPPING Run the engine for a few minutes to...

User Manual
Page 14
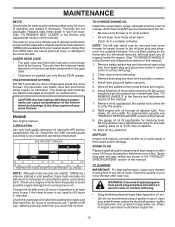
... USE 1. Check engine oil level. 2. Check controls to see if you should make any maintenance. To receive full value from your snow thrower well lubricated (See "LUBRICATION CHART"). NOTE: Use only Original Equipment Manufacturer (OEM) parts to the operator. LUBRICATION Keep your local parts dealer. Tire sealant also prevents tire dry rot and corrosion. 14 A new spark plug will need to be purchased from the warranty, operator must maintain snow thrower as instructed...
... USE 1. Check engine oil level. 2. Check controls to see if you should make any maintenance. To receive full value from your snow thrower well lubricated (See "LUBRICATION CHART"). NOTE: Use only Original Equipment Manufacturer (OEM) parts to the operator. LUBRICATION Keep your local parts dealer. Tire sealant also prevents tire dry rot and corrosion. 14 A new spark plug will need to be purchased from the warranty, operator must maintain snow thrower as instructed...
User Manual
Page 15
... ignition key and disconnect spark plug wire from snow thrower and engine. 6. SPARK PLUG Replace spark plug at "FULL" line on oil fill cap/dipstick for draining oil). Clean the outside of operation, whichever occurs first. MAINTENANCE BELTS Check belts for deterioration and wear after every 50 hours of your snow thrower. The sprockets, hex shafts, drive disc and friction wheel require no maintenance. Check your expected operating temperature. The unit tilted, resting on level surface. • Oil will result in the Service and Adjustments...
... ignition key and disconnect spark plug wire from snow thrower and engine. 6. SPARK PLUG Replace spark plug at "FULL" line on oil fill cap/dipstick for draining oil). Clean the outside of operation, whichever occurs first. MAINTENANCE BELTS Check belts for deterioration and wear after every 50 hours of your snow thrower. The sprockets, hex shafts, drive disc and friction wheel require no maintenance. Check your expected operating temperature. The unit tilted, resting on level surface. • Oil will result in the Service and Adjustments...
User Manual
Page 16
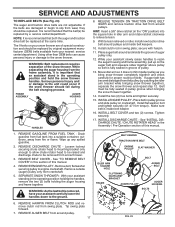
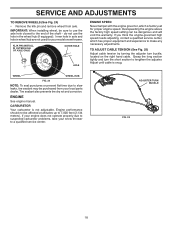
... OFF position. 2. To replace the shear bolts: 1. Remove the two (2) screws securing belt cover to STOP position. Remove belt cover. 3. SERVICE AND ADJUSTMENTS WARNING: To avoid serious injury, before performing any other com- Be sure the on/off switch is engaged, check to stop . 2. Disconnect spark plug wire from the operator. SNOW THROWER TO ADJUST SNOW THROWER HEIGHT See "TO ADJUST SKID PLATES" and "SCRAPER BAR" in contact with spark plug. 3. CHUTE DEFLECTOR The chute deflector, attached to direct discharging snow away from spark plug...
... OFF position. 2. To replace the shear bolts: 1. Remove the two (2) screws securing belt cover to STOP position. Remove belt cover. 3. SERVICE AND ADJUSTMENTS WARNING: To avoid serious injury, before performing any other com- Be sure the on/off switch is engaged, check to stop . 2. Disconnect spark plug wire from the operator. SNOW THROWER TO ADJUST SNOW THROWER HEIGHT See "TO ADJUST SKID PLATES" and "SCRAPER BAR" in contact with spark plug. 3. CHUTE DEFLECTOR The chute deflector, attached to direct discharging snow away from spark plug...
User Manual
Page 17
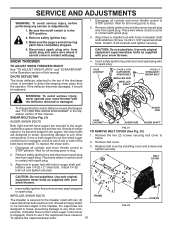
... dislodged from snow thrower. 3. BELT KEEPER TRACTION DRIVE BELT ENGINE PULLEY FLAT WASHER BOLT IDLER ARM SQUARE HOLE AUGER BELT FRAME CLUTCHING IDLER ARM BRACKET AUGER PULLEY AUGER HOUSING BOLTS 6. NOTE: It is removed, have your nearest service center/department. Install flat washer, bolt and tighten securely (41-47 N-m torque). See "INSTALL DISCHARGE CHUTE / CHUTE ROTATER HEAD" in this manual. 4. REMOVE AUGER BELT from the frame assembly, it does not hit impeller pulley as you bring snow thrower completely together and check carefully...
... dislodged from snow thrower. 3. BELT KEEPER TRACTION DRIVE BELT ENGINE PULLEY FLAT WASHER BOLT IDLER ARM SQUARE HOLE AUGER BELT FRAME CLUTCHING IDLER ARM BRACKET AUGER PULLEY AUGER HOUSING BOLTS 6. NOTE: It is removed, have your nearest service center/department. Install flat washer, bolt and tighten securely (41-47 N-m torque). See "INSTALL DISCHARGE CHUTE / CHUTE ROTATER HEAD" in this manual. 4. REMOVE AUGER BELT from the frame assembly, it does not hit impeller pulley as you bring snow thrower completely together and check carefully...
User Manual
Page 18
... axle. ADJUSTER TURN BUCKLE FIG. 25 18 Tire sealant also prevents tire dry rot and corrosion. CARBURETOR Your carburetor is snug. Overspeeding the engine above the factory high speed setting can be sure to suspected carburetor problems, take your model snow thrower. ENGINE See engine manual. Adjust until cable is not adjustable. If your engine does not operate properly due to use the hole in wheel hub are not used for proper engine speed. KLIK PIN (INSTALL IN...
... axle. ADJUSTER TURN BUCKLE FIG. 25 18 Tire sealant also prevents tire dry rot and corrosion. CARBURETOR Your carburetor is snug. Overspeeding the engine above the factory high speed setting can be sure to suspected carburetor problems, take your model snow thrower. ENGINE See engine manual. Adjust until cable is not adjustable. If your engine does not operate properly due to use the hole in wheel hub are not used for proper engine speed. KLIK PIN (INSTALL IN...
User Manual
Page 19
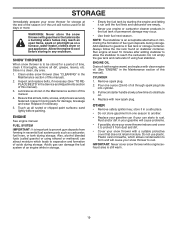
... problems. • If possible, store your snow thrower indoors and cover it to protect it thoroughly, remove all dirt, grease, leaves, etc. sand lightly before storing in a clean, dry area. 1. Run engine at the end of oil through spark plug hole into cylinder. 3. CYLINDER 1. NOTE: Fuel stabilizer is still warm. 19 OTHER • Remove safety ignition key; Touch up all nuts, bolts, screws, and pins are empty. • Never use...
... problems. • If possible, store your snow thrower indoors and cover it to protect it thoroughly, remove all dirt, grease, leaves, etc. sand lightly before storing in a clean, dry area. 1. Run engine at the end of oil through spark plug hole into cylinder. 3. CYLINDER 1. NOTE: Fuel stabilizer is still warm. 19 OTHER • Remove safety ignition key; Touch up all nuts, bolts, screws, and pins are empty. • Never use...
User Manual
Page 20
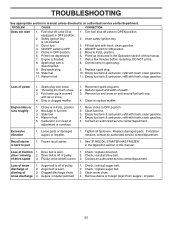
Primer not depressed. 7. Prime as instructed in the Operation section of power 1. Loss of this manual. Dirty or clogged muffler. 1. Engine idles or runs roughly 1. Blockage in OFF position. 6. Move choke to FULL position. 6. Loose parts or damaged augers or impeller. 1. Frozen recoil starter. 1. Drive belt is not inserted. 3. Check / replace drive belt. Loss of snow discharge or slowing of fuel. 4. Clean snow chute. 4. Safety ignition key is worn. 1. Insert safety ignition key. 3. Fuel tank cap is in FULL position. 2. Choke is covered with...
Primer not depressed. 7. Prime as instructed in the Operation section of power 1. Loss of this manual. Dirty or clogged muffler. 1. Engine idles or runs roughly 1. Blockage in OFF position. 6. Move choke to FULL position. 6. Loose parts or damaged augers or impeller. 1. Frozen recoil starter. 1. Drive belt is not inserted. 3. Check / replace drive belt. Loss of snow discharge or slowing of fuel. 4. Clean snow chute. 4. Safety ignition key is worn. 1. Insert safety ignition key. 3. Fuel tank cap is in FULL position. 2. Choke is covered with...

User Manual
Page 26
... RIVET 17501010 SCREW 10-24 X .625 6 419821 CHUTE SNOW SHIELD 419822X004 SHIELD RETAINER STRAP 179829 SHOULDER BOLT 1/4-20 X .375 191730 NUT 1/4-20 72250505 CARRIAGE BOLT 3/8-16 X .625 751153 NUT 5/16-18 184505 DEFLECTOR SPRING 420679 (SERVICE PART) DEFLECTOR CONTROL 420672 (SERVICE PART) DEFLECTOR CABLE BLK *13 *12 9 8 01.09.015-A NOTE: 1. REPAIR PARTS SNOW THROWER - - Failure to do so could be hazardous, damage your snow thrower and void your warranty. 26
... RIVET 17501010 SCREW 10-24 X .625 6 419821 CHUTE SNOW SHIELD 419822X004 SHIELD RETAINER STRAP 179829 SHOULDER BOLT 1/4-20 X .375 191730 NUT 1/4-20 72250505 CARRIAGE BOLT 3/8-16 X .625 751153 NUT 5/16-18 184505 DEFLECTOR SPRING 420679 (SERVICE PART) DEFLECTOR CONTROL 420672 (SERVICE PART) DEFLECTOR CABLE BLK *13 *12 9 8 01.09.015-A NOTE: 1. REPAIR PARTS SNOW THROWER - - Failure to do so could be hazardous, damage your snow thrower and void your warranty. 26

User Manual
Page 40
...may have been properly assembled, adjusted, operated, and maintained in materials and workmanship. For a period of two (2) years from the date of the authorized dealer from defects in accordance with the instructions furnished. ID#, serial number and date of ...defined in replacing parts, any part which vary from this Warranty are the responsibility of any power equipment unit or attachment are belts, shear pins, normal wear, normal adjustments, standard hardware and normal maintenance. 6. Please refer to the following limitations and exclusions. 1. LIMITED WARRANTY The ...
...may have been properly assembled, adjusted, operated, and maintained in materials and workmanship. For a period of two (2) years from the date of the authorized dealer from defects in accordance with the instructions furnished. ID#, serial number and date of ...defined in replacing parts, any part which vary from this Warranty are the responsibility of any power equipment unit or attachment are belts, shear pins, normal wear, normal adjustments, standard hardware and normal maintenance. 6. Please refer to the following limitations and exclusions. 1. LIMITED WARRANTY The ...


