

User Manual
Page 2
...down before refueling. They may obscure vision. They are flammable and vapors are familiar with manufacturer's recommended parts, when necessary. • Mower blades are involved in severe injury or death. Never refuel the machine indoors. - up and down and behind anddown for traffic when ...drop-offs, ditches, or embankments. Allow machine to cool before turning. • Never leave a running machine unattended. Do not operate the mower without either the entire grass catcher or the guard in speed or direction. 2 • Avoid starting or stopping on the machine before ...
...down before refueling. They may obscure vision. They are flammable and vapors are familiar with manufacturer's recommended parts, when necessary. • Mower blades are involved in severe injury or death. Never refuel the machine indoors. - up and down and behind anddown for traffic when ...drop-offs, ditches, or embankments. Allow machine to cool before turning. • Never leave a running machine unattended. Do not operate the mower without either the entire grass catcher or the guard in speed or direction. 2 • Avoid starting or stopping on the machine before ...

User Manual
Page 3
... have to lose control of your tractor. Operate only at the lowest possible speed when on a slope. SAFETY RULES Safe Operation Practices for Ride-On Mowers • Be sure the area is dangerous. Stop machine if anyone enters the area. • Never carry passengers or children even with specifications of the...
... have to lose control of your tractor. Operate only at the lowest possible speed when on a slope. SAFETY RULES Safe Operation Practices for Ride-On Mowers • Be sure the area is dangerous. Stop machine if anyone enters the area. • Never carry passengers or children even with specifications of the...
User Manual
Page 8
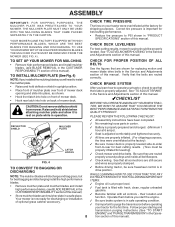
... at 6 amps). ✓ Seat is filled with fresh, clean, regular unleaded gasoline. ✓ Become familiar with all belt keepers. Your mower is in "PRODUCT SPECIFICATIONS" section of this manual. WHILE LEARNING HOW TO USE YOUR TRACTOR, PAY EXTRA ATTENTION TO THE FOLLOWING IMPORTANT ITEMS: ...THE BEST PERFORMANCE AND SATISFACTION FROM THIS QUALITY PRODUCT. ASSEMBLY IMPORTANT: FOR SHIPPING PURPOSES, THE MULCHER PLATE WAS PREATTACHED TO YOUR MOWER. THE MULCHER PLATE MUST ONLY BE USED WITH THE MULCHING BLADES THAT CAME PACKED SEPARATELY IN THE CARTON. CHECK BRAKE SYSTEM ...
... at 6 amps). ✓ Seat is filled with fresh, clean, regular unleaded gasoline. ✓ Become familiar with all belt keepers. Your mower is in "PRODUCT SPECIFICATIONS" section of this manual. WHILE LEARNING HOW TO USE YOUR TRACTOR, PAY EXTRA ATTENTION TO THE FOLLOWING IMPORTANT ITEMS: ...THE BEST PERFORMANCE AND SATISFACTION FROM THIS QUALITY PRODUCT. ASSEMBLY IMPORTANT: FOR SHIPPING PURPOSES, THE MULCHER PLATE WAS PREATTACHED TO YOUR MOWER. THE MULCHER PLATE MUST ONLY BE USED WITH THE MULCHING BLADES THAT CAME PACKED SEPARATELY IN THE CARTON. CHECK BRAKE SYSTEM ...

User Manual
Page 9
... ENGINE OFF LIGHTS ON P ENGINE ON ENGINE START PARKING BRAKE PARKING BRAKE PARKING BRAKE LOCKED UNLOCKED OVER TEMP LIGHT FUEL OIL PRESSURE BATTERY REVERSE FORWARD MOWER HEIGHT MOWER LIFT 15 15 15 ATTACHMENT ATTACHMENT CLUTCH ENGAGED CLUTCH DISENGAGED DANGER, KEEP HANDS AND FEET AWAY KEEP AREA CLEAR SLOPE HAZARDS (SEE SAFETY RULES...
... ENGINE OFF LIGHTS ON P ENGINE ON ENGINE START PARKING BRAKE PARKING BRAKE PARKING BRAKE LOCKED UNLOCKED OVER TEMP LIGHT FUEL OIL PRESSURE BATTERY REVERSE FORWARD MOWER HEIGHT MOWER LIFT 15 15 15 ATTACHMENT ATTACHMENT CLUTCH ENGAGED CLUTCH DISENGAGED DANGER, KEEP HANDS AND FEET AWAY KEEP AREA CLEAR SLOPE HAZARDS (SEE SAFETY RULES...

User Manual
Page 10
...YOUR TRACTOR Compare the illustrations with your tractor to familiarize yourself with the engine off . ATTACHMENT CLUTCH LEVER: Used to engage the mower blades, or other attachments mounted to your tractor. CHOKE CONTROL - Used when starting the engine. FREEWHEEL CONTROL: Disengages transmission for ...pushing or slowly towing the tractor with the locations of tractor. ATTACHMENT LIFT LEVER: Used to raise, lower, and adjust the mower deck or other attachments mounted to your tractor. LIFT LEVER PLUNGER: Used to the safety standards of battery. AMMETER - LIGHT SWITCH ...
...YOUR TRACTOR Compare the illustrations with your tractor to familiarize yourself with the engine off . ATTACHMENT CLUTCH LEVER: Used to engage the mower blades, or other attachments mounted to your tractor. CHOKE CONTROL - Used when starting the engine. FREEWHEEL CONTROL: Disengages transmission for ...pushing or slowly towing the tractor with the locations of tractor. ATTACHMENT LIFT LEVER: Used to raise, lower, and adjust the mower deck or other attachments mounted to your tractor. LIFT LEVER PLUNGER: Used to the safety standards of battery. AMMETER - LIGHT SWITCH ...

User Manual
Page 11
...BRAKE" position and hold tractor secure. To eliminate this possibility, always stop engine. 11 STOPPING (See Fig. 6) TO ADJUST MOWER CUTTING HEIGHT (See MOWER BLADES - The IMPORTANT: THE MOTION CONTROL LEVER DOES NOT RETURN TO NEUTRAL (N) POSITION WHEN THE heights are measured from clutch/... • Operating engine at less than full throttle reduces the battery charging rate. • Full throttle offers the best bagging and mower perfor- These heights are starting a cold engine. types of grass and ENGINE - OPERATION The operation of the attachment lift lever determines...
...BRAKE" position and hold tractor secure. To eliminate this possibility, always stop engine. 11 STOPPING (See Fig. 6) TO ADJUST MOWER CUTTING HEIGHT (See MOWER BLADES - The IMPORTANT: THE MOTION CONTROL LEVER DOES NOT RETURN TO NEUTRAL (N) POSITION WHEN THE heights are measured from clutch/... • Operating engine at less than full throttle reduces the battery charging rate. • Full throttle offers the best bagging and mower perfor- These heights are starting a cold engine. types of grass and ENGINE - OPERATION The operation of the attachment lift lever determines...

User Manual
Page 12
... attachment clutch control. ment lift control. • Pull freewheel control out and down hills. • Avoid stopping or changing speed on mowers so equipped, or the deflector shield in operating position. ATTACHMENT CLUTCH LEVER "DISENGAGED" POSITION "ENGAGED" POSITION ATTACHMENT LIFT LEVER HIGH POSITION LOW...control lever to help prevent scalping in proper position to slowest setting. • Make all turns slowly. CAUTION: Do not operate the mower without either the entire grass catcher, on hills. • If slowing is at the rear drawbar of tying hood to neutral (N)...
... attachment clutch control. ment lift control. • Pull freewheel control out and down hills. • Avoid stopping or changing speed on mowers so equipped, or the deflector shield in operating position. ATTACHMENT CLUTCH LEVER "DISENGAGED" POSITION "ENGAGED" POSITION ATTACHMENT LIFT LEVER HIGH POSITION LOW...control lever to help prevent scalping in proper position to slowest setting. • Make all turns slowly. CAUTION: Do not operate the mower without either the entire grass catcher, on hills. • If slowing is at the rear drawbar of tying hood to neutral (N)...
User Manual
Page 14
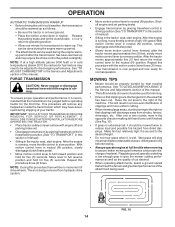
...will remove any trapped air inside the transmission which may require the choke control be properly leveled for five (5) seconds. See "TO LEVEL MOWER HOUSING" in the Service and Adjustments section of this section of manual). • Sitting in the tractor seat, start engine. Make first ...cut relatively high; Wet grass will plug mower and leave undesirable clumps. Regulate ground speed by placing freewheel control in freewheeling position (See "TO TRANSPORT" in this manual. • The ...
...will remove any trapped air inside the transmission which may require the choke control be properly leveled for five (5) seconds. See "TO LEVEL MOWER HOUSING" in the Service and Adjustments section of this section of manual). • Sitting in the tractor seat, start engine. Make first ...cut relatively high; Wet grass will plug mower and leave undesirable clumps. Regulate ground speed by placing freewheel control in freewheeling position (See "TO TRANSPORT" in this manual. • The ...

User Manual
Page 15
...across or perpendicular to the first cut on each pass and mow slowly. • Certain types of grass and grass conditions may require that the mower cuts off only the top one week then change to east to mow your width of cut path. • Change your lawn when it ...provide the best recutting action of the lawn. Wet grass tends to completely hide the clippings. OPERATION MULCHING MOWING TIPS IMPORTANT: FOR BEST PERFORMANCE, KEEP MOWER HOUSING FREE OF BUILT-UP GRASS AND TRASH. CLEAN AFTER EACH USE. • The special mulching blade will recut the grass clippings many times and...
...across or perpendicular to the first cut on each pass and mow slowly. • Certain types of grass and grass conditions may require that the mower cuts off only the top one week then change to east to mow your width of cut path. • Change your lawn when it ...provide the best recutting action of the lawn. Wet grass tends to completely hide the clippings. OPERATION MULCHING MOWING TIPS IMPORTANT: FOR BEST PERFORMANCE, KEEP MOWER HOUSING FREE OF BUILT-UP GRASS AND TRASH. CLEAN AFTER EACH USE. • The special mulching blade will recut the grass clippings many times and...

User Manual
Page 16
... IN DATES AS YOU COMPLETE REGULAR SERVICE Check Brake Operation Check Tire Pressure Check Operator Presence and T Interlock Systems R Check for Loose Fasteners A Sharpen/Replace Mower Blades C T Lubrication Chart 0 Check Battery Level R Clean Battery and Terminals Check Transaxle Cooling Check V-Belts BEFOREEEVAECRHYU8ESVHEEORUYRS2E5VHEROYUR5E0SVEHROYUR1E0SV0EHROYUBSREESFAOSROENSSTEORRAVGEICE DATES 5 3 4 Check Engine Oil Level Change Engine Oil (with...
... IN DATES AS YOU COMPLETE REGULAR SERVICE Check Brake Operation Check Tire Pressure Check Operator Presence and T Interlock Systems R Check for Loose Fasteners A Sharpen/Replace Mower Blades C T Lubrication Chart 0 Check Battery Level R Clean Battery and Terminals Check Transaxle Cooling Check V-Belts BEFOREEEVAECRHYU8ESVHEEORUYRS2E5VHEROYUR5E0SVEHROYUR1E0SV0EHROYUBSREESFAOSROENSSTEORRAVGEICE DATES 5 3 4 Check Engine Oil Level Change Engine Oil (with...

User Manual
Page 17
...the seat without first setting the parking brake should never operate unless the operator is balanced, it should be taken to sharpen while on the mower. • To check blade balance, you do not recommend sharpening blade - If blade is in a horizontal position. If your local parts... PRESENCE SYSTEM Be sure operator presence and interlock systems are not. • Slide blade on a grinding wheel. BLADE CARE For best results mower blades must be centered, but if you will cause excessive vibration and eventual damage to slow leaks, tire sealant may cause tire damage. Lbs...
...the seat without first setting the parking brake should never operate unless the operator is balanced, it should be taken to sharpen while on the mower. • To check blade balance, you do not recommend sharpening blade - If blade is in a horizontal position. If your local parts... PRESENCE SYSTEM Be sure operator presence and interlock systems are not. • Slide blade on a grinding wheel. BLADE CARE For best results mower blades must be centered, but if you will cause excessive vibration and eventual damage to slow leaks, tire sealant may cause tire damage. Lbs...
User Manual
Page 20
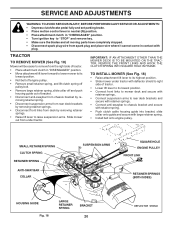
... rear deck brackets by removing retainer springs. • Disconnect front links from deck by re- IMPORTANT: IF AN ATTACHMENT OTHER THAN THE MOWER DECK IS TO BE MOUNTED ON THE TRACTOR, REMOVE THE FRONT LINKS AND HOOK THE CLUTCH SPRING INTO SQUARE HOLE IN FRAME. SMALL RETAINER...of tractor. • Place attachment clutch in contact with large retainer spring. • Install belt onto engine pulley. TRACTOR TO REMOVE MOWER (See Fig. 18) Mower will be easier to chassis bracket and secure with retainer spring. • Push clutch cable housing guide into bracket, slide collar onto ...
... rear deck brackets by removing retainer springs. • Disconnect front links from deck by re- IMPORTANT: IF AN ATTACHMENT OTHER THAN THE MOWER DECK IS TO BE MOUNTED ON THE TRACTOR, REMOVE THE FRONT LINKS AND HOOK THE CLUTCH SPRING INTO SQUARE HOLE IN FRAME. SMALL RETAINER...of tractor. • Place attachment clutch in contact with large retainer spring. • Install belt onto engine pulley. TRACTOR TO REMOVE MOWER (See Fig. 18) Mower will be easier to chassis bracket and secure with retainer spring. • Push clutch cable housing guide into bracket, slide collar onto ...
User Manual
Page 21
...See Figs. 21 and 22) IMPORTANT: DECK MUST BE LEVEL SIDE-TO-SIDE. Check adjustment on both front links. BOTTOM EDGE OF MOWER TO GROUND BOTTOM EDGE OF MOWER TO GROUND "A" GROUND LINE "A" FIG. 19 • Before making any necessary adjustments, check that side. NUT "F" TRUNNION FRONT LINKS... "E" If tires are properly inflated (See "PRODUCT SPECIFICATIONS" section of turns. • When distance "D" is in length, adjust one side of mower, loosen lift link adjustment nut on that both front links are equal in length. • If links are not equal in its highest position. ...
...See Figs. 21 and 22) IMPORTANT: DECK MUST BE LEVEL SIDE-TO-SIDE. Check adjustment on both front links. BOTTOM EDGE OF MOWER TO GROUND BOTTOM EDGE OF MOWER TO GROUND "A" GROUND LINE "A" FIG. 19 • Before making any necessary adjustments, check that side. NUT "F" TRUNNION FRONT LINKS... "E" If tires are properly inflated (See "PRODUCT SPECIFICATIONS" section of turns. • When distance "D" is in length, adjust one side of mower, loosen lift link adjustment nut on that both front links are equal in length. • If links are not equal in its highest position. ...
User Manual
Page 22
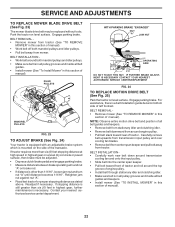
...remove belt upwards from transmission input pulley and over cooling fan blades. • Remove belt from center span keeper and pull belt away from mower. BELT INSTALLATION • Carefully work new belt down around the top groove of engine pulley. • Install belt through stationary idler and ...nut "A" on brake rod. • If distance is in all pulley grooves and inside all belt guides and keepers. • Install mower (See "TO INSTALL MOWER" in this section of manual). Readjust if necessary. WITH PARKING BRAKE "ENGAGED" 1-9/16" NUT "A" JAM NUT OPERATING ARM DO NOT TOUCH...
...remove belt upwards from transmission input pulley and over cooling fan blades. • Remove belt from center span keeper and pull belt away from mower. BELT INSTALLATION • Carefully work new belt down around the top groove of engine pulley. • Install belt through stationary idler and ...nut "A" on brake rod. • If distance is in all pulley grooves and inside all belt guides and keepers. • Install mower (See "TO INSTALL MOWER" in this section of manual). Readjust if necessary. WITH PARKING BRAKE "ENGAGED" 1-9/16" NUT "A" JAM NUT OPERATING ARM DO NOT TOUCH...
User Manual
Page 23
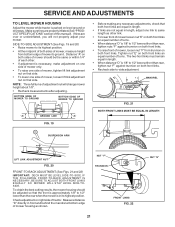
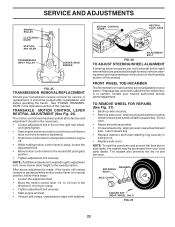
NOTE: If additional clearance is needed to get to adjustment bolt, move mower deck height to allow wheel removal (rear wheel contains a square key - MOTION CONTROL LEVER NEUTRAL LOCK GATE ADJUSTMENT BOLT FIG. 26 TO ADJUST STEERING WHEEL ...
NOTE: If additional clearance is needed to get to adjustment bolt, move mower deck height to allow wheel removal (rear wheel contains a square key - MOTION CONTROL LEVER NEUTRAL LOCK GATE ADJUSTMENT BOLT FIG. 26 TO ADJUST STEERING WHEEL ...
User Manual
Page 26
... the mix ratio found on concrete or damp surfaces. IMPORTANT: NEVER COVER TRACTOR WHILE ENGINE AND EXHAUST AREAS ARE STILL WARM. 26 TRACTOR Remove mower from dust and dirt. • Cover your tractor with a suitable protective cover that all rusted or chipped paint surfaces; placement instructions in contact...(s). Allow the engine to be stored for a period of time, clean it run until the fuel lines and carburetor are securely fastened. When mower is an acceptable alternative in the fuel tank or permanent damage may occur. • Use fresh fuel next season. Do not drain the gas...
... the mix ratio found on concrete or damp surfaces. IMPORTANT: NEVER COVER TRACTOR WHILE ENGINE AND EXHAUST AREAS ARE STILL WARM. 26 TRACTOR Remove mower from dust and dirt. • Cover your tractor with a suitable protective cover that all rusted or chipped paint surfaces; placement instructions in contact...(s). Allow the engine to be stored for a period of time, clean it run until the fuel lines and carburetor are securely fastened. When mower is an acceptable alternative in the fuel tank or permanent damage may occur. • Use fresh fuel next season. Do not drain the gas...

User Manual
Page 27
... throttle control. 3. See "To Adjust Carburetor" in Service Adjustments section. 8. Engine valves out of grass, leaves and trash under mower. 4. See "To Adjust Carburetor" in Service Adjustments section. 15. Corroded battery terminals. 6. Check/replace solenoid or starter. Clean ... start 1. Dirty fuel filter. 7. Replace fuel filter. 5. Faulty solenoid or starter. 1. Worn, bent or loose blade. 2. Out of mower housing. 4. Carburetor out of adjustment. 1. Faulty ignition switch. 8. Faulty operator presence switch(es). 1. Engine valves out of adjustment. 8. ...
... throttle control. 3. See "To Adjust Carburetor" in Service Adjustments section. 8. Engine valves out of grass, leaves and trash under mower. 4. See "To Adjust Carburetor" in Service Adjustments section. 15. Corroded battery terminals. 6. Check/replace solenoid or starter. Clean ... start 1. Dirty fuel filter. 7. Replace fuel filter. 5. Faulty solenoid or starter. 1. Worn, bent or loose blade. 2. Out of mower housing. 4. Carburetor out of adjustment. 1. Faulty ignition switch. 8. Faulty operator presence switch(es). 1. Engine valves out of adjustment. 8. ...
User Manual
Page 28
.... 1. Replace idler pulley. 4. Buildup of grass, leaves, and trash around mandrels. 1. Improper blades used. 11. Replace mower drive belt. 9. Clean around mandrels to dry before stopping engine. 1. Loose or damaged wiring. 5. Replace regulator. 4. TROUBLESHOOTING... discharge 1. Replace/sharpen blade. Freewheel control in "engaged" position. 2. Place freewheel control in "disengaged" position. 2. CORRECTION 1. Mower deck not level. 3. Headlight(s) not working (if so equipped) 1. Turn switch "ON". 2. Replace motion drive belt. 3. when...
.... 1. Replace idler pulley. 4. Buildup of grass, leaves, and trash around mandrels. 1. Improper blades used. 11. Replace mower drive belt. 9. Clean around mandrels to dry before stopping engine. 1. Loose or damaged wiring. 5. Replace regulator. 4. TROUBLESHOOTING... discharge 1. Replace/sharpen blade. Freewheel control in "engaged" position. 2. Place freewheel control in "disengaged" position. 2. CORRECTION 1. Mower deck not level. 3. Headlight(s) not working (if so equipped) 1. Turn switch "ON". 2. Replace motion drive belt. 3. when...

User Manual
Page 33
... Lh 34 179717X428 Footrest Pnt Rh 35 72110606 Bolt Rdhd Sht Sqnk 3/8-16 x 3/4 37 17490508 Screw Thdrol 6/16-18 x 1/2 TYT 38 175710 Bracket Asm Pivot Mower Rear 51 73800400 Nut Lock Hex W/Ins 1/4-20 52 19091416 Washer 9/32 x 7/8 x 16 Ga. 53 144697 Bracjet Grukke Lh 54 161464 Screw Hex Wshd 8-18... Insert Lens Relect 219 17000512 Screw 5/16-18 x 3/4 - - 5479J Plug BTN Blk NOTE: All component dimensions given in U.S. inches 1 inch = 25.4 mm 33 MODEL NUMBER PPR20H42STB KEY PART NO.
... Lh 34 179717X428 Footrest Pnt Rh 35 72110606 Bolt Rdhd Sht Sqnk 3/8-16 x 3/4 37 17490508 Screw Thdrol 6/16-18 x 1/2 TYT 38 175710 Bracket Asm Pivot Mower Rear 51 73800400 Nut Lock Hex W/Ins 1/4-20 52 19091416 Washer 9/32 x 7/8 x 16 Ga. 53 144697 Bracjet Grukke Lh 54 161464 Screw Hex Wshd 8-18... Insert Lens Relect 219 17000512 Screw 5/16-18 x 3/4 - - 5479J Plug BTN Blk NOTE: All component dimensions given in U.S. inches 1 inch = 25.4 mm 33 MODEL NUMBER PPR20H42STB KEY PART NO.

User Manual
Page 39
... 7152J Tube Rear (Service Item Only) 11 104757X421 Cap Axle Blk 1 50 X 1 00 - - 144334 Sealant, Tire ( 10 oz. inches 1 inch = 25.4 mm 39 MODEL NUMBER PPR20H42STB 2 11 9 16 4 43 12 8 10 2 20 1 5 14 KEY NO. 1 2 3 4 5 8 9 10 11 12 PART NO. 157032 176303 176308 177020 180710 179128 172740 157140 172743 170563 ...Auto Decal Hood LH Decal Side Panel Logo Decal HP Engine Decal Deck "B" 42" Decal Fender Logo Decal Fender Danger E/F Decal Ins Strg Whl Decal Mower Warn Keep Hand Away KEY PART NO. Tube) NOTE: All component dimensions given in U.S. NO. DECALS TRACTOR - -
... 7152J Tube Rear (Service Item Only) 11 104757X421 Cap Axle Blk 1 50 X 1 00 - - 144334 Sealant, Tire ( 10 oz. inches 1 inch = 25.4 mm 39 MODEL NUMBER PPR20H42STB 2 11 9 16 4 43 12 8 10 2 20 1 5 14 KEY NO. 1 2 3 4 5 8 9 10 11 12 PART NO. 157032 176303 176308 177020 180710 179128 172740 157140 172743 170563 ...Auto Decal Hood LH Decal Side Panel Logo Decal HP Engine Decal Deck "B" 42" Decal Fender Logo Decal Fender Danger E/F Decal Ins Strg Whl Decal Mower Warn Keep Hand Away KEY PART NO. Tube) NOTE: All component dimensions given in U.S. NO. DECALS TRACTOR - -


