

User Manual
Page 2
... check components and replace with the engine running . • Grass catcher components are sharp and can result in a large percentage of -control and tipover accidents, which could overturn the machine. Stop machine if anyone . Never remove gas cap or add fuel with manufacturer's recommended parts, when necessary. • Mower blades are subject to plow leaves or other fuels. DO NOT: • Do not turn machine off blades...
... check components and replace with the engine running . • Grass catcher components are sharp and can result in a large percentage of -control and tipover accidents, which could overturn the machine. Stop machine if anyone . Never remove gas cap or add fuel with manufacturer's recommended parts, when necessary. • Mower blades are subject to plow leaves or other fuels. DO NOT: • Do not turn machine off blades...

User Manual
Page 4
... this manual. In the state of a new Tractor. TABLE OF CONTENTS SAFETY RULES 2-3 PRODUCT SPECIFICATIONS 4 CUSTOMER RESPONSIBILITIES 4, 16-19 ASSEMBLY 6-8 OPERATION 9-15 MAINTENANCE SCHEDULE 16 SERVICE AND ADJUSTMENTS 20-25 STORAGE 26 TROUBLESHOOTING 27-28 REPAIR PARTS - Should you cannot easily remedy, please contact your purchase of California the above 32°F) SAE 5W-30 (below 32°F) OIL CAPACITY: W/FILTER 4.0 PINTS W/O FILTER 3.75 PINTS SPARK PLUG: (GAP: .040") CHAMPION...
... this manual. In the state of a new Tractor. TABLE OF CONTENTS SAFETY RULES 2-3 PRODUCT SPECIFICATIONS 4 CUSTOMER RESPONSIBILITIES 4, 16-19 ASSEMBLY 6-8 OPERATION 9-15 MAINTENANCE SCHEDULE 16 SERVICE AND ADJUSTMENTS 20-25 STORAGE 26 TROUBLESHOOTING 27-28 REPAIR PARTS - Should you cannot easily remedy, please contact your purchase of California the above 32°F) SAE 5W-30 (below 32°F) OIL CAPACITY: W/FILTER 4.0 PINTS W/O FILTER 3.75 PINTS SPARK PLUG: (GAP: .040") CHAMPION...

User Manual
Page 7
... position. • Start the engine. Continue with gasoline. • Place freewheel control in "transmission engaged" position. • Sit on seat in operating position, depress clutch/brake pedal and set parking brake and place motion control lever in slot and pull seat towards rear of this manual. Be sure tractor is clear of other people and objects. • Be sure all the above assembly steps have been completed. • Check engine oil level...
... position. • Start the engine. Continue with gasoline. • Place freewheel control in "transmission engaged" position. • Sit on seat in operating position, depress clutch/brake pedal and set parking brake and place motion control lever in slot and pull seat towards rear of this manual. Be sure tractor is clear of other people and objects. • Be sure all the above assembly steps have been completed. • Check engine oil level...
User Manual
Page 8
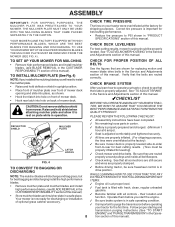
... Service and Adjustments section of this manual. FIG. 4 ✓ Check wiring. PLEASE REVIEW THE FOLLOWING CHECKLIST: DEFLECTOR SHIELD MULCHER PLATE ✓ All assembly instructions have been completed. ✓ No remaining loose parts in safe operating condition. ✓ It is important for best cutting performance. • Reduce tire pressure to -rear for leveling). ✓ Check mower and drive belts. See that the brake is now ready for discharging or installation...
... Service and Adjustments section of this manual. FIG. 4 ✓ Check wiring. PLEASE REVIEW THE FOLLOWING CHECKLIST: DEFLECTOR SHIELD MULCHER PLATE ✓ All assembly instructions have been completed. ✓ No remaining loose parts in safe operating condition. ✓ It is important for best cutting performance. • Reduce tire pressure to -rear for leveling). ✓ Check mower and drive belts. See that the brake is now ready for discharging or installation...

User Manual
Page 11
... engine to "backfire". • Turn ignition key to slow position. CHOKE CONTROL LEVER THROTTLE CONTROL LEVER "BRAKE" POSITION ATTACHMENT CLUTCH LEVER "ENGAGED" POSITION IGNITION KEY "DISENGAGED" POSITION PARKING BRAKE "ENGAGED" POSITION CLUTCH/BRAKE PEDAL "DRIVE" POSITION MOTION CONTROL LEVER PARKING BRAKE "DISENGAGED" POSITION FIG. 6 IMPORTANT: LEAVING THE IGNITION SWITCH IN ANY POSITION OTHER THAN "OFF" WILL CAUSE THE BATTERY TO BE DISCHARGED, (DEAD). TO MOVE FORWARD AND BACKWARD (See Fig. 6) The direction and speed of grass. STOPPING (See Fig. 6) TO ADJUST MOWER CUTTING HEIGHT...
... engine to "backfire". • Turn ignition key to slow position. CHOKE CONTROL LEVER THROTTLE CONTROL LEVER "BRAKE" POSITION ATTACHMENT CLUTCH LEVER "ENGAGED" POSITION IGNITION KEY "DISENGAGED" POSITION PARKING BRAKE "ENGAGED" POSITION CLUTCH/BRAKE PEDAL "DRIVE" POSITION MOTION CONTROL LEVER PARKING BRAKE "DISENGAGED" POSITION FIG. 6 IMPORTANT: LEAVING THE IGNITION SWITCH IN ANY POSITION OTHER THAN "OFF" WILL CAUSE THE BATTERY TO BE DISCHARGED, (DEAD). TO MOVE FORWARD AND BACKWARD (See Fig. 6) The direction and speed of grass. STOPPING (See Fig. 6) TO ADJUST MOWER CUTTING HEIGHT...

User Manual
Page 12
... disengage transmission by the operator to leave the seat with tractor on hills. • If slowing is necessary, move motion control lever to slowest setting. • Make all turns slowly. ATTACHMENT CLUTCH LEVER "DISENGAGED" POSITION "ENGAGED" POSITION ATTACHMENT LIFT LEVER HIGH POSITION LOW POSITION DEFLECTOR SHIELD FIG. 8 TO OPERATE ON HILLS CAUTION: Do not drive up or down hills. • Avoid stopping or changing speed on a flat level surface. • Adjust mower to desired cutting...
... disengage transmission by the operator to leave the seat with tractor on hills. • If slowing is necessary, move motion control lever to slowest setting. • Make all turns slowly. ATTACHMENT CLUTCH LEVER "DISENGAGED" POSITION "ENGAGED" POSITION ATTACHMENT LIFT LEVER HIGH POSITION LOW POSITION DEFLECTOR SHIELD FIG. 8 TO OPERATE ON HILLS CAUTION: Do not drive up or down hills. • Avoid stopping or changing speed on a flat level surface. • Adjust mower to desired cutting...

User Manual
Page 13
... and set parking brake. • Place motion control lever in neutral (N) position. • Move attachment clutch to "DISENGAGED" position. • Move throttle control to fast position • Pull choke control out for a few seconds, remove and read the warm and cold starting (See "OIL VISCOSITY CHART" in this manual. Drain the gas tank, start the engine and let it run until the fuel lines and carburetor are recommended by and comply with specifications of the manufacturer of your tractor...
... and set parking brake. • Place motion control lever in neutral (N) position. • Move attachment clutch to "DISENGAGED" position. • Move throttle control to fast position • Pull choke control out for a few seconds, remove and read the warm and cold starting (See "OIL VISCOSITY CHART" in this manual. Drain the gas tank, start the engine and let it run until the fuel lines and carburetor are recommended by and comply with specifications of the manufacturer of your tractor...
User Manual
Page 14
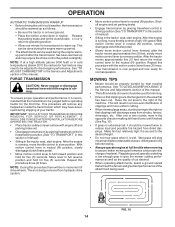
... used during shipping of your tractor. See "TO ADJUST CARBURETOR" in the tractor seat, start engine. PURGE TRANSMISSION CAUTION: Never engage or disengage freewheel lever while the engine is running, move throttle control to slow position. After the engine is running , move motion control lever to the neutral (N) position. Move lever to half (1/2) speed. Have the cut relatively high; the second to be adjusted for normal operation. Wet grass will suit the terrain and give the mower cutting...
... used during shipping of your tractor. See "TO ADJUST CARBURETOR" in the tractor seat, start engine. PURGE TRANSMISSION CAUTION: Never engage or disengage freewheel lever while the engine is running, move throttle control to slow position. After the engine is running , move motion control lever to the neutral (N) position. Move lever to half (1/2) speed. Have the cut relatively high; the second to be adjusted for normal operation. Wet grass will suit the terrain and give the mower cutting...

User Manual
Page 16
... Cooling Check V-Belts BEFOREEEVAECRHYU8ESVHEEORUYRS2E5VHEROYUR5E0SVEHROYUR1E0SV0EHROYUBSREESFAOSROENSSTEORRAVGEICE DATES 5 3 4 Check Engine Oil Level Change Engine Oil (with maintenance-free battery. 5 - A new spark plug and clean air filter assure proper air-fuel mixture and help your tractor. Tighten front axle pivot bolt to 35 ft.-lbs. LUBRICATION CHART ➀SPINDLE ZERK ➀SPINDLE ZERK ➀FRONT WHEEL BEARING ZERK ➀FRONT WHEEL BEARING ZERK ➁ENGINE BEFORE EACH USE • Check engine oil level. • Check brake operation. • Check tire pressure...
... Cooling Check V-Belts BEFOREEEVAECRHYU8ESVHEEORUYRS2E5VHEROYUR5E0SVEHROYUR1E0SV0EHROYUBSREESFAOSROENSSTEORRAVGEICE DATES 5 3 4 Check Engine Oil Level Change Engine Oil (with maintenance-free battery. 5 - A new spark plug and clean air filter assure proper air-fuel mixture and help your tractor. Tighten front axle pivot bolt to 35 ft.-lbs. LUBRICATION CHART ➀SPINDLE ZERK ➀SPINDLE ZERK ➀FRONT WHEEL BEARING ZERK ➀FRONT WHEEL BEARING ZERK ➁ENGINE BEFORE EACH USE • Check engine oil level. • Check brake operation. • Check tire pressure...

User Manual
Page 17
... not start unless the clutch/brake pedal is fully depressed and attachement clutch control is in the disengaged position. • When the engine is running, any attempt by the operator to keep the blade balanced. TRAILING EDGE UP BLADE CENTER HOLE MANDREL ASSEMBLY LOCK WASHER STAR FLAT WASHER BLADE BOLT (GRADE 8)* *A GRADE 8 HEAT TREATED BOLT CAN BE IDENTIFIED BY SIX LINES ON THE BOLT HEAD. An unbalanced blade will need a 5/8" diameter steel bolt, pin...
... not start unless the clutch/brake pedal is fully depressed and attachement clutch control is in the disengaged position. • When the engine is running, any attempt by the operator to keep the blade balanced. TRAILING EDGE UP BLADE CENTER HOLE MANDREL ASSEMBLY LOCK WASHER STAR FLAT WASHER BLADE BOLT (GRADE 8)* *A GRADE 8 HEAT TREATED BOLT CAN BE IDENTIFIED BY SIX LINES ON THE BOLT HEAD. An unbalanced blade will need a 5/8" diameter steel bolt, pin...

User Manual
Page 18
...; ENGINE • LUBRICATION Only use compressed air or high pressure sprayer to clean cooling fins. To open or remove caps or covers. TRANSAXLE COOLING The transmission fan and cooling fins should be sure fan blades are not adjustable. Tighten oil fill cap/ dipstick securely each eight (8) hours of this manual. After oil has drained completely, close and lock the drain valve by pushing inward and turning counterclockwise. Pour slowly. TO CLEAN BATTERY AND...
...; ENGINE • LUBRICATION Only use compressed air or high pressure sprayer to clean cooling fins. To open or remove caps or covers. TRANSAXLE COOLING The transmission fan and cooling fins should be sure fan blades are not adjustable. Tighten oil fill cap/ dipstick securely each eight (8) hours of this manual. After oil has drained completely, close and lock the drain valve by pushing inward and turning counterclockwise. Pour slowly. TO CLEAN BATTERY AND...

User Manual
Page 19
.... Spark plug type and gap setting are kept clean at the beginning of each season. of all foreign matter. • Keep finished surfaces and wheels free of all times. Water in engine can result in "PRODUCT SPECIFICATIONS" section of this manual. IN-LINE FUEL FILTER (See Fig. 17) The fuel filter should be kept free of dirt and chaff to carburetor, replacement is required. • With engine cool, remove filter and plug fuel line sec- CLEAN AIR INTAKE...
.... Spark plug type and gap setting are kept clean at the beginning of each season. of all foreign matter. • Keep finished surfaces and wheels free of all times. Water in engine can result in "PRODUCT SPECIFICATIONS" section of this manual. IN-LINE FUEL FILTER (See Fig. 17) The fuel filter should be kept free of dirt and chaff to carburetor, replacement is required. • With engine cool, remove filter and plug fuel line sec- CLEAN AIR INTAKE...
User Manual
Page 20
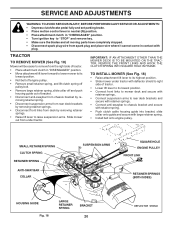
... bracket by removing retainer springs. • Raise lift lever to raise suspension arms. Slide mower out from under tractor. SERVICE AND ADJUSTMENTS WARNING: TO AVIOD SERIOUS INJURY, BEFORE PERFORMING ANY SERVICE OR ADJUSTMENTS: • Depress clutch/brake pedal fully and set parking brake. • Place motion control lever in neutral (N) position. • Place attachment clutch in "DISENGAGED" position. • Turn ignition key to "STOP" and remove key. • Make sure the blades and...
... bracket by removing retainer springs. • Raise lift lever to raise suspension arms. Slide mower out from under tractor. SERVICE AND ADJUSTMENTS WARNING: TO AVIOD SERIOUS INJURY, BEFORE PERFORMING ANY SERVICE OR ADJUSTMENTS: • Depress clutch/brake pedal fully and set parking brake. • Place motion control lever in neutral (N) position. • Place attachment clutch in "DISENGAGED" position. • Turn ignition key to "STOP" and remove key. • Make sure the blades and...
User Manual
Page 22
... all belt guides. • Install mower (See "To Install Mower" in highest gear on a level dry concrete or paved surface, then brake must be replaced without tools. Readjust if necessary. Retighten jam nut against nut "A". • Road test tractor for proper stopping distance as stated above. WITH PARKING BRAKE "ENGAGED" 1-9/16" NUT "A" JAM NUT OPERATING ARM DO NOT TOUCH THIS NUT. Park the tractor on the side of manual). SERVICE AND ADJUSTMENTS TO REPLACE MOWER BLADE DRIVE BELT...
... all belt guides. • Install mower (See "To Install Mower" in highest gear on a level dry concrete or paved surface, then brake must be replaced without tools. Readjust if necessary. Retighten jam nut against nut "A". • Road test tractor for proper stopping distance as stated above. WITH PARKING BRAKE "ENGAGED" 1-9/16" NUT "A" JAM NUT OPERATING ARM DO NOT TOUCH THIS NUT. Park the tractor on the side of manual). SERVICE AND ADJUSTMENTS TO REPLACE MOWER BLADE DRIVE BELT...
User Manual
Page 23
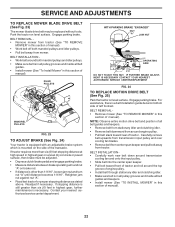
... transmission require removal for service or replacement, it is needed to get to adjustment bolt, move forward or backward. • Hold motion control lever in that position and turn engine off. • While holding motion control lever in place, loosen the adjustment bolt. • Move motion control lever to the neutral (N) (lock gate) position. • Tighten adjustment bolt securely. See "PURGE TRANSMISSION" in the Operation section of the right rear wheel, and lightly tighten. • Start engine...
... transmission require removal for service or replacement, it is needed to get to adjustment bolt, move forward or backward. • Hold motion control lever in that position and turn engine off. • While holding motion control lever in place, loosen the adjustment bolt. • Move motion control lever to the neutral (N) (lock gate) position. • Tighten adjustment bolt securely. See "PURGE TRANSMISSION" in the Operation section of the right rear wheel, and lightly tighten. • Start engine...

User Manual
Page 25
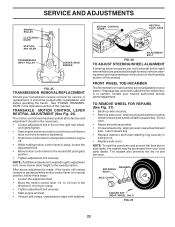
... choke position. • Loosen knob and remove cover assembly from starting. • Check wiring. If adjustment is not adjustable. TO REMOVE HOOD AND GRILL ASSEMBLY (See Fig. 31) • Raise hood. • Unsnap headlight wire connector. • Stand in fuse. If it is not, loosen cable clamp screw and pull cable back until choke is factory adjusted. IMPORTANT: NEVER TAMPER WITH THE ENGINE GOVERNOR, WHICH IS FACTORY SET FOR PROPER ENGINE SPEED. TO REPLACE FUSE Replace...
... choke position. • Loosen knob and remove cover assembly from starting. • Check wiring. If adjustment is not adjustable. TO REMOVE HOOD AND GRILL ASSEMBLY (See Fig. 31) • Raise hood. • Unsnap headlight wire connector. • Stand in fuse. If it is not, loosen cable clamp screw and pull cable back until choke is factory adjusted. IMPORTANT: NEVER TAMPER WITH THE ENGINE GOVERNOR, WHICH IS FACTORY SET FOR PROPER ENGINE SPEED. TO REPLACE FUSE Replace...
User Manual
Page 26
... the fuel lines and carburetor are securely fastened. NOTE: Fuel stabilizer is an acceptable alternative in the Customer Responsibilities section of oil through spark plug hole(s) into cylinder(s). • Turn ignition key to "START" position for a few seconds to distribute oil. • Replace with battery terminals. • If battery is to rust. ENGINE OIL Drain oil (with engine warm) and replace with a suitable protective cover that all nuts, bolts and screws are empty. • Never use...
... the fuel lines and carburetor are securely fastened. NOTE: Fuel stabilizer is an acceptable alternative in the Customer Responsibilities section of oil through spark plug hole(s) into cylinder(s). • Turn ignition key to "START" position for a few seconds to distribute oil. • Replace with battery terminals. • If battery is to rust. ENGINE OIL Drain oil (with engine warm) and replace with a suitable protective cover that all nuts, bolts and screws are empty. • Never use...

User Manual
Page 27
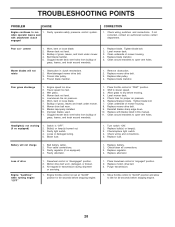
... start CAUSE 1. Weak or dead battery. 4. Corroded battery terminals. 6. Faulty operator presence switch(es). 1. Faulty solenoid or starter. 1. Clean battery terminals. 3. Check/replace solenoid or starter. Low oil level/dirty oil. 6. Carburetor out of adjustment. 10. Adjust throttle control. 3. Clean underside of fuel. 2. Check oil level/change spark plug. 7. Replace fuel filter. 8. Clean engine air screen/fins. 12. Tighten blade bolt. 2. Replace damaged parts. 27 Out of mower housing. 4. Dirty air filter. 6. Check all wiring. 7. Check all wiring...
... start CAUSE 1. Weak or dead battery. 4. Corroded battery terminals. 6. Faulty operator presence switch(es). 1. Faulty solenoid or starter. 1. Clean battery terminals. 3. Check/replace solenoid or starter. Low oil level/dirty oil. 6. Carburetor out of adjustment. 10. Adjust throttle control. 3. Clean underside of fuel. 2. Check oil level/change spark plug. 7. Replace fuel filter. 8. Clean engine air screen/fins. 12. Tighten blade bolt. 2. Replace damaged parts. 27 Out of mower housing. 4. Dirty air filter. 6. Check all wiring. 7. Check all wiring...
User Manual
Page 28
... or servicing. 1. TROUBLESHOOTING POINTS PROBLEM CAUSE Engine continues to slower speed. 3. Shift to run 1. Loose or damaged wiring. 5. Replace battery. 2. uneven 1. Mower blades will not charge 1. Clogged mower deck vent holes from buildup of grass, leaves and trash under mower. 4. Engine speed too slow. 2. Turn switch "ON". 2. Place freewheel control in this manual. 11. when operator leaves seat with blades listed in "engaged" position. 2. Replace fuse. Replace alternator. Replace mower drive belt. 3. Tighten blade bolt. 7. Check/clean all connections. 3. Bulb...
... or servicing. 1. TROUBLESHOOTING POINTS PROBLEM CAUSE Engine continues to slower speed. 3. Shift to run 1. Loose or damaged wiring. 5. Replace battery. 2. uneven 1. Mower blades will not charge 1. Clogged mower deck vent holes from buildup of grass, leaves and trash under mower. 4. Engine speed too slow. 2. Turn switch "ON". 2. Place freewheel control in this manual. 11. when operator leaves seat with blades listed in "engaged" position. 2. Replace fuse. Replace alternator. Replace mower drive belt. 3. Tighten blade bolt. 7. Check/clean all connections. 3. Bulb...

User Manual
Page 46
... of 1975. 46 The Warranty period for any power equipment unit or attachment are belts, blades, blade adapters, normal wear, normal adjustments, standard hardware and normal maintenance. 7. After ninety (90) days, we will exchange the Battery, charging you have other than EHP manufactured transaxle/transmission components, battery (except as noted below) or components parts thereof. Outdoor Products Customer Service Dept. 250 Bobby Jones...
... of 1975. 46 The Warranty period for any power equipment unit or attachment are belts, blades, blade adapters, normal wear, normal adjustments, standard hardware and normal maintenance. 7. After ninety (90) days, we will exchange the Battery, charging you have other than EHP manufactured transaxle/transmission components, battery (except as noted below) or components parts thereof. Outdoor Products Customer Service Dept. 250 Bobby Jones...


