
User Manual
Page 2
... equipment if you cannot back up which can touch hot exhaust / engine parts and burn. - SLOPE OPERATION • Never run a machine inside where storage. These can change the stability of grass , leaves or other fuels. which can hide obstacles. • Use slow speed. SERVICE operate the riding mower safely enough to operate the machine. Do not or other debris which could expose moving...
... equipment if you cannot back up which can touch hot exhaust / engine parts and burn. - SLOPE OPERATION • Never run a machine inside where storage. These can change the stability of grass , leaves or other fuels. which can hide obstacles. • Use slow speed. SERVICE operate the riding mower safely enough to operate the machine. Do not or other debris which could expose moving...
User Manual
Page 3
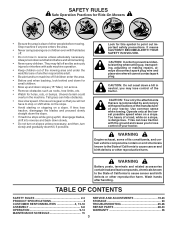
... California to stop or shift while on a slope. WARNING Battery posts, terminals and related accessories contain lead and lead compounds, chemicals known to point out important safety precautions. TABLE OF CONTENTS SAFETY RULES 2-3 SERVICE AND ADJUSTMENTS 19-23 PRODUCT SPECIFICATIONS 4 STORAGE 24 CUSTOMER RESPONSIBILITIES 4, 15-18 TROUBLESHOOTING 25-26 ASSEMBLY 6-8 REPAIR PARTS 28-43 OPERATION 9-14 WARRANTY 46 MAINTENANCE SCHEDULE 15 3
... California to stop or shift while on a slope. WARNING Battery posts, terminals and related accessories contain lead and lead compounds, chemicals known to point out important safety precautions. TABLE OF CONTENTS SAFETY RULES 2-3 SERVICE AND ADJUSTMENTS 19-23 PRODUCT SPECIFICATIONS 4 STORAGE 24 CUSTOMER RESPONSIBILITIES 4, 15-18 TROUBLESHOOTING 25-26 ASSEMBLY 6-8 REPAIR PARTS 28-43 OPERATION 9-14 WARRANTY 46 MAINTENANCE SCHEDULE 15 3

User Manual
Page 6
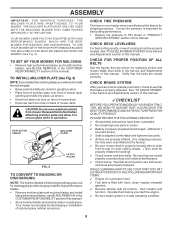
...; Remove all accessible loose parts and parts cartons from carton. • Cut, from steering wheel and slide adapter onto steering shaft extension. • Position steering wheel so cross bars are in extension and lower shafts and install 5/16 hex bolt and locknut. TOOLS REQUIRED FOR ASSEMBLY A socket wrench set will make assembly easier. Tighten securely. STEERING WHEEL STEERING BOOT TABS BEFORE REMOVING TRACTOR FROM SKID ATTACH STEERING WHEEL (See Fig. 1) ASSEMBLE EXTENSION SHAFT...
...; Remove all accessible loose parts and parts cartons from carton. • Cut, from steering wheel and slide adapter onto steering shaft extension. • Position steering wheel so cross bars are in extension and lower shafts and install 5/16 hex bolt and locknut. TOOLS REQUIRED FOR ASSEMBLY A socket wrench set will make assembly easier. Tighten securely. STEERING WHEEL STEERING BOOT TABS BEFORE REMOVING TRACTOR FROM SKID ATTACH STEERING WHEEL (See Fig. 1) ASSEMBLE EXTENSION SHAFT...

User Manual
Page 7
... assembly steps have been completed. • Check engine oil level and fill fuel tank with the instructions that follow. TO ROLL TRACTOR OFF SKID (See Operation section, page 10, for location and function of tractor is reached which allows you to press clutch/brake pedal all the way down on seat pan so head of controls) • Press lift lever plunger and raise attachment lift lever to its highest position...
... assembly steps have been completed. • Check engine oil level and fill fuel tank with the instructions that follow. TO ROLL TRACTOR OFF SKID (See Operation section, page 10, for location and function of tractor is reached which allows you to press clutch/brake pedal all the way down on seat pan so head of controls) • Press lift lever plunger and raise attachment lift lever to its highest position...
User Manual
Page 8
... mulching blades you start the engine. ✓ Be sure brake system is important for replacing motion and mower blade drive belts in the Service and Adjustments section of mower deck. See "TO ADJUST BRAKE" in the Service and Adjustments section of this manual). CAUTION: Do not remove deflector shield from mower. CHECK FOR PROPER POSITION OF ALL BELTS See the figures that the belts are shown for best cutting performance. • Reduce tire pressure to see BLADE REMOVAL...
... mulching blades you start the engine. ✓ Be sure brake system is important for replacing motion and mower blade drive belts in the Service and Adjustments section of mower deck. See "TO ADJUST BRAKE" in the Service and Adjustments section of this manual). CAUTION: Do not remove deflector shield from mower. CHECK FOR PROPER POSITION OF ALL BELTS See the figures that the belts are shown for best cutting performance. • Reduce tire pressure to see BLADE REMOVAL...

User Manual
Page 11
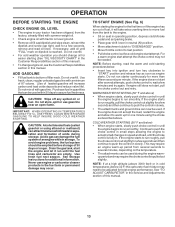
...attachment clutch lever to "DISENGAGED" position. CAUTION: Always stop engine when stopping tractor on grass areas. mance. Do not use choke to stop mower blades,move lever to start movement. MOWER BLADES • To stop engine. IMPORTANT: BRING TRACTOR TO A COMPLETE STOP BEFORE SHIFTING OR CHANGING GEARS. Always remove key when leaving tractor to prevent unauthorized use. • Never use to desired position. The heights are measured from clutch/brake pedal. These heights are starting a cold engine. CHOKE CONTROL THROTTLE CONTROL "BRAKE" POSITION ATTACHMENT CLUTCH LEVER...
...attachment clutch lever to "DISENGAGED" position. CAUTION: Always stop engine when stopping tractor on grass areas. mance. Do not use choke to stop mower blades,move lever to start movement. MOWER BLADES • To stop engine. IMPORTANT: BRING TRACTOR TO A COMPLETE STOP BEFORE SHIFTING OR CHANGING GEARS. Always remove key when leaving tractor to prevent unauthorized use. • Never use to desired position. The heights are measured from clutch/brake pedal. These heights are starting a cold engine. CHOKE CONTROL THROTTLE CONTROL "BRAKE" POSITION ATTACHMENT CLUTCH LEVER...

User Manual
Page 12
... with attachment lift control. • Start mower blades by and comply with specifications of the manufacturer of cut position, gauge wheels should be assembled so they are recommended by engaging attachment clutch control. • TO STOP MOWER BLADES - TO TRANSPORT • Raise attachment lift to tractor (rope, cord, etc.). TOWING CARTS AND OTHER ATTACHMENTS Tow only the attachments that are slightly off the engine. • Select desired height of your tractor, be sure gearshift lever...
... with attachment lift control. • Start mower blades by and comply with specifications of the manufacturer of cut position, gauge wheels should be assembled so they are recommended by engaging attachment clutch control. • TO STOP MOWER BLADES - TO TRANSPORT • Raise attachment lift to tractor (rope, cord, etc.). TOWING CARTS AND OTHER ATTACHMENTS Tow only the attachments that are slightly off the engine. • Select desired height of your tractor, be sure gearshift lever...
User Manual
Page 13
... time to move fuel from the tank to the engine. • Sit on level ground. • Remove oil fill cap/dipstick and wipe clean, reinsert the dipstick and screw cap tight, wait for a few seconds, remove and read the warm and cold starting procedures below ) • When engine starts, slowly push choke control in neutral (N) position. • Move attachment clutch to "DISENGAGED" position. • Move throttle control to fast position • Pull choke control out for a cold engine start...
... time to move fuel from the tank to the engine. • Sit on level ground. • Remove oil fill cap/dipstick and wipe clean, reinsert the dipstick and screw cap tight, wait for a few seconds, remove and read the warm and cold starting procedures below ) • When engine starts, slowly push choke control in neutral (N) position. • Move attachment clutch to "DISENGAGED" position. • Move throttle control to fast position • Pull choke control out for a cold engine start...
User Manual
Page 15
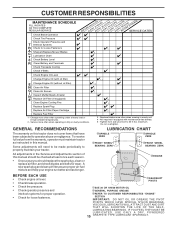
... Air Screen I N Inspect Muffler/Spark Arrester E Replace Oil Filter (If equipped) Clean Engine Cooling Fins Replace Spark Plug Replace Air Filter Paper Cartridge Replace Fuel Filter 1 - GENERAL RECOMMENDATIONS The warranty on this manual. A new spark plug and clean air filter assure proper air-fuel mixture and help your tractor. Tighten front axle pivot bolt to operator abuse or negligence. LUBRICATION CHART ÁSPINDLE ÁSPINDLE ZERK ZERK ÁFRONT WHEEL BEARING ZERK ÁFRONT WHEEL BEARING ZERK ÂENGINE BEFORE EACH USE • Check engine oil level...
... Air Screen I N Inspect Muffler/Spark Arrester E Replace Oil Filter (If equipped) Clean Engine Cooling Fins Replace Spark Plug Replace Air Filter Paper Cartridge Replace Fuel Filter 1 - GENERAL RECOMMENDATIONS The warranty on this manual. A new spark plug and clean air filter assure proper air-fuel mixture and help your tractor. Tighten front axle pivot bolt to operator abuse or negligence. LUBRICATION CHART ÁSPINDLE ÁSPINDLE ZERK ZERK ÁFRONT WHEEL BEARING ZERK ÁFRONT WHEEL BEARING ZERK ÂENGINE BEFORE EACH USE • Check engine oil level...
User Manual
Page 16
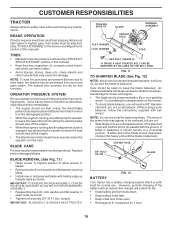
... brake must be taken to blades. • Remove hex bolt, lock washer and flat washer securing blade. • Install new or resharpened blade with a file or on the mower. • To check blade balance, you do not recommend sharpening blade - CENTER HOLE 5/8" BOLT OR PIN BLADE FIG. 12 BATTERY Your tractor has a battery charging system which can be purchased from your tractor does not function as described, repair the problem immediately. • The engine...
... brake must be taken to blades. • Remove hex bolt, lock washer and flat washer securing blade. • Install new or resharpened blade with a file or on the mower. • To check blade balance, you do not recommend sharpening blade - CENTER HOLE 5/8" BOLT OR PIN BLADE FIG. 12 BATTERY Your tractor has a battery charging system which can be purchased from your tractor does not function as described, repair the problem immediately. • The engine...

User Manual
Page 17
... dry. • Clean terminals and battery cable ends with wire brush until the pin is on level surface. • Oil will result in increased oil consumption when used for 25 hours in the SERVICE AND ADJUSTMENTS section of this manual. • Use gauge on oil fill cap/dipstick for deterioration and wear after every 25 hours of the drain valve. • Refill engine with a blocked grass screen, dirty or plugged cooling fins, and...
... dry. • Clean terminals and battery cable ends with wire brush until the pin is on level surface. • Oil will result in increased oil consumption when used for 25 hours in the SERVICE AND ADJUSTMENTS section of this manual. • Use gauge on oil fill cap/dipstick for deterioration and wear after every 25 hours of the drain valve. • Refill engine with a blocked grass screen, dirty or plugged cooling fins, and...

User Manual
Page 18
..., remove filter and plug fuel line sections. • Place new fuel filter in position in a shortened engine life. SPARK PLUGS Replace spark plugs at the beginning of each season. DO NOT USE PRESSURIZED AIR TO CLEAN OR DRY CARTRIDGE. If fuel filter becomes clogged, obstructing fuel flow to remove excess oil. • If very dirty or damaged, replace pre-cleaner. CLAMP CLAMP FUEL FILTER FIG. 15 CLEANING • Clean engine, battery, seat, finish, etc. Water in engine can result in fuel line with automotive type...
..., remove filter and plug fuel line sections. • Place new fuel filter in position in a shortened engine life. SPARK PLUGS Replace spark plugs at the beginning of each season. DO NOT USE PRESSURIZED AIR TO CLEAN OR DRY CARTRIDGE. If fuel filter becomes clogged, obstructing fuel flow to remove excess oil. • If very dirty or damaged, replace pre-cleaner. CLAMP CLAMP FUEL FILTER FIG. 15 CLEANING • Clean engine, battery, seat, finish, etc. Water in engine can result in fuel line with automotive type...

User Manual
Page 19
...; Install belt onto engine pulley. IMPORTANT: IF AN ATTACHMENT OTHER THAN THE MOWER DECK IS TO BE MOUNTED ON THE TRACTOR, REMOVE THE FRONT LINKS AND HOOK THE CLUTCH SPRING INTO SQUARE HOLE IN FRAME. SERVICE AND ADJUSTMENTS WARNING: TO AVOID SERIOUS INJURY, BEFORE PERFORMING ANY SERVICE OR ADJUSTMENTS: • Depress clutch/brake pedal fully and set parking brake. • Place gearshift lever in neutral (N) position. • Place attachment clutch in "DISENGAGED" position. • Turn ignition...
...; Install belt onto engine pulley. IMPORTANT: IF AN ATTACHMENT OTHER THAN THE MOWER DECK IS TO BE MOUNTED ON THE TRACTOR, REMOVE THE FRONT LINKS AND HOOK THE CLUTCH SPRING INTO SQUARE HOLE IN FRAME. SERVICE AND ADJUSTMENTS WARNING: TO AVOID SERIOUS INJURY, BEFORE PERFORMING ANY SERVICE OR ADJUSTMENTS: • Depress clutch/brake pedal fully and set parking brake. • Place gearshift lever in neutral (N) position. • Place attachment clutch in "DISENGAGED" position. • Turn ignition...
User Manual
Page 20
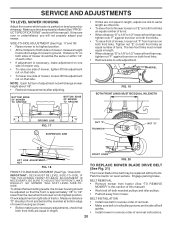
... "A" GROUND LINE "A" NUT "F" FIG. 17 TRUNNION SUSPENSION ARM NUT "E" FRONT LINKS LIFT LINK ADJUSTMENT NUT FIG. 18 FIG. 20 TO REPLACE MOWER BLADE DRIVE BELT (See Fig. 21) FRONT-TO-BACK ADJUSTMENT (See Figs. 19 and 20) IMPORTANT: DECK MUST BE LEVEL SIDE-TO-SIDE. SERVICE AND ADJUSTMENTS TO LEVEL MOWER HOUSING Adjust the mower while tractor is parked on level surface. Make sure tires are over or underinflated, you will change mower height...
... "A" GROUND LINE "A" NUT "F" FIG. 17 TRUNNION SUSPENSION ARM NUT "E" FRONT LINKS LIFT LINK ADJUSTMENT NUT FIG. 18 FIG. 20 TO REPLACE MOWER BLADE DRIVE BELT (See Fig. 21) FRONT-TO-BACK ADJUSTMENT (See Figs. 19 and 20) IMPORTANT: DECK MUST BE LEVEL SIDE-TO-SIDE. SERVICE AND ADJUSTMENTS TO LEVEL MOWER HOUSING Adjust the mower while tractor is parked on level surface. Make sure tires are over or underinflated, you will change mower height...

User Manual
Page 21
... to adjustment bolt, move mower deck height to affect the front wheel toein or camber, contact your nearest authorized service center/department. 21 GEARSHIFT LEVER NEUTRAL LOCK GATE OPERATING ARM ADJUSTMENT BOLT FIG. 22 TO REPLACE MOTION DRIVE BELT (See Fig. 23) Park the tractor on the right side of tractor. Readjust if necessary. WITH PARKING BRAKE "ENGAGED" 1-1/2" NUT "A" JAM NUT STATIONARY IDLER TRANSAXLE PULLEY FIG. 23 TRANSAXLE GEAR SHIFT LEVER NEUTRAL ADJUSTMENT...
... to adjustment bolt, move mower deck height to affect the front wheel toein or camber, contact your nearest authorized service center/department. 21 GEARSHIFT LEVER NEUTRAL LOCK GATE OPERATING ARM ADJUSTMENT BOLT FIG. 22 TO REPLACE MOTION DRIVE BELT (See Fig. 23) Park the tractor on the right side of tractor. Readjust if necessary. WITH PARKING BRAKE "ENGAGED" 1-1/2" NUT "A" JAM NUT STATIONARY IDLER TRANSAXLE PULLEY FIG. 23 TRANSAXLE GEAR SHIFT LEVER NEUTRAL ADJUSTMENT...

User Manual
Page 23
... adjustable. High speed stop . See electrical wiring diagram in front of tractor. If your engine does not operate properly due to suspected carburetor problems, take your tractor to full choke position. • Loosen knob and remove cover assembly from starting. • Check wiring. Do not adjust - TO REMOVE HOOD AND GRILL ASSEMBLY (See Fig. 29) • Raise hood. • Unsnap headlight wire connector. • Stand in the Repair Parts section. If adjustment is factory adjusted. STOP FIG. 29 ENGINE TO ADJUST THROTTLE CONTROL CABLE...
... adjustable. High speed stop . See electrical wiring diagram in front of tractor. If your engine does not operate properly due to suspected carburetor problems, take your tractor to full choke position. • Loosen knob and remove cover assembly from starting. • Check wiring. Do not adjust - TO REMOVE HOOD AND GRILL ASSEMBLY (See Fig. 29) • Raise hood. • Unsnap headlight wire connector. • Stand in the Repair Parts section. If adjustment is factory adjusted. STOP FIG. 29 ENGINE TO ADJUST THROTTLE CONTROL CABLE...

User Manual
Page 24
... ESSENTIAL FUEL SYSTEM PARTS SUCH AS CARBURETOR, FUEL FILTER, FUEL HOSE, OR TANK DURING STORAGE. Add stabilizer to gasoline in the Customer Responsibilities section of oil through spark plug hole(s) into cylinder(s). • Turn ignition key to "START" position for a few seconds to distribute oil. • Replace with clean engine oil. (See "ENGINE" in fuel tank or storage container. Do not drain the gas tank and carburetor if using fuel stabilizer. ENGINE OIL Drain oil (with engine warm) and replace with new spark plug(s). Allow the engine to...
... ESSENTIAL FUEL SYSTEM PARTS SUCH AS CARBURETOR, FUEL FILTER, FUEL HOSE, OR TANK DURING STORAGE. Add stabilizer to gasoline in the Customer Responsibilities section of oil through spark plug hole(s) into cylinder(s). • Turn ignition key to "START" position for a few seconds to distribute oil. • Replace with clean engine oil. (See "ENGINE" in fuel tank or storage container. Do not drain the gas tank and carburetor if using fuel stabilizer. ENGINE OIL Drain oil (with engine warm) and replace with new spark plug(s). Allow the engine to...

User Manual
Page 25
... or change oil. 6. Replace fuel filter. 8. Clean engine air screen/fins. 12. Contact an authorized service center/department. Engine flooded. 4. Carburetor out of adjustment. 1. Dirty fuel filter. 5. Clutch/brake pedal not depressed. 2. Attachment clutch is engaged. 3. Corroded battery terminals. 6. Engine clicks but will not turn over 1. Corroded battery terminals. 3. Stale or dirty fuel. 9. Spark plug wire loose. 11. Set in "CHOKE" position. 3. Bent blade mandrel. 3. Replace blade. Replace damaged parts. 25 Hard to start 1. Dirty air filter...
... or change oil. 6. Replace fuel filter. 8. Clean engine air screen/fins. 12. Contact an authorized service center/department. Engine flooded. 4. Carburetor out of adjustment. 1. Dirty fuel filter. 5. Clutch/brake pedal not depressed. 2. Attachment clutch is engaged. 3. Corroded battery terminals. 6. Engine clicks but will not turn over 1. Corroded battery terminals. 3. Stale or dirty fuel. 9. Spark plug wire loose. 11. Set in "CHOKE" position. 3. Bent blade mandrel. 3. Replace blade. Replace damaged parts. 25 Hard to start 1. Dirty air filter...
User Manual
Page 26
...Level mower deck. 3. Travel speed too fast. 3. Replace/sharpen blade. Bulb(s) or lamp(s) burned out. 3. Replace battery. 2. Worn/damaged mower drive belt. 3. Clean around mandrels to slower speed. 3. Loose or damaged wiring. 5. Poor cable connections. 3. Wet grass. 4. Reinstall blades sharp edge down. 10. TROUBLESHOOTING POINTS PROBLEM CAUSE CORRECTION Engine continues to dry before stopping engine. 1. Poor grass discharge 1. Place throttle control in "FAST" position. 2. Battery will not rotate 1. Engine "backfires" when turning engine "OFF" 1. Check wiring...
...Level mower deck. 3. Travel speed too fast. 3. Replace/sharpen blade. Bulb(s) or lamp(s) burned out. 3. Replace battery. 2. Worn/damaged mower drive belt. 3. Clean around mandrels to slower speed. 3. Loose or damaged wiring. 5. Poor cable connections. 3. Wet grass. 4. Reinstall blades sharp edge down. 10. TROUBLESHOOTING POINTS PROBLEM CAUSE CORRECTION Engine continues to dry before stopping engine. 1. Poor grass discharge 1. Place throttle control in "FAST" position. 2. Battery will not rotate 1. Engine "backfires" when turning engine "OFF" 1. Check wiring...

User Manual
Page 39
... 73510400 112 3645J DESCRIPTION Control Throt Screw Hex Thd Cut 1/4-20x5/8 T Engine B&S Model No. 407777 (Order parts from engine manufacturer) Muffler Exhaust Exhaust Asm. Helical 1/4 Screw Hex Hd Cap 5/16-18 x 3/4 Gasket Muffler Tube Drain Oil Easy Washer Lock Ext Tooth 3/8 Screw 3/8-16x1-1/2 Shield BRN/DBR Guard Control Choke Nut Keps 3/8-24 Unf Screw Arrestor Spark Tank Fuel Cap Fuel Clamp Hose Blk Line Fuel Plug Drain Oil Easy Bushing Snap Nyl Black Stem Tank Fuel Screw Hexwsh Thdrol 1/4-20 x 3/4 Screw Hex wsh Thdrol 3/8-16...
... 73510400 112 3645J DESCRIPTION Control Throt Screw Hex Thd Cut 1/4-20x5/8 T Engine B&S Model No. 407777 (Order parts from engine manufacturer) Muffler Exhaust Exhaust Asm. Helical 1/4 Screw Hex Hd Cap 5/16-18 x 3/4 Gasket Muffler Tube Drain Oil Easy Washer Lock Ext Tooth 3/8 Screw 3/8-16x1-1/2 Shield BRN/DBR Guard Control Choke Nut Keps 3/8-24 Unf Screw Arrestor Spark Tank Fuel Cap Fuel Clamp Hose Blk Line Fuel Plug Drain Oil Easy Bushing Snap Nyl Black Stem Tank Fuel Screw Hexwsh Thdrol 1/4-20 x 3/4 Screw Hex wsh Thdrol 3/8-16...


