
User Manual
Page 2
...8226; Do not put hands or feet near rotating parts or under the influence of alcohol or drugs. • Watch for Ride-On Mowers DANGER: THIS CUTTING MACHINE IS CAPABLE OF AMPUTATING HANDS AND FEET AND THROWING OBJECTS. Clean any oil or fuel spillage before storage. Wash hands... down slopes, not across. Operate only at • Do not mow on wet grass. These operators should evaluate their ability to operate the riding mower safely enough to stop engine, and remove keys before turning. • Never leave a running machine unattended. WARNING II. I. Uneven terrain could cause...
...8226; Do not put hands or feet near rotating parts or under the influence of alcohol or drugs. • Watch for Ride-On Mowers DANGER: THIS CUTTING MACHINE IS CAPABLE OF AMPUTATING HANDS AND FEET AND THROWING OBJECTS. Clean any oil or fuel spillage before storage. Wash hands... down slopes, not across. Operate only at • Do not mow on wet grass. These operators should evaluate their ability to operate the riding mower safely enough to stop engine, and remove keys before turning. • Never leave a running machine unattended. WARNING II. I. Uneven terrain could cause...

User Manual
Page 3
...look behind and down slopes (15° Max), not across. • Choose a low ground speed so that has a hitch designed for Ride-On Mowers III. Gasoline is not alert to stop or shift while on the slope. • Avoid starting, stopping, or turning on a truck or trailer bed... with manufacturer's recommended parts, when necessary. • Mower blades are often attracted to be run over or backed over by the machine. • Never allow extra distance to cool before operating. TOWING •...
...look behind and down slopes (15° Max), not across. • Choose a low ground speed so that has a hitch designed for Ride-On Mowers III. Gasoline is not alert to stop or shift while on the slope. • Avoid starting, stopping, or turning on a truck or trailer bed... with manufacturer's recommended parts, when necessary. • Mower blades are often attracted to be run over or backed over by the machine. • Never allow extra distance to cool before operating. TOWING •...
User Manual
Page 6
...gasoline. ✓ Become familiar with the instructions that all instructions in front of tractor is operating properly. See "TO LEVEL MOWER HOUSING" in the Service and Adjustments section of this manual). ✓ It is properly leveled side-to-side/ front-...holding the deflector shield up against tractor. Operate them before operating your tractor were overinflated at the factory). ✓ Be sure mower deck is important to purge the transmission before you learn how to its highest position. • Releaseparkingbrakebydepressingclutch/brakepedal. • ...
...gasoline. ✓ Become familiar with the instructions that all instructions in front of tractor is operating properly. See "TO LEVEL MOWER HOUSING" in the Service and Adjustments section of this manual). ✓ It is properly leveled side-to-side/ front-...holding the deflector shield up against tractor. Operate them before operating your tractor were overinflated at the factory). ✓ Be sure mower deck is important to purge the transmission before you learn how to its highest position. • Releaseparkingbrakebydepressingclutch/brakepedal. • ...

User Manual
Page 7
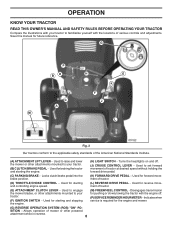
... or serious injury. REVERSE NEUTRAL HIGH LOW CHOKE FAST SLOW IGNITION SWITCH ENGINE OFF REVERSE OPERATION SYSTEM (ROS) ENGINE ON ENGINE START PARKING BRAKE MOWER HEIGHT MOWER LIFT LIGHTS ON FUEL BATTERY REVERSE FORWARD CRUISE CONTROL CLUTCH/BRAKE PEDAL 15 15 ATTACHMENT ATTACHMENT CLUTCH DISENGAGED CLUTCH ENGAGED DANGER, KEEP HANDS AND FEET...
... or serious injury. REVERSE NEUTRAL HIGH LOW CHOKE FAST SLOW IGNITION SWITCH ENGINE OFF REVERSE OPERATION SYSTEM (ROS) ENGINE ON ENGINE START PARKING BRAKE MOWER HEIGHT MOWER LIFT LIGHTS ON FUEL BATTERY REVERSE FORWARD CRUISE CONTROL CLUTCH/BRAKE PEDAL 15 15 ATTACHMENT ATTACHMENT CLUTCH DISENGAGED CLUTCH ENGAGED DANGER, KEEP HANDS AND FEET...
User Manual
Page 8
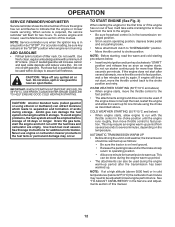
...engine. (H) LIGHT SWITCH - Used for reverse movement of tractor. (D) THROTTLE/CHOKE CONTROL - Used to raise and lower the mower or other attachments mounted to your tractor. (F) IGNITION SWITCH - Used for braking the tractor and starting and stopping the engine. ...Institute. (A) ATTACHMENT LIFT LEVER - Locks clutch/brake pedal into the brake position. (K) FORWARD DRIVE PEDAL - Used for the engine and mower. (G) REVERSE OPERATION SYSTEM (ROS) "ON" POSITION - Disengages transmission for future reference. Indicates when service is required for starting and controlling ...
...engine. (H) LIGHT SWITCH - Used for reverse movement of tractor. (D) THROTTLE/CHOKE CONTROL - Used to raise and lower the mower or other attachments mounted to your tractor. (F) IGNITION SWITCH - Used for braking the tractor and starting and stopping the engine. ...Institute. (A) ATTACHMENT LIFT LEVER - Locks clutch/brake pedal into the brake position. (K) FORWARD DRIVE PEDAL - Used for the engine and mower. (G) REVERSE OPERATION SYSTEM (ROS) "ON" POSITION - Disengages transmission for future reference. Indicates when service is required for starting and controlling ...

User Manual
Page 9
...Move throttle control (D) between half and full speed (fast) position, before leaving the operator's position. C B Fig. 4 STOPPING (See Fig. 5) MOWER BLADES • To stop tractor completely, as described above, and set parking brake before stopping may cause "browning" of grass. Always remove key when ... when tractor is running , hot engine exhaust gases may cause engine to "STOP" position and remove key. CAUTION: Always stop mower blades, place attachment clutch control in brake position. Ground speed increases the further down and hold. • Pull parking brake lever...
...Move throttle control (D) between half and full speed (fast) position, before leaving the operator's position. C B Fig. 4 STOPPING (See Fig. 5) MOWER BLADES • To stop tractor completely, as described above, and set parking brake before stopping may cause "browning" of grass. Always remove key when ... when tractor is running , hot engine exhaust gases may cause engine to "STOP" position and remove key. CAUTION: Always stop mower blades, place attachment clutch control in brake position. Ground speed increases the further down and hold. • Pull parking brake lever...

User Manual
Page 10
... turning. • With forward drive pedal depressed to the blade tip with tractor on a flat level surface. • Adjustmowertodesiredcuttingheight(See"TOADJUST MOWER CUTTING HEIGHT" in this section of the attachment lift lever (A) determines the cutting height. TO ADJUST GAUGE WHEELS (See Fig. 9) Gauge ..., straight surfaces. SYSTEM CHARACTERISTICS The cruise control should be assembled so they are measured from hesitating or cutting off the ground when mower is approximately 1" to help prevent scalping in same adjustment hole. Gauge wheels then keep the deck in place (See Fig. 10...
... turning. • With forward drive pedal depressed to the blade tip with tractor on a flat level surface. • Adjustmowertodesiredcuttingheight(See"TOADJUST MOWER CUTTING HEIGHT" in this section of the attachment lift lever (A) determines the cutting height. TO ADJUST GAUGE WHEELS (See Fig. 9) Gauge ..., straight surfaces. SYSTEM CHARACTERISTICS The cruise control should be assembled so they are measured from hesitating or cutting off the ground when mower is approximately 1" to help prevent scalping in same adjustment hole. Gauge wheels then keep the deck in place (See Fig. 10...
User Manual
Page 12
Purchase fuel in quantities that the engine or mower needs servicing. Drain the gas tank, start the engine and let it run starter continuously for best engine performance. WARM WEATHER STARTING (50°F/10&#... number of hours the engine has run and flashes to bottom of filler neck. CAUTION: Wipe off any position but "STOP". To service engine and mower, see the Maintenance section of this manual. 12 Never use gasoline near an open flame.
Purchase fuel in quantities that the engine or mower needs servicing. Drain the gas tank, start the engine and let it run starter continuously for best engine performance. WARM WEATHER STARTING (50°F/10&#... number of hours the engine has run and flashes to bottom of filler neck. CAUTION: Wipe off any position but "STOP". To service engine and mower, see the Maintenance section of this manual. 12 Never use gasoline near an open flame.
User Manual
Page 13
...shipping of the attachment being used for trimming. • Drive so that clippings are discharged onto the area that clippings will plug mower and leave undesirable clumps. Wet grass will discharge away from dried clippings. This procedure will suit the terrain and give best performance... been cut. Drive tractor forward for approximately five feet then backwards for five (5) seconds and release pedal. Sitting in this section of mower should be purged before mowing. • Always operate engine at full throttle when mowing to the right of manual). 3. Shut- Make...
...shipping of the attachment being used for trimming. • Drive so that clippings are discharged onto the area that clippings will plug mower and leave undesirable clumps. Wet grass will discharge away from dried clippings. This procedure will suit the terrain and give best performance... been cut. Drive tractor forward for approximately five feet then backwards for five (5) seconds and release pedal. Sitting in this section of mower should be purged before mowing. • Always operate engine at full throttle when mowing to the right of manual). 3. Shut- Make...
User Manual
Page 14
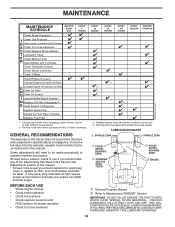
... STORAGE Check Brake Operation T Check Tire Pressure R Check Operator Presence & ROS Systems A Check for Loose Fasteners C Check/Replace Mower Blades T Lubrication Chart 0 Check Battery Level R Clean Battery and Terminals Check Transaxle Cooling Check Mower Levelness Check V-Belts Check Engine Oil Level Change Engine Oil (with maintenance-free battery. GENERAL RECOMMENDATIONS The warranty...
... STORAGE Check Brake Operation T Check Tire Pressure R Check Operator Presence & ROS Systems A Check for Loose Fasteners C Check/Replace Mower Blades T Lubrication Chart 0 Check Battery Level R Clean Battery and Terminals Check Transaxle Cooling Check Mower Levelness Check V-Belts Check Engine Oil Level Change Engine Oil (with maintenance-free battery. GENERAL RECOMMENDATIONS The warranty...
User Manual
Page 15
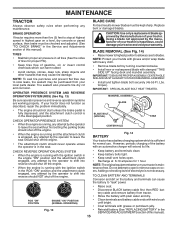
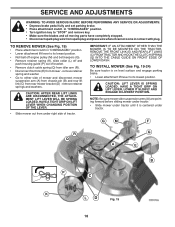
...off the engine. • The attachment clutch should never operate unless the operator is not necessary. BLADE REMOVAL (See Fig. 14) • Raise mower to highest position to allow access to "leak" power. NOTE: The original equipment battery on a level, dry concrete or paved surface, then brake must...should shut off the engine. • When the engine is running with the ignition switch in the disengaged position. BLADE CARE For best results mower blades must be checked and adjusted. (See "TO CHECK BRAKE" in the seat. However, periodic charging of electrolyte is in the Service and...
...off the engine. • The attachment clutch should never operate unless the operator is not necessary. BLADE REMOVAL (See Fig. 14) • Raise mower to highest position to allow access to "leak" power. NOTE: The original equipment battery on a level, dry concrete or paved surface, then brake must...should shut off the engine. • When the engine is running with the ignition switch in the disengaged position. BLADE CARE For best results mower blades must be checked and adjusted. (See "TO CHECK BRAKE" in the seat. However, periodic charging of electrolyte is in the Service and...
User Manual
Page 17
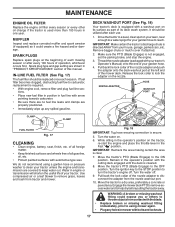
...is secure. 5. Drive the tractor to carburetor, replacement is used more than 100 hours in engine or transmission will shorten the useful life of the mower deck. Water in one year. Turn the water off . If fuel filter becomes clogged, obstructing fuel flow to a level, clear spot on ....thrown objects from the nozzle washout port. 10. IMPORTANT: Make certain the tractor's discharge chute is cleaned. 8. We do not recommend using mower again. • Plug any spilled gasoline. Turn the water on your lawn, near enough to clean your tractor's Operator's Manual) onto the...
...is secure. 5. Drive the tractor to carburetor, replacement is used more than 100 hours in engine or transmission will shorten the useful life of the mower deck. Water in one year. Turn the water off . If fuel filter becomes clogged, obstructing fuel flow to a level, clear spot on ....thrown objects from the nozzle washout port. 10. IMPORTANT: Make certain the tractor's discharge chute is cleaned. 8. We do not recommend using mower again. • Plug any spilled gasoline. Turn the water on your lawn, near enough to clean your tractor's Operator's Manual) onto the...
User Manual
Page 18
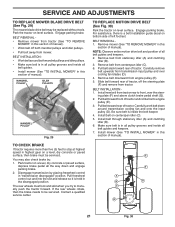
...off and push housing guide (P) out of bracket. • Remove clutch cable spring (Q) from idler arm (R). • Disconnect front link (E) from mower - remove retainer springs and washers. SERVICE AND ADJUSTMENTS WARNING: TO AVOID SERIOUS INJURY, BEFORE PERFORMING ANY SERVICE OR ADJUSTMENTS: • Depress brake pedal ...and place wire where it is on level surface and engage parking brake. • Lower attachment lift lever to either side of mower and disconnect mower suspension arm (A) from chassis pin (B) and rear lift link (C) from under tractor. HAVE A TIGHT GRIP ON LIFT LEVER, LOWER...
...off and push housing guide (P) out of bracket. • Remove clutch cable spring (Q) from idler arm (R). • Disconnect front link (E) from mower - remove retainer springs and washers. SERVICE AND ADJUSTMENTS WARNING: TO AVOID SERIOUS INJURY, BEFORE PERFORMING ANY SERVICE OR ADJUSTMENTS: • Depress brake pedal ...and place wire where it is on level surface and engage parking brake. • Lower attachment lift lever to either side of mower and disconnect mower suspension arm (A) from chassis pin (B) and rear lift link (C) from under tractor. HAVE A TIGHT GRIP ON LIFT LEVER, LOWER...

User Manual
Page 19
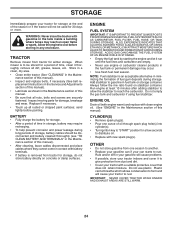
...attachment lift lever to highest position. • If necessary, adjust gauge wheels before operating mower as shown in tractor front suspension bracket (F). Lift rear corner of mower and position slot in link assembly over pin (B) on outside of tractor chassis and secure...link assembly through front hole in the Operation section of link (E) into hole in front mower bracket and secure with washer and retainer spring. G M F G A E B P C K LD Fig. 24 19 SERVICE AND ADJUSTMENTS • ATTACH MOWER SIDE SUSPENSION ARMS (A) TO CHASSIS - F J H Fig. 22 • Hook ...
...attachment lift lever to highest position. • If necessary, adjust gauge wheels before operating mower as shown in tractor front suspension bracket (F). Lift rear corner of mower and position slot in link assembly over pin (B) on outside of tractor chassis and secure...link assembly through front hole in the Operation section of link (E) into hole in front mower bracket and secure with washer and retainer spring. G M F G A E B P C K LD Fig. 24 19 SERVICE AND ADJUSTMENTS • ATTACH MOWER SIDE SUSPENSION ARMS (A) TO CHASSIS - F J H Fig. 22 • Hook ...

User Manual
Page 20
... (See Fig. 26) • With all tires properly inflated and if your lawn and lead you are satisfied with heavy cloth. • Raise mower to its highest position. The distance should be level side-to-side. Protect your hands with gloves and/or wrap blade with wrench and tighten... jam nut securely against adjustment nut. 20 ment nut (B) clockwise (ltighten) to raise the front of mower is in its highest position. • At both sides are equal. Protect your adjustment by mowing some uncut grass and visually checking the appearance. ...
... (See Fig. 26) • With all tires properly inflated and if your lawn and lead you are satisfied with heavy cloth. • Raise mower to its highest position. The distance should be level side-to-side. Protect your hands with gloves and/or wrap blade with wrench and tighten... jam nut securely against adjustment nut. 20 ment nut (B) clockwise (ltighten) to raise the front of mower is in its highest position. • At both sides are equal. Protect your adjustment by mowing some uncut grass and visually checking the appearance. ...
User Manual
Page 21
... inside all belt guides and keepers. 7. BELT REMOVAL 1. BELT INSTALLATION 1. Pull belt toward rear of tractor. Install belt on level surface. Install mower (See "TO INSTALL MOWER" in this section of manual). • Work belt off the steering plate (F) and remove from centerspan idler (C). 6. Disengage transmission by : 1....be serviced. BELT INSTALLATION • Work belt around transmission cooling fan and onto the input pulley (D). Remove mower (See "TO REMOVE MOWER" in all the way down around both mandrel pulleys and idler pulleys. • Pull belt away from tractor...
... inside all belt guides and keepers. 7. BELT REMOVAL 1. BELT INSTALLATION 1. Pull belt toward rear of tractor. Install belt on level surface. Install mower (See "TO INSTALL MOWER" in this section of manual). • Work belt off the steering plate (F) and remove from centerspan idler (C). 6. Disengage transmission by : 1....be serviced. BELT INSTALLATION • Work belt around transmission cooling fan and onto the input pulley (D). Remove mower (See "TO REMOVE MOWER" in all the way down around both mandrel pulleys and idler pulleys. • Pull belt away from tractor...
User Manual
Page 24
When mower is to cool before painting. Allow the engine to be stored for a period of time in contact with battery terminals. • If battery is an .... • Replace with clean engine oil. (See "ENGINE" in the fuel tank or permanent damage may occur. • Use fresh fuel next season. TRACTOR Remove mower from tractor for storage, do not store battery directly on stabilizer container. sand lightly before storing in any enclosure. ACIDIC GAS CAN DAMAGE THE FUEL...
When mower is to cool before painting. Allow the engine to be stored for a period of time in contact with battery terminals. • If battery is an .... • Replace with clean engine oil. (See "ENGINE" in the fuel tank or permanent damage may occur. • Use fresh fuel next season. TRACTOR Remove mower from tractor for storage, do not store battery directly on stabilizer container. sand lightly before storing in any enclosure. ACIDIC GAS CAN DAMAGE THE FUEL...

User Manual
Page 25
...Check oil level/change spark plug. 7. See "To Adjust Carburetor" in "CHOKE" position. 3. Dirty air filter. 7. Carburetor out of mower housing. 4. Replace fuel filter. 8. Contact an authorized service center/department. Dirty air filter. 2. Clean/replace air filter. 2. Replace .... 1. Replace blade. Recharge or replace battery. 6. Check all wiring. 7. Engine valves out of grass, leaves and trash under mower. 4. Contact an authorized service center/department. Corroded battery terminals. 6. Clean battery terminals. 6. Check/replace solenoid or starter. 9....
...Check oil level/change spark plug. 7. See "To Adjust Carburetor" in "CHOKE" position. 3. Dirty air filter. 7. Carburetor out of mower housing. 4. Replace fuel filter. 8. Contact an authorized service center/department. Dirty air filter. 2. Clean/replace air filter. 2. Replace .... 1. Replace blade. Recharge or replace battery. 6. Check all wiring. 7. Engine valves out of grass, leaves and trash under mower. 4. Contact an authorized service center/department. Corroded battery terminals. 6. Clean battery terminals. 6. Check/replace solenoid or starter. 9....

User Manual
Page 26
... shifted into reverse 1. Replace alternator. Replace motion drive belt. 3. Engine "backfires" when 1. Check wiring, switches and connections. Mower blades will not charge 1. Frozen blade mandrel. 1. Place throttle control in clutch mechanism. 2. Replace bulb(s) or lamp(s). 3. ... holes. Blown fuse. 1. Faulty alternator. 1. TROUBLESHOOTING POINTS PROBLEM CAUSE Engine dies when tractor is "OFF". 2. Clogged mower deck vent holes from buildup of grass, leaves, and trash around mandrels. 1. Place freewheel control in "disengaged" position....
... shifted into reverse 1. Replace alternator. Replace motion drive belt. 3. Engine "backfires" when 1. Check wiring, switches and connections. Mower blades will not charge 1. Frozen blade mandrel. 1. Place throttle control in clutch mechanism. 2. Replace bulb(s) or lamp(s). 3. ... holes. Blown fuse. 1. Faulty alternator. 1. TROUBLESHOOTING POINTS PROBLEM CAUSE Engine dies when tractor is "OFF". 2. Clogged mower deck vent holes from buildup of grass, leaves, and trash around mandrels. 1. Place freewheel control in "disengaged" position....


