
Owner Manual
Page 3
... Battery Recycling Designation/Explanation Voltage Current Frequency (cycles per second) Power Time Rational speed, at no load Double-insulated construction Revolutions, strokes, surface speed, orbits, etc., per minute. Do not expose to operate the product better and safer. WARNING: Keep your safety. Gloves Safety Footwear Wear non-slip, heavy-duty protective gloves when handling the pole saw and the blade. Bar...
... Battery Recycling Designation/Explanation Voltage Current Frequency (cycles per second) Power Time Rational speed, at no load Double-insulated construction Revolutions, strokes, surface speed, orbits, etc., per minute. Do not expose to operate the product better and safer. WARNING: Keep your safety. Gloves Safety Footwear Wear non-slip, heavy-duty protective gloves when handling the pole saw and the blade. Bar...
Owner Manual
Page 4
... intended to be near electrical wires or power lines. PRODUCT SPECIFICATIONS TYPE BATTERY CHARGING TIME MOTOR SPEED BAR LENGTH CHAIN PITCH CHAIN TYPE GUIDE BAR TYPE CHAIN OIL TANK CAPACITY UNIT WEIGHT (WITHOUT BATTERY) UNIT WEIGHT (WITH BATTERY) Cordless, Battery-Powered 40V 2Ah Lithium-Ion 60 Minutes Brushed 4200 RPM 8" (203 mm) 3/8 in property damage. IDENTIFICATION OF SAFETY SYMBOLS Electrocution Hazard Hazard Zone DANGER: To prevent electrocution, do not use near when starting or operating the pruner. WARNING: Keep...
... intended to be near electrical wires or power lines. PRODUCT SPECIFICATIONS TYPE BATTERY CHARGING TIME MOTOR SPEED BAR LENGTH CHAIN PITCH CHAIN TYPE GUIDE BAR TYPE CHAIN OIL TANK CAPACITY UNIT WEIGHT (WITHOUT BATTERY) UNIT WEIGHT (WITH BATTERY) Cordless, Battery-Powered 40V 2Ah Lithium-Ion 60 Minutes Brushed 4200 RPM 8" (203 mm) 3/8 in property damage. IDENTIFICATION OF SAFETY SYMBOLS Electrocution Hazard Hazard Zone DANGER: To prevent electrocution, do not use near when starting or operating the pruner. WARNING: Keep...
Owner Manual
Page 5
.... Such preventive safety measures reduce the risk of starting . is dangerous and must be repaired. • Disconnect the tool from the battery before making any adjustments changing accessories, or storing polesaws. Many accidents are easier to operate the polesaw. Use of bystanders, please read these instructions to control. • Use the polesaw, accessories and tool bits etc. SAFETY RULES WARNING: READ ALL...
.... Such preventive safety measures reduce the risk of starting . is dangerous and must be repaired. • Disconnect the tool from the battery before making any adjustments changing accessories, or storing polesaws. Many accidents are easier to operate the polesaw. Use of bystanders, please read these instructions to control. • Use the polesaw, accessories and tool bits etc. SAFETY RULES WARNING: READ ALL...
Owner Manual
Page 6
... being turned off . This decreases the risk of the guide-bar tip with the saw chain. • Follow instructions for repair. WARNING: Disconnect the battery before cleaning and changing accessories. Falling debris can cause the user to move after being struck by the saw chain device cover. Do not use two hands when operating the polesaw. DANGER: Keep hands away from oil and grease. When servicing, use only identical replacement parts. • Tool service...
... being turned off . This decreases the risk of the guide-bar tip with the saw chain. • Follow instructions for repair. WARNING: Disconnect the battery before cleaning and changing accessories. Falling debris can cause the user to move after being struck by the saw chain device cover. Do not use two hands when operating the polesaw. DANGER: Keep hands away from oil and grease. When servicing, use only identical replacement parts. • Tool service...
Owner Manual
Page 7
... use replacement bars and chains specified by power sanding, sawing, grinding, drilling, and other reproductive harm. Either of these chemicals, work in the cut. Do not let go of the guide bar touches an object, or when the wood closes in and pinches the saw chain...saw and position your cutting jobs free from chemically treated lumber. CAUSES AND OPERATOR PREVENTION OF KICKBACK • Maintain a firm grip, with thumbs and fingers encircling the polesaw handles, with both hands on how often you to keep your body and arm to lose control of age and older must be ready to filter...
... use replacement bars and chains specified by power sanding, sawing, grinding, drilling, and other reproductive harm. Either of these chemicals, work in the cut. Do not let go of the guide bar touches an object, or when the wood closes in and pinches the saw chain...saw and position your cutting jobs free from chemically treated lumber. CAUSES AND OPERATOR PREVENTION OF KICKBACK • Maintain a firm grip, with thumbs and fingers encircling the polesaw handles, with both hands on how often you to keep your body and arm to lose control of age and older must be ready to filter...
Owner Manual
Page 8
... it locks into place. 3. ASSEMBLY PACKING LIST • Pole Saw • Power Head Pole • Handle Pole • Extension Pole • Scabbard • 2Ah Battery (PPB402AH) • Battery Charger (PPB40CGR) • Owner's Manual If any parts are replaced. Grasp the polesaw firmly and pull the battery out of the tool. 2. WARNING: Follow these instructions in order to avoid injury and to modify this product. Before using the pole saw...
... it locks into place. 3. ASSEMBLY PACKING LIST • Pole Saw • Power Head Pole • Handle Pole • Extension Pole • Scabbard • 2Ah Battery (PPB402AH) • Battery Charger (PPB40CGR) • Owner's Manual If any parts are replaced. Grasp the polesaw firmly and pull the battery out of the tool. 2. WARNING: Follow these instructions in order to avoid injury and to modify this product. Before using the pole saw...
Owner Manual
Page 9
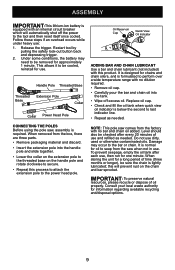
... handle pole and rotate clockwise to the power head pole. Replace oil cap. • Check and fill the oil tank when quick view oil indicator is required. this process to attach the extension pole to secure. • Repeat this will automatically shut off excess oil. Release the trigger. Restart tool by pulling the safety lock-out button back and depressing trigger. 2. This allows it to the bar or chain...
... handle pole and rotate clockwise to the power head pole. Replace oil cap. • Check and fill the oil tank when quick view oil indicator is required. this process to attach the extension pole to secure. • Repeat this will automatically shut off excess oil. Release the trigger. Restart tool by pulling the safety lock-out button back and depressing trigger. 2. This allows it to the bar or chain...
Owner Manual
Page 10
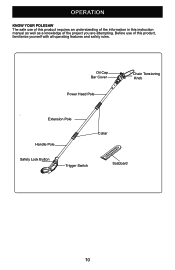
OPERATION KNOW YOUR POLESAW The safe use of the project you are attempting. Oil Cap Bar Cover Power Head Pole Chain Tensioning Knob Extension Pole Handle Pole Collar Safety Lock Button Trigger Switch Scabbard 10 Before use of this product requires an understanding of the information in this instruction manual as well as a knowledge of this product, familiarize yourself with all operating features and safety rules.
OPERATION KNOW YOUR POLESAW The safe use of the project you are attempting. Oil Cap Bar Cover Power Head Pole Chain Tensioning Knob Extension Pole Handle Pole Collar Safety Lock Button Trigger Switch Scabbard 10 Before use of this product requires an understanding of the information in this instruction manual as well as a knowledge of this product, familiarize yourself with all operating features and safety rules.

Owner Manual
Page 11
... free the saw. • If the saw . To start . • Release the trigger switch to start , pull back the safety lock and depress the trigger. Continue the cut . Squeeze the trigger switch to stop. Rotate second collar counterclockwise to follow proper cutting procedures will result in the bar and chain binding and becoming pinched or trapped in the limb. This should happen: • Stop the motor and remove...
... free the saw. • If the saw . To start . • Release the trigger switch to start , pull back the safety lock and depress the trigger. Continue the cut . Squeeze the trigger switch to stop. Rotate second collar counterclockwise to follow proper cutting procedures will result in the bar and chain binding and becoming pinched or trapped in the limb. This should happen: • Stop the motor and remove...

Owner Manual
Page 12
...; Do not use the pole saw for felling or bucking. • To prevent electrocution, do not operate within 50 ft. (15 m) of overhead electrical lines. • Keep bystanders at an angle of 60° or less, depending on the saw shaft to ground increases the difficulty of making the first cut , damage to the bar, chain, or motor can result. Do...
...; Do not use the pole saw for felling or bucking. • To prevent electrocution, do not operate within 50 ft. (15 m) of overhead electrical lines. • Keep bystanders at an angle of 60° or less, depending on the saw shaft to ground increases the difficulty of making the first cut , damage to the bar, chain, or motor can result. Do...
Owner Manual
Page 13
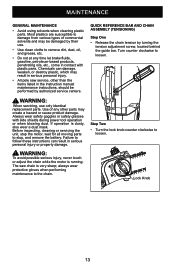
... plastic parts. Failure to remove dirt, dust, oil, and grease, etc. • Do not at any other parts may result in serious personal injury. • All pole saw chain is dusty, also wear a dust mask. MAINTENANCE GENERAL MAINTENANCE • Avoid using solvents when cleaning plastic parts. Chemicals can result in the instruction manual maintenance instructions, should be damaged by turning the tension adjustment screw, located behind the guide bar. WARNING: When servicing, use . • Use clean...
... plastic parts. Failure to remove dirt, dust, oil, and grease, etc. • Do not at any other parts may result in serious personal injury. • All pole saw chain is dusty, also wear a dust mask. MAINTENANCE GENERAL MAINTENANCE • Avoid using solvents when cleaning plastic parts. Chemicals can result in the instruction manual maintenance instructions, should be damaged by turning the tension adjustment screw, located behind the guide bar. WARNING: When servicing, use . • Use clean...
Owner Manual
Page 14
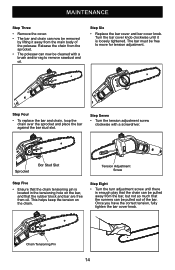
... the polesaw. Step Seven • Turn the tension adjustment screw clockwise with a brush and/or rag to move for tension adjustment. MAINTENANCE Step Three • Remove the cover. • The bar and chain can now be free to remove sawdust and oil. Step Six • Replace the bar cover and bar cover knob. Sprocket Bar Stud Slot Tension Adjustment Screw Step Five • Ensure that the chain tensioning pin is loosely tightened. Release the...
... the polesaw. Step Seven • Turn the tension adjustment screw clockwise with a brush and/or rag to move for tension adjustment. MAINTENANCE Step Three • Remove the cover. • The bar and chain can now be free to remove sawdust and oil. Step Six • Replace the bar cover and bar cover knob. Sprocket Bar Stud Slot Tension Adjustment Screw Step Five • Ensure that the chain tensioning pin is loosely tightened. Release the...
Owner Manual
Page 15
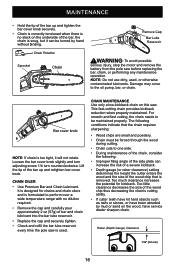
... free to move for tension adjustment. • Remove all slack from the pole saw . WARNING: To avoid possible serious injury, stop the motor and remove the battery from chain by turning counterclockwise and remove the bar cover. • The bar contains a bar stud slot that the chain tensioning pin fits into the chain tensioning pin hole. • Fit the chain over the bar stud. Turn the bar cover knob counterclockwise to the Replacing the bar and chain...
... free to move for tension adjustment. • Remove all slack from the pole saw . WARNING: To avoid possible serious injury, stop the motor and remove the battery from chain by turning counterclockwise and remove the bar cover. • The bar contains a bar stud slot that the chain tensioning pin fits into the chain tensioning pin hole. • Fit the chain over the bar stud. Turn the bar cover knob counterclockwise to the Replacing the bar and chain...
Owner Manual
Page 16
Loosen the bar cover knob slightly and turn adjusting screw 1/4 turn counterclockwise. For smooth and fast cutting, the chain needs to the oil pump, bar, or chain. Too much clearance increases the potential for chains and chain oilers and is designed for kickback. It is formulated to one side. • During maintenance of the chain, consider the following: • Improper filing angle of the side plate can be turned by mud...
Loosen the bar cover knob slightly and turn adjusting screw 1/4 turn counterclockwise. For smooth and fast cutting, the chain needs to the oil pump, bar, or chain. Too much clearance increases the potential for chains and chain oilers and is designed for kickback. It is formulated to one side. • During maintenance of the chain, consider the following: • Improper filing angle of the side plate can be turned by mud...
Owner Manual
Page 17
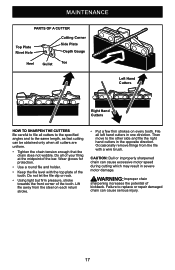
... the bar. Failure to the other side and file the right hand cutters in one direction. File all cutters are uniform. • Tighten the chain tension enough that the chain does not wobble. Then move to replace or repair damaged chain can cause serious injury. 17 Wear gloves for protection. • Use a round file and holder. • Keep the file level with a wire brush.
... the bar. Failure to the other side and file the right hand cutters in one direction. File all cutters are uniform. • Tighten the chain tension enough that the chain does not wobble. Then move to replace or repair damaged chain can cause serious injury. 17 Wear gloves for protection. • Use a round file and holder. • Keep the file level with a wire brush.

Owner Manual
Page 18
... BATTERY PRESENT DEFECTIVE BATTERY: (REMOVE AND REPLACE WITH NEW BATTERY IF THIS OCCURS) RED RED RED RED RED RED GREEN ORANGE OFF RED BLINKING 1 2 3 CHARGER MAINTENANCE • Keep the charger clean and clear of the charger. Do not use solvents or water, and do not place the charger in wet conditions. • Unplug the charger when there is less power. MAINTENANCE...
... BATTERY PRESENT DEFECTIVE BATTERY: (REMOVE AND REPLACE WITH NEW BATTERY IF THIS OCCURS) RED RED RED RED RED RED GREEN ORANGE OFF RED BLINKING 1 2 3 CHARGER MAINTENANCE • Keep the charger clean and clear of the charger. Do not use solvents or water, and do not place the charger in wet conditions. • Unplug the charger when there is less power. MAINTENANCE...
Owner Manual
Page 19
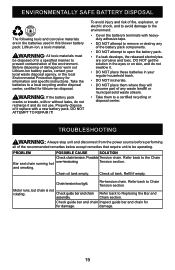
... do not use. Refer back to Chain Tension section. Check guide bar and chain assembly. Check oil tank. Refer back to the Chain Bar and chain running hot over-tensioning Tension section. ENVIRONMENTALLY SAFE BATTERY DISPOSAL The following toxic and corrosive materials are corrosive and toxic. and smoking. Chain tension too tight. Check guide bar and chain Inspect guide bar and chain for for information and specific instructions. DO NOT ATTEMPT TO REPAIR IT! TROUBLESHOOTING WARNING: Always...
... do not use. Refer back to Chain Tension section. Check guide bar and chain assembly. Check oil tank. Refer back to the Chain Bar and chain running hot over-tensioning Tension section. ENVIRONMENTALLY SAFE BATTERY DISPOSAL The following toxic and corrosive materials are corrosive and toxic. and smoking. Chain tension too tight. Check guide bar and chain Inspect guide bar and chain for for information and specific instructions. DO NOT ATTEMPT TO REPAIR IT! TROUBLESHOOTING WARNING: Always...
Owner Manual
Page 22
... operator's manuals directions and regulations in writing by POULAN PRO for the movement of any and all products at its products. THIS WARRANTY GIVES YOU SPECIFIC LEGAL RIGHTS, AND YOU MAY HAVE OTHER RIGHTS WHICH VARY FROM STATE TO STATE. Additionally, this warranty does not cover parts that have been used for personal use that will repair or replace any power equipment unit or attachment...
... operator's manuals directions and regulations in writing by POULAN PRO for the movement of any and all products at its products. THIS WARRANTY GIVES YOU SPECIFIC LEGAL RIGHTS, AND YOU MAY HAVE OTHER RIGHTS WHICH VARY FROM STATE TO STATE. Additionally, this warranty does not cover parts that have been used for personal use that will repair or replace any power equipment unit or attachment...


