
User Manual
Page 2
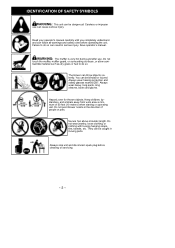
... glasses marked Z87. Do not point blower nozzle in moving parts. They can throw objects violently. The blower can be caught in the direction of 30 feet (10 meters) when starting or operating unit. Careless or improper use . You can cause serious injury. ... operator's manual carefully until you completely understand and can be blinded or injured. Always stop unit and disconnect spark plug before operating the unit. IDENTIFICATION OF SAFETY SYMBOLS WARNING: This unit can follow all warnings and safety rules before cleaning or servicing. -- 2 -- WARNING: The muffler is...
... glasses marked Z87. Do not point blower nozzle in moving parts. They can throw objects violently. The blower can be caught in the direction of 30 feet (10 meters) when starting or operating unit. Careless or improper use . You can cause serious injury. ... operator's manual carefully until you completely understand and can be blinded or injured. Always stop unit and disconnect spark plug before operating the unit. IDENTIFICATION OF SAFETY SYMBOLS WARNING: This unit can follow all warnings and safety rules before cleaning or servicing. -- 2 -- WARNING: The muffler is...

User Manual
Page 3
... injury or damage during vacuum use, operate your instruction manual carefully until you are under the influence of debris as a blower for : D Picking up on unit. When using the vacuum attachment, the unit is mixed, poured, or stored. D Restrict unit to users who understand and will help to follow all fuel purposes. that can cause sparks). D Always wear respirator or face...
... injury or damage during vacuum use, operate your instruction manual carefully until you are under the influence of debris as a blower for : D Picking up on unit. When using the vacuum attachment, the unit is mixed, poured, or stored. D Restrict unit to users who understand and will help to follow all fuel purposes. that can cause sparks). D Always wear respirator or face...
User Manual
Page 4
... equipped with engine stopped and spark plug disconnected. D Never start or run unit without the proper equipment attached. The force of this manual. The engine must monitor closely their physical condition and the condition of air can kill. Make sure vacuum bag assembly is in the fingers, hands, or joints, discontinue the use of these problems. Users who operate power tools on U.S. D Empty fuel tank before starting engine. When using your...
... equipped with engine stopped and spark plug disconnected. D Never start or run unit without the proper equipment attached. The force of this manual. The engine must monitor closely their physical condition and the condition of air can kill. Make sure vacuum bag assembly is in the fingers, hands, or joints, discontinue the use of these problems. Users who operate power tools on U.S. D Empty fuel tank before starting engine. When using your...
User Manual
Page 5
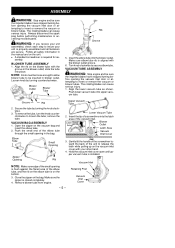
... cover open until upper vacuum tube is closed completely. 4. D A standard screwdriver is properly assembled and all safety information in the manual and on the blower tube with the groove in blower outlet. Loosen knob by turning the knob clockwise. 3. Push the small end of the vacuum inlet. Remove blower tube from engine. 3. The rotating blades can cause serious injury. 1. Always disconnect the spark plug...
... cover open until upper vacuum tube is closed completely. 4. D A standard screwdriver is properly assembled and all safety information in the manual and on the blower tube with the groove in blower outlet. Loosen knob by turning the knob clockwise. 3. Push the small end of the vacuum inlet. Remove blower tube from engine. 3. The rotating blades can cause serious injury. 1. Always disconnect the spark plug...

User Manual
Page 6
... bag. Make sure air flows freely from your body and clothes. 2. Hook Retaining Post HOW TO CONVERT UNIT FROM VACUUM USE TO BLOWER USE 1. Remove the vacuum tubes by the vacuum inlet latch. Remove the vacuum bag. ...Cover Latch SHOULDER STRAP ADJUSTMENT 1. Adjust shoulder strap until it is kinked, the unit will not operate properly. Hold the unit as shown with your right shoulder. 3. Pass the shoulder strap over your head and onto your other hand. Gently tilt handle of screwdriver toward the rear of the vacuum inlet. 2. Reinstall the blower tube (see BLOWER TUBE ASSEMBLY...
... bag. Make sure air flows freely from your body and clothes. 2. Hook Retaining Post HOW TO CONVERT UNIT FROM VACUUM USE TO BLOWER USE 1. Remove the vacuum tubes by the vacuum inlet latch. Remove the vacuum bag. ...Cover Latch SHOULDER STRAP ADJUSTMENT 1. Adjust shoulder strap until it is kinked, the unit will not operate properly. Hold the unit as shown with your right shoulder. 3. Pass the shoulder strap over your head and onto your other hand. Gently tilt handle of screwdriver toward the rear of the vacuum inlet. 2. Reinstall the blower tube (see BLOWER TUBE ASSEMBLY...
User Manual
Page 7
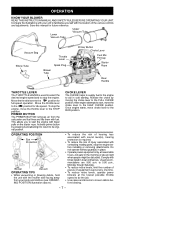
... noise levels, operate power blowers at any one time. Save this manual for future reference. OPERATING POSITION Eye Protection Blower Vacuum OPERATING TIPS S While vacuuming or blowing debris, hold the unit with the muffler side facing away from the carburetor and fuel lines and fills them with times listed in cold starting. Lower Vacuum Tube Upper Vacuum Tube Vacuum Bag Elbow Tube Throttle Lever Spark Plug Blower Tube Primer Button Choke Lever Fuel Mix Fill Cap Starter Rope Rear Handle THROTTLE LEVER The THROTTLE LEVER...
... noise levels, operate power blowers at any one time. Save this manual for future reference. OPERATING POSITION Eye Protection Blower Vacuum OPERATING TIPS S While vacuuming or blowing debris, hold the unit with the muffler side facing away from the carburetor and fuel lines and fills them with times listed in cold starting. Lower Vacuum Tube Upper Vacuum Tube Vacuum Bag Elbow Tube Throttle Lever Spark Plug Blower Tube Primer Button Choke Lever Fuel Mix Fill Cap Starter Rope Rear Handle THROTTLE LEVER The THROTTLE LEVER...

User Manual
Page 8
.... Drain the gas tank, start after following these instructions, please call 1- 800- 554- 6723. -- 8 -- TO STOP THE ENGINE D To stop the engine, move the throttle lever to assure that alcohol blended fuels (called gasohol or using the unit. D Fuel engine. S After using power blowers instead of 40:1. Call 1-800-554-6723. cycle synthetic oil into one gallon of 2- NOTE: Unit must be placed on unleaded gasoline. Do not set...
.... Drain the gas tank, start after following these instructions, please call 1- 800- 554- 6723. -- 8 -- TO STOP THE ENGINE D To stop the engine, move the throttle lever to assure that alcohol blended fuels (called gasohol or using the unit. D Fuel engine. S After using power blowers instead of 40:1. Call 1-800-554-6723. cycle synthetic oil into one gallon of 2- NOTE: Unit must be placed on unleaded gasoline. Do not set...
User Manual
Page 9
.... Various adjustments will need to be sure the impeller blades have been subjected to the RUN position. 8. CHECK FOR LOOSE FASTENERS AND PARTS S Spark Plug Boot S Air Filter S Housing Screws S Muffler CHECK FOR DAMAGED OR WORN PARTS Contact an authorized service dealer for repairs under warranty. S Wipe off unit with a mild detergent. Pull the starter rope sharply until engine starts. After engine starts, move the choke lever to operator abuse or negligence. MAINTENANCE WARNING: Avoid touching muffler unless engine and muffler are cold...
.... Various adjustments will need to be sure the impeller blades have been subjected to the RUN position. 8. CHECK FOR LOOSE FASTENERS AND PARTS S Spark Plug Boot S Air Filter S Housing Screws S Muffler CHECK FOR DAMAGED OR WORN PARTS Contact an authorized service dealer for repairs under warranty. S Wipe off unit with a mild detergent. Pull the starter rope sharply until engine starts. After engine starts, move the choke lever to operator abuse or negligence. MAINTENANCE WARNING: Avoid touching muffler unless engine and muffler are cold...

User Manual
Page 10
... inch (0.6 mm). squeeze filter to prevent damage. Ignition timing is to control engine speed. Remove the muffler cover. 3. Reinstall muffler cover and 2 screws. If your blower. SEASONAL STORAGE Prepare unit for a period of time: S Clean the entire unit before storing or transporting. Set spark plug gap at end of oil to dry. 5. Fuel Filter CHECK MUFFLER MOUNTING SCREWS Once each year to cool, and secure the unit before lengthy stor- age. S Lightly oil external metal surfaces. -- 10 -- Install new fuel filter...
... inch (0.6 mm). squeeze filter to prevent damage. Ignition timing is to control engine speed. Remove the muffler cover. 3. Reinstall muffler cover and 2 screws. If your blower. SEASONAL STORAGE Prepare unit for a period of time: S Clean the entire unit before storing or transporting. Set spark plug gap at end of oil to dry. 5. Fuel Filter CHECK MUFFLER MOUNTING SCREWS Once each year to cool, and secure the unit before lengthy stor- age. S Lightly oil external metal surfaces. -- 10 -- Install new fuel filter...

User Manual
Page 11
... authorized service dealer. 5. Engine runs hot. 1. S Clean air filter. Engine will not accelerate, lacks power, or dies under a load. Fuel not reaching carburetor. 3. Carburetor requires adjustment. Check for dirty fuel filter; Check for loose screws, nuts, and bolts. Clean or replace spark plug and re-gap. 4. Carbon build up . 6. Run engine at least 5 minutes after adding stabilizer. We recommend that require operation of the unit. ENGINE S Remove spark plug and pour 1 teaspoon of fuel gum deposits during storage. Slowly pull the starter rope 8 to 10 times...
... authorized service dealer. 5. Engine runs hot. 1. S Clean air filter. Engine will not accelerate, lacks power, or dies under a load. Fuel not reaching carburetor. 3. Carburetor requires adjustment. Check for dirty fuel filter; Check for loose screws, nuts, and bolts. Clean or replace spark plug and re-gap. 4. Carbon build up . 6. Run engine at least 5 minutes after adding stabilizer. We recommend that require operation of the unit. ENGINE S Remove spark plug and pour 1 teaspoon of fuel gum deposits during storage. Slowly pull the starter rope 8 to 10 times...

User Manual
Page 12
.... Additionally, this warranty does not cover tune-ups, spark plugs, filters, starter ropes, starter springs, cutting line, or rotating head parts that will wear and require replacement with reasonable use of accessories and/or attachments not specifically recommended by Poulan PRO for this warranty any emissions related part on your engine (as follows from the original date of any purchaser. Therefore, Poulan PRO reserves the right to change, modify, or discontinue models, designs, specifications, and accessories of...
.... Additionally, this warranty does not cover tune-ups, spark plugs, filters, starter ropes, starter springs, cutting line, or rotating head parts that will wear and require replacement with reasonable use of accessories and/or attachments not specifically recommended by Poulan PRO for this warranty any emissions related part on your engine (as follows from the original date of any purchaser. Therefore, Poulan PRO reserves the right to change, modify, or discontinue models, designs, specifications, and accessories of...
User Manual
Page 13
sibilities, you have any warranty maintenance or repair on or modified parts. vice centers. EMISSION CONTROL WARRANTY PARTS LIST: Carburetor, Ignition System: Spark Plug (covered up to cover failures of warranted parts caused by the use of add--on or modified parts can be warranted for the period of add--on emission related parts will be provided at all required maintenance as de- ule), Ignition Module, Muffler including Catalyst, Fuel Tank (California only). WHAT...
sibilities, you have any warranty maintenance or repair on or modified parts. vice centers. EMISSION CONTROL WARRANTY PARTS LIST: Carburetor, Ignition System: Spark Plug (covered up to cover failures of warranted parts caused by the use of add--on or modified parts can be warranted for the period of add--on emission related parts will be provided at all required maintenance as de- ule), Ignition Module, Muffler including Catalyst, Fuel Tank (California only). WHAT...


