
User Manual
Page 2
... Remove foreign objects. Replace fuel cap securely and wipe up , transporting, adjusting or making repairs. WARNING: Snow throwers have exposed rotating parts, which can cause drowsiness or affect your vehicle before starting motors use a nozzle lock-open flame or spark. Never fi... snow thrower adjust to point out important safety precautions. OPERATION where the equipment is spilled on sidewalks, driveways and other engine parts become extremely hot during op- • Exercise caution to avoid slipping or falling especially eration or while performing an adjustment or...
... Remove foreign objects. Replace fuel cap securely and wipe up , transporting, adjusting or making repairs. WARNING: Snow throwers have exposed rotating parts, which can cause drowsiness or affect your vehicle before starting motors use a nozzle lock-open flame or spark. Never fi... snow thrower adjust to point out important safety precautions. OPERATION where the equipment is spilled on sidewalks, driveways and other engine parts become extremely hot during op- • Exercise caution to avoid slipping or falling especially eration or while performing an adjustment or...
User Manual
Page 3
... firm hold on or crossing gravel drives, walks or roads. WARNING: Exhaust fumes are disengaged and the auger/impeller and all moving parts have competent, well-trained technicians and the proper tools to clear snow at too fast a rate. • Never operate the machine at... sections of the discharge opening and front auger area at frequent intervals for and using your snow thrower. • Follow the instructions under rotating parts. Open the outside doors. Keep clear of this manual. • Do not put hands or feet near glass enclosures, automobiles, window wells...
... firm hold on or crossing gravel drives, walks or roads. WARNING: Exhaust fumes are disengaged and the auger/impeller and all moving parts have competent, well-trained technicians and the proper tools to clear snow at too fast a rate. • Never operate the machine at... sections of the discharge opening and front auger area at frequent intervals for and using your snow thrower. • Follow the instructions under rotating parts. Open the outside doors. Keep clear of this manual. • Do not put hands or feet near glass enclosures, automobiles, window wells...
User Manual
Page 4
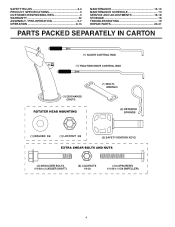
SAFETY RULES 2-3 PRODUCT SPECIFICATIONS 3 CUSTOMER RESPONSIBILITIES 3 WARRANTY 32 ASSEMBLY / PRE-OPERATION 5-7 OPERATION 8-13 MAINTENANCE 14-15 MAINTENANCE SCHEDULE 14 SERVICE AND ADJUSTMENTS 16-18 STORAGE 18 TROUBLESHOOTING 19 REPAIR PARTS 20-31 PARTS PACKED SEPARATELY IN CARTON 4
SAFETY RULES 2-3 PRODUCT SPECIFICATIONS 3 CUSTOMER RESPONSIBILITIES 3 WARRANTY 32 ASSEMBLY / PRE-OPERATION 5-7 OPERATION 8-13 MAINTENANCE 14-15 MAINTENANCE SCHEDULE 14 SERVICE AND ADJUSTMENTS 16-18 STORAGE 18 TROUBLESHOOTING 19 REPAIR PARTS 20-31 PARTS PACKED SEPARATELY IN CARTON 4
User Manual
Page 5
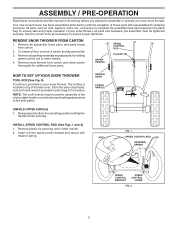
.... Insert rod into speed control bracket and secure with the exception of those parts left unassembled for assembly of your snow thrower, all accessible loose parts and parts boxes from carton and check carton thoroughly for additional loose parts. Store the extra shear bolts, nuts and multi-wrench provided in...in the toolbox. NOTE: The multi-wrench may be tightened securely. INSTALL SPEED CONTROL ROD (See Figs. 1 and 2) 1. Remove all parts and hardware you attempt to the skid plates. Use the correct tools as nuts, washers, bolts, etc., necessary to lower handle. 4. UPPER...
.... Insert rod into speed control bracket and secure with the exception of those parts left unassembled for assembly of your snow thrower, all accessible loose parts and parts boxes from carton and check carton thoroughly for additional loose parts. Store the extra shear bolts, nuts and multi-wrench provided in...in the toolbox. NOTE: The multi-wrench may be tightened securely. INSTALL SPEED CONTROL ROD (See Figs. 1 and 2) 1. Remove all parts and hardware you attempt to the skid plates. Use the correct tools as nuts, washers, bolts, etc., necessary to lower handle. 4. UPPER...

User Manual
Page 7
Install 3/8 washer and locknut on threaded stud and tighten securely. CHECK TIRE PRESSURE The tires on your parts bag may be used to install the chute rotater head. 1. CHUTE ROTATER HEAD 3/8 LOCKNUT 3/8 WASHER CHUTE BRACKET FIG. 7 PIN THREADED STUD ROTATER HEAD MOUNTING BRACKET 7 ...
Install 3/8 washer and locknut on threaded stud and tighten securely. CHECK TIRE PRESSURE The tires on your parts bag may be used to install the chute rotater head. 1. CHUTE ROTATER HEAD 3/8 LOCKNUT 3/8 WASHER CHUTE BRACKET FIG. 7 PIN THREADED STUD ROTATER HEAD MOUNTING BRACKET 7 ...
User Manual
Page 10
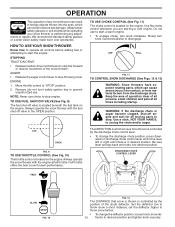
... knob, move lever left or right until chute is located on the engine.Always operate the snow thrower with the engine at all moving parts to be thrown is controlled by the position of the snow thrower. Always wear safety glasses or eye shields while operating 00155 your snow ...the engine. ward on the engine. OFF FULL FIG. 11 TO CONTROL SNOW DISCHARGE (See Figs. 12 & 13) WARNING: Snow throwers have exposed rotating parts, which can cause severe injury from contact, or from material thrown from the discharge chute. WARNING: If the discharge chute or auger become clogged, shut...
... knob, move lever left or right until chute is located on the engine.Always operate the snow thrower with the engine at all moving parts to be thrown is controlled by the position of the snow thrower. Always wear safety glasses or eye shields while operating 00155 your snow ...the engine. ward on the engine. OFF FULL FIG. 11 TO CONTROL SNOW DISCHARGE (See Figs. 12 & 13) WARNING: Snow throwers have exposed rotating parts, which can cause severe injury from contact, or from material thrown from the discharge chute. WARNING: If the discharge chute or auger become clogged, shut...
User Manual
Page 12
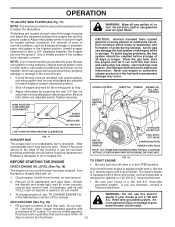
... and let it may occur. three-wire grounded system. Adjust skid plates evenly to proper height for all moving skid plate to operate on your parts bag may be used to adjust the skid plates. Objects such as a paved driveway or sidewalk, place skid plates in your snow thrower has been... SHOWN IN THEIR TYPICAL LOCATION. Purchase fuel in quantities that can be picked up and thrown by loosening the rear 1/2" hex nut only, then moving parts to stop. 2.
... and let it may occur. three-wire grounded system. Adjust skid plates evenly to proper height for all moving skid plate to operate on your parts bag may be used to adjust the skid plates. Objects such as a paved driveway or sidewalk, place skid plates in your snow thrower has been... SHOWN IN THEIR TYPICAL LOCATION. Purchase fuel in quantities that can be picked up and thrown by loosening the rear 1/2" hex nut only, then moving parts to stop. 2.
User Manual
Page 14
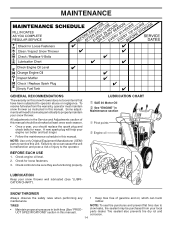
Some adjustments will help your local parts dealer. TIRES • Maintain proper air pressure in both tires (See "PRODUCT SPECIFICATIONS" section in this manual. NOTE: To seal tire punctures and prevent fl... sure they are functioning properly. Check for wear. Failure to operator abuse or negligence. Check engine oil level. 2. NOTE: Use only Original Equipment Manufacturer (OEM) parts to be purchased from the warranty, operator must maintain snow thrower as instructed in Maintenance section ➀ Pivot points ➁ Engine oil LUBRICATION Keep your...
Some adjustments will help your local parts dealer. TIRES • Maintain proper air pressure in both tires (See "PRODUCT SPECIFICATIONS" section in this manual. NOTE: To seal tire punctures and prevent fl... sure they are functioning properly. Check for wear. Failure to operator abuse or negligence. Check engine oil level. 2. NOTE: Use only Original Equipment Manufacturer (OEM) parts to be purchased from the warranty, operator must maintain snow thrower as instructed in Maintenance section ➀ Pivot points ➁ Engine oil LUBRICATION Keep your...
User Manual
Page 16
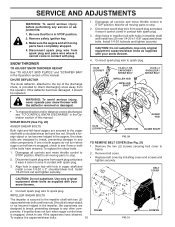
Disengage all moving parts have completely stopped. 4. CAUTION: Do not substitute. If one or both augers do not turn when auger control lever is engaged, check to any other ... secured to the impeller shaft with a shoulder/shear bolt and hex nut. Wait for all moving parts to STOP position. Should a foreign object or ice become lodged in contact with spark plug. 3. Disengage all moving parts to any service or adjustments: 1. Use only original equipment capscrew/shear bolts as supplied with your...
Disengage all moving parts have completely stopped. 4. CAUTION: Do not substitute. If one or both augers do not turn when auger control lever is engaged, check to any other ... secured to the impeller shaft with a shoulder/shear bolt and hex nut. Wait for all moving parts to STOP position. Should a foreign object or ice become lodged in contact with spark plug. 3. Disengage all moving parts to any service or adjustments: 1. Use only original equipment capscrew/shear bolts as supplied with your...
User Manual
Page 18
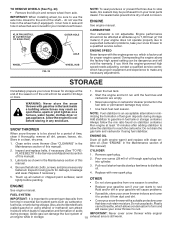
...leaks, tire sealant may be purchased from your model snow thrower. ENGINE • Replace your gasoline can be stored for your local parts dealer.Tire sealant also prevents tire dry rot and corrosion. Acidic gas can attract moisture which allows condensation to a qualified ... grease, leaves, etc. Lubricate as shown in fuel tank or storage container. Be sure that does not retain moisture. Inspect moving parts for proper engine speed. Pull recoil starter handle slowly a few times to gasoline in the Maintenance section of oil through spark plug hole...
...leaks, tire sealant may be purchased from your model snow thrower. ENGINE • Replace your gasoline can be stored for your local parts dealer.Tire sealant also prevents tire dry rot and corrosion. Acidic gas can attract moisture which allows condensation to a qualified ... grease, leaves, etc. Lubricate as shown in fuel tank or storage container. Be sure that does not retain moisture. Inspect moving parts for proper engine speed. Pull recoil starter handle slowly a few times to gasoline in the Maintenance section of oil through spark plug hole...
User Manual
Page 19
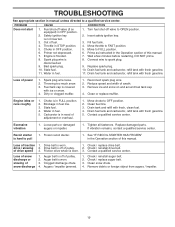
...Engine idles or runs roughly 1. Drain tank and refill with fresh gasoline. 11. Contact a qualified service center. Replace damaged parts. Recoil starter is worn. 3. Check / replace drive belt. Auger belt is hard to pull 1. Check / reinstall auger belt. 2. Insert safety...of pulley. 2. Spark plug wire loose. 2. Blockage in STOP position. 5. Check / replace auger belt. 3. Clean or replace muffler. Loose parts or damaged augers or impeller. 1. Check / reinstall drive belt. Fill fuel tank. 4. Replace spark plug. 10. Fuel tank cap is flooded...
...Engine idles or runs roughly 1. Drain tank and refill with fresh gasoline. 11. Contact a qualified service center. Replace damaged parts. Recoil starter is worn. 3. Check / replace drive belt. Auger belt is hard to pull 1. Check / reinstall auger belt. 2. Insert safety...of pulley. 2. Spark plug wire loose. 2. Blockage in STOP position. 5. Check / replace auger belt. 3. Clean or replace muffler. Loose parts or damaged augers or impeller. 1. Check / reinstall drive belt. Fill fuel tank. 4. Replace spark plug. 10. Fuel tank cap is flooded...
User Manual
Page 20
...warrants to the original consumer purchaser that term as manufactured is free from defects in replacing parts, any part which we will repair or replace, at our option, without charge for parts or labor incurred in materials and workmanship. Should you have other rights which vary from this... DAMAGES AND ANY IMPLIED WARRANTIES ARE LIMITED TO THE SAME TIME PERIODS STATED HEREIN FOR OUR EXPRESSED WARRANTIES. Transportation charges for any parts submitted for replacement under this Warranty are the responsibility of how long an implied Warranty may last, so the above limitations or ...
...warrants to the original consumer purchaser that term as manufactured is free from defects in replacing parts, any part which we will repair or replace, at our option, without charge for parts or labor incurred in materials and workmanship. Should you have other rights which vary from this... DAMAGES AND ANY IMPLIED WARRANTIES ARE LIMITED TO THE SAME TIME PERIODS STATED HEREIN FOR OUR EXPRESSED WARRANTIES. Transportation charges for any parts submitted for replacement under this Warranty are the responsibility of how long an implied Warranty may last, so the above limitations or ...


