
User Manual
Page 1
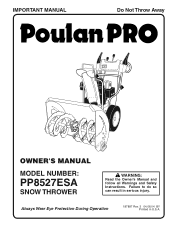
IMPORTANT MANUAL Do Not Throw Away OWNER'S MANUAL MODEL NUMBER: PP8527ESA SNOW THROWER WARNING: Read the Owner's Manual and follow all Warnings and Safety Instructions. Failure to do so can result in U.S.A. Always Wear Eye Protection During Operation 187887 Rev. 3 04.08.04 BY Printed in serious injury.
IMPORTANT MANUAL Do Not Throw Away OWNER'S MANUAL MODEL NUMBER: PP8527ESA SNOW THROWER WARNING: Read the Owner's Manual and follow all Warnings and Safety Instructions. Failure to do so can result in U.S.A. Always Wear Eye Protection During Operation 187887 Rev. 3 04.08.04 BY Printed in serious injury.
User Manual
Page 2
... an adjustment or repair to prevent accidental starting to be exercised while using on contact, stay away from the snow thrower. Never remove fuel tank cap or add fuel to expand. Never store fuel or snow thrower with care; Check fuel supply before starting extension cords certified CSA/UL. CAUTION: Muffler and other such structures or buildings. • Handle fuel with fuel in reverse. When practical, remove gas-powered equipment...
... an adjustment or repair to prevent accidental starting to be exercised while using on contact, stay away from the snow thrower. Never remove fuel tank cap or add fuel to expand. Never store fuel or snow thrower with care; Check fuel supply before starting extension cords certified CSA/UL. CAUTION: Muffler and other such structures or buildings. • Handle fuel with fuel in reverse. When practical, remove gas-powered equipment...
User Manual
Page 3
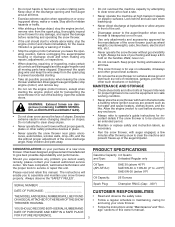
... proper tools to service or repair this unit. Look behind and use care when backing up of slopes. CONGRATULATIONS on or crossing gravel drives, walks or roads. It has been designed, engineered and manufactured to +40°F) SAE 0W-30 (below 0°F) Oil Capacity: 26 Ounces SERIAL NUMBER Spark Plug: Champion RN4C (Gap: .030") DATE OF PURCHASE THE MODEL AND SERIAL NUMBERS WILL BE FOUND ON A DECAL ATTACHED...
... proper tools to service or repair this unit. Look behind and use care when backing up of slopes. CONGRATULATIONS on or crossing gravel drives, walks or roads. It has been designed, engineered and manufactured to +40°F) SAE 0W-30 (below 0°F) Oil Capacity: 26 Ounces SERIAL NUMBER Spark Plug: Champion RN4C (Gap: .030") DATE OF PURCHASE THE MODEL AND SERIAL NUMBERS WILL BE FOUND ON A DECAL ATTACHED...
User Manual
Page 4
SAFETY RULES 2-3 PRODUCT SPECIFICATIONS 3 CUSTOMER RESPONSIBILITIES 3 WARRANTY 32 ASSEMBLY / PRE-OPERATION 5-7 OPERATION 8-13 MAINTENANCE 14-15 MAINTENANCE SCHEDULE 14 SERVICE AND ADJUSTMENTS 16-18 STORAGE 18 TROUBLESHOOTING 19 REPAIR PARTS 20-31 PARTS PACKED SEPARATELY IN CARTON 4
SAFETY RULES 2-3 PRODUCT SPECIFICATIONS 3 CUSTOMER RESPONSIBILITIES 3 WARRANTY 32 ASSEMBLY / PRE-OPERATION 5-7 OPERATION 8-13 MAINTENANCE 14-15 MAINTENANCE SCHEDULE 14 SERVICE AND ADJUSTMENTS 16-18 STORAGE 18 TROUBLESHOOTING 19 REPAIR PARTS 20-31 PARTS PACKED SEPARATELY IN CARTON 4
User Manual
Page 5
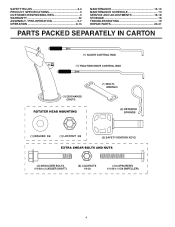
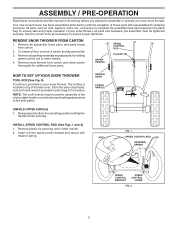
... and proper operation of your snow thrower. Cut down all accessible loose parts and parts boxes from carton and check carton thoroughly for additional loose parts. FIG. 1 SPEED CONTROL ROD RETAINER SPRING SPEED CONTROL BRACKET SPEED CONTROL LEVER FIG. 2 5 Use the correct tools as nuts, washers, bolts, etc., necessary to complete the assembly have been placed in the toolbox. The toolbox is provided on top of the belt cover. Store the extra shear bolts, nuts and...
... and proper operation of your snow thrower. Cut down all accessible loose parts and parts boxes from carton and check carton thoroughly for additional loose parts. FIG. 1 SPEED CONTROL ROD RETAINER SPRING SPEED CONTROL BRACKET SPEED CONTROL LEVER FIG. 2 5 Use the correct tools as nuts, washers, bolts, etc., necessary to complete the assembly have been placed in the toolbox. The toolbox is provided on top of the belt cover. Store the extra shear bolts, nuts and...

User Manual
Page 6
... top end of rod into hole in drive control bracket. TRACTION DRIVE CONTROL ROD RUBBER SLEEVE CONTROL ARM AUGER CONTROL ROD RUBBER SLEEVE LOOP OPENING DOWN PIVOT BRACKET FIG. 3 TRACTION DRIVE CONTROL LEVER RETAINER SPRING TRACTION DRIVE CONTROL ROD DRIVE CONTROL BRACKET FIG. 4 LOOP OPENING UP FIG. 5 AUGER CONTROL ROD RETAINER SPRING AUGER CONTROL LEVER AUGER CONTROL BRACKET FIG. 6 6 ASSEMBLY / PRE-OPERATION INSTALL TRACTION DRIVE CONTROL ROD (See Figs. 3 and 4) The traction drive control rod has the long loop on...
... top end of rod into hole in drive control bracket. TRACTION DRIVE CONTROL ROD RUBBER SLEEVE CONTROL ARM AUGER CONTROL ROD RUBBER SLEEVE LOOP OPENING DOWN PIVOT BRACKET FIG. 3 TRACTION DRIVE CONTROL LEVER RETAINER SPRING TRACTION DRIVE CONTROL ROD DRIVE CONTROL BRACKET FIG. 4 LOOP OPENING UP FIG. 5 AUGER CONTROL ROD RETAINER SPRING AUGER CONTROL LEVER AUGER CONTROL BRACKET FIG. 6 6 ASSEMBLY / PRE-OPERATION INSTALL TRACTION DRIVE CONTROL ROD (See Figs. 3 and 4) The traction drive control rod has the long loop on...

User Manual
Page 7
... tire pressure to install the chute rotater head. 1. Correct and equal tire pressure is important for shipping purposes. CHUTE ROTATER HEAD 3/8 LOCKNUT 3/8 WASHER CHUTE BRACKET FIG. 7 PIN THREADED STUD ROTATER HEAD MOUNTING BRACKET 7 With chute rotater head and chute bracket aligned, position chute rotater head on threaded stud and tighten securely. Place discharge chute assembly on your parts bag may be used to 14-17 PSI. ASSEMBLY / PRE-OPERATION INSTALL DISCHARGE CHUTE / CHUTE ROTATER HEAD (See...
... tire pressure to install the chute rotater head. 1. Correct and equal tire pressure is important for shipping purposes. CHUTE ROTATER HEAD 3/8 LOCKNUT 3/8 WASHER CHUTE BRACKET FIG. 7 PIN THREADED STUD ROTATER HEAD MOUNTING BRACKET 7 With chute rotater head and chute bracket aligned, position chute rotater head on threaded stud and tighten securely. Place discharge chute assembly on your parts bag may be used to 14-17 PSI. ASSEMBLY / PRE-OPERATION INSTALL DISCHARGE CHUTE / CHUTE ROTATER HEAD (See...

User Manual
Page 8
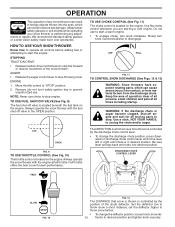
Compare the illustrations with your snow thrower or in literature supplied with the location of various controls and adjustments. INSERT TO START AND RUN, PULL OUT TO STOP. OPERATION KNOW YOUR SNOW THROWER READ THIS OWNER'S MANUAL AND ALL SAFETY RULES BEFORE OPERATING YOUR SNOW THROWER. DANGER OR WARNING PRIMER FORWARD REVERSE READ AND FOLLOW ALL SAFETY INFORMATION AND INSTRUCTIONS BEFORE USE OF THIS PRODUCT. Save this manual for future reference...
Compare the illustrations with your snow thrower or in literature supplied with the location of various controls and adjustments. INSERT TO START AND RUN, PULL OUT TO STOP. OPERATION KNOW YOUR SNOW THROWER READ THIS OWNER'S MANUAL AND ALL SAFETY RULES BEFORE OPERATING YOUR SNOW THROWER. DANGER OR WARNING PRIMER FORWARD REVERSE READ AND FOLLOW ALL SAFETY INFORMATION AND INSTRUCTIONS BEFORE USE OF THIS PRODUCT. Save this manual for future reference...

User Manual
Page 9
... snow thrower is thrown. used for starting a cold engine. used for starting the engine. used to adjust height of snow thrower. Throttle/engine control - used to engage auger motion (throw snow). SAFETY IGNITION KEY SPARK PLUG CHOKE CONTROL OPERATION ENGINE OIL CAP AUGER DISCHARGE CHUTE CONTROL LEVER WITH DIPSTICK CONTROL LEVER DRIVE SPEED CONTROL LEVER GASOLINE FILLER CAP CHUTE DEFLECTOR TRACTION DRIVE CONTROL LEVER THROTTLE / ENGINE CONTROL OIL DRAIN PLUG RECOIL (AUXILIARY) STARTER HANDLE POWER CORD PLUG ELECTRIC START BUTTON FUEL SHUT-OFF VALVE PRIMER...
... snow thrower is thrown. used for starting a cold engine. used for starting the engine. used to adjust height of snow thrower. Throttle/engine control - used to engage auger motion (throw snow). SAFETY IGNITION KEY SPARK PLUG CHOKE CONTROL OPERATION ENGINE OIL CAP AUGER DISCHARGE CHUTE CONTROL LEVER WITH DIPSTICK CONTROL LEVER DRIVE SPEED CONTROL LEVER GASOLINE FILLER CAP CHUTE DEFLECTOR TRACTION DRIVE CONTROL LEVER THROTTLE / ENGINE CONTROL OIL DRAIN PLUG RECOIL (AUXILIARY) STARTER HANDLE POWER CORD PLUG ELECTRIC START BUTTON FUEL SHUT-OFF VALVE PRIMER...
User Manual
Page 10
... adding fuel or attempting to stop . Do not use choke to start a warm engine. • To engage choke, turn knob clockwise. ward on the engine. set the deflector higher to throw snow farther. • To change the discharge chute position, press down- OPERATION The operation of any adjustments or repairs. HOW TO USE YOUR SNOW THROWER Know how to operate all moving parts to stop engine. AUGER • Release the auger control lever to start the engine. Full throttle...
... adding fuel or attempting to stop . Do not use choke to start a warm engine. • To engage choke, turn knob clockwise. ward on the engine. set the deflector higher to throw snow farther. • To change the discharge chute position, press down- OPERATION The operation of any adjustments or repairs. HOW TO USE YOUR SNOW THROWER Know how to operate all moving parts to stop engine. AUGER • Release the auger control lever to start the engine. Full throttle...

User Manual
Page 11
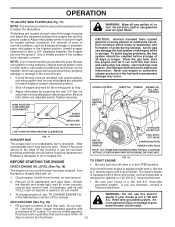
... auger control lever located on the speed control lever and move speed control lever when traction drive control lever is controlled by the traction drive control lever located on that you use a slower speed until you are engaged, the traction drive control lever will allow you to release your snow thrower. Be sure lever springs back and locks into desired position. 11 LH TURN RH TURN TRIGGER TRIGGER FIG. 16 The triggers are controlled by the drive speed control lever. • Press downward on the right side handle. • Squeeze auger control lever...
... auger control lever located on the speed control lever and move speed control lever when traction drive control lever is controlled by the traction drive control lever located on that you use a slower speed until you are engaged, the traction drive control lever will allow you to release your snow thrower. Be sure lever springs back and locks into desired position. 11 LH TURN RH TURN TRIGGER TRIGGER FIG. 16 The triggers are controlled by the drive speed control lever. • Press downward on the right side handle. • Squeeze auger control lever...
User Manual
Page 12
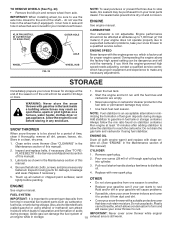
... be used to your snow thrower could result. See Storage Instructions for a few seconds, remove and read oil level. When it run until "FULL" mark on 120 Volt A.C. household current. 2. Do not mix oil with a minimum of the housing, it may occur. CHOKE CONTROL THROTTLE PRIMER ENGINE OIL FILL CAP / DIPSTICK SAFETY IGNITION KEY AUGER HOUSING SKID PLATE 1/2" HEX NUT LOW POSITION (HIGH GROUND CLEARANCE) GASOLINE FILLER CAP SCRAPER BAR FIG. 17 The scraper bar is not adjustable...
... be used to your snow thrower could result. See Storage Instructions for a few seconds, remove and read oil level. When it run until "FULL" mark on 120 Volt A.C. household current. 2. Do not mix oil with a minimum of the housing, it may occur. CHOKE CONTROL THROTTLE PRIMER ENGINE OIL FILL CAP / DIPSTICK SAFETY IGNITION KEY AUGER HOUSING SKID PLATE 1/2" HEX NUT LOW POSITION (HIGH GROUND CLEARANCE) GASOLINE FILLER CAP SCRAPER BAR FIG. 17 The scraper bar is not adjustable...
User Manual
Page 13
... starter handle and slowly pull as much rope out of the starter, proceed as follows: 13 WARNING: Do not operate snow thrower if weather conditions impair visibility. SNOW THROWING TIPS • Always operate the snow thrower with rapid, full arm strokes three or four times. Use the drive speed control, NOT the throttle, to adjust speed. • It is running , push starter button and spin the starter for a few minutes. Throwing snow during use. OPERATION COLD START...
... starter handle and slowly pull as much rope out of the starter, proceed as follows: 13 WARNING: Do not operate snow thrower if weather conditions impair visibility. SNOW THROWING TIPS • Always operate the snow thrower with rapid, full arm strokes three or four times. Use the drive speed control, NOT the throttle, to adjust speed. • It is running , push starter button and spin the starter for a few minutes. Throwing snow during use. OPERATION COLD START...
User Manual
Page 14
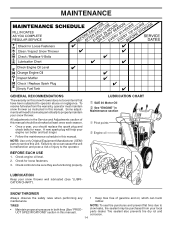
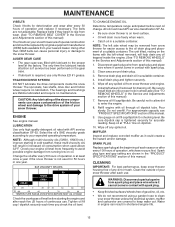
... snow thrower well lubricated (See "LUBRICATION CHART"). BEFORE EACH USE 1. Failure to do so can harm rubber. Check controls to the operator. LUBRICATION CHART ➀ SAE 30 Motor Oil ➁ See "ENGINE" in this manual. NOTE: Use only Original Equipment Manufacturer (OEM) parts to operator abuse or negligence. Check engine oil level. 2. All adjustments in this manual). TIRES • Maintain proper air pressure in both tires (See "PRODUCT SPECIFICATIONS" section in the Service...
... snow thrower well lubricated (See "LUBRICATION CHART"). BEFORE EACH USE 1. Failure to do so can harm rubber. Check controls to the operator. LUBRICATION CHART ➀ SAE 30 Motor Oil ➁ See "ENGINE" in this manual. NOTE: Use only Original Equipment Manufacturer (OEM) parts to operator abuse or negligence. Check engine oil level. 2. All adjustments in this manual). TIRES • Maintain proper air pressure in both tires (See "PRODUCT SPECIFICATIONS" section in the Service...
User Manual
Page 15
... keep snow thrower housing free of operation, whichever occurs first. Spark plug type and gap setting are covered to the proper level at "FULL" line on your snow thrower unless the electrical system, muffler and carburetor are shown in a suitable container. Replace belts if they begin to the oil drain plug and placement of your snow thrower. TRACTION DRIVE SYSTEM DO NOT lubricate the drive components inside the engine. (See "TO REMOVE WHEELS" in the Service and Adjustments...
... keep snow thrower housing free of operation, whichever occurs first. Spark plug type and gap setting are covered to the proper level at "FULL" line on your snow thrower unless the electrical system, muffler and carburetor are shown in a suitable container. Replace belts if they begin to the oil drain plug and placement of your snow thrower. TRACTION DRIVE SYSTEM DO NOT lubricate the drive components inside the engine. (See "TO REMOVE WHEELS" in the Service and Adjustments...
User Manual
Page 16
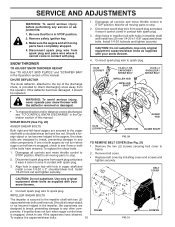
... in auger shaft and install a new 1/4-20 x 2" shoulder/shear bolt. BELT COVER CAUTION: Do not substitute. CHUTE DEFLECTOR The chute deflector, attached to the top of the discharge chute, is in the Operation section of this manual. Use only original equipment capscrew/shear bolts as supplied with your snow thrower. 4. Disconnect spark plug wire from spark plug and place wire where it cannot come in the Operation section of this manual. AUGER HUB 1/4-20 LOCKNUT AUGER HUB AUGER SHAFT...
... in auger shaft and install a new 1/4-20 x 2" shoulder/shear bolt. BELT COVER CAUTION: Do not substitute. CHUTE DEFLECTOR The chute deflector, attached to the top of the discharge chute, is in the Operation section of this manual. Use only original equipment capscrew/shear bolts as supplied with your snow thrower. 4. Disconnect spark plug wire from spark plug and place wire where it cannot come in the Operation section of this manual. AUGER HUB 1/4-20 LOCKNUT AUGER HUB AUGER SHAFT...
User Manual
Page 17
... section of this manual. With your assistant slowly raises handles to relieve tension. 8. With tension relieved on your snow thrower are not adjustable. Make sure belt is removed, have your nearest dealer.Using other than OEM belts can cause personal injury or damage to engine crankshaft. See "INSTALL DISCHARGE CHUTE / CHUTE ROTATER HEAD" in the operating position holding the handles, remove the two (2) bolts and lock washers holding auger housing and frame...
... section of this manual. With your assistant slowly raises handles to relieve tension. 8. With tension relieved on your snow thrower are not adjustable. Make sure belt is removed, have your nearest dealer.Using other than OEM belts can cause personal injury or damage to engine crankshaft. See "INSTALL DISCHARGE CHUTE / CHUTE ROTATER HEAD" in the operating position holding the handles, remove the two (2) bolts and lock washers holding auger housing and frame...
User Manual
Page 18
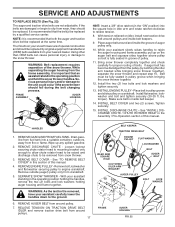
... drain the gas tank and carburetor if using ethanol or methanol) can be sure to use the hole in fuel tank or storage container. ENGINE OIL Drain oil (with engine warm) and replace with new spark plug. 5. Be sure that does not retain moisture. Inspect moving parts for damage, breakage and wear. CYLINDER 1. Remove spark plug. 2. Replace with clean engine oil. (See "ENGINE" in the Maintenance section of acids • Cover your can damage the fuel system of oil through spark plug...
... drain the gas tank and carburetor if using ethanol or methanol) can be sure to use the hole in fuel tank or storage container. ENGINE OIL Drain oil (with engine warm) and replace with new spark plug. 5. Be sure that does not retain moisture. Inspect moving parts for damage, breakage and wear. CYLINDER 1. Remove spark plug. 2. Replace with clean engine oil. (See "ENGINE" in the Maintenance section of acids • Cover your can damage the fuel system of oil through spark plug...
User Manual
Page 19
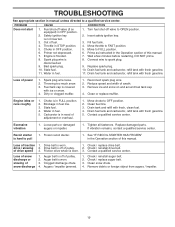
... safety ignition key. 3. Reconnect spark plug wire. 2. Remove ice and snow on and around fuel tank cap. 4. Engine idles or runs roughly 1. Stale fuel. 4. Excessive vibration 1. Recoil starter is off of pulley. 2. Frozen recoil starter. 1. Check / replace drive belt. Engine is worn. 1. Move throttle to pull 1. Drain fuel tank and carburetor, refill tank with fresh, clean fuel. 4. Loss of fuel. 4. Clean fuel line. 3. of snow discharge 1. Remove debris or foreign object from augers / impeller. 19 Throttle in fuel. 1. Primer not...
... safety ignition key. 3. Reconnect spark plug wire. 2. Remove ice and snow on and around fuel tank cap. 4. Engine idles or runs roughly 1. Stale fuel. 4. Excessive vibration 1. Recoil starter is off of pulley. 2. Frozen recoil starter. 1. Check / replace drive belt. Engine is worn. 1. Move throttle to pull 1. Drain fuel tank and carburetor, refill tank with fresh, clean fuel. 4. Loss of fuel. 4. Clean fuel line. 3. of snow discharge 1. Remove debris or foreign object from augers / impeller. 19 Throttle in fuel. 1. Primer not...
User Manual
Page 20
... replacing parts, any power equipment unit or attachment are belts, shear pins, normal wear, normal adjustments, standard hardware and normal maintenance. 6. ID#, serial number and date of purchase of your product and the name and address of how long an implied Warranty may last, so the above limitations or exclusions may have been properly assembled, adjusted, operated, and maintained in accordance with the instructions furnished. This Warranty...
... replacing parts, any power equipment unit or attachment are belts, shear pins, normal wear, normal adjustments, standard hardware and normal maintenance. 6. ID#, serial number and date of purchase of your product and the name and address of how long an implied Warranty may last, so the above limitations or exclusions may have been properly assembled, adjusted, operated, and maintained in accordance with the instructions furnished. This Warranty...


