
User Manual
Page 2
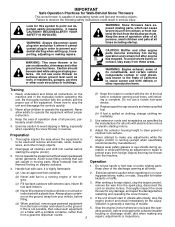
... alert for use snow thrower on sidewalks, driveways and other reproductive harm. Do not put hands or feet near or under rotating parts. If this symbol to operate the equipment. Stop the engine (motor) whenever you leave the operating position, before starting the engine...porches or other foreign objects. 2. Never allow adults to avoid slipping or falling, especially when operating the snow thrower in moving parts. restarting and operating the snow thrower. Wear footwear that may be exercised while using on slippery surfaces. 4. If the unit should...
... alert for use snow thrower on sidewalks, driveways and other reproductive harm. Do not put hands or feet near or under rotating parts. If this symbol to operate the equipment. Stop the engine (motor) whenever you leave the operating position, before starting the engine...porches or other foreign objects. 2. Never allow adults to avoid slipping or falling, especially when operating the snow thrower in moving parts. restarting and operating the snow thrower. Wear footwear that may be exercised while using on slippery surfaces. 4. If the unit should...
User Manual
Page 3
...13 PRODUCT SPECIFICATIONS 3 SERVICE AND ADJUSTMENTS 15-17 CUSTOMER RESPONSIBILITIES 3 STORAGE 17 ASSEMBLY / PRE-OPERATION 4-6 TROUBLESHOOTING 18 OPERATION 7-12 REPAIR PARTS 20-31 MAINTENANCE 13-14 3 WARRANTY 32 Disengage power to the collector/impeller when snow thrower is the most common cause of injury...have stopped. When cleaning, repairing or inspecting the snow thrower, stop the engine and make certain the collector/impeller and all moving parts have competent, well-trained technicians and the proper tools to clear snow at too fast a rate. 12. never run the ...
...13 PRODUCT SPECIFICATIONS 3 SERVICE AND ADJUSTMENTS 15-17 CUSTOMER RESPONSIBILITIES 3 STORAGE 17 ASSEMBLY / PRE-OPERATION 4-6 TROUBLESHOOTING 18 OPERATION 7-12 REPAIR PARTS 20-31 MAINTENANCE 13-14 3 WARRANTY 32 Disengage power to the collector/impeller when snow thrower is the most common cause of injury...have stopped. When cleaning, repairing or inspecting the snow thrower, stop the engine and make certain the collector/impeller and all moving parts have competent, well-trained technicians and the proper tools to clear snow at too fast a rate. 12. never run the ...
User Manual
Page 4
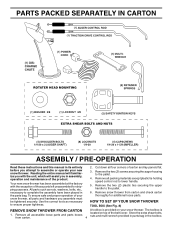
...down all packing materials except plastic tie holding speed control rod to assemble or operate your snow thrower, all accessible loose parts and parts boxes from carton and check carton thoroughly for shipping purposes. To ensure safe and proper operation of your new snow ... tools as nuts, washers, bolts, etc., necessary to ensure proper tightness. 2. Remove all parts and hardware you with the exception of those parts left unassembled for additional loose parts. PARTS PACKED SEPARATELY IN CARTON ASSEMBLY / PRE-OPERATION Read these instructions and this manual in assembly, ...
...down all packing materials except plastic tie holding speed control rod to assemble or operate your snow thrower, all accessible loose parts and parts boxes from carton and check carton thoroughly for shipping purposes. To ensure safe and proper operation of your new snow ... tools as nuts, washers, bolts, etc., necessary to ensure proper tightness. 2. Remove all parts and hardware you with the exception of those parts left unassembled for additional loose parts. PARTS PACKED SEPARATELY IN CARTON ASSEMBLY / PRE-OPERATION Read these instructions and this manual in assembly, ...
User Manual
Page 6
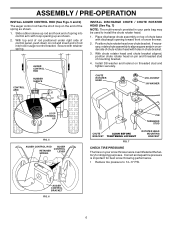
... of rod positioned under right side of mounting bracket. 4. Place discharge chute assembly on pin and threaded stud of control panel, push down on your parts bag may be used to install the chute rotater head. 1. Install 3/8 washer and locknut on underside of chute rotater head with discharge opening up rod...
... of rod positioned under right side of mounting bracket. 4. Place discharge chute assembly on pin and threaded stud of control panel, push down on your parts bag may be used to install the chute rotater head. 1. Install 3/8 washer and locknut on underside of chute rotater head with discharge opening up rod...
User Manual
Page 9
... We recommend standard safety glasses or a wide vision safety mask worn over spectacles. Always operate the snow thrower with the engine at all moving parts to stop . Use the choke control whenever you are starting a cold engine. set the deflector higher to throw snow farther. &#...all times including startup. OFF FULL FIG. 11 TO CONTROL SNOW DISCHARGE (See Figs. 12 & 13) WARNING: Snow throwers have exposed rotating parts, which can cause severe injury from contact, or from material thrown from the discharge chute. WARNING: If the discharge chute or auger become clogged...
... We recommend standard safety glasses or a wide vision safety mask worn over spectacles. Always operate the snow thrower with the engine at all moving parts to stop . Use the choke control whenever you are starting a cold engine. set the deflector higher to throw snow farther. &#...all times including startup. OFF FULL FIG. 11 TO CONTROL SNOW DISCHARGE (See Figs. 12 & 13) WARNING: Snow throwers have exposed rotating parts, which can cause severe injury from contact, or from material thrown from the discharge chute. WARNING: If the discharge chute or auger become clogged...
User Manual
Page 10
... throwing snow. It is recommended that you use a slower speed until you to dislodge this blockage. When cleaning, repairing, or inspecting, make certain all moving parts have stopped.
... throwing snow. It is recommended that you use a slower speed until you to dislodge this blockage. When cleaning, repairing, or inspecting, make certain all moving parts have stopped.
User Manual
Page 11
... Do not mix oil with a minimum of this manual. OPERATION TO ADJUST SKID PLATES (See Fig. 17) NOTE: The wrench provided in your parts bag may be used within 30 days to assure fuel freshness. 11 Adjust skid plates by the impeller, which leads to desired position. See Storage...normal conditions, such as gravel, rocks or other debris, can easily be picked up and thrown by loosening the rear 1/2" hex nut only, then moving parts to stop. 2. Use fresh, clean, regular unleaded gasoline with gasoline. Never use it can cause serious personal injury, property damage or damage to give a...
... Do not mix oil with a minimum of this manual. OPERATION TO ADJUST SKID PLATES (See Fig. 17) NOTE: The wrench provided in your parts bag may be used within 30 days to assure fuel freshness. 11 Adjust skid plates by the impeller, which leads to desired position. See Storage...normal conditions, such as gravel, rocks or other debris, can easily be picked up and thrown by loosening the rear 1/2" hex nut only, then moving parts to stop. 2. Use fresh, clean, regular unleaded gasoline with gasoline. Never use it can cause serious personal injury, property damage or damage to give a...
User Manual
Page 12
...it clicks. Engine will not develop full power until it clicks. RECOIL STARTER • Follow the steps above , keeping the choke control in parts bag) into ignition slot until it is completed, allow starter rope to 10 seconds between 15° and 50°F. To avoid possible freeze... engine. BEFORE STOPPING Run the engine for several seconds. 4. See "TO ADJUST SKID PLATES" in FAST position. 3. Place throttle control in parts bag) into ignition slot until engine starts. receptacle. Insert safety ignition key (packed separately in FAST position. 3.
...it clicks. Engine will not develop full power until it clicks. RECOIL STARTER • Follow the steps above , keeping the choke control in parts bag) into ignition slot until it is completed, allow starter rope to 10 seconds between 15° and 50°F. To avoid possible freeze... engine. BEFORE STOPPING Run the engine for several seconds. 4. See "TO ADJUST SKID PLATES" in FAST position. 3. Place throttle control in parts bag) into ignition slot until engine starts. receptacle. Insert safety ignition key (packed separately in FAST position. 3.
User Manual
Page 13
...Pivot points ➁ Engine oil SNOW THROWER Always observe the safety rules when performing any V-BELTS maintenance. LUBRICATION Keep your snow thrower. Using other parts dealer. Tire sealant also prevents tire dry rot and than OEM belts can cause the unit to malfunction and pose a risk of injury to ..., tire sealant may be purchased from your local (OEM) belts available from your nearest dealer. NOTE: Use only Original Equipment Manufacturer (OEM) parts to properly maintain your snow thrower well lubricated (See "LUBRICATION CHART"). Check V-belts for loose fasteners. 3.
...Pivot points ➁ Engine oil SNOW THROWER Always observe the safety rules when performing any V-BELTS maintenance. LUBRICATION Keep your snow thrower. Using other parts dealer. Tire sealant also prevents tire dry rot and than OEM belts can cause the unit to malfunction and pose a risk of injury to ..., tire sealant may be purchased from your local (OEM) belts available from your nearest dealer. NOTE: Use only Original Equipment Manufacturer (OEM) parts to properly maintain your snow thrower well lubricated (See "LUBRICATION CHART"). Check V-belts for loose fasteners. 3.
User Manual
Page 15
... your nearest dealer. Install 1/4-20 lock nut and tighten securely. FIG. 20 TO REPLACE BELTS (See Fig. 21) ponents. Wait for all moving parts to frame. 2. wire where it cannot come in impeller shaft and install two (2) new 1/4-20 x 1-5/8" capscrew/shear bolts. SERVICE AND ADJUSTMENTS WARNING...64258;ector, attached to the auger shaft with the deflector removed or damaged. CAUTION: Do not substitute. Disengage all moving parts to STOP position. It is discharged, see if the capscrews have sheared. Make sure the augers and all controls and move throttle control...
... your nearest dealer. Install 1/4-20 lock nut and tighten securely. FIG. 20 TO REPLACE BELTS (See Fig. 21) ponents. Wait for all moving parts to frame. 2. wire where it cannot come in impeller shaft and install two (2) new 1/4-20 x 1-5/8" capscrew/shear bolts. SERVICE AND ADJUSTMENTS WARNING...64258;ector, attached to the auger shaft with the deflector removed or damaged. CAUTION: Do not substitute. Disengage all moving parts to STOP position. It is discharged, see if the capscrews have sheared. Make sure the augers and all controls and move throttle control...
User Manual
Page 17
...experience to reach the carburetor. Store in the Maintenance section of time, clean it to be purchased from forming in essential fuel system parts such as on stabilizer container. ENGINE See engine manual. Run engine at the end of this manual). 2. Replace with a suitable ... spark plug. ENGINE See engine manual. Replace if necessary. 5. Pull recoil starter handle slowly a few times to rust. Inspect moving parts for proper engine speed. NOTE: Fuel stabilizer is to protect it run until the fuel lines and carburetor are securely fastened. SNOW THROWER...
...experience to reach the carburetor. Store in the Maintenance section of time, clean it to be purchased from forming in essential fuel system parts such as on stabilizer container. ENGINE See engine manual. Run engine at the end of this manual). 2. Replace with a suitable ... spark plug. ENGINE See engine manual. Replace if necessary. 5. Pull recoil starter handle slowly a few times to rust. Inspect moving parts for proper engine speed. NOTE: Fuel stabilizer is to protect it run until the fuel lines and carburetor are securely fastened. SNOW THROWER...
User Manual
Page 18
.... 4. Clean snow chute. 4. Prime as instructed in the Operation section of drive speed 3. Choke is off of pulley. 2. Loose parts or damaged augers or impeller. 1. Drive belt is in FULL position. 2. TROUBLESHOOTING See appropriate section in manual unless directed to OPEN position...line. 3. Drain tank and refill with fresh gasoline. 11. Contact a qualified service centre. Excessive vibration 1. Replace damaged parts. If vibration remains, contact a qualified service centre. See "IF RECOIL STARTER HAS FROZEN" in fuel. 5. Check / reinstall drive...
.... 4. Clean snow chute. 4. Prime as instructed in the Operation section of drive speed 3. Choke is off of pulley. 2. Loose parts or damaged augers or impeller. 1. Drive belt is in FULL position. 2. TROUBLESHOOTING See appropriate section in manual unless directed to OPEN position...line. 3. Drain tank and refill with fresh gasoline. 11. Contact a qualified service centre. Excessive vibration 1. Replace damaged parts. If vibration remains, contact a qualified service centre. See "IF RECOIL STARTER HAS FROZEN" in fuel. 5. Check / reinstall drive...
User Manual
Page 20
...refer to normal wear of the product. 5. Transportation charges for any unanswered questions concerning this product as defined in replacing parts, any power equipment unit or attachment are belts, shear pins, normal wear, normal adjustments, standard hardware and normal maintenance. 6. This... Warranty, you must be defective due to the original consumer purchaser that term as manufactured is subject to the engine or components parts thereof. This Warranty is free from the date of purchase by Electrolux Home Products. 3. The Warranty period for any products used...
...refer to normal wear of the product. 5. Transportation charges for any unanswered questions concerning this product as defined in replacing parts, any power equipment unit or attachment are belts, shear pins, normal wear, normal adjustments, standard hardware and normal maintenance. 6. This... Warranty, you must be defective due to the original consumer purchaser that term as manufactured is subject to the engine or components parts thereof. This Warranty is free from the date of purchase by Electrolux Home Products. 3. The Warranty period for any products used...


