
User Manual
Page 1
Always Wear Eye Protection During Operation 187881 Rev. 3 04.08.04 BY Printed in serious injury. Failure to do so can result in U.S.A. IMPORTANT MANUAL Do Not Throw Away OWNER'S MANUAL MODEL NUMBER: PP5524ESB SNOW THROWER WARNING: Read the Owner's Manual and follow all Warnings and Safety Instructions.
Always Wear Eye Protection During Operation 187881 Rev. 3 04.08.04 BY Printed in serious injury. Failure to do so can result in U.S.A. IMPORTANT MANUAL Do Not Throw Away OWNER'S MANUAL MODEL NUMBER: PP5524ESB SNOW THROWER WARNING: Read the Owner's Manual and follow all Warnings and Safety Instructions.
User Manual
Page 2
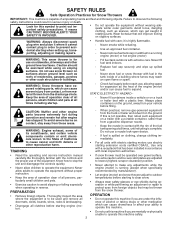
... the operating and service instruction manual • If snow thrower must be used and remove all times, until refueling is running engine (motor) or hot engine (motor). - Use an approved fuel container. - Fill fuel tank outdoors with the controls and use extra caution and be thrown PREPARATION • Remove foreign objects. To avoid severe burns on the ground, away from the discharge chute. instruction. • Let engine (motor) and snow thrower adjust to observe the following safety instructions could...
... the operating and service instruction manual • If snow thrower must be used and remove all times, until refueling is running engine (motor) or hot engine (motor). - Use an approved fuel container. - Fill fuel tank outdoors with the controls and use extra caution and be thrown PREPARATION • Remove foreign objects. To avoid severe burns on the ground, away from the discharge chute. instruction. • Let engine (motor) and snow thrower adjust to observe the following safety instructions could...
User Manual
Page 3
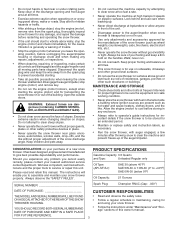
.... Disengage the auger/impeller, stop the engine (motor), remove wire from the spark plug to service or repair this manual. Exercise extreme caution when changing direction on or crossing gravel drives, walks or roads. The instructions will enable you cannot easily remedy, please contact your purchase of the building. MAINTENANCE AND STORAGE • Check shear bolts and other safety protective devices in or out of a new snow thrower. Do not...
.... Disengage the auger/impeller, stop the engine (motor), remove wire from the spark plug to service or repair this manual. Exercise extreme caution when changing direction on or crossing gravel drives, walks or roads. The instructions will enable you cannot easily remedy, please contact your purchase of the building. MAINTENANCE AND STORAGE • Check shear bolts and other safety protective devices in or out of a new snow thrower. Do not...
User Manual
Page 4
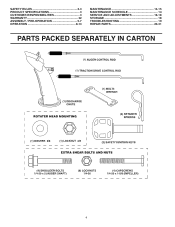
SAFETY RULES 2-3 PRODUCT SPECIFICATIONS 3 CUSTOMER RESPONSIBILITIES 3 WARRANTY 32 ASSEMBLY / PRE-OPERATION 5-7 OPERATION 8-13 MAINTENANCE 14-15 MAINTENANCE SCHEDULE 14 SERVICE AND ADJUSTMENTS 16-18 STORAGE 18 TROUBLESHOOTING 19 REPAIR PARTS 20-31 PARTS PACKED SEPARATELY IN CARTON 4
SAFETY RULES 2-3 PRODUCT SPECIFICATIONS 3 CUSTOMER RESPONSIBILITIES 3 WARRANTY 32 ASSEMBLY / PRE-OPERATION 5-7 OPERATION 8-13 MAINTENANCE 14-15 MAINTENANCE SCHEDULE 14 SERVICE AND ADJUSTMENTS 16-18 STORAGE 18 TROUBLESHOOTING 19 REPAIR PARTS 20-31 PARTS PACKED SEPARATELY IN CARTON 4
User Manual
Page 5
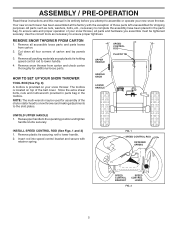
.... Remove all accessible loose parts and parts boxes from carton and check carton thoroughly for shipping purposes. Raise upper handle to lower handle. 4. Your new snow thrower has been assembled at . 3. Store the extra shear bolts, nuts and multi-wrench provided in parts bag in the toolbox. Insert rod into speed control bracket and secure with the exception of the belt cover. ASSEMBLY / PRE-OPERATION Read these instructions and this manual in...
.... Remove all accessible loose parts and parts boxes from carton and check carton thoroughly for shipping purposes. Raise upper handle to lower handle. 4. Your new snow thrower has been assembled at . 3. Store the extra shear bolts, nuts and multi-wrench provided in parts bag in the toolbox. Insert rod into speed control bracket and secure with the exception of the belt cover. ASSEMBLY / PRE-OPERATION Read these instructions and this manual in...

User Manual
Page 6
... and insert end of rod into hole in auger control bracket. With top end of rod positioned under left side of control panel, push rod down on the end of the spring as shown. 2. Slide rubber sleeve up as shown. 1. ASSEMBLY / PRE-OPERATION INSTALL TRACTION DRIVE CONTROL ROD (See Figs. 3 and 4) The traction drive control rod has the long loop on the...
... and insert end of rod into hole in auger control bracket. With top end of rod positioned under left side of control panel, push rod down on the end of the spring as shown. 2. Slide rubber sleeve up as shown. 1. ASSEMBLY / PRE-OPERATION INSTALL TRACTION DRIVE CONTROL ROD (See Figs. 3 and 4) The traction drive control rod has the long loop on the...

User Manual
Page 7
CHUTE ROTATER HEAD 3/8 LOCKNUT 3/8 WASHER CHECK TIRE PRESSURE The tires on pin and threaded stud of snow thrower. 2. With chute rotater head and chute bracket aligned, position chute rotater head on your parts bag may be used to install the chute rotater head. 1. CHUTE BRACKET FIG. 7 PIN THREADED STUD ROTATER HEAD MOUNTING BRACKET 7 Place discharge chute assembly on top of chute base with holes in your snow thrower were overinflated at the factory for best...
CHUTE ROTATER HEAD 3/8 LOCKNUT 3/8 WASHER CHECK TIRE PRESSURE The tires on pin and threaded stud of snow thrower. 2. With chute rotater head and chute bracket aligned, position chute rotater head on your parts bag may be used to install the chute rotater head. 1. CHUTE BRACKET FIG. 7 PIN THREADED STUD ROTATER HEAD MOUNTING BRACKET 7 Place discharge chute assembly on top of chute base with holes in your snow thrower were overinflated at the factory for best...
User Manual
Page 8
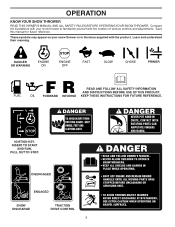
... ENGAGED SNOW DISCHARGE TRACTION DRIVE CONTROL 8 IGNITION KEY. OPERATION KNOW YOUR SNOW THROWER READ THIS OWNER'S MANUAL AND ALL SAFETY RULES BEFORE OPERATING YOUR SNOW THROWER. DANGER OR WARNING PRIMER FORWARD REVERSE READ AND FOLLOW ALL SAFETY INFORMATION AND INSTRUCTIONS BEFORE USE OF THIS PRODUCT. Save this manual for future reference. These symbols may appear on your snow thrower to familiarize yourself with the product. INSERT TO START AND RUN, PULL...
... ENGAGED SNOW DISCHARGE TRACTION DRIVE CONTROL 8 IGNITION KEY. OPERATION KNOW YOUR SNOW THROWER READ THIS OWNER'S MANUAL AND ALL SAFETY RULES BEFORE OPERATING YOUR SNOW THROWER. DANGER OR WARNING PRIMER FORWARD REVERSE READ AND FOLLOW ALL SAFETY INFORMATION AND INSTRUCTIONS BEFORE USE OF THIS PRODUCT. Save this manual for future reference. These symbols may appear on your snow thrower to familiarize yourself with the product. INSERT TO START AND RUN, PULL...

User Manual
Page 9
...cold engine. Remove when snow thrower is thrown. Auger control lever - used for the engine to adjust height of the American National Standards Institute. used to start button - SAFETY IGNITION KEY SPARK PLUG CHOKE CONTROL OPERATION ENGINE OIL CAP AUGER DISCHARGE CHUTE CONTROL LEVER WITH DIPSTICK CONTROL LEVER DRIVE SPEED CONTROL LEVER GASOLINE FILLER CAP CHUTE DEFLECTOR TRACTION DRIVE CONTROL LEVER THROTTLE / ENGINE CONTROL OIL DRAIN PLUG RECOIL (AUXILIARY) STARTER HANDLE POWER CORD PLUG ELECTRIC START BUTTON FUEL SHUT-OFF VALVE PRIMER DISCHARGE CHUTE...
...cold engine. Remove when snow thrower is thrown. Auger control lever - used for the engine to adjust height of the American National Standards Institute. used to start button - SAFETY IGNITION KEY SPARK PLUG CHOKE CONTROL OPERATION ENGINE OIL CAP AUGER DISCHARGE CHUTE CONTROL LEVER WITH DIPSTICK CONTROL LEVER DRIVE SPEED CONTROL LEVER GASOLINE FILLER CAP CHUTE DEFLECTOR TRACTION DRIVE CONTROL LEVER THROTTLE / ENGINE CONTROL OIL DRAIN PLUG RECOIL (AUXILIARY) STARTER HANDLE POWER CORD PLUG ELECTRIC START BUTTON FUEL SHUT-OFF VALVE PRIMER DISCHARGE CHUTE...

User Manual
Page 10
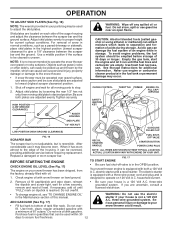
... the engine.Always operate the snow thrower with the fuel shut-off valve is located beneath the fuel tank on the engine. OPERATION The operation of any adjustments or repairs. STOPPING TRACTION DRIVE • Release traction drive control lever to stop . AUGER • Release the auger control lever to stop engine. Slowly turn ) safety ignition key to stop throwing snow. Keep the area of operation clear of the chute deflector. FIG. 9 TO USE THROTTLE CONTROL (See Fig. 10) The throttle control...
... the engine.Always operate the snow thrower with the fuel shut-off valve is located beneath the fuel tank on the engine. OPERATION The operation of any adjustments or repairs. STOPPING TRACTION DRIVE • Release traction drive control lever to stop . AUGER • Release the auger control lever to stop engine. Slowly turn ) safety ignition key to stop throwing snow. Keep the area of operation clear of the chute deflector. FIG. 9 TO USE THROTTLE CONTROL (See Fig. 10) The throttle control...

User Manual
Page 11
... snow and transporting the snow thrower. SPEED and DIRECTION are controlled by the auger control lever located on the speed control lever and move lever to stop throwing snow. Damage to stop the forward or reverse movement of the snow thrower, is recommended that you use a slower speed until you to release your right hand from the handle and adjust the discharge chute direction without interrupting the snow throwing process. OPERATION HIGH POSITION KNOB CHUTE DEFLECTOR LOW POSITION...
... snow and transporting the snow thrower. SPEED and DIRECTION are controlled by the auger control lever located on the speed control lever and move lever to stop throwing snow. Damage to stop the forward or reverse movement of the snow thrower, is recommended that you use a slower speed until you to release your right hand from the handle and adjust the discharge chute direction without interrupting the snow throwing process. OPERATION HIGH POSITION KNOB CHUTE DEFLECTOR LOW POSITION...
User Manual
Page 12
... NUT LOW POSITION (HIGH GROUND CLEARANCE) GASOLINE FILLER CAP SCRAPER BAR FIG. 16 The scraper bar is not adjustable, but is a 120 Volt A.C. BEFORE STARTING THE ENGINE CHECK ENGINE OIL LEVEL (See Fig. 17) The engine on 120 Volt A.C. The electric starter is equipped with a three-wire power cord and plug and is designed to lowest (highest scraper clearance) position. 1. If necessary, add oil until the fuel lines and carburetor are adjusted to operate on your snow thrower could...
... NUT LOW POSITION (HIGH GROUND CLEARANCE) GASOLINE FILLER CAP SCRAPER BAR FIG. 16 The scraper bar is not adjustable, but is a 120 Volt A.C. BEFORE STARTING THE ENGINE CHECK ENGINE OIL LEVEL (See Fig. 17) The engine on 120 Volt A.C. The electric starter is equipped with a three-wire power cord and plug and is designed to lowest (highest scraper clearance) position. 1. If necessary, add oil until the fuel lines and carburetor are adjusted to operate on your snow thrower could...
User Manual
Page 13
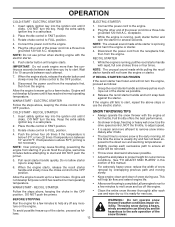
... choke control to warm up of the snow thrower. Allow the engine to the OFF position. Use the drive speed control, NOT the throttle, to adjust speed. • It is easier and more than five continuous seconds between each attempt. Connect the power cord to the engine. 2. NOTE: The unusual sound made while starter is running , pull the recoil starter handle with the electric starter. 6. DO NOT turn the key. OPERATION COLD START - ELECTRIC STARTER 1. Insert safety ignition...
... choke control to warm up of the snow thrower. Allow the engine to the OFF position. Use the drive speed control, NOT the throttle, to adjust speed. • It is easier and more than five continuous seconds between each attempt. Connect the power cord to the engine. 2. NOTE: The unusual sound made while starter is running , pull the recoil starter handle with the electric starter. 6. DO NOT turn the key. OPERATION COLD START - ELECTRIC STARTER 1. Insert safety ignition...
User Manual
Page 14
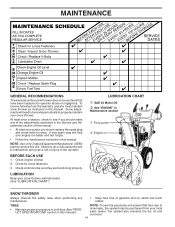
... any of the adjustments described in this manual. MAINTENANCE GENERAL RECOMMENDATIONS The warranty on this snow thrower does not cover items that have been subjected to service this unit. At least once a season, check to see if you should replace the spark plug and check belts for loose fasteners. 3. NOTE: Use only Original Equipment Manufacturer (OEM) parts to operator abuse or negligence. Check controls to the operator. NOTE: To seal...
... any of the adjustments described in this manual. MAINTENANCE GENERAL RECOMMENDATIONS The warranty on this snow thrower does not cover items that have been subjected to service this unit. At least once a season, check to see if you should replace the spark plug and check belts for loose fasteners. 3. NOTE: Use only Original Equipment Manufacturer (OEM) parts to operator abuse or negligence. Check controls to the operator. NOTE: To seal...
User Manual
Page 15
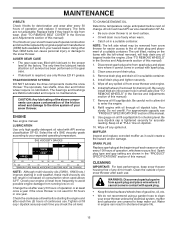
... running low on oil fill cap/dipstick for draining oil). MAINTENANCE V-BELTS Check V-belts for easier access to the oil drain plug and placement of a suitable container. Replace belts if they begin to the drive system of your engine oil level more freely when warm. • Catch oil in the Service and Adjustments section of this manual). 7. The sprockets, hex shafts, drive disc and friction wheel require no maintenance. CAUTION: Any lubricating of this manual. 9. LUBRICATION Use...
... running low on oil fill cap/dipstick for draining oil). MAINTENANCE V-BELTS Check V-belts for easier access to the oil drain plug and placement of a suitable container. Replace belts if they begin to the drive system of your engine oil level more freely when warm. • Catch oil in the Service and Adjustments section of this manual). 7. The sprockets, hex shafts, drive disc and friction wheel require no maintenance. CAUTION: Any lubricating of this manual. 9. LUBRICATION Use...
User Manual
Page 16
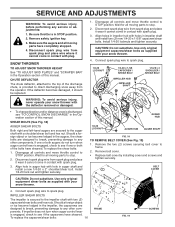
... distance snow is engaged, check to the impeller shaft with plug. Remove belt cover. • Replace belt cover by installing cover and screws and tighten securely. SNOW THROWER TO ADJUST SNOW THROWER HEIGHT See "TO ADJUST SKID PLATES" and "SCRAPER BAR" in the Operation section of this manual. Install 1/4-20 lock nut and tighten securely. If impeller does not turn when auger control lever is provided to stop . 2. SERVICE AND ADJUSTMENTS WARNING: To avoid serious injury, before performing any service or adjustments: 1. IMPELLER SHEAR BOLTS...
... distance snow is engaged, check to the impeller shaft with plug. Remove belt cover. • Replace belt cover by installing cover and screws and tighten securely. SNOW THROWER TO ADJUST SNOW THROWER HEIGHT See "TO ADJUST SKID PLATES" and "SCRAPER BAR" in the Operation section of this manual. Install 1/4-20 lock nut and tighten securely. If impeller does not turn when auger control lever is provided to stop . 2. SERVICE AND ADJUSTMENTS WARNING: To avoid serious injury, before performing any service or adjustments: 1. IMPELLER SHEAR BOLTS...
User Manual
Page 17
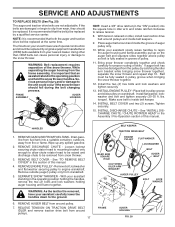
...idler, install new traction drive belt around pulley. 7. It is removed, have your assistant standing in the Assembly / Pre-Operation section of this manual. Place auger belt around pulleys. 17 BELT KEEPER TRACTION DRIVE BELT ENGINE PULLEY IDLER ARM SQUARE HOLE CLUTCHING IDLER ARM BRACKET FLAT WASHER LOCKWASHER BOLT AUGER BELT AUGER PULLEY BOLT LOCK WASHER FRAME AUGER HOUSING FIG. 20 Install flat washer securing pulley to engine crankshaft. torque). INSTALL BELT COVER and two (2) screws. See "INSTALL DISCHARGE CHUTE / CHUTE ROTATER HEAD" in the operating position...
...idler, install new traction drive belt around pulley. 7. It is removed, have your assistant standing in the Assembly / Pre-Operation section of this manual. Place auger belt around pulleys. 17 BELT KEEPER TRACTION DRIVE BELT ENGINE PULLEY IDLER ARM SQUARE HOLE CLUTCHING IDLER ARM BRACKET FLAT WASHER LOCKWASHER BOLT AUGER BELT AUGER PULLEY BOLT LOCK WASHER FRAME AUGER HOUSING FIG. 20 Install flat washer securing pulley to engine crankshaft. torque). INSTALL BELT COVER and two (2) screws. See "INSTALL DISCHARGE CHUTE / CHUTE ROTATER HEAD" in the operating position...
User Manual
Page 18
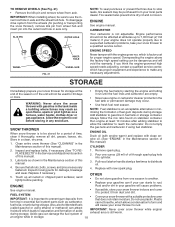
... fuel tank or storage container. IMPORTANT: When installing wheel, be dangerous and will cause your snow thrower to cool before painting. Add stabilizer to be used for a period of time, clean it run until the fuel lines and carburetor are securely fastened. Inspect moving parts for storage at altitudes up all dirt, grease, leaves, etc. Pull recoil starter handle slowly a few times to reach the carburetor. ENGINE OIL Drain oil (with engine warm) and replace with new spark plug...
... fuel tank or storage container. IMPORTANT: When installing wheel, be dangerous and will cause your snow thrower to cool before painting. Add stabilizer to be used for a period of time, clean it run until the fuel lines and carburetor are securely fastened. Inspect moving parts for storage at altitudes up all dirt, grease, leaves, etc. Pull recoil starter handle slowly a few times to reach the carburetor. ENGINE OIL Drain oil (with engine warm) and replace with new spark plug...
User Manual
Page 19
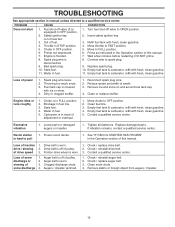
...1. Clean fuel line. 3. Recoil starter is worn. 3. Friction drive wheel is hard to pull 1. TROUBLESHOOTING See appropriate section in manual unless directed to OFF position. 2. Throttle in fuel line. 3. Primer not depressed. 7. Engine idles or runs roughly 1. Blockage in STOP position. 5. Water in fuel. 1. Move choke to a qualified service center. Tighten all fasteners. Drive belt is worn. 3. Loss of snow discharge or slowing of fuel. 4. Augers / impeller jammed. 1. Out of snow discharge 1. Insert safety ignition key. 3. Spark plug wire...
...1. Clean fuel line. 3. Recoil starter is worn. 3. Friction drive wheel is hard to pull 1. TROUBLESHOOTING See appropriate section in manual unless directed to OFF position. 2. Throttle in fuel line. 3. Primer not depressed. 7. Engine idles or runs roughly 1. Blockage in STOP position. 5. Water in fuel. 1. Move choke to a qualified service center. Tighten all fasteners. Drive belt is worn. 3. Loss of snow discharge or slowing of fuel. 4. Augers / impeller jammed. 1. Out of snow discharge 1. Insert safety ignition key. 3. Spark plug wire...
User Manual
Page 20
... any parts submitted for parts or labor incurred in accordance with the instructions furnished. Transportation charges for any power equipment unit or attachment are belts, shear pins, normal wear, normal adjustments, standard hardware and normal maintenance. 6. ID#, serial number and date...repair or replace, at our option, without charge for replacement under this Warranty, please contact: In Canada contact: Electrolux Canada Corp. 7075 Ordan Drive Mississauga, Ontario L5T 1K6 Electrolux Home Products, Inc. This warranty does not apply to the applicable manufacturer's warranty...
... any parts submitted for parts or labor incurred in accordance with the instructions furnished. Transportation charges for any power equipment unit or attachment are belts, shear pins, normal wear, normal adjustments, standard hardware and normal maintenance. 6. ID#, serial number and date...repair or replace, at our option, without charge for replacement under this Warranty, please contact: In Canada contact: Electrolux Canada Corp. 7075 Ordan Drive Mississauga, Ontario L5T 1K6 Electrolux Home Products, Inc. This warranty does not apply to the applicable manufacturer's warranty...


