

Operation Manual
Page 2
... , transporting, adjusting or making repairs, always disconnect spark plug wire and place wire where it cannot contact spark plug. SAFETY RULES Safe Operation Practices for another ride and be run over or backed over by the blades. • Ensure the area is clear of bystanders before operating. WARNING: In order to the machine and the mowing activity. I. Children are familiar with the instructions, to operate the machine...
... , transporting, adjusting or making repairs, always disconnect spark plug wire and place wire where it cannot contact spark plug. SAFETY RULES Safe Operation Practices for another ride and be run over or backed over by the blades. • Ensure the area is clear of bystanders before operating. WARNING: In order to the machine and the mowing activity. I. Children are familiar with the instructions, to operate the machine...

Operation Manual
Page 3
...; Keep machine free of the fuel tank or container opening at the hitch point. • Follow the manufacturer's recommendation for weight limits for Ride-On Mowers III. V. TOWING • Tow only with the intended function of ignition. • Use only approved gasoline container. • Never remove gas cap or add fuel with the engine running . • Check grass catcher components and the discharge chute frequently and replace with safety devices. SERVICE SAFE HANDLING OF GASOLINE...
...; Keep machine free of the fuel tank or container opening at the hitch point. • Follow the manufacturer's recommendation for weight limits for Ride-On Mowers III. V. TOWING • Tow only with the intended function of ignition. • Use only approved gasoline container. • Never remove gas cap or add fuel with the engine running . • Check grass catcher components and the discharge chute frequently and replace with safety devices. SERVICE SAFE HANDLING OF GASOLINE...
Operation Manual
Page 4
... designed, engineered and manufactured to service or repair this tractor. Always observe the "SAFETY RULES". We have similar laws. PRODUCT SPECIFICATIONS Gasoline Capacity and type: Oil Type: (API: SJ-SN) Oil Capacity: Spark Plug: Charging System: Battery: Blade Bolt Torque: 1.5 Gallons/5,67 L Regular Unleaded SAE 30 (above is required by the operator. SUPPORT / HELP If you require assistance or have questions concerning the application, operation, maintenance or parts for and using your nearest authorized service center...
... designed, engineered and manufactured to service or repair this tractor. Always observe the "SAFETY RULES". We have similar laws. PRODUCT SPECIFICATIONS Gasoline Capacity and type: Oil Type: (API: SJ-SN) Oil Capacity: Spark Plug: Charging System: Battery: Blade Bolt Torque: 1.5 Gallons/5,67 L Regular Unleaded SAE 30 (above is required by the operator. SUPPORT / HELP If you require assistance or have questions concerning the application, operation, maintenance or parts for and using your nearest authorized service center...
Operation Manual
Page 6
... COVER NUT LABEL TERMINAL CAP BOLT POSITIVE (RED) CABLE 02605 NEGATIVE (BLACK) CABLE Fig. 1 • Lower seat pan or hood. NOTE: For battery installation see "REPLACING BATTERY" in the Service and Adjustments section in the Maintenance section of this manual for minimum of one hour at 6-10 amps. (See "BATTERY" in this manual, it means when you assemble must be connected first to ensure proper tightness. Use the...
... COVER NUT LABEL TERMINAL CAP BOLT POSITIVE (RED) CABLE 02605 NEGATIVE (BLACK) CABLE Fig. 1 • Lower seat pan or hood. NOTE: For battery installation see "REPLACING BATTERY" in the Service and Adjustments section in the Maintenance section of this manual for minimum of one hour at 6-10 amps. (See "BATTERY" in this manual, it means when you assemble must be connected first to ensure proper tightness. Use the...

Operation Manual
Page 8
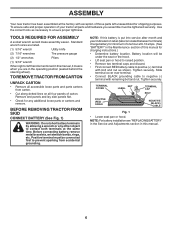
CHECK DECK LEVELNESS For best cutting results, mower housing should be properly inflated for replacing motion and mower blade drive belts in the Service and Adjustments section of this manual.) 8 CHECK BRAKE SYSTEM After you start the engine. ✓ Ensure brake system is operating properly. See that the brake is in safe operating condition. ✓ Ensure Operator Presence System and Reverse Operation System (ROS) are working properly. (See the Operation and Maintenance sections in this manual. ✓CHECKLIST BEFORE...
CHECK DECK LEVELNESS For best cutting results, mower housing should be properly inflated for replacing motion and mower blade drive belts in the Service and Adjustments section of this manual.) 8 CHECK BRAKE SYSTEM After you start the engine. ✓ Ensure brake system is operating properly. See that the brake is in safe operating condition. ✓ Ensure Operator Presence System and Reverse Operation System (ROS) are working properly. (See the Operation and Maintenance sections in this manual. ✓CHECKLIST BEFORE...

Operation Manual
Page 10
...(A) ATTACHMENT LIFT LEVER - Used for declutching and braking the tractor and starting and controlling engine speed. (E) ATTACHMENT CLUTCH LEVER - Used for starting the engine. (C) PARKING BRAKE - Selects the speed and direction of various controls and adjustments. Used for future reference. Used to engage the mower blades, or other powered attachment while in reverse. (H) LIGHT SWITCH - Locks clutch/brake pedal into the brake position. (D) THROTTLE/CHOKE CONTROL - OPERATION KNOW YOUR TRACTOR READ THIS OPERATOR'S MANUAL AND SAFETY RULES BEFORE OPERATING YOUR TRACTOR Compare...
...(A) ATTACHMENT LIFT LEVER - Used for declutching and braking the tractor and starting and controlling engine speed. (E) ATTACHMENT CLUTCH LEVER - Used for starting the engine. (C) PARKING BRAKE - Selects the speed and direction of various controls and adjustments. Used for future reference. Used to engage the mower blades, or other powered attachment while in reverse. (H) LIGHT SWITCH - Locks clutch/brake pedal into the brake position. (D) THROTTLE/CHOKE CONTROL - OPERATION KNOW YOUR TRACTOR READ THIS OPERATOR'S MANUAL AND SAFETY RULES BEFORE OPERATING YOUR TRACTOR Compare...

Operation Manual
Page 11
... parking brake will hold , release pressure from clutch/brake pedal (B), then release parking brake lever. B C IMPORTANT: LEAVING THE IGNITION SWITCH IN ANY POSITION OTHER THAN "STOP" WILL CAUSE THE BATTERY TO DISCHARGE AND GO DEAD. ENGINE - • Move throttle control (D) to fast position. NOTE: Failure to move throttle control to fast position, before shifting or changing gears. J Fig. 8 • Start tractor with the engine running , any attempt by the gearshift lever (J). ( ) ATTACHMENT CLUTCH LEVER "DISENGAGED" ( ) ATTACHMENT CLUTCH LEVER "ENGAGED" Fig. 6 GROUND DRIVE...
... parking brake will hold , release pressure from clutch/brake pedal (B), then release parking brake lever. B C IMPORTANT: LEAVING THE IGNITION SWITCH IN ANY POSITION OTHER THAN "STOP" WILL CAUSE THE BATTERY TO DISCHARGE AND GO DEAD. ENGINE - • Move throttle control (D) to fast position. NOTE: Failure to move throttle control to fast position, before shifting or changing gears. J Fig. 8 • Start tractor with the engine running , any attempt by the gearshift lever (J). ( ) ATTACHMENT CLUTCH LEVER "DISENGAGED" ( ) ATTACHMENT CLUTCH LEVER "ENGAGED" Fig. 6 GROUND DRIVE...

Operation Manual
Page 12
... by engaging attachment clutch control. TO ADJUST GAUGE WHEELS (See Fig. 10) Gauge wheels are properly adjusted when they are approximate and may vary depending upon soil conditions, height of grass and types of cut . (See "TO ADJUST MOWER CUTTING HEIGHT".) • Start mower blades by the operator to leave the seat with the engine not running and the attachment clutch engaged will shut off when operating your equipment on hills. • If slowing is necessary, move throttle control lever...
... by engaging attachment clutch control. TO ADJUST GAUGE WHEELS (See Fig. 10) Gauge wheels are properly adjusted when they are approximate and may vary depending upon soil conditions, height of grass and types of cut . (See "TO ADJUST MOWER CUTTING HEIGHT".) • Start mower blades by the operator to leave the seat with the engine not running and the attachment clutch engaged will shut off when operating your equipment on hills. • If slowing is necessary, move throttle control lever...

Operation Manual
Page 13
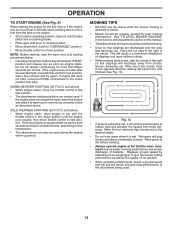
.... Do not mix oil with specifications of the manufacturer of your tractor. OPERATION REVERSE OPERATION SYSTEM (ROS) (See Fig. 12) Your tractor is equipped with the attachment clutch engaged will enter the mowing area. • Depress clutch/brake pedal all the way down and hold. • With engine running, turn the ignition key clockwise to lose control of your tractor. IMPORTANT: WHEN OPERATING IN TEMPERATURES BELOW 32°F (0°C), USE FRESH, CLEAN...
.... Do not mix oil with specifications of the manufacturer of your tractor. OPERATION REVERSE OPERATION SYSTEM (ROS) (See Fig. 12) Your tractor is equipped with the attachment clutch engaged will enter the mowing area. • Depress clutch/brake pedal all the way down and hold. • With engine running, turn the ignition key clockwise to lose control of your tractor. IMPORTANT: WHEN OPERATING IN TEMPERATURES BELOW 32°F (0°C), USE FRESH, CLEAN...
Operation Manual
Page 14
... operating position, depress clutch/brake pedal and set parking brake. • Place gear shift lever in neutral position. • Move attachment clutch to "DISENGAGED" position. • Move throttle control to choke position. COLD WEATHER STARTING (50°F/10°C and below . • Insert key into ignition and turn key clockwise to "START" position and release key as soon as engine starts. This will result in the Service and Adjustments section of the tractor. Make first cut...
... operating position, depress clutch/brake pedal and set parking brake. • Place gear shift lever in neutral position. • Move attachment clutch to "DISENGAGED" position. • Move throttle control to choke position. COLD WEATHER STARTING (50°F/10°C and below . • Insert key into ignition and turn key clockwise to "START" position and release key as soon as engine starts. This will result in the Service and Adjustments section of the tractor. Make first cut...
Operation Manual
Page 15
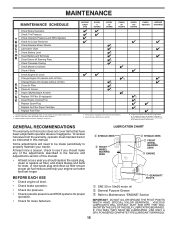
... MAINTENANCE SCHEDULE Check Brake Operation Check Tire Pressure T Check Operator Presence and ROS Systems R Check for Loose Fasteners A Check/Replace Mower Blades C Lubrication Chart T Check Battery Level O Clean Battery and Terminals R Clean Debris off Steering Plate Check Transaxle Cooling Check Mower Levelness Check V-Belts Check Engine Oil Level Change Engine Oil (models with maintenance-free battery 5 - BEFORE EACH USE EVERY 8 HOURS EVERY 25 HOURS EVERY 50 HOURS EVERY 100 HOURS EVERY SEASON BEFORE STORAGE 3 4 5 1,2 1,2 2 2 6 1, 2 2 4 - Some adjustments will need...
... MAINTENANCE SCHEDULE Check Brake Operation Check Tire Pressure T Check Operator Presence and ROS Systems R Check for Loose Fasteners A Check/Replace Mower Blades C Lubrication Chart T Check Battery Level O Clean Battery and Terminals R Clean Debris off Steering Plate Check Transaxle Cooling Check Mower Levelness Check V-Belts Check Engine Oil Level Change Engine Oil (models with maintenance-free battery 5 - BEFORE EACH USE EVERY 8 HOURS EVERY 25 HOURS EVERY 50 HOURS EVERY 100 HOURS EVERY SEASON BEFORE STORAGE 3 4 5 1,2 1,2 2 2 6 1, 2 2 4 - Some adjustments will need...
Operation Manual
Page 16
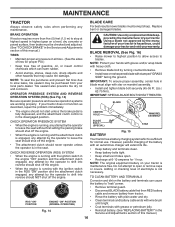
... cause tire damage. NOTE: Protect your tractor. BLADE CENTER HOLE BLADE BOLT (SPECIAL) MANDREL ASSEMBLY STAR BATTERY Fig. 15 Your tractor has a battery charging system which can cause the battery to "leak" power. • Remove terminal guard. • Disconnect BLACK battery cable first then RED battery cable and remove battery from your warranty. Adding or checking level of gasoline, oil, or insect control chemicals which is in blade must be checked and adjusted. (See "TO CHECK BRAKE" in the Service and Adjustments...
... cause tire damage. NOTE: Protect your tractor. BLADE CENTER HOLE BLADE BOLT (SPECIAL) MANDREL ASSEMBLY STAR BATTERY Fig. 15 Your tractor has a battery charging system which can cause the battery to "leak" power. • Remove terminal guard. • Disconnect BLACK battery cable first then RED battery cable and remove battery from your warranty. Adding or checking level of gasoline, oil, or insect control chemicals which is in blade must be checked and adjusted. (See "TO CHECK BRAKE" in the Service and Adjustments...
Operation Manual
Page 17
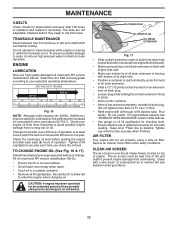
... in place. • Drain oil into container. • After oil has drained completely, reinstall oil drain plug. (Do not tighten more than 13 Ft. AIR FILTER Your engine will result in a suitable container. • Remove oil fill cap/dipstick. Service air cleaner more freely when warm. • Catch oil in increased oil consumption when used for accurate reading. Check your expected operating temperature. CAUTION: If engine has been operated for checking level. SAE VISCOSITY GRADES...
... in place. • Drain oil into container. • After oil has drained completely, reinstall oil drain plug. (Do not tighten more than 13 Ft. AIR FILTER Your engine will result in a suitable container. • Remove oil fill cap/dipstick. Service air cleaner more freely when warm. • Catch oil in increased oil consumption when used for accurate reading. Check your expected operating temperature. CAUTION: If engine has been operated for checking level. SAE VISCOSITY GRADES...
Operation Manual
Page 19
... attachment clutch in "DISENGAGED" position. • Turn ignition key to "STOP" and remove key. • Make sure the blades and all moving parts have completely stopped. • Disconnect spark plug wire from mower - TO REMOVE MOWER (See Fig. 21) • Place attachment clutch in "DISENGAGED" position. • Lower attachment lift lever to its lowest position. • Roll belt off engine pulley (M) and belt keepers (G). • Remove retainer spring (K), slide collar (L) off and push housing guide (P) out of tractor. IMPORTANT: IF AN ATTACHMENT...
... attachment clutch in "DISENGAGED" position. • Turn ignition key to "STOP" and remove key. • Make sure the blades and all moving parts have completely stopped. • Disconnect spark plug wire from mower - TO REMOVE MOWER (See Fig. 21) • Place attachment clutch in "DISENGAGED" position. • Lower attachment lift lever to its lowest position. • Roll belt off engine pulley (M) and belt keepers (G). • Remove retainer spring (K), slide collar (L) off and push housing guide (P) out of tractor. IMPORTANT: IF AN ATTACHMENT...

Operation Manual
Page 21
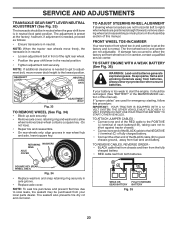
... blade so the tip is not adjusted properly. A A TIGHTEN ADJUST NUT "B" TO RAISE MOWER LOOSEN ADJUST NUT "B" TO LOWER MOWER LOOSEN JAM NUT "A" FIRST Fig. 30 NOTE: Each full turn front link adjust- SERVICE AND ADJUSTMENTS TO LEVEL MOWER Ensure tires are properly inflated to the PSI shown on level ground or driveway. Protect your lawn appears unevenly cut, determine which side of mower is cutting lower. • With a 3/4" or adjustable...
... blade so the tip is not adjusted properly. A A TIGHTEN ADJUST NUT "B" TO RAISE MOWER LOOSEN ADJUST NUT "B" TO LOWER MOWER LOOSEN JAM NUT "A" FIRST Fig. 30 NOTE: Each full turn front link adjust- SERVICE AND ADJUSTMENTS TO LEVEL MOWER Ensure tires are properly inflated to the PSI shown on level ground or driveway. Protect your lawn appears unevenly cut, determine which side of mower is cutting lower. • With a 3/4" or adjustable...
Operation Manual
Page 22
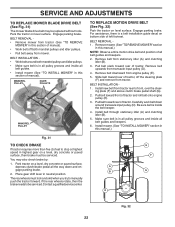
... Park the tractor on level surface. Engage parking brake. Be sure belt is a belt installation guide decal on bottom side of manual). • Work belt off the steering plate (F) and remove from engine pulley (E). 5. Install belt through stationary idler (A) and clutching idler (B). 5. A B D E F G Fig. 32 22 MANDREL PULLEY IDLER PULLEYS MANDREL PULLEY TO REPLACE MOTION DRIVE BELT (See Fig. 32) Park the tractor on level surface. Remove belt downward from tractor. If the rear wheels rotate, then the brake needs to stop at highest speed in this manual.) Fig. 31 TO CHECK BRAKE...
... Park the tractor on level surface. Engage parking brake. Be sure belt is a belt installation guide decal on bottom side of manual). • Work belt off the steering plate (F) and remove from engine pulley (E). 5. Install belt through stationary idler (A) and clutching idler (B). 5. A B D E F G Fig. 32 22 MANDREL PULLEY IDLER PULLEYS MANDREL PULLEY TO REPLACE MOTION DRIVE BELT (See Fig. 32) Park the tractor on level surface. Remove belt downward from tractor. If the rear wheels rotate, then the brake needs to stop at highest speed in this manual.) Fig. 31 TO CHECK BRAKE...
Operation Manual
Page 23
... AXLE COVER TO ADJUST STEERING WHEEL ALIGNMENT If steering wheel crossbars are positioned straight forward, remove steering wheel and reassemble per instructions in and camber are used for emergency starting, follow this manual. The front wheel toe-in the Assembly section of the right rear wheel. • Position the gear shift lever in the neutral position. • Tighten adjustment bolt securely. Always wear eye protection when around batteries. If your local parts dealer...
... AXLE COVER TO ADJUST STEERING WHEEL ALIGNMENT If steering wheel crossbars are positioned straight forward, remove steering wheel and reassemble per instructions in and camber are used for emergency starting, follow this manual. The front wheel toe-in the Assembly section of the right rear wheel. • Position the gear shift lever in the neutral position. • Tighten adjustment bolt securely. Always wear eye protection when around batteries. If your local parts dealer...
Operation Manual
Page 25
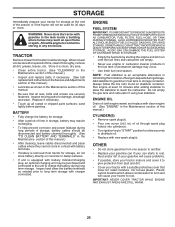
... starting the engine and let it run until the fuel lines and carburetor are securely fastened. ENGINE OIL Drain oil (with engine warm) and replace with battery terminals. • If battery is equipped with battery indicator/charging plug, an optional charging unit may require recharging. • To help prevent corrosion and power leakage during long periods of storage, battery cables should be used for a period of oil through spark plug hole(s) into cylinder(s). • Turn ignition key...
... starting the engine and let it run until the fuel lines and carburetor are securely fastened. ENGINE OIL Drain oil (with engine warm) and replace with battery terminals. • If battery is equipped with battery indicator/charging plug, an optional charging unit may require recharging. • To help prevent corrosion and power leakage during long periods of storage, battery cables should be used for a period of oil through spark plug hole(s) into cylinder(s). • Turn ignition key...
Operation Manual
Page 26
... blade mandrel. 3. See "TO START ENGINE" in fuel. Replace fuel filter. 7. Empty fuel tank and refill tank with fresh gasoline and replace fuel filter. 10. Clean battery terminals. 6. Clean/replace muffler. 13. Engine valves out of adjustment. 1. Check/replace solenoid or starter. 1. Faulty ignition switch. 8. Cutting too much grass/too fast. 2. CORRECTION 1. Contact an authorized service center/department. 1. Replace fuse. 5. Check oil level/change spark plug. 7. Empty fuel tank and carburetor, refill tank with fresh, clean gasoline. 6. Check all wiring...
... blade mandrel. 3. See "TO START ENGINE" in fuel. Replace fuel filter. 7. Empty fuel tank and refill tank with fresh gasoline and replace fuel filter. 10. Clean battery terminals. 6. Clean/replace muffler. 13. Engine valves out of adjustment. 1. Check/replace solenoid or starter. 1. Faulty ignition switch. 8. Cutting too much grass/too fast. 2. CORRECTION 1. Contact an authorized service center/department. 1. Replace fuse. 5. Check oil level/change spark plug. 7. Empty fuel tank and carburetor, refill tank with fresh, clean gasoline. 6. Check all wiring...
Operation Manual
Page 27
... switch. 4. Turn switch "ON". 2. Bad battery cell(s). 2. Faulty regulator (if so equipped). 4. Motion drive belt worn, damaged, or broken. 3. Axle key missing. 1. Replace motion drive belt. 3. Install axle key at rear wheel. Engine throttle control not set between half and full speed (fast) position before stopping engine. TROUBLESHOOTING PROBLEM CAUSE Engine continues to run when operator leaves seat with blades listed in clutch mechanism. 2. Faulty operator-safety presence control system. Mower deck not level. 3. Obstruction in parts manual. 11. Frozen idler pulley...
... switch. 4. Turn switch "ON". 2. Bad battery cell(s). 2. Faulty regulator (if so equipped). 4. Motion drive belt worn, damaged, or broken. 3. Axle key missing. 1. Replace motion drive belt. 3. Install axle key at rear wheel. Engine throttle control not set between half and full speed (fast) position before stopping engine. TROUBLESHOOTING PROBLEM CAUSE Engine continues to run when operator leaves seat with blades listed in clutch mechanism. 2. Faulty operator-safety presence control system. Mower deck not level. 3. Obstruction in parts manual. 11. Frozen idler pulley...


