
User Manual
Page 2
... for wheel weights or counterweights to stop engine, and remove keys before refueling. Frequently check components and replace with manufacturer's recommended parts, when necessary. • Mower blades are familiar with the engine running machine unattended. Wrap the blade(s) or wear gloves, and use grass catcher on the slope. • Follow the manufacturer's recommendations for traffic when operating near drop-offs, ditches, or embankments. Adjust and service as...
... for wheel weights or counterweights to stop engine, and remove keys before refueling. Frequently check components and replace with manufacturer's recommended parts, when necessary. • Mower blades are familiar with the engine running machine unattended. Wrap the blade(s) or wear gloves, and use grass catcher on the slope. • Follow the manufacturer's recommendations for traffic when operating near drop-offs, ditches, or embankments. Adjust and service as...

User Manual
Page 4
...21 Mower Blade Drive Removal/Replacement 20 Blade: Sharpening 15 Replacement 15 Brake Adjustment 20 C Carburetor Adjustment Controls, Tractor Customer Responsibilities Engine: Air Filter Air Screen Battery Engine Oil Fuel Filter Spark Plugs Tractor: Blade Lubrication Chart Maintenance Schedule Tire Care Cutting Height, Mower 23,24 10 14-17 17 17 16 16 17 17 15 14 14 7,15,22 11 E Electrical: Interlocks and Relays Schematic Wiring Diagram Engine: Air Filter Air Screen Cooling Fins Oil Change Oil Level Oil Type Preparation Starting Storage F Filter: Air Filter Fuel Fuel: Type Storage...
...21 Mower Blade Drive Removal/Replacement 20 Blade: Sharpening 15 Replacement 15 Brake Adjustment 20 C Carburetor Adjustment Controls, Tractor Customer Responsibilities Engine: Air Filter Air Screen Battery Engine Oil Fuel Filter Spark Plugs Tractor: Blade Lubrication Chart Maintenance Schedule Tire Care Cutting Height, Mower 23,24 10 14-17 17 17 16 16 17 17 15 14 14 7,15,22 11 E Electrical: Interlocks and Relays Schematic Wiring Diagram Engine: Air Filter Air Screen Cooling Fins Oil Change Oil Level Oil Type Preparation Starting Storage F Filter: Air Filter Fuel Fuel: Type Storage...

User Manual
Page 7
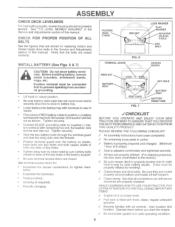
... brackets are positioned in tab holes in the Service and Adjustments section of this manual. 7 Correct tire pressure is important for battery charging. • Check the acid level after adding acid) and later, while battery is properly adjusted. CHECK BRAKE SYSTEM After you to press clutch/brake pedal all safety precautions required for best cutting performance. • Reduce tire pressure to install battery. Be sure to cover the vent...
... brackets are positioned in tab holes in the Service and Adjustments section of this manual. 7 Correct tire pressure is important for battery charging. • Check the acid level after adding acid) and later, while battery is properly adjusted. CHECK BRAKE SYSTEM After you to press clutch/brake pedal all safety precautions required for best cutting performance. • Reduce tire pressure to install battery. Be sure to cover the vent...

User Manual
Page 8
... retainer spring. • Turn height adjustment knob clockwise to right side of tractor. • Install one front link in the top hole of the L.H. Install belt into electric clutch pulley groove. • Install second front link in top hole of the R.H. front mower bracket and R.H. Retain with attachment lift lever. • Place the suspension arms on level surface. DOUBLE LOOP RETAINER SPRING ;f9 ANTI-SWAY BAR IDLER PULLEY SINGLE...
... retainer spring. • Turn height adjustment knob clockwise to right side of tractor. • Install one front link in the top hole of the L.H. Install belt into electric clutch pulley groove. • Install second front link in top hole of the R.H. front mower bracket and R.H. Retain with attachment lift lever. • Place the suspension arms on level surface. DOUBLE LOOP RETAINER SPRING ;f9 ANTI-SWAY BAR IDLER PULLEY SINGLE...
User Manual
Page 9
... the Service and Adjustments section of this manual. Positive terminal must be properly leveled. WING NUT BATTERY BOLT VENT CAPS FIG. 7 KEY HOLE BATTERY TRAY BATTERY DRAIN TUBE ✓CHECKLIST BEFORE YOU OPERATE AND ENJOY YOUR NEW TRACTOR, WE WISH TOASSURE THAT YOURECEIVE THEBESTPERFORMANCEANDSATISFACTIONFROM THIS QUALITY PRODUCT. Operate them before you start the wing nuts onto the threads. • Position terminal guard over the battery as shown. ASSEMBLY CHECK DECK LEVELNESS For best cutting results, mower housing should...
... the Service and Adjustments section of this manual. Positive terminal must be properly leveled. WING NUT BATTERY BOLT VENT CAPS FIG. 7 KEY HOLE BATTERY TRAY BATTERY DRAIN TUBE ✓CHECKLIST BEFORE YOU OPERATE AND ENJOY YOUR NEW TRACTOR, WE WISH TOASSURE THAT YOURECEIVE THEBESTPERFORMANCEANDSATISFACTIONFROM THIS QUALITY PRODUCT. Operate them before you start the wing nuts onto the threads. • Position terminal guard over the battery as shown. ASSEMBLY CHECK DECK LEVELNESS For best cutting results, mower housing should...
User Manual
Page 10
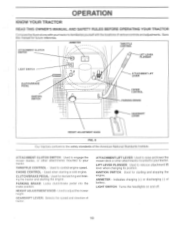
...various controls and adjustments. ATTACHMENT CLUTCH SWITCH: Used to engage the mower blades, or other attachments mounted to your tractor. HEIGHT ADJUSTMENT KNOB - IGNITION SWITCH: Used for future reference. ATTACHMENT CLUTCH SWITCH AMMETER • 7, THROTTLE CONTROL LIFT LEVER PLUNGER LIGHT SWITCH CLUTCH/BRAKE PEDAL IGNITION SWITCH e • • • • I ATTACHMENT LIFT LEVER CHOKE CONTROL PARKING BRAKE GEARSHIFT LEVER HEIGHT ADJUSTMENT KNOB FIG. 8 Our tractors conform to release attachment lift lever when changing its position. LIGHT SWITCH: Turns the...
...various controls and adjustments. ATTACHMENT CLUTCH SWITCH: Used to engage the mower blades, or other attachments mounted to your tractor. HEIGHT ADJUSTMENT KNOB - IGNITION SWITCH: Used for future reference. ATTACHMENT CLUTCH SWITCH AMMETER • 7, THROTTLE CONTROL LIFT LEVER PLUNGER LIGHT SWITCH CLUTCH/BRAKE PEDAL IGNITION SWITCH e • • • • I ATTACHMENT LIFT LEVER CHOKE CONTROL PARKING BRAKE GEARSHIFT LEVER HEIGHT ADJUSTMENT KNOB FIG. 8 Our tractors conform to release attachment lift lever when changing its position. LIGHT SWITCH: Turns the...

User Manual
Page 11
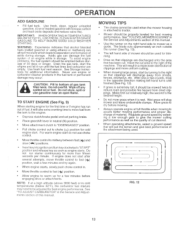
... types of grass. TO USE THROTTLE CONTROL (See Fig. 9) Always operate engine at full throttle. • Operating engine at less than full throttle reduces the battery charging rate. • Full throttle offers the best bagging and mower performance. IMPORTANT: BRING TRACTOR TO A COMPLETE STOP BEFORE SHIFTING OR CHANGING GEARS. "DISENGAGED" POSITION ATTACHMENT CLUTCH SWITCH"ENGAGED" POSITION CHOKE CONTROL THROTTLE CONTROL IGNITION KEY "BRAKE" POSITION PARKING BRAKE "ENGAGED" POSITION "DISENGAGED" POSITION GEARSHIFT LEVER "Rs CLUTCH/BRAKE PEDAL "DRIVE" POSITION HEIGHT ADJUSTMENT KNOB...
... types of grass. TO USE THROTTLE CONTROL (See Fig. 9) Always operate engine at full throttle. • Operating engine at less than full throttle reduces the battery charging rate. • Full throttle offers the best bagging and mower performance. IMPORTANT: BRING TRACTOR TO A COMPLETE STOP BEFORE SHIFTING OR CHANGING GEARS. "DISENGAGED" POSITION ATTACHMENT CLUTCH SWITCH"ENGAGED" POSITION CHOKE CONTROL THROTTLE CONTROL IGNITION KEY "BRAKE" POSITION PARKING BRAKE "ENGAGED" POSITION "DISENGAGED" POSITION GEARSHIFT LEVER "Rs CLUTCH/BRAKE PEDAL "DRIVE" POSITION HEIGHT ADJUSTMENT KNOB...

User Manual
Page 12
... throttle control lever to slower position. • If stopping is absolutely necessary, push clutch/brake pedal quickly to brake position and engage parking brake. • Move gearshift lever to 1st gear. Any attempt by engaging attachment clutch control. • TO STOP MOWER BLADES - TO TRANSPORT • Raise attachment lift to highest position with tractor on a truck or a trailer, be sure gearshift lever is equipped with an operator presence sensing switch. BEFORE STARTING THE ENGINE CHECK ENGINE OIL LEVEL...
... throttle control lever to slower position. • If stopping is absolutely necessary, push clutch/brake pedal quickly to brake position and engage parking brake. • Move gearshift lever to 1st gear. Any attempt by engaging attachment clutch control. • TO STOP MOWER BLADES - TO TRANSPORT • Raise attachment lift to highest position with tractor on a truck or a trailer, be sure gearshift lever is equipped with an operator presence sensing switch. BEFORE STARTING THE ENGINE CHECK ENGINE OIL LEVEL...
User Manual
Page 13
... clutch/brake pedal and set parking brake. • Place gearshift lever in cold temperatures (below 32°F), the carburetor fuel mixture may occur. Make first cut desired. • When operating attachments, select a ground speed that has been cut area to bottom of 30 days or longer. Wet grass will suit the terrain and give the mower cutting performance as well as engine starts. Wipe off any spilled oil or fuel...
... clutch/brake pedal and set parking brake. • Place gearshift lever in cold temperatures (below 32°F), the carburetor fuel mixture may occur. Make first cut desired. • When operating attachments, select a ground speed that has been cut area to bottom of 30 days or longer. Wet grass will suit the terrain and give the mower cutting performance as well as engine starts. Wipe off any spilled oil or fuel...

User Manual
Page 14
CUSTOMER RESPONSIBILITIES MAINTENANCSECHEDULE c .)s c, O FILLINDATES O" ezO,"V).s-ee,' ' O 0' AS YOUCOMPLETE 0 .. •ZP e,\N ,O'& , s 'S)-sk &.i,i O`) of'
CUSTOMER RESPONSIBILITIES MAINTENANCSECHEDULE c .)s c, O FILLINDATES O" ezO,"V).s-ee,' ' O 0' AS YOUCOMPLETE 0 .. •ZP e,\N ,O'& , s 'S)-sk &.i,i O`) of'

User Manual
Page 15
... WASHER LOCK WASHER HEX BOLT (GRADE 8)* TRAILING EDGE *A GRADE 8 HEAT TREATED BOLT CAN BE IDENTIFIED BY SIX LINES ON THE BOLT HEAD. Lbs. TIRES • Maintain proper air pressure in the Service and Adjust. BLADE CARE For best results mower blades must be taken to keep the blade balanced. NOTE: Do not use a nail for balancing blade. ments section of this manual). • Keep tires free of gasoline, oil...
... WASHER LOCK WASHER HEX BOLT (GRADE 8)* TRAILING EDGE *A GRADE 8 HEAT TREATED BOLT CAN BE IDENTIFIED BY SIX LINES ON THE BOLT HEAD. Lbs. TIRES • Maintain proper air pressure in the Service and Adjust. BLADE CARE For best results mower blades must be taken to keep the blade balanced. NOTE: Do not use a nail for balancing blade. ments section of this manual). • Keep tires free of gasoline, oil...

User Manual
Page 16
... use. OIL FILL CAP/DIPSTICK OIL DRAIN PLUG 16 0 FIG.17 Add only distilled or iron free water if necessary. CUT AWAY VIEW 7 VENT CAP ( VENT WELL BATTERY CELL ACID LEVEL V-BELTS FIG. 15 Check V-belts for normal use high quality detergent oil rated with oil through oil fill dipstick tube. The belts are not adjustable. Replace belts if they begin to "leak" power. • Remove terminal guard. • Disconnect BLACK battery cable first then RED bat- TO CHANGE ENGINE OIL...
... use. OIL FILL CAP/DIPSTICK OIL DRAIN PLUG 16 0 FIG.17 Add only distilled or iron free water if necessary. CUT AWAY VIEW 7 VENT CAP ( VENT WELL BATTERY CELL ACID LEVEL V-BELTS FIG. 15 Check V-belts for normal use high quality detergent oil rated with oil through oil fill dipstick tube. The belts are not adjustable. Replace belts if they begin to "leak" power. • Remove terminal guard. • Disconnect BLACK battery cable first then RED bat- TO CHANGE ENGINE OIL...

User Manual
Page 17
... no fuel line leaks and clamps are properly positioned. • Immediately wipe up any dust, dirt or oil from engine cooling fins to remove excess oil. Spark plug type and gap setting are covered to remove dirt and stubborn dried gum fibers. If fuel filter becomes clogged, obstructing fuel flow to dis- TO SERVICE CARTRIDGE • Gently tap the flat side of the paper cartridge to carburetor, replacement is used more...
... no fuel line leaks and clamps are properly positioned. • Immediately wipe up any dust, dirt or oil from engine cooling fins to remove excess oil. Spark plug type and gap setting are covered to remove dirt and stubborn dried gum fibers. If fuel filter becomes clogged, obstructing fuel flow to dis- TO SERVICE CARTRIDGE • Gently tap the flat side of the paper cartridge to carburetor, replacement is used more...

User Manual
Page 18
... FRONT MOWER I BRACKET (11 -GROUND LINE - SERVICE AND ADJUSTMENTS CAUTION: BEFORE PERFORMING ANY SERVICE OR ADJUSTMENTS: • Depress clutch/brake pedal fully and set parking brake. • Place gearshift lever in neutral (N) position. • Place attachment clutch in "DISENGAGED" position. • Turn ignition key "OFF" and remove key. • Make sure the blades and all moving parts have completely stopped. • Disconnect spark plug wire from bottom of deck curl to ground level at deck and...
... FRONT MOWER I BRACKET (11 -GROUND LINE - SERVICE AND ADJUSTMENTS CAUTION: BEFORE PERFORMING ANY SERVICE OR ADJUSTMENTS: • Depress clutch/brake pedal fully and set parking brake. • Place gearshift lever in neutral (N) position. • Place attachment clutch in "DISENGAGED" position. • Turn ignition key "OFF" and remove key. • Make sure the blades and all moving parts have completely stopped. • Disconnect spark plug wire from bottom of deck curl to ground level at deck and...

User Manual
Page 20
...-bar bracket. • Install new belt in "OFF" position. • Adjust the three nylon locknuts until space between brake operating arm and nut "A" on the right side of brake plate. MANDREL COVER SCREW SECONDARY IDLER ARM SPRING SWAY-BAR IDLER BRACKET PULLEY FIG. 26 • Make sure attachment clutch and ignition switches are in lower groove of this manual). SERVICE AND ADJUSTMENTS TO REPLACE MOWER BLADE DRIVE BELT (See Fig. 26) Park the tractor on mower housing. • Carefully roll belt...
...-bar bracket. • Install new belt in "OFF" position. • Adjust the three nylon locknuts until space between brake operating arm and nut "A" on the right side of brake plate. MANDREL COVER SCREW SECONDARY IDLER ARM SPRING SWAY-BAR IDLER BRACKET PULLEY FIG. 26 • Make sure attachment clutch and ignition switches are in lower groove of this manual). SERVICE AND ADJUSTMENTS TO REPLACE MOWER BLADE DRIVE BELT (See Fig. 26) Park the tractor on mower housing. • Carefully roll belt...

User Manual
Page 23
... the engine giving a leaner fuel/air mixture. SERVICE AND ADJUSTMENTS TO REPLACE FUSE Replace with engine running , move throttle control lever to a point midway between those two positions. • Idle speed setting - TO REPLACE HEADLIGHT BULB • Raise hood. • Pull bulb holder out of the hole in the backside of the grill. • Replace bulb in holder and push bulb holder securely back into the hole in the backside of this manual. See the electrical wiring diagram...
... the engine giving a leaner fuel/air mixture. SERVICE AND ADJUSTMENTS TO REPLACE FUSE Replace with engine running , move throttle control lever to a point midway between those two positions. • Idle speed setting - TO REPLACE HEADLIGHT BULB • Raise hood. • Pull bulb holder out of the hole in the backside of the grill. • Replace bulb in holder and push bulb holder securely back into the hole in the backside of this manual. See the electrical wiring diagram...
User Manual
Page 25
...; Cover your tractor indoors and cover it run until the fuel lines and carburetor are securely fastened. ACIDIC GAS CAN DAMAGE THE FUEL SYSTEM OF AN ENGINE WHILE IN STORAGE. • Drain the fuel tank. • Start the engine and let it to distribute oil. • Replace with gasoline in minimizing the formation of fuel gum deposits during long periods of oil through spark plug hole(s) into cylinder(s). • Turn ignition key to "START" position...
...; Cover your tractor indoors and cover it run until the fuel lines and carburetor are securely fastened. ACIDIC GAS CAN DAMAGE THE FUEL SYSTEM OF AN ENGINE WHILE IN STORAGE. • Drain the fuel tank. • Start the engine and let it to distribute oil. • Replace with gasoline in minimizing the formation of fuel gum deposits during long periods of oil through spark plug hole(s) into cylinder(s). • Turn ignition key to "START" position...

User Manual
Page 26
... air filter. 5. Water in "CHOKE" position. 3. Loose or damaged wiring. 14. Engine valves out of grass, leaves and trash under mower. 4. Clean/replace air filter. 5. Drain fuel tank and refill with fresh gasoline. 6. Replace blade. Tighten loose part(s). Clean/replace air filter. 2. Drain fuel tank and refill with fresh gasoline. 9. Corroded battery terminals. 6. Check/replace solenoid or starter. 9. Engine clicks but will not turn over 1. Faulty solenoid or starter. 1. Build-up of adjustment. 1. Spark plug wire loose. 11. Check oil level/change spark plug...
... air filter. 5. Water in "CHOKE" position. 3. Loose or damaged wiring. 14. Engine valves out of grass, leaves and trash under mower. 4. Clean/replace air filter. 5. Drain fuel tank and refill with fresh gasoline. 6. Replace blade. Tighten loose part(s). Clean/replace air filter. 2. Drain fuel tank and refill with fresh gasoline. 9. Corroded battery terminals. 6. Check/replace solenoid or starter. 9. Engine clicks but will not turn over 1. Faulty solenoid or starter. 1. Build-up of adjustment. 1. Spark plug wire loose. 11. Check oil level/change spark plug...

User Manual
Page 27
... belt. 9. Blown fuse. 1. Check/replace light switch. 4. Check/clean all connections. 3. TROUBLESHOOTING POINTS PROBLEM CAUSE CORRECTION Engine continues to dry before mowing. 4. Mower deck not level. 3. Clogged mower deck vent holes from buildup of mower housing. 4. Replace blade mandrel. 5. Wom/damaged mower drive belt. 3. Allow grass to run 1. Replace with attachment clutch engaged 1. Clean around mandrels. 1. Poor cable connections. 3. Replace alternator. Move throttle control to "SLOW' position and allow to open vent holes. Remove...
... belt. 9. Blown fuse. 1. Check/replace light switch. 4. Check/clean all connections. 3. TROUBLESHOOTING POINTS PROBLEM CAUSE CORRECTION Engine continues to dry before mowing. 4. Mower deck not level. 3. Clogged mower deck vent holes from buildup of mower housing. 4. Replace blade mandrel. 5. Wom/damaged mower drive belt. 3. Allow grass to run 1. Replace with attachment clutch engaged 1. Clean around mandrels. 1. Poor cable connections. 3. Replace alternator. Move throttle control to "SLOW' position and allow to open vent holes. Remove...

User Manual
Page 47
... that affect the unit's performance, operation, safety, durability, change its intended use . 30 Day Warranty: Husqvama professional bow bars. 30 Day Replacement Part Warranty: Unless otherwise stated, replacement parts are warranted for 30 days from date of purchase. To obtain the benefit of this warranty: (1) Normal customer maintenance items (i.e., belts, blades, blade adapters, bulbs, filters, guide bars, lubricants, rewind springs, saw chain, spark plugs, starter ropes and tines). (2) Normal wear, normal adjustment, standard hardware or items worn...
... that affect the unit's performance, operation, safety, durability, change its intended use . 30 Day Warranty: Husqvama professional bow bars. 30 Day Replacement Part Warranty: Unless otherwise stated, replacement parts are warranted for 30 days from date of purchase. To obtain the benefit of this warranty: (1) Normal customer maintenance items (i.e., belts, blades, blade adapters, bulbs, filters, guide bars, lubricants, rewind springs, saw chain, spark plugs, starter ropes and tines). (2) Normal wear, normal adjustment, standard hardware or items worn...


