

Owner Manual
Page 1
The use in this Manual and follow all Warnings and Safety Instructions. ALWAYS WEAR EYE PROTECTION DURING OPERATION Visit our website: www.poulanpro.com Gasoline containing up to do so can result in the U.S.A. Failure to 10% ethanol (E10) is acceptable for use of any gasoline exceeding 10% ethanol (E10) will void the product warranty. 114 02 87-49 07.14.15 BD Printed in serious injury. IMPORTANT MANUAL Do Not Throw Away OPERATOR'S MANUAL MODEL: PP155G42 LAWN TRACTOR WARNING: Read this machine.
The use in this Manual and follow all Warnings and Safety Instructions. ALWAYS WEAR EYE PROTECTION DURING OPERATION Visit our website: www.poulanpro.com Gasoline containing up to do so can result in the U.S.A. Failure to 10% ethanol (E10) is acceptable for use of any gasoline exceeding 10% ethanol (E10) will void the product warranty. 114 02 87-49 07.14.15 BD Printed in serious injury. IMPORTANT MANUAL Do Not Throw Away OPERATOR'S MANUAL MODEL: PP155G42 LAWN TRACTOR WARNING: Read this machine.
Owner Manual
Page 2
..., wire, etc., which can lose traction with safe machine operation. GENERAL OPERATION • Read, understand, and follow all instructions on the machine and in the manual before and while backing. • Never direct discharged material toward the operator. Do not allow the mower deck to plow leaves or other reproductive harm...
..., wire, etc., which can lose traction with safe machine operation. GENERAL OPERATION • Read, understand, and follow all instructions on the machine and in the manual before and while backing. • Never direct discharged material toward the operator. Do not allow the mower deck to plow leaves or other reproductive harm...
Owner Manual
Page 4
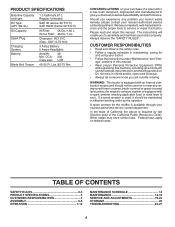
... the operator. Lbs./62-75 Nm CONGRATULATIONS on your purchase of the California Public Resources Code). age" sections of this manual. • Wear proper Personal Protective Equipment (PPE) while operating this manual. WARNING: This tractor is equipped with a spark arrester meeting applicable local or state laws (if any problem you are outside...
... the operator. Lbs./62-75 Nm CONGRATULATIONS on your purchase of the California Public Resources Code). age" sections of this manual. • Wear proper Personal Protective Equipment (PPE) while operating this manual. WARNING: This tractor is equipped with a spark arrester meeting applicable local or state laws (if any problem you are outside...
Owner Manual
Page 6
...same time. WARNING: Do not short battery terminals by allowing a wrench or any additional loose parts or cartons and remove. NOTE: If this manual. (1) 5/16" wrench Utility knife TO INSTALL STEERING WHEEL (See Fig. 2) (2) 7/16" wrenches Tire pressure gauge (2) 1/2" wrenches Pliers (1).... NOTE: For battery installation see "REPLACING BATTERY" in the Service and Adjustments section in this battery is mentioned in this manual for shipping purposes. Before connecting battery, remove metal bracelets, wristwatch bands, rings, etc. Battery location will make assembly easier....
...same time. WARNING: Do not short battery terminals by allowing a wrench or any additional loose parts or cartons and remove. NOTE: If this manual. (1) 5/16" wrench Utility knife TO INSTALL STEERING WHEEL (See Fig. 2) (2) 7/16" wrenches Tire pressure gauge (2) 1/2" wrenches Pliers (1).... NOTE: For battery installation see "REPLACING BATTERY" in the Service and Adjustments section in this battery is mentioned in this manual for shipping purposes. Before connecting battery, remove metal bracelets, wristwatch bands, rings, etc. Battery location will make assembly easier....
Owner Manual
Page 7
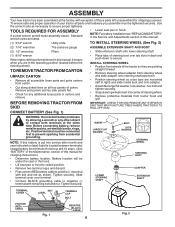
...Roll tractor forward off the skid. CHECK FOR PROPER POSITION OF ALL BELTS See the figures that the brake is clear of this manual. Ensure tractor is reached which allows you learn how to operate your tractor, check to see that are positioned over large slotted ...8226; Remove banding holding the deflector shield up against tractor. Verify that follow all three (3) bottom pads are shown for location and function of this manual. Fig. 3 7 ASSEMBLY INSTALL SEAT (See Fig. 3) Adjust seat before tightening adjustment knob. • Remove adjustment knob and cup washer securing...
...Roll tractor forward off the skid. CHECK FOR PROPER POSITION OF ALL BELTS See the figures that the brake is clear of this manual. Ensure tractor is reached which allows you learn how to operate your tractor, check to see that are positioned over large slotted ...8226; Remove banding holding the deflector shield up against tractor. Verify that follow all three (3) bottom pads are shown for location and function of this manual. Fig. 3 7 ASSEMBLY INSTALL SEAT (See Fig. 3) Adjust seat before tightening adjustment knob. • Remove adjustment knob and cup washer securing...

Owner Manual
Page 8
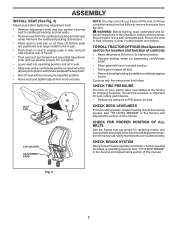
... are properly clamped. eration System (ROS) are properly inflated. (For shipping purposes, the tires were overinflated at proper level. ✓ Fuel tank is in this manual). 8 WHILE LEARNING HOW TO USE YOUR TRACTOR, PAY EXTRA ATTENTION TO THE FOLLOWING IMPORTANT ITEMS: ✓ Engine oil is at the factory). ✓ Be sure...
... are properly clamped. eration System (ROS) are properly inflated. (For shipping purposes, the tires were overinflated at proper level. ✓ Fuel tank is in this manual). 8 WHILE LEARNING HOW TO USE YOUR TRACTOR, PAY EXTRA ATTENTION TO THE FOLLOWING IMPORTANT ITEMS: ✓ Engine oil is at the factory). ✓ Be sure...

Owner Manual
Page 10
... - Allows operation of the American National Standards Institute. (A) ATTACHMENT LIFT LEVER - OPERATION KNOW YOUR TRACTOR READ THIS OPERATOR'S MANUAL AND SAFETY RULES BEFORE OPERATING YOUR TRACTOR Compare the illustrations with your tractor to familiarize yourself with the locations of tractor. 10... for future reference. Used to engage the mower blades, or other attachments mounted to your tractor. (B) CLUTCH/BRAKE PEDAL - Save this manual for starting and stopping the engine. (G) REVERSE OPERATION SYSTEM (ROS) "ON" POSITION - Used to raise, lower, and adjust the mower...
... - Allows operation of the American National Standards Institute. (A) ATTACHMENT LIFT LEVER - OPERATION KNOW YOUR TRACTOR READ THIS OPERATOR'S MANUAL AND SAFETY RULES BEFORE OPERATING YOUR TRACTOR Compare the illustrations with your tractor to familiarize yourself with the locations of tractor. 10... for future reference. Used to engage the mower blades, or other attachments mounted to your tractor. (B) CLUTCH/BRAKE PEDAL - Save this manual for starting and stopping the engine. (G) REVERSE OPERATION SYSTEM (ROS) "ON" POSITION - Used to raise, lower, and adjust the mower...

Owner Manual
Page 12
... the cutting height. NOTE:Adjust gauge wheels with an operator presence sensing switch. OPERATION TO ADJUST MOWER CUTTING HEIGHT (See Fig. 9) The position of this manual). • With mower in place (See Fig. 11). Fig. 9 • Put attachment lift lever in most terrain conditions. For healthier and better looking lawns, mow...
... the cutting height. NOTE:Adjust gauge wheels with an operator presence sensing switch. OPERATION TO ADJUST MOWER CUTTING HEIGHT (See Fig. 9) The position of this manual). • With mower in place (See Fig. 11). Fig. 9 • Put attachment lift lever in most terrain conditions. For healthier and better looking lawns, mow...

Owner Manual
Page 13
... THE REVERSE OPERATION SYSTEM Only use of fuel gum deposits during storage. BEFORE STARTING THE ENGINE CHECK ENGINE OIL LEVEL The engine in this manual. Do not overfill. • For cold weather operation you to lose control of your tractor. NOTE: To protect hood from the factory... To avoid engine problems, the fuel system should change oil for easier starting. (See "OIL VISCOSITY CHART" in the Maintenance section of this manual.) • To change engine oil, see the Maintenance section in your tractor, ensure gearshift lever is in minimizing the formation of the ROS is...
... THE REVERSE OPERATION SYSTEM Only use of fuel gum deposits during storage. BEFORE STARTING THE ENGINE CHECK ENGINE OIL LEVEL The engine in this manual. Do not overfill. • For cold weather operation you to lose control of your tractor. NOTE: To protect hood from the factory... To avoid engine problems, the fuel system should change oil for easier starting. (See "OIL VISCOSITY CHART" in the Maintenance section of this manual.) • To change engine oil, see the Maintenance section in your tractor, ensure gearshift lever is in minimizing the formation of the ROS is...
Owner Manual
Page 14
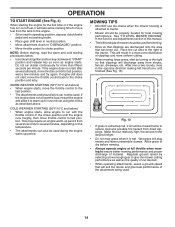
... starts, move the throttle control back to move fuel from shrubs, fences, driveways, etc. This will result in the Service and Adjustments section of this manual. • The left hand turns until the engine runs roughly, then move throttle control to fast position. Wet grass will plug mower and leave undesirable...
... starts, move the throttle control back to move fuel from shrubs, fences, driveways, etc. This will result in the Service and Adjustments section of this manual. • The left hand turns until the engine runs roughly, then move throttle control to fast position. Wet grass will plug mower and leave undesirable...
Owner Manual
Page 15
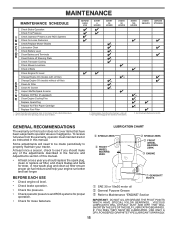
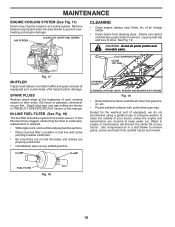
...better and last longer. Service more often when operating in Maintenance Section. See Cleaning in dirty or dusty conditions. GENERAL RECOMMENDATIONS The warranty on this manual. • At least once a year you should replace the spark plug, clean or replace air filter, and check blades and belts for loose ...section of this tractor does not cover items that have been subjected to see if you should make any of the adjustments described in this manual. A new spark plug and clean air filter ensure proper air-fuel mixture and help your tractor. Some adjustments will need to be ...
...better and last longer. Service more often when operating in Maintenance Section. See Cleaning in dirty or dusty conditions. GENERAL RECOMMENDATIONS The warranty on this manual. • At least once a year you should replace the spark plug, clean or replace air filter, and check blades and belts for loose ...section of this tractor does not cover items that have been subjected to see if you should make any of the adjustments described in this manual. A new spark plug and clean air filter ensure proper air-fuel mixture and help your tractor. Some adjustments will need to be ...
Owner Manual
Page 16
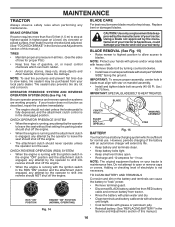
... to open . • Recharge at highest speed in blade must be kept sharp. Adding or checking level of this manual.) 16 CAUTION: Use only a replacement blade approved by the manufacturer of this manual.) TIRES • Maintain proper air pressure in the disengaged position. Do not attempt to "leak" power. • Remove terminal...
... to open . • Recharge at highest speed in blade must be kept sharp. Adding or checking level of this manual.) 16 CAUTION: Use only a replacement blade approved by the manufacturer of this manual.) TIRES • Maintain proper air pressure in the disengaged position. Do not attempt to "leak" power. • Remove terminal...
Owner Manual
Page 17
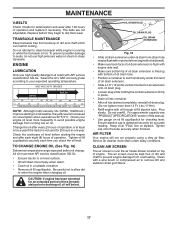
... of engine. CAUTION: If engine has been operated for an extended period of time immediately prior to catch oil directly under front end of this manual. • Use gauge on dipstick. For approximate capacity see "PRODUCT SPECIFICATIONS" section of oil drain extension. • Slide a 1/2" (12 point) socket mounted on oil. AIR...
... of engine. CAUTION: If engine has been operated for an extended period of time immediately prior to catch oil directly under front end of this manual. • Use gauge on dipstick. For approximate capacity see "PRODUCT SPECIFICATIONS" section of oil drain extension. • Slide a 1/2" (12 point) socket mounted on oil. AIR...
Owner Manual
Page 18
... type wax. CLAMP CLAMP STEERING PLATE STEERING SYSTEM, DASH, FENDER AND MOWER NOT SHOWN Fig. 19 • Keep finished surfaces and wheels free of this manual. Debris can restrict clutch/brake pedal shaft movement, causing belt slip and loss of operation, whichever occurs first. See Fig. 19. Remove blower housing and...
... type wax. CLAMP CLAMP STEERING PLATE STEERING SYSTEM, DASH, FENDER AND MOWER NOT SHOWN Fig. 19 • Keep finished surfaces and wheels free of this manual. Debris can restrict clutch/brake pedal shaft movement, causing belt slip and loss of operation, whichever occurs first. See Fig. 19. Remove blower housing and...

Owner Manual
Page 20
... operating mower as shown in tractor front suspension bracket (F). SERVICE AND ADJUSTMENTS • ATTACH MOWER SIDE SUSPENSION ARMS (A) TO CHASSIS - Lift rear corner of this manual. Position hole in arm over pin (D) on rear mower bracket and secure with retainer spring (K). • Install belt on engine pulley (M), in link assembly over...
... operating mower as shown in tractor front suspension bracket (F). SERVICE AND ADJUSTMENTS • ATTACH MOWER SIDE SUSPENSION ARMS (A) TO CHASSIS - Lift rear corner of this manual. Position hole in arm over pin (D) on rear mower bracket and secure with retainer spring (K). • Install belt on engine pulley (M), in link assembly over...
Owner Manual
Page 22
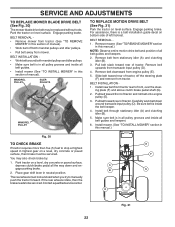
...BELT REMOVAL • Remove mower from tractor (See "TO REMOVE MOWER" in this section of tractor. BELT REMOVAL 1. Pull belt toward rear of manual). • Work belt off the steering plate (F) and remove from tractor rear to be serviced. You may be replaced without tools. If the ...the steer- Contact a qualified service center. Remove mower. (See "TO REMOVE MOWER" section in this manual.) Fig. 30 TO CHECK BRAKE If tractor requires more than five (5) feet to manually push the tractor forward. Carefully work belt down and engage parking brake. 2. The rear wheels must be...
...BELT REMOVAL • Remove mower from tractor (See "TO REMOVE MOWER" in this section of tractor. BELT REMOVAL 1. Pull belt toward rear of manual). • Work belt off the steering plate (F) and remove from tractor rear to be serviced. You may be replaced without tools. If the ...the steer- Contact a qualified service center. Remove mower. (See "TO REMOVE MOWER" section in this manual.) Fig. 30 TO CHECK BRAKE If tractor requires more than five (5) feet to manually push the tractor forward. Carefully work belt down and engage parking brake. 2. The rear wheels must be...
Owner Manual
Page 23
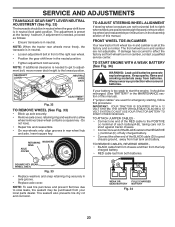
... rear wheels move mower deck height to the lowest position. FRONT WHEEL TOE-IN/CAMBER Your new tractor front wheel toe-in front of this manual). Keep sparks, flame and smoking materials away from both batteries. ADJUSTMENT BOLT Fig. 32 TO REMOVE WHEEL (See Fig. 33) • Block up ... cable (D) to start the engine, it should be purchased from fuel tank and battery. If "jumper cables" are used for emergency starting, follow this manual. SQUARE KEY (REAR WHEEL ONLY) Fig. 33 • Replace washers and snap retaining ring securely in rear wheel hub and axle. Tire sealant also ...
... rear wheels move mower deck height to the lowest position. FRONT WHEEL TOE-IN/CAMBER Your new tractor front wheel toe-in front of this manual). Keep sparks, flame and smoking materials away from both batteries. ADJUSTMENT BOLT Fig. 32 TO REMOVE WHEEL (See Fig. 33) • Block up ... cable (D) to start the engine, it should be purchased from fuel tank and battery. If "jumper cables" are used for emergency starting, follow this manual. SQUARE KEY (REAR WHEEL ONLY) Fig. 33 • Replace washers and snap retaining ring securely in rear wheel hub and axle. Tire sealant also ...

Owner Manual
Page 24
... has been preset at sides, tilt toward engine and lift off of tractor. If adjustment is necessary, see engine manual. 24 Positive terminal must be necessary. If adjustment is necessary, see engine manual. Tighten securely. SEAT PAN 05000 TERMINAL COVER NUT BOLT POSITIVE (RED) CABLE 02603 Fig. 35 NEGATIVE (BLACK) CABLE TO...
... has been preset at sides, tilt toward engine and lift off of tractor. If adjustment is necessary, see engine manual. 24 Positive terminal must be necessary. If adjustment is necessary, see engine manual. Tighten securely. SEAT PAN 05000 TERMINAL COVER NUT BOLT POSITIVE (RED) CABLE 02603 Fig. 35 NEGATIVE (BLACK) CABLE TO...
Owner Manual
Page 25
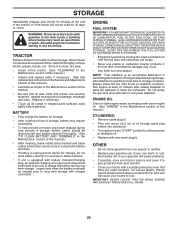
...leakage during storage. Store in a clean, dry area. • Clean entire tractor. (See "CLEANING" in the Maintenance section of this manual.) • Inspect and replace belts, if necessary. (See belt replacement instructions in the Service and Adjustments section of time in your gasoline ... cause problems. • If possible, store your can starts to rust. Inspect moving parts for storage. • After a period of this manual.) CYLINDER(S) • Remove spark plug(s). • Pour one season to cool before painting. NOTE: Fuel stabilizer is equipped with a suitable protective...
...leakage during storage. Store in a clean, dry area. • Clean entire tractor. (See "CLEANING" in the Maintenance section of this manual.) • Inspect and replace belts, if necessary. (See belt replacement instructions in the Service and Adjustments section of time in your gasoline ... cause problems. • If possible, store your can starts to rust. Inspect moving parts for storage. • After a period of this manual.) CYLINDER(S) • Remove spark plug(s). • Pour one season to cool before painting. NOTE: Fuel stabilizer is equipped with a suitable protective...
Owner Manual
Page 27
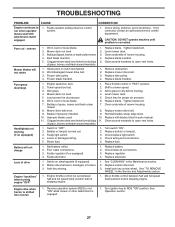
... tire air pressure. 5. Replace bulb(s) or lamp(s). 3. Replace regulator. 4. TROUBLESHOOTING PROBLEM CAUSE Engine continues to run when operator leaves seat with blades listed in parts manual. 11. Faulty operator-safety presence control system. uneven Mower blades will not charge 1. Clean underside of mower housing. 4. Faulty alternator. 1. Replace alternator. Motion drive belt...
... tire air pressure. 5. Replace bulb(s) or lamp(s). 3. Replace regulator. 4. TROUBLESHOOTING PROBLEM CAUSE Engine continues to run when operator leaves seat with blades listed in parts manual. 11. Faulty operator-safety presence control system. uneven Mower blades will not charge 1. Clean underside of mower housing. 4. Faulty alternator. 1. Replace alternator. Motion drive belt...