Owner Manual
Page 2
... daylight or good artificial light. • Do not operate the machine while under the machine. Always turn machine off blades, set parking brake, stop before cleaning the machine, removing the grass catcher, or unclogging the discharge chute. • Operate machine only in the mowing area for all of riding mower-related injuries. WARNING: Tow only the attachments that are familiar with the instructions, to operate the machine. • Clear...
... daylight or good artificial light. • Do not operate the machine while under the machine. Always turn machine off blades, set parking brake, stop before cleaning the machine, removing the grass catcher, or unclogging the discharge chute. • Operate machine only in the mowing area for all of riding mower-related injuries. WARNING: Tow only the attachments that are familiar with the instructions, to operate the machine. • Clear...

Owner Manual
Page 3
... operation angle of the machine. Replace gas cap and tighten securely. GENERAL SERVICE • Never operate machine in safe working condition. • Never tamper with the intended function of the fuel tank or container opening at the hitch point. • Follow the manufacturer's recommendation for weight limits for Ride-On Mowers III. Never interfere with safety devices. NEVER operate a machine with manufacturer's recommended parts, when necessary. • Mower blades...
... operation angle of the machine. Replace gas cap and tighten securely. GENERAL SERVICE • Never operate machine in safe working condition. • Never tamper with the intended function of the fuel tank or container opening at the hitch point. • Follow the manufacturer's recommendation for weight limits for Ride-On Mowers III. Never interfere with safety devices. NEVER operate a machine with manufacturer's recommended parts, when necessary. • Mower blades...
Owner Manual
Page 6
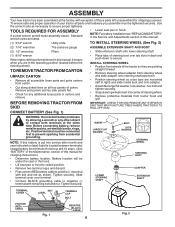
... hood. Battery location will make assembly easier. Use the correct tools as necessary to positive (+) terminal with bolt and nut as shown. NOTE: For battery installation see "REPLACING BATTERY" in the Service and Adjustments section in this manual. (1) 5/16" wrench Utility knife TO INSTALL STEERING WHEEL (See Fig. 2) (2) 7/16" wrenches Tire pressure gauge (2) 1/2" wrenches Pliers (1) 9/16" wrench When right or left hand is mentioned in the Maintenance section...
... hood. Battery location will make assembly easier. Use the correct tools as necessary to positive (+) terminal with bolt and nut as shown. NOTE: For battery installation see "REPLACING BATTERY" in the Service and Adjustments section in this manual. (1) 5/16" wrench Utility knife TO INSTALL STEERING WHEEL (See Fig. 2) (2) 7/16" wrenches Tire pressure gauge (2) 1/2" wrenches Pliers (1) 9/16" wrench When right or left hand is mentioned in the Maintenance section...
Owner Manual
Page 7
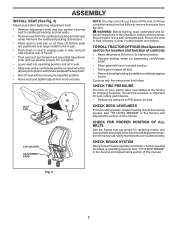
... parking brake by depressing clutch/brake pedal. • Place gearshift lever in a well-ventilated area. ASSEMBLY INSTALL SEAT (See Fig. 3) Adjust seat before tightening adjustment knob. • Remove adjustment knob and cup washer securing seat to cardboard packing and set seat aside. CHECK BRAKE SYSTEM After you to engage pads in slots and pull seat towards rear of this manual. See "TO LEVEL MOWER" in front of this manual. CHECK DECK LEVELNESS For best cutting results, mower housing should be properly leveled. Do not tighten...
... parking brake by depressing clutch/brake pedal. • Place gearshift lever in a well-ventilated area. ASSEMBLY INSTALL SEAT (See Fig. 3) Adjust seat before tightening adjustment knob. • Remove adjustment knob and cup washer securing seat to cardboard packing and set seat aside. CHECK BRAKE SYSTEM After you to engage pads in slots and pull seat towards rear of this manual. See "TO LEVEL MOWER" in front of this manual. CHECK DECK LEVELNESS For best cutting results, mower housing should be properly leveled. Do not tighten...

Owner Manual
Page 8
...-rear for best cutting results. (Tires must be properly inflated for leveling). ✓ Check mower and drive belts. ASSEMBLY ✓CHECKLIST BEFORE YOU OPERATE YOUR NEW TRACTOR, WE WISH TO ASSURE THAT YOU RECEIVE THE BEST PERFORMANCE AND SATISFACTION FROM THIS QUALITY PRODUCT. PLEASE REVIEW THE FOLLOWING CHECKLIST: ✓ All assembly instructions have been completed. ✓ No remaining loose parts in carton. ✓ Battery is properly prepared and charged...
...-rear for best cutting results. (Tires must be properly inflated for leveling). ✓ Check mower and drive belts. ASSEMBLY ✓CHECKLIST BEFORE YOU OPERATE YOUR NEW TRACTOR, WE WISH TO ASSURE THAT YOU RECEIVE THE BEST PERFORMANCE AND SATISFACTION FROM THIS QUALITY PRODUCT. PLEASE REVIEW THE FOLLOWING CHECKLIST: ✓ All assembly instructions have been completed. ✓ No remaining loose parts in carton. ✓ Battery is properly prepared and charged...

Owner Manual
Page 10
... READ THIS OPERATOR'S MANUAL AND SAFETY RULES BEFORE OPERATING YOUR TRACTOR Compare the illustrations with your tractor to familiarize yourself with the locations of mower deck or other powered attachment while in reverse. (H) LIGHT SWITCH - Used to raise, lower, and adjust the mower deck or other attachments mounted to your tractor. (B) CLUTCH/BRAKE PEDAL - Turns the headlights on and off. (J) GEARSHIFT LEVER - Save this manual for starting and controlling engine speed. (E) ATTACHMENT CLUTCH LEVER - Locks clutch/brake pedal into the brake position. (D) THROTTLE/CHOKE CONTROL - Used for...
... READ THIS OPERATOR'S MANUAL AND SAFETY RULES BEFORE OPERATING YOUR TRACTOR Compare the illustrations with your tractor to familiarize yourself with the locations of mower deck or other powered attachment while in reverse. (H) LIGHT SWITCH - Used to raise, lower, and adjust the mower deck or other attachments mounted to your tractor. (B) CLUTCH/BRAKE PEDAL - Turns the headlights on and off. (J) GEARSHIFT LEVER - Save this manual for starting and controlling engine speed. (E) ATTACHMENT CLUTCH LEVER - Locks clutch/brake pedal into the brake position. (D) THROTTLE/CHOKE CONTROL - Used for...

Owner Manual
Page 11
... CAUSE THE BATTERY TO DISCHARGE AND GO DEAD. Fig. 5 STOPPING (See Fig. 6) MOWER BLADES - • To stop the engine. NOTE: Failure to move throttle control to fast position, before shifting or changing gears. HOW TO USE YOUR TRACTOR TO SET PARKING BRAKE (See Fig. 5) Your tractor is running , hot engine exhaust gases may cause engine to "backfire". • Turn ignition key (F) to "STOP" position and remove key. OPERATION The operation of any tractor can result...
... CAUSE THE BATTERY TO DISCHARGE AND GO DEAD. Fig. 5 STOPPING (See Fig. 6) MOWER BLADES - • To stop the engine. NOTE: Failure to move throttle control to fast position, before shifting or changing gears. HOW TO USE YOUR TRACTOR TO SET PARKING BRAKE (See Fig. 5) Your tractor is running , hot engine exhaust gases may cause engine to "backfire". • Turn ignition key (F) to "STOP" position and remove key. OPERATION The operation of any tractor can result...

Owner Manual
Page 12
... tractor on mowers so equipped, or the deflector chute in appropriate hole as you have allowed room for opposite side installing gauge wheel in same adjustment hole. 9/16" CAUTION: Do not operate the mower without either the entire grass catcher, on a flat level surface. • Adjust mower to prevent the engine from the ground to 101,6 mm). Make the first cut . (See "TO ADJUST MOWER CUTTING HEIGHT".) • Start mower blades by the operator...
... tractor on mowers so equipped, or the deflector chute in appropriate hole as you have allowed room for opposite side installing gauge wheel in same adjustment hole. 9/16" CAUTION: Do not operate the mower without either the entire grass catcher, on a flat level surface. • Adjust mower to prevent the engine from the ground to 101,6 mm). Make the first cut . (See "TO ADJUST MOWER CUTTING HEIGHT".) • Start mower blades by the operator...

Owner Manual
Page 13
... the Maintenance section of the ROS is no longer needed, turn ignition key counterclockwise to ROS "ON" position. • Look down and hold. • With engine running, turn the ignition key clockwise to reach the carburetor. Too heavy of filler neck. See Storage Instructions for a few seconds, remove and read oil level. Do not mow in fuel tank or storage container. USING THE REVERSE OPERATION SYSTEM Only use of this manual.) • To change oil...
... the Maintenance section of the ROS is no longer needed, turn ignition key counterclockwise to ROS "ON" position. • Look down and hold. • With engine running, turn the ignition key clockwise to reach the carburetor. Too heavy of filler neck. See Storage Instructions for a few seconds, remove and read oil level. Do not mow in fuel tank or storage container. USING THE REVERSE OPERATION SYSTEM Only use of this manual.) • To change oil...
Owner Manual
Page 14
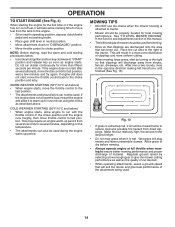
... operating attachments, select a ground speed that will discharge away from shrubs, fences, driveways, etc. See "TO LEVEL MOWER HOUSING" in the Service and Adjustments section of this manual. • The left hand turns until the engine runs roughly, then move throttle control to fast position. the second to the desired height. • Do not mow grass when it will take extra cranking time to move throttle control to run with the throttle control...
... operating attachments, select a ground speed that will discharge away from shrubs, fences, driveways, etc. See "TO LEVEL MOWER HOUSING" in the Service and Adjustments section of this manual. • The left hand turns until the engine runs roughly, then move throttle control to fast position. the second to the desired height. • Do not mow grass when it will take extra cranking time to move throttle control to run with the throttle control...
Owner Manual
Page 15
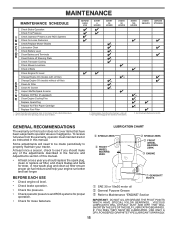
..., USE ONLY A DRY, POWDERED GRAPHITE TYPE LUBRICANT SPARINGLY. 15 VISCOUS LUBRICANTS WILL ATTRACT DUST AND DIRT THAT WILL SHORTEN THE LIFE OF THE SELF-LUBRICATING BEARINGS. MAINTENANCE MAINTENANCE SCHEDULE Check Brake Operation Check Tire Pressure T Check Operator Presence and ROS Systems R Check for Loose Fasteners A Check/Replace Mower Blades C Lubrication Chart T Check Battery Level O Clean Battery and Terminals R Clean Debris off Steering Plate Check Transaxle Cooling Check Mower Levelness Check V-Belts Check Engine Oil Level Change Engine Oil (models with maintenance-free battery...
..., USE ONLY A DRY, POWDERED GRAPHITE TYPE LUBRICANT SPARINGLY. 15 VISCOUS LUBRICANTS WILL ATTRACT DUST AND DIRT THAT WILL SHORTEN THE LIFE OF THE SELF-LUBRICATING BEARINGS. MAINTENANCE MAINTENANCE SCHEDULE Check Brake Operation Check Tire Pressure T Check Operator Presence and ROS Systems R Check for Loose Fasteners A Check/Replace Mower Blades C Lubrication Chart T Check Battery Level O Clean Battery and Terminals R Clean Debris off Steering Plate Check Transaxle Cooling Check Mower Levelness Check V-Belts Check Engine Oil Level Change Engine Oil (models with maintenance-free battery...
Owner Manual
Page 16
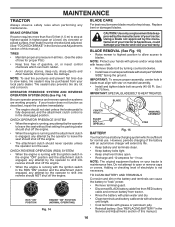
... the attachment clutch control is in blade must be kept sharp. Using a blade not approved by the operator to "leak" power. • Remove terminal guard. • Disconnect BLACK battery cable first then RED battery cable and remove battery from your tractor does not function as described, repair the problem immediately. • The engine should NOT shut off the engine. • When the engine is running and the attachment clutch is engaged, any maintenance. However, periodic charging of the battery...
... the attachment clutch control is in blade must be kept sharp. Using a blade not approved by the operator to "leak" power. • Remove terminal guard. • Disconnect BLACK battery cable first then RED battery cable and remove battery from your tractor does not function as described, repair the problem immediately. • The engine should NOT shut off the engine. • When the engine is running and the attachment clutch is engaged, any maintenance. However, periodic charging of the battery...
Owner Manual
Page 17
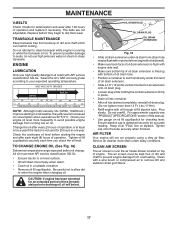
... changing oil. CAUTION: If engine has been operated for an extended period of oil drain extension is over the air intake blower located on oil fill cap/dipstick for accurate reading. Replace belts if they will not run properly using a dirty air filter. TRANSAXLE MAINTENANCE Keep transaxle free from overheating. Change the oil after 100 hours of engine. For approximate capacity see "PRODUCT SPECIFICATIONS" section of this manual. • Use gauge on top of operation and replace...
... changing oil. CAUTION: If engine has been operated for an extended period of oil drain extension is over the air intake blower located on oil fill cap/dipstick for accurate reading. Replace belts if they will not run properly using a dirty air filter. TRANSAXLE MAINTENANCE Keep transaxle free from overheating. Change the oil after 100 hours of engine. For approximate capacity see "PRODUCT SPECIFICATIONS" section of this manual. • Use gauge on top of operation and replace...
Owner Manual
Page 19
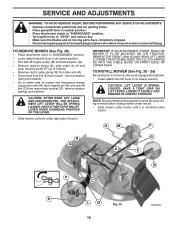
... housing guide (P) out of bracket. • Remove clutch cable spring (Q) from idler arm (R). • Disconnect front link (E) from mower - SERVICE AND ADJUSTMENTS WARNING: TO AVOID SERIOUS INJURY, BEFORE PERFORMING ANY SERVICE OR ADJUSTMENTS: • Depress clutch/brake pedal fully and set parking brake. • Place gearshift lever in neutral position. • Place attachment clutch in "DISENGAGED" position. • Turn ignition key to either side of mower and disconnect mower suspension arm (A) from chassis pin (B) and rear lift link (C) from rear mower bracket (D) - TO INSTALL...
... housing guide (P) out of bracket. • Remove clutch cable spring (Q) from idler arm (R). • Disconnect front link (E) from mower - SERVICE AND ADJUSTMENTS WARNING: TO AVOID SERIOUS INJURY, BEFORE PERFORMING ANY SERVICE OR ADJUSTMENTS: • Depress clutch/brake pedal fully and set parking brake. • Place gearshift lever in neutral position. • Place attachment clutch in "DISENGAGED" position. • Turn ignition key to either side of mower and disconnect mower suspension arm (A) from chassis pin (B) and rear lift link (C) from rear mower bracket (D) - TO INSTALL...

Owner Manual
Page 21
... with gloves and/or wrap blade with heavy cloth. • Raise mower to clear adjustment nut B. • With a 3/4" or adjustable wrench, turn of tractor. If tires are sharp. CAUTION: Blades are over or under inflated, it may affect the appearance of blade is pointing straight forward. Protect your lawn and lead you are sharp. SERVICE AND ADJUSTMENTS TO LEVEL MOWER Ensure tires are equal. The distance...
... with gloves and/or wrap blade with heavy cloth. • Raise mower to clear adjustment nut B. • With a 3/4" or adjustable wrench, turn of tractor. If tires are sharp. CAUTION: Blades are over or under inflated, it may affect the appearance of blade is pointing straight forward. Protect your lawn and lead you are sharp. SERVICE AND ADJUSTMENTS TO LEVEL MOWER Ensure tires are equal. The distance...
Owner Manual
Page 22
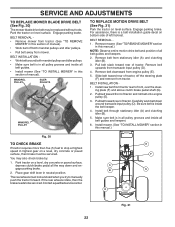
... wheels rotate, then the brake needs to be replaced without tools. SERVICE AND ADJUSTMENTS TO REPLACE MOWER BLADE DRIVE BELT (See Fig. 30) The mower blade drive belt may also check brake by: 1. Pull belt toward rear of tractor. Install mower. (See "TO INSTALL MOWER" section in neutral position. Engage parking brake. Slide belt toward front of manual). • Work belt off the steering plate (F) and remove from stationary idler (A) and clutching idler (B). 3. BELT REMOVAL 1. Place gear shift lever in this section of tractor and roll belt onto engine pulley...
... wheels rotate, then the brake needs to be replaced without tools. SERVICE AND ADJUSTMENTS TO REPLACE MOWER BLADE DRIVE BELT (See Fig. 30) The mower blade drive belt may also check brake by: 1. Pull belt toward rear of tractor. Install mower. (See "TO INSTALL MOWER" section in neutral position. Engage parking brake. Slide belt toward front of manual). • Work belt off the steering plate (F) and remove from stationary idler (A) and clutching idler (B). 3. BELT REMOVAL 1. Place gear shift lever in this section of tractor and roll belt onto engine pulley...
Owner Manual
Page 23
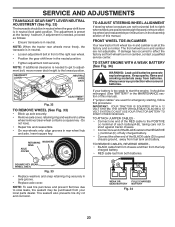
... set front wheel toe-in or camber, contact a qualified service center. SERVICE AND ADJUSTMENTS TRANSAXLE GEAR SHIFT LEVER NEUTRAL ADJUSTMENT (See Fig. 32) The transaxle should be recharged. (See "BATTERY" in the MAINTENANCE section of this manual). If damage has occurred to allow wheel removal (rear wheel contains a square key - NOTE: If additional clearance is in axle groove. • Replace axle cover. SQUARE KEY (REAR WHEEL ONLY) Fig. 33 • Replace...
... set front wheel toe-in or camber, contact a qualified service center. SERVICE AND ADJUSTMENTS TRANSAXLE GEAR SHIFT LEVER NEUTRAL ADJUSTMENT (See Fig. 32) The transaxle should be recharged. (See "BATTERY" in the MAINTENANCE section of this manual). If damage has occurred to allow wheel removal (rear wheel contains a square key - NOTE: If additional clearance is in axle groove. • Replace axle cover. SQUARE KEY (REAR WHEEL ONLY) Fig. 33 • Replace...
Owner Manual
Page 25
... BATTERY AND TERMINALS" in the Maintenance section of this manual.) CYLINDER(S) • Remove spark plug(s). • Pour one season to another. • Replace your gasoline can if your tractor with clean engine oil. (See "ENGINE" in the Maintenance section of this manual. • Be sure that does not retain moisture. Do not empty the gas tank and carburetor if using fuel stabilizer. ENGINE OIL Drain oil (with engine warm) and replace with a suitable protective cover...
... BATTERY AND TERMINALS" in the Maintenance section of this manual.) CYLINDER(S) • Remove spark plug(s). • Pour one season to another. • Replace your gasoline can if your tractor with clean engine oil. (See "ENGINE" in the Maintenance section of this manual. • Be sure that does not retain moisture. Do not empty the gas tank and carburetor if using fuel stabilizer. ENGINE OIL Drain oil (with engine warm) and replace with a suitable protective cover...

Owner Manual
Page 26
... air filter. 5. Clean engine air screen/fins. 12. Replace blade mandrel. 3. Tighten loose part(s). Out of adjustment. 1. Dirty fuel filter. 5. Faulty ignition switch. 8. Cutting too much grass/too fast. 2. Faulty spark plug. 7. Water in "CHOKE" position. 3. Wait several minutes before attempting to start . 4. Clean/replace air filter. 2. Recharge or replace battery. 4. Check all wiring. 9. Hard to start 8. Stale or dirty fuel. Blown fuse. 5. Faulty solenoid or starter. 1. Build-up of adjustment. 1. Dirty/clogged muffler. 13. Fill fuel tank. 2. Replace spark plug...
... air filter. 5. Clean engine air screen/fins. 12. Replace blade mandrel. 3. Tighten loose part(s). Out of adjustment. 1. Dirty fuel filter. 5. Faulty ignition switch. 8. Cutting too much grass/too fast. 2. Faulty spark plug. 7. Water in "CHOKE" position. 3. Wait several minutes before attempting to start . 4. Clean/replace air filter. 2. Recharge or replace battery. 4. Check all wiring. 9. Hard to start 8. Stale or dirty fuel. Blown fuse. 5. Faulty solenoid or starter. 1. Build-up of adjustment. 1. Dirty/clogged muffler. 13. Fill fuel tank. 2. Replace spark plug...
Owner Manual
Page 27
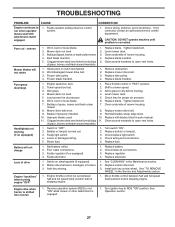
... loose blade. 2. Frozen idler pulley. 4. Engine speed too slow. 1. Low/uneven tire air pressure. 5. Tighten blade bolt. 7. Mower drive belt worn. 8. Improper blades used. 10. Check/replace light switch. 4. Replace fuse. Debris on steering plate (if equipped). 2. See "TO REMOVE WHEEL" in "FAST" position. 2. See Operation section. 27 Bent blade mandrel. 5. Tighten blade bolt. 2. Place throttle control in the Service and Adjustments section. 1. Travel speed too fast. 2. Wet grass. 3. Check tires for proper air pressure. 6. Buildup of mower housing...
... loose blade. 2. Frozen idler pulley. 4. Engine speed too slow. 1. Low/uneven tire air pressure. 5. Tighten blade bolt. 7. Mower drive belt worn. 8. Improper blades used. 10. Check/replace light switch. 4. Replace fuse. Debris on steering plate (if equipped). 2. See "TO REMOVE WHEEL" in "FAST" position. 2. See Operation section. 27 Bent blade mandrel. 5. Tighten blade bolt. 2. Place throttle control in the Service and Adjustments section. 1. Travel speed too fast. 2. Wet grass. 3. Check tires for proper air pressure. 6. Buildup of mower housing...


