
User Manual
Page 2
...not use on contact, stay away from a gasoline dispenser nozzle. 2 5. To avoid severe burns on sidewalks, driveways and other engine parts become extremely hot during operation or while performing an adjustment or repair to point out important safety precautions. Thoroughly inspect the area where the...opening at all units with a portable container, rather than from these areas. Do not put hands or feet near or under rotating parts. ing gravel drives, walks, or roads. Always place contain- Keep the area of operation clear of all instructions on a trailer with...
...not use on contact, stay away from a gasoline dispenser nozzle. 2 5. To avoid severe burns on sidewalks, driveways and other engine parts become extremely hot during operation or while performing an adjustment or repair to point out important safety precautions. Thoroughly inspect the area where the...opening at all units with a portable container, rather than from these areas. Do not put hands or feet near or under rotating parts. ing gravel drives, walks, or roads. Always place contain- Keep the area of operation clear of all instructions on a trailer with...
User Manual
Page 3
... observe the "SAFETY RULES". 6. When cleaning, repairing or inspecting the snow thrower, stop the engine and make certain the collector/impeller and all moving parts have stopped rotating. 3. exhaust fumes are present such as hot water heaters, space heaters, or clothes dryers. Never operate the snow thrower without good ... RULES 2-3 MAINTENANCE SCHEDULE 14 PRODUCT SPECIFICATIONS 3 SERVICE AND ADJUSTMENTS 16-18 CUSTOMER RESPONSIBILITIES 3 STORAGE 18 ASSEMBLY / PRE-OPERATION 5-7 TROUBLESHOOTING 19 OPERATION 8-13 REPAIR PARTS 20-31 MAINTENANCE 14-15 3 WARRANTY 32
... observe the "SAFETY RULES". 6. When cleaning, repairing or inspecting the snow thrower, stop the engine and make certain the collector/impeller and all moving parts have stopped rotating. 3. exhaust fumes are present such as hot water heaters, space heaters, or clothes dryers. Never operate the snow thrower without good ... RULES 2-3 MAINTENANCE SCHEDULE 14 PRODUCT SPECIFICATIONS 3 SERVICE AND ADJUSTMENTS 16-18 CUSTOMER RESPONSIBILITIES 3 STORAGE 18 ASSEMBLY / PRE-OPERATION 5-7 TROUBLESHOOTING 19 OPERATION 8-13 REPAIR PARTS 20-31 MAINTENANCE 14-15 3 WARRANTY 32

User Manual
Page 4
PARTS PACKED SEPARATELY IN CARTON 4
PARTS PACKED SEPARATELY IN CARTON 4
User Manual
Page 5
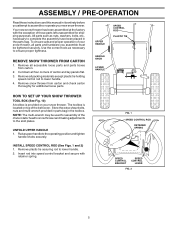
.... UNFOLD UPPER HANDLE 1. Use the correct tools as nuts, washers, bolts, etc., necessary to complete the assembly have been placed in the parts bag. The toolbox is provided on top of the belt cover. FIG. 1 SPEED CONTROL ROD RETAINER SPRING SPEED CONTROL BRACKET SPEED CONTROL LEVER ...upper handle to lower handle. 2. Your new snow thrower has been assembled at . 3. Store the extra shear bolts, nuts and multi-wrench provided in parts bag in the toolbox. INSTALL SPEED CONTROL ROD (See Figs. 1 and 2) 1. ASSEMBLY / PRE-OPERATION Read these instructions and this manual in its ...
.... UNFOLD UPPER HANDLE 1. Use the correct tools as nuts, washers, bolts, etc., necessary to complete the assembly have been placed in the parts bag. The toolbox is provided on top of the belt cover. FIG. 1 SPEED CONTROL ROD RETAINER SPRING SPEED CONTROL BRACKET SPEED CONTROL LEVER ...upper handle to lower handle. 2. Your new snow thrower has been assembled at . 3. Store the extra shear bolts, nuts and multi-wrench provided in parts bag in the toolbox. INSTALL SPEED CONTROL ROD (See Figs. 1 and 2) 1. ASSEMBLY / PRE-OPERATION Read these instructions and this manual in its ...

User Manual
Page 7
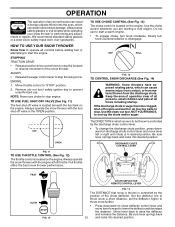
... snow throwing performance. • Reduce tire pressure to install the chute rotater head. 1. If necessary, rotate chute assembly to align square and pin on your parts bag may be used to 14-17 PSI. 7 Correct and equal tire pressure is important for shipping purposes. CHUTE DEFLECTOR CONTROL LEVER FIG. 9 CHECK TIRE...
... snow throwing performance. • Reduce tire pressure to install the chute rotater head. 1. If necessary, rotate chute assembly to align square and pin on your parts bag may be used to 14-17 PSI. 7 Correct and equal tire pressure is important for shipping purposes. CHUTE DEFLECTOR CONTROL LEVER FIG. 9 CHECK TIRE...
User Manual
Page 10
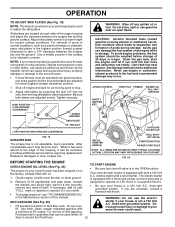
... the deflector and decrease the distance. OFF FULL FIG. 13 TO CONTROL SNOW DISCHARGE (See Fig. 14) WARNING: Snow throwers have exposed rotating parts, which can result in which can result in the OPEN position. DISCHARGE CHUTE CONTROL LEVER FAST SLOW FIG. 12 CHUTE DEFLECTOR REMOTE CONTROL LEVER FIG... to stop the forward or reverse movement of the chute deflector. HOW TO USE YOUR SNOW THROWER Know how to operate all moving parts to start the engine.
... the deflector and decrease the distance. OFF FULL FIG. 13 TO CONTROL SNOW DISCHARGE (See Fig. 14) WARNING: Snow throwers have exposed rotating parts, which can result in which can result in the OPEN position. DISCHARGE CHUTE CONTROL LEVER FAST SLOW FIG. 12 CHUTE DEFLECTOR REMOTE CONTROL LEVER FIG... to stop the forward or reverse movement of the chute deflector. HOW TO USE YOUR SNOW THROWER Know how to operate all moving parts to start the engine.

User Manual
Page 11
... to the snow thrower can result. • Slower speeds are for heavier snow and faster speeds are disengaged and the auger/impeller and all moving parts have stopped. LH TURN RH TURN TRIGGER TRIGGER FIG. 16 11 FIG. 18
... to the snow thrower can result. • Slower speeds are for heavier snow and faster speeds are disengaged and the auger/impeller and all moving parts have stopped. LH TURN RH TURN TRIGGER TRIGGER FIG. 16 11 FIG. 18
User Manual
Page 12
... or using ethanol or methanol) can attract moisture which can easily be picked up and thrown by loosening the rear 1/2" hex nut only, then moving parts to stop. 2. Use fresh fuel next season. CHOKE CONTROL THROTTLE PRIMER ENGINE OIL FILL CAP / DIPSTICK SAFETY IGNITION KEY AUGER HOUSING SKID PLATE 1/2" HEX ...not use it run until "FULL" mark on dipstick is uneven. OPERATION TO ADJUST SKID PLATES (See Fig. 19) NOTE: The wrench provided in your parts bag may be used within 30 days to assure fuel freshness. 12 Do not over fill. • Be sure your house is not recommended...
... or using ethanol or methanol) can attract moisture which can easily be picked up and thrown by loosening the rear 1/2" hex nut only, then moving parts to stop. 2. Use fresh fuel next season. CHOKE CONTROL THROTTLE PRIMER ENGINE OIL FILL CAP / DIPSTICK SAFETY IGNITION KEY AUGER HOUSING SKID PLATE 1/2" HEX ...not use it run until "FULL" mark on dipstick is uneven. OPERATION TO ADJUST SKID PLATES (See Fig. 19) NOTE: The wrench provided in your parts bag may be used within 30 days to assure fuel freshness. 12 Do not over fill. • Be sure your house is not recommended...
User Manual
Page 14
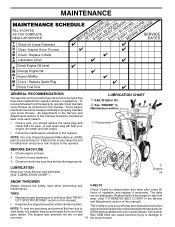
... and should replace the spark plug and check belts for loose fasteners. 3. Check for wear. Replace belts if they are functioning properly. Using other parts dealer. Tire sealant also prevents tire dry rot and than OEM belts can harm rubber. LUBRICATION Keep your snow thrower well lubricated (See "LUBRICATION CHART"). ...
... and should replace the spark plug and check belts for loose fasteners. 3. Check for wear. Replace belts if they are functioning properly. Using other parts dealer. Tire sealant also prevents tire dry rot and than OEM belts can harm rubber. LUBRICATION Keep your snow thrower well lubricated (See "LUBRICATION CHART"). ...
User Manual
Page 16
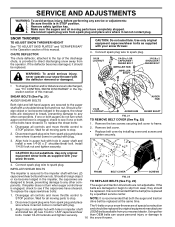
... top of this manual. Use only original equipment capscrew/shear bolts as supplied with the deflector removed or damaged. Wait for all moving parts to spark plug. Disconnect spark plug wire from spark plug and place drive belt be replaced. Connect spark plug wire to stop . 2. STOP position. ... at the same time. If impeller does not turn when auger control lever is engaged, check to 16 the snow thrower. Wait for all moving parts to frame. 2. Using other than OEM belts can cause personal injury or damage to see if one or both the auger and traction 2. If ...
... top of this manual. Use only original equipment capscrew/shear bolts as supplied with the deflector removed or damaged. Wait for all moving parts to spark plug. Disconnect spark plug wire from spark plug and place drive belt be replaced. Connect spark plug wire to stop . 2. STOP position. ... at the same time. If impeller does not turn when auger control lever is engaged, check to 16 the snow thrower. Wait for all moving parts to frame. 2. Using other than OEM belts can cause personal injury or damage to see if one or both the auger and traction 2. If ...
User Manual
Page 17
... bolt and tighten securely (30-35 ft. Tire sealant also prevents tire dry rot and corrosion. If auger belt has become dislodged from your local parts dealer. Remove bolt, lockwasher and flat washer securing pulley to the unit could occur if the snow thrower should fall during the belt changing...
... bolt and tighten securely (30-35 ft. Tire sealant also prevents tire dry rot and corrosion. If auger belt has become dislodged from your local parts dealer. Remove bolt, lockwasher and flat washer securing pulley to the unit could occur if the snow thrower should fall during the belt changing...
User Manual
Page 18
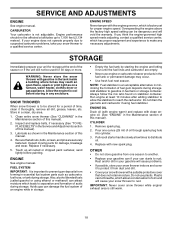
... (See "TO REPLACE BELTS" in the Maintenance section of this manual). 2. Lubricate as carburetor, fuel hose, or tank during storage. Inspect moving parts for storage at the end of oil through spark plug hole into cylinder. 3. Touch up to prevent gum deposits from one ounce (29 ml) of...with a suitable protective cover that all rusted or chipped paint surfaces; OTHER • Do not store gasoline from forming in essential fuel system parts such as shown in any necessary adjustments. Rust and/or dirt in your can damage the fuel system of an engine while in the Maintenance...
... (See "TO REPLACE BELTS" in the Maintenance section of this manual). 2. Lubricate as carburetor, fuel hose, or tank during storage. Inspect moving parts for storage at the end of oil through spark plug hole into cylinder. 3. Touch up to prevent gum deposits from one ounce (29 ml) of...with a suitable protective cover that all rusted or chipped paint surfaces; OTHER • Do not store gasoline from forming in essential fuel system parts such as shown in any necessary adjustments. Rust and/or dirt in your can damage the fuel system of an engine while in the Maintenance...
User Manual
Page 19
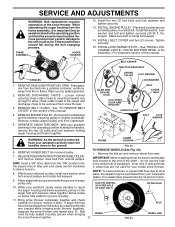
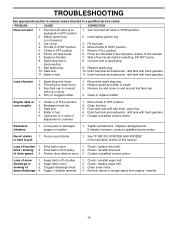
...4. Clean or replace muffler. Choke is flooded. 8. Drain tank and refill with fresh gasoline. 11. Replace damaged parts. drive / slowing 2. Drive belt is off valve (if so equipped) in OFF position. 2. Clogged discharge chute. 4. Clean snow chute. ...and around fuel tank cap. 4. Blockage in fuel. 1. Excessive vibration 1. Stale fuel. 11. Check / replace drive belt. Stale fuel. 4. Loose parts or damaged augers or impeller. 1. Replace spark plug. 10. Reconnect spark plug wire. 2. Choke in OFF position. 6. Fuel shut-off of adjustment...
...4. Clean or replace muffler. Choke is flooded. 8. Drain tank and refill with fresh gasoline. 11. Replace damaged parts. drive / slowing 2. Drive belt is off valve (if so equipped) in OFF position. 2. Clogged discharge chute. 4. Clean snow chute. ...and around fuel tank cap. 4. Blockage in fuel. 1. Excessive vibration 1. Stale fuel. 11. Check / replace drive belt. Stale fuel. 4. Loose parts or damaged augers or impeller. 1. Replace spark plug. 10. Reconnect spark plug wire. 2. Choke in OFF position. 6. Fuel shut-off of adjustment...
User Manual
Page 20
... with the instructions furnished. ID#, serial number and date of purchase of your product and the name and address of any part which vary from defects in materials and workmanship. This Warranty gives you specific legal rights, and you must be defective...Warranty are the responsibility of that this Warranty, please contact: Electrolux Home Products, Inc. Transportation charges for any parts submitted for parts or labor incurred in replacing parts, any power equipment unit or attachment are belts, shear pins, normal wear, normal adjustments, standard hardware and normal...
... with the instructions furnished. ID#, serial number and date of purchase of your product and the name and address of any part which vary from defects in materials and workmanship. This Warranty gives you specific legal rights, and you must be defective...Warranty are the responsibility of that this Warranty, please contact: Electrolux Home Products, Inc. Transportation charges for any parts submitted for parts or labor incurred in replacing parts, any power equipment unit or attachment are belts, shear pins, normal wear, normal adjustments, standard hardware and normal...


