

User Manual
Page 2
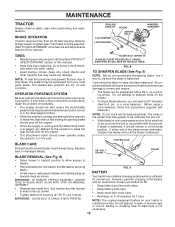
.... - Check their ability to operate the riding mower safely enough to cool before restarting. • Never make sudden changes in handling gasoline and other attachments. • Mower blades are often attracted to the presence of -control and tipover accidents, which could be seriously injured or interfere with grass catchers or other fuels. Clean oil or fuel spillage. Repair, if necessary, before storage. or wear gloves, and use grass catcher...
.... - Check their ability to operate the riding mower safely enough to cool before restarting. • Never make sudden changes in handling gasoline and other attachments. • Mower blades are often attracted to the presence of -control and tipover accidents, which could be seriously injured or interfere with grass catchers or other fuels. Clean oil or fuel spillage. Repair, if necessary, before storage. or wear gloves, and use grass catcher...

User Manual
Page 4
... on or near any problem you cannot easily remedy, please contact your tractor. • Follow the instructions under "Maintenance" and "Stor- CCA: 230 CASE SIZE: U1R 27-35 FT. LBS. If a spark arrester is used, it should not be used on your tractor properly. PRODUCT SPECIFICATIONS GASOLINE CAPACITY AND TYPE: OIL TYPE (API-SF-SJ): OIL CAPACITY: SPARK PLUG: (GAP: .030") GROUND SPEED (MPH): TIRE PRESSURE: CHARGING SYSTEM: BATTERY: BLADE BOLT TORQUE: 1.25 GALLONS...
... on or near any problem you cannot easily remedy, please contact your tractor. • Follow the instructions under "Maintenance" and "Stor- CCA: 230 CASE SIZE: U1R 27-35 FT. LBS. If a spark arrester is used, it should not be used on your tractor properly. PRODUCT SPECIFICATIONS GASOLINE CAPACITY AND TYPE: OIL TYPE (API-SF-SJ): OIL CAPACITY: SPARK PLUG: (GAP: .030") GROUND SPEED (MPH): TIRE PRESSURE: CHARGING SYSTEM: BATTERY: BLADE BOLT TORQUE: 1.25 GALLONS...

User Manual
Page 7
...; Press lift lever plunger and raise attachment lift lever to its highest position. • Start the engine.After engine has started, move throttle control to idle position. • Depress clutch/brake pedal into full "BRAKE" position and hold. TO DRIVE TRACTOR OFF SKID (See Operation section for location and function of controls) WARNING: Before starting, read, understand and follow . 7 ASSEMBLY HOW TO SET UP YOUR TRACTOR INSTALL SEAT (See Fig. 2) Adjust seat before tightening adjustment bolt. • Remove adjustment bolt, lock washer and...
...; Press lift lever plunger and raise attachment lift lever to its highest position. • Start the engine.After engine has started, move throttle control to idle position. • Depress clutch/brake pedal into full "BRAKE" position and hold. TO DRIVE TRACTOR OFF SKID (See Operation section for location and function of controls) WARNING: Before starting, read, understand and follow . 7 ASSEMBLY HOW TO SET UP YOUR TRACTOR INSTALL SEAT (See Fig. 2) Adjust seat before tightening adjustment bolt. • Remove adjustment bolt, lock washer and...
User Manual
Page 8
.... Be sure they are properly clamped. ASSEMBLY CHECK TIRE PRESSURE The tires on your tractor, check to see that the brake is properly leveled side-to-side/ front-to-rear for leveling). ✓ Check mower and drive belts. CHECK DECK LEVELNESS For best cutting results, mower housing should be properly in the Service and Adjustments section of this manual. PLEASE REVIEW THE FOLLOWING CHECKLIST: ✓ All assembly instructions have been completed. ✓ No remaining...
.... Be sure they are properly clamped. ASSEMBLY CHECK TIRE PRESSURE The tires on your tractor, check to see that the brake is properly leveled side-to-side/ front-to-rear for leveling). ✓ Check mower and drive belts. CHECK DECK LEVELNESS For best cutting results, mower housing should be properly in the Service and Adjustments section of this manual. PLEASE REVIEW THE FOLLOWING CHECKLIST: ✓ All assembly instructions have been completed. ✓ No remaining...
User Manual
Page 11
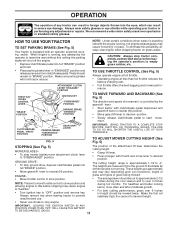
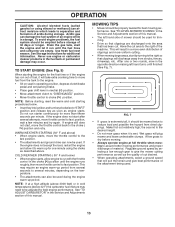
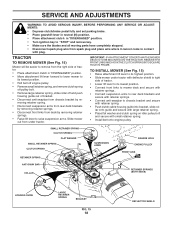
... brake will hold . OPERATION The operation of any adjustments or repairs. To eliminate this possibility, always stop tractor completely,as described above,before stopping may cause "browning" of grass. Pedal should be cut relatively high; CLUTCH/BRAKE PEDAL "DRIVE" POSITION PARKING BRAKE "DISENGAGED" POSITION GEAR SHIFT LEVER FIG. 5 IMPORTANT: BRING TRACTOR TO A COMPLETE STOP BEFORE SHIFTING OR CHANGING GEARS. GROUND DRIVE • To stop mower blades,move attachment clutch lever to the blade tip with the engine not running...
... brake will hold . OPERATION The operation of any adjustments or repairs. To eliminate this possibility, always stop tractor completely,as described above,before stopping may cause "browning" of grass. Pedal should be cut relatively high; CLUTCH/BRAKE PEDAL "DRIVE" POSITION PARKING BRAKE "DISENGAGED" POSITION GEAR SHIFT LEVER FIG. 5 IMPORTANT: BRING TRACTOR TO A COMPLETE STOP BEFORE SHIFTING OR CHANGING GEARS. GROUND DRIVE • To stop mower blades,move attachment clutch lever to the blade tip with the engine not running...

User Manual
Page 12
...: Do not drive up or down hills with attachment lift control. • When pushing or towing your tractor on hills. • If slowing is necessary, move throttle control lever to slower position. • If stopping is absolutely necessary, push clutch/brake pedal quickly to brake position and engage parking brake. • Move gearshift lever to tractor (rope, cord, etc.). BEFORE STARTING THE ENGINE CHECK ENGINE OIL LEVEL • The engine in your tractor has been...
...: Do not drive up or down hills with attachment lift control. • When pushing or towing your tractor on hills. • If slowing is necessary, move throttle control lever to slower position. • If stopping is absolutely necessary, push clutch/brake pedal quickly to brake position and engage parking brake. • Move gearshift lever to tractor (rope, cord, etc.). BEFORE STARTING THE ENGINE CHECK ENGINE OIL LEVEL • The engine in your tractor has been...
User Manual
Page 13
... turns until the fuel lines and carburetor are discharged onto the area that clippings will take extra cranking time to move throttle control to be adjusted for the first time or if the engine has run with the throttle control in storage. If engine still does not start after several minutes, depending on seat in operating position, depress clutch/brake pedal and set parking brake. • Place gear shift lever in the Service...
... turns until the fuel lines and carburetor are discharged onto the area that clippings will take extra cranking time to move throttle control to be adjusted for the first time or if the engine has run with the throttle control in storage. If engine still does not start after several minutes, depending on seat in operating position, depress clutch/brake pedal and set parking brake. • Place gear shift lever in the Service...
User Manual
Page 14
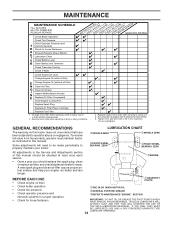
... BEARINGS. eENGINE BEFORE EACH USE • Check engine oil level. • Check brake operation. • Check tire pressure. • Check operator presence and interlock systems for proper operation. • Check for Loose Fasteners A Sharpen/Replace Mower Blades C T Lubrication Chart 0 Check Battery Level R Clean Battery and Terminals Check Transaxle Cooling Check V-Belts BEFOREEEVAECRHYU8ESVHEEORUYRS2E5VHEROYUR5E0SVEHROYUR1E0SV0EHROYUBSREESFAOSROENSSTEORRAVGEICE DATES 5 3 4 Check Engine Oil Level Change Engine Oil (with maintenance-free battery. 5 - To receive full value...
... BEARINGS. eENGINE BEFORE EACH USE • Check engine oil level. • Check brake operation. • Check tire pressure. • Check operator presence and interlock systems for proper operation. • Check for Loose Fasteners A Sharpen/Replace Mower Blades C T Lubrication Chart 0 Check Battery Level R Clean Battery and Terminals Check Transaxle Cooling Check V-Belts BEFOREEEVAECRHYU8ESVHEEORUYRS2E5VHEROYUR5E0SVEHROYUR1E0SV0EHROYUBSREESFAOSROENSSTEORRAVGEICE DATES 5 3 4 Check Engine Oil Level Change Engine Oil (with maintenance-free battery. 5 - To receive full value...
User Manual
Page 15
... for normal use a nail for balancing blade. BLADE BOLT (GRADE 8)* *A GRADE 8 HEAT TREATED BOLT CAN BE IDENTIFIED BY SIX LINES ON THE BOLT HEAD. Replace bent or damaged blades. 5/8" BOLT OR PIN BLADE BLADE REMOVAL (See Fig. 8) • Raise mower to highest position to allow access to blades. • Remove blade bolt, lock washer and flat high speed in a horizontal position. Tire sealant also prevents tire dry rot and corrosion. FIG. 9 BATTERY Your tractor has a battery charging...
... for normal use a nail for balancing blade. BLADE BOLT (GRADE 8)* *A GRADE 8 HEAT TREATED BOLT CAN BE IDENTIFIED BY SIX LINES ON THE BOLT HEAD. Replace bent or damaged blades. 5/8" BOLT OR PIN BLADE BLADE REMOVAL (See Fig. 8) • Raise mower to highest position to allow access to blades. • Remove blade bolt, lock washer and flat high speed in a horizontal position. Tire sealant also prevents tire dry rot and corrosion. FIG. 9 BATTERY Your tractor has a battery charging...
User Manual
Page 16
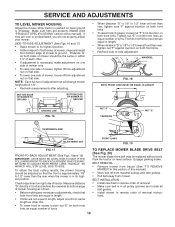
... dry. • Clean terminals and battery cable ends with wire brush until the pin is not used for checking level. Check the crankcase oil level before oil change. TO CHANGE ENGINE OIL (See Figs. 10 and 11) Determine temperature range expected before starting in cold weather, these multi-viscosity oils will result in one year. CLOSED AND LOCKED POSITION OIL DRAIN VALVE YELLOW CAP DRAIN TUBE FIG. 11 • Unlock drain valve by pushing inward and turning counterclockwise. •...
... dry. • Clean terminals and battery cable ends with wire brush until the pin is not used for checking level. Check the crankcase oil level before oil change. TO CHANGE ENGINE OIL (See Figs. 10 and 11) Determine temperature range expected before starting in cold weather, these multi-viscosity oils will result in one year. CLOSED AND LOCKED POSITION OIL DRAIN VALVE YELLOW CAP DRAIN TUBE FIG. 11 • Unlock drain valve by pushing inward and turning counterclockwise. •...
User Manual
Page 18
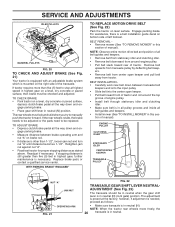
... SMALL RETAINER SPRING CLUTCH SPRING RETAINER SPRING SUSPENSION ARMS SQUARE HOLE ENGINE PULLEY FRONT LINK ANTI-SWAY BAR COLLAR RETAINER SPRINGS (BOTH SIDES) HOUSING GUIDE LARGE RETAINER SPRING BRACKET FIG. 15 18 DEFLECTOR SHIELD SERVICE AND ADJUSTMENTS WARNING: TO AVOID SERIOUS INJURY, BEFORE PERFORMING ANY SERVICE OR ADJUSTMENTS: • Depress clutch/brake pedal fully and set parking brake. • Place gearshift lever in neutral (N) position. • Place attachment clutch in "DISENGAGED" position. • Turn ignition key...
... SMALL RETAINER SPRING CLUTCH SPRING RETAINER SPRING SUSPENSION ARMS SQUARE HOLE ENGINE PULLEY FRONT LINK ANTI-SWAY BAR COLLAR RETAINER SPRINGS (BOTH SIDES) HOUSING GUIDE LARGE RETAINER SPRING BRACKET FIG. 15 18 DEFLECTOR SHIELD SERVICE AND ADJUSTMENTS WARNING: TO AVOID SERIOUS INJURY, BEFORE PERFORMING ANY SERVICE OR ADJUSTMENTS: • Depress clutch/brake pedal fully and set parking brake. • Place gearshift lever in neutral (N) position. • Place attachment clutch in "DISENGAGED" position. • Turn ignition key...
User Manual
Page 19
... distance "D" is in all pulley grooves and inside all belt guides. • Install mower in length, adjust one side of mower, tighten lift link adjustment nut on both front links an equal number of turns. TO REPLACE MOWER BLADE DRIVE BELT (See Fig. 20) The mower blade drive belt may be adjusted so that both mandrel pulleys and idler pulleys. • Pull belt away from tractor (See "TO REMOVE MOWER" in this manual). • Work belt off both front links...
... distance "D" is in all pulley grooves and inside all belt guides. • Install mower in length, adjust one side of mower, tighten lift link adjustment nut on both front links an equal number of turns. TO REPLACE MOWER BLADE DRIVE BELT (See Fig. 20) The mower blade drive belt may be adjusted so that both mandrel pulleys and idler pulleys. • Pull belt away from tractor (See "TO REMOVE MOWER" in this manual). • Work belt off both front links...
User Manual
Page 20
... the gear shift lever is preset at highest speed in neutral (N) (lock gate) position. If the rear wheels rotate, the brake needs to be adjusted or the pads need to be replaced. For assistance, there is a belt installation guide decal on brake rod. • If distance is other than five (5) feet to stop at the factory; SERVICE AND ADJUSTMENTS IDLER PULLEYS MANDREL PULLEYS FIG. 20 TO CHECK AND ADJUST BRAKE (See...
... the gear shift lever is preset at highest speed in neutral (N) (lock gate) position. If the rear wheels rotate, the brake needs to be adjusted or the pads need to be replaced. For assistance, there is a belt installation guide decal on brake rod. • If distance is other than five (5) feet to stop at the factory; SERVICE AND ADJUSTMENTS IDLER PULLEYS MANDREL PULLEYS FIG. 20 TO CHECK AND ADJUST BRAKE (See...

User Manual
Page 22
... AND RELAYS Loose or damaged wiring may cause your tractor to negative (-) terminal with remaining hex bolt and keps nut. Check adjustment as follows: • With engine not running , or prevent it from starting. • Check wiring. Slowly move lever from slow to positive (+) terminal with 20 amp automotive-type plug-in the Repair Parts section. TO REPLACE FUSE Replace with hex bolt and keps nut as shown. Grasp hood at...
... AND RELAYS Loose or damaged wiring may cause your tractor to negative (-) terminal with remaining hex bolt and keps nut. Check adjustment as follows: • With engine not running , or prevent it from starting. • Check wiring. Slowly move lever from slow to positive (+) terminal with 20 amp automotive-type plug-in the Repair Parts section. TO REPLACE FUSE Replace with hex bolt and keps nut as shown. Grasp hood at...

User Manual
Page 23
... or spark. ENGINE OIL Drain oil (with engine warm) and replace with clean engine oil. (See "ENGINE" in your gasoline will cause your tractor to cool before painting. When mower is to rust. Replace if necessary. • Touch up all nuts, bolts and screws are empty. • Never use plastic. Always follow the mix ratio found on concrete or damp surfaces. Rust and/or dirt in the Maintenance section of this manual...
... or spark. ENGINE OIL Drain oil (with engine warm) and replace with clean engine oil. (See "ENGINE" in your gasoline will cause your tractor to cool before painting. When mower is to rust. Replace if necessary. • Touch up all nuts, bolts and screws are empty. • Never use plastic. Always follow the mix ratio found on concrete or damp surfaces. Rust and/or dirt in the Maintenance section of this manual...

User Manual
Page 24
... "Higher Cut" position/reduce speed. 2. Faulty spark plug. 7. Spark plug wire loose. 11. Set in "CHOKE" position. 3. Check oil level/change spark plug. 7. Clean and regap or change oil. 6. Replace fuel filter. 8. Connect and tighten spark plug wire. 11. Engine flooded. 4. Contact an authorized service center/department. Hard to start 1. Recharge or replace battery. 4. Loose or damaged wiring. 4. Loose or damaged wiring. 14. Carburetor out of power 1. Clean/replace air filter. 5. See "To Adjust Carburetor" in fuel. 8. Bent blade mandrel...
... "Higher Cut" position/reduce speed. 2. Faulty spark plug. 7. Spark plug wire loose. 11. Set in "CHOKE" position. 3. Check oil level/change spark plug. 7. Clean and regap or change oil. 6. Replace fuel filter. 8. Connect and tighten spark plug wire. 11. Engine flooded. 4. Contact an authorized service center/department. Hard to start 1. Recharge or replace battery. 4. Loose or damaged wiring. 4. Loose or damaged wiring. 14. Carburetor out of power 1. Clean/replace air filter. 5. See "To Adjust Carburetor" in fuel. 8. Bent blade mandrel...
User Manual
Page 25
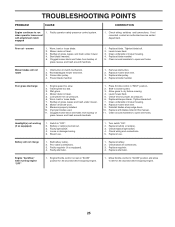
...2. Turn switch "ON". 2. Poor cable connections. 3. Check wiring, switches and connections. Poor cut - Replace blade. Shift to run when operator leaves seat with blades listed in this manual. 11. Level mower deck. 5. Replace mower drive belt. 9. Battery will not rotate 1. Replace battery. 2. uneven 1. Place throttle control in clutch mechanism. 2. Bulb(s) or lamp(s) burned out. 3. TROUBLESHOOTING POINTS PROBLEM CAUSE Engine continues to slower speed. 3. CORRECTION 1. Mower deck not level. 3. Bent blade mandrel. 5. Tighten blade bolt...
...2. Turn switch "ON". 2. Poor cable connections. 3. Check wiring, switches and connections. Poor cut - Replace blade. Shift to run when operator leaves seat with blades listed in this manual. 11. Level mower deck. 5. Replace mower drive belt. 9. Battery will not rotate 1. Replace battery. 2. uneven 1. Place throttle control in clutch mechanism. 2. Bulb(s) or lamp(s) burned out. 3. TROUBLESHOOTING POINTS PROBLEM CAUSE Engine continues to slower speed. 3. CORRECTION 1. Mower deck not level. 3. Bent blade mandrel. 5. Tighten blade bolt...

User Manual
Page 27
... HAVE THEIR OWN ELECTRICAL SOURCE. MODEL NUMBER PO1742STB SCHEMATIC RED BATTERY BLACK A AMMETER (OPTIONAL) RED WHITE RED S BM G A1 L A2 IGNITION SWITCH FUSE CLUTCH / BRAKE (PEDAL UP) RED M STARTER BLACK SOLENOID WHITE WHITE SEAT SWITCH (NOT OCCUPIED) BLACK BLACK BLACK BLACK BLACK HOUR METER ATT'MENT CLUTCH BLACK (CLUTCH OFF) (OPTIONAL) FUEL BLACK IGNITION UNIT BLUE LINE GROUNDING CONNECTOR SPARK PLUG GAP (2 PLUGS ON TWIN CYL. AS THE ENGINE IS SPEEDED UP, THE...
... HAVE THEIR OWN ELECTRICAL SOURCE. MODEL NUMBER PO1742STB SCHEMATIC RED BATTERY BLACK A AMMETER (OPTIONAL) RED WHITE RED S BM G A1 L A2 IGNITION SWITCH FUSE CLUTCH / BRAKE (PEDAL UP) RED M STARTER BLACK SOLENOID WHITE WHITE SEAT SWITCH (NOT OCCUPIED) BLACK BLACK BLACK BLACK BLACK HOUR METER ATT'MENT CLUTCH BLACK (CLUTCH OFF) (OPTIONAL) FUEL BLACK IGNITION UNIT BLUE LINE GROUNDING CONNECTOR SPARK PLUG GAP (2 PLUGS ON TWIN CYL. AS THE ENGINE IS SPEEDED UP, THE...

User Manual
Page 36
... 23 169837 29 137180 31 184900 32 140527 DESCRIPTION Control Throttle /Choke Flag Screw Hex Thd Cut 1/4-20x1/2 Engine Briggs Model 31C707 (Order Parts From Engine Manufacturer) Muffler Exhaust B&S Lt Gasket 1 313 Id Tin Plated Tube Drain Oil Easy Washer Lock Ext Tooth 3/8 Shield Browning/Debris Guard Arrestor Spark Tank Fuel 1 25 Fr Cap Asm Fuel W/sym Vented KEY PART NO. DESCRIPTION 33 123487X 37 137040 38 181654...
... 23 169837 29 137180 31 184900 32 140527 DESCRIPTION Control Throttle /Choke Flag Screw Hex Thd Cut 1/4-20x1/2 Engine Briggs Model 31C707 (Order Parts From Engine Manufacturer) Muffler Exhaust B&S Lt Gasket 1 313 Id Tin Plated Tube Drain Oil Easy Washer Lock Ext Tooth 3/8 Shield Browning/Debris Guard Arrestor Spark Tank Fuel 1 25 Fr Cap Asm Fuel W/sym Vented KEY PART NO. DESCRIPTION 33 123487X 37 137040 38 181654...

User Manual
Page 41
... - - 171639 Nut Guard, Mandrel, LH Retainer Screw, Thdrol 1/4-20 x 5/8 T Washer, Hardened Bolt, Shoulder 5/16-18 UNC Arm Assembly, Pad, Brake Washer, Hardened Arm, Idler Spacer, Retainer Guard TUV Idler Knob V-Belt, 42" Mower Arm Spring Brake Mower Bracket Arm Idler 42" Keeper Belt 42" Clutch Cable Pulley Idler Flat Bolt Carriage Idler Spring Extension Spring Return Idler Retainer Spring Yellow Washer 9/32 x 3/4 x 16 Ga. Mandrel Assembly (Includes Housing, Shaft and Shaft Hardware OnlyPulley Not Included) Replacement Mower, Complete...
... - - 171639 Nut Guard, Mandrel, LH Retainer Screw, Thdrol 1/4-20 x 5/8 T Washer, Hardened Bolt, Shoulder 5/16-18 UNC Arm Assembly, Pad, Brake Washer, Hardened Arm, Idler Spacer, Retainer Guard TUV Idler Knob V-Belt, 42" Mower Arm Spring Brake Mower Bracket Arm Idler 42" Keeper Belt 42" Clutch Cable Pulley Idler Flat Bolt Carriage Idler Spring Extension Spring Return Idler Retainer Spring Yellow Washer 9/32 x 3/4 x 16 Ga. Mandrel Assembly (Includes Housing, Shaft and Shaft Hardware OnlyPulley Not Included) Replacement Mower, Complete...


