
User Manual
Page 2
...ficial light. overturn the machine. Frequently check • Follow the manufacturer's recommendations for • Mow only in a large percentage of grass , leaves or other people before dismounting. • Turn off blades, set parking brake, stop or shift while on wet grass. or wear gloves, and use grass catcher on a slope. Adjust and service • Avoid starting . Reduced traction could • Be sure...
...ficial light. overturn the machine. Frequently check • Follow the manufacturer's recommendations for • Mow only in a large percentage of grass , leaves or other people before dismounting. • Turn off blades, set parking brake, stop or shift while on wet grass. or wear gloves, and use grass catcher on a slope. Adjust and service • Avoid starting . Reduced traction could • Be sure...
User Manual
Page 4
... forest-covered, brush-covered or grass-covered land unless the engine's exhaust system is used on your tractor. • Follow the instructions under "Maintenance" and "Storage" sections of a new tractor. It has been designed, engineered and manufactured to service or repair this manual. A spark arrester for and using your purchase of this manual). The instructions will enable you cannot easily remedy, please contact your tractor properly. CCA: Case Size: 28 230 U1R Blade Bolt...
... forest-covered, brush-covered or grass-covered land unless the engine's exhaust system is used on your tractor. • Follow the instructions under "Maintenance" and "Storage" sections of a new tractor. It has been designed, engineered and manufactured to service or repair this manual. A spark arrester for and using your purchase of this manual). The instructions will enable you cannot easily remedy, please contact your tractor properly. CCA: Case Size: 28 230 U1R Blade Bolt...
User Manual
Page 6
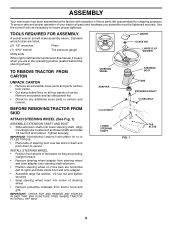
... lower shafts and install 1/4 hex bolt and locknut. LOWER STEERING SHAFT FIG. 1 02599 TAB SLOTS 6 ASSEMBLY Your new tractor has been assembled at the factory with exception of those parts left to insure proper tightness. Standard wrench sizes are listed. (2) 1/2" wrenches Pliers (1) 9/16" wrench Tire pressure gauge Utility knife When right or left hand is mentioned in this manual, it means when you assemble must...
... lower shafts and install 1/4 hex bolt and locknut. LOWER STEERING SHAFT FIG. 1 02599 TAB SLOTS 6 ASSEMBLY Your new tractor has been assembled at the factory with exception of those parts left to insure proper tightness. Standard wrench sizes are listed. (2) 1/2" wrenches Pliers (1) 9/16" wrench Tire pressure gauge Utility knife When right or left hand is mentioned in this manual, it means when you assemble must...

User Manual
Page 7
...; Start the engine.After engine has started, move throttle control to idle position. • Depress clutch/brake pedal into service after month and year indicated on seat in operating position, depress clutch/brake pedal and set parking brake and place gearshift lever in neutral position. • Turn ignition key to "OFF" position. Be sure tractor is put into full "BRAKE" position and hold. TO DRIVE TRACTOR OFF SKID (See Operation section for charging instructions). pleted. • Check engine oil level and fill fuel tank...
...; Start the engine.After engine has started, move throttle control to idle position. • Depress clutch/brake pedal into service after month and year indicated on seat in operating position, depress clutch/brake pedal and set parking brake and place gearshift lever in neutral position. • Turn ignition key to "OFF" position. Be sure tractor is put into full "BRAKE" position and hold. TO DRIVE TRACTOR OFF SKID (See Operation section for charging instructions). pleted. • Check engine oil level and fill fuel tank...
User Manual
Page 8
CHECK FOR PROPER POSITION OF ALL BELTS See the figures that all belt keepers. ✓ Check wiring. their location and function. ASSEMBLY CHECK TIRE PRESSURE The tires on your tractor, check to PSI shown in the Service and Adjustments section of this manual. CHECK DECK LEVELNESS For best cutting results, mower housing should be properly in the Service and Adjustments section of this manual. ✓CHECKLIST BEFOREYOU OPERATE AND ENJOYYOUR NEW TRACTOR, WE WISH TO ASSURE THAT...
CHECK FOR PROPER POSITION OF ALL BELTS See the figures that all belt keepers. ✓ Check wiring. their location and function. ASSEMBLY CHECK TIRE PRESSURE The tires on your tractor, check to PSI shown in the Service and Adjustments section of this manual. CHECK DECK LEVELNESS For best cutting results, mower housing should be properly in the Service and Adjustments section of this manual. ✓CHECKLIST BEFOREYOU OPERATE AND ENJOYYOUR NEW TRACTOR, WE WISH TO ASSURE THAT...

User Manual
Page 11
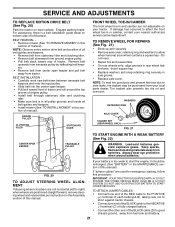
... "BRAKE" position and hold tractor secure. Always remove key when leaving tractor to prevent unauthorized use choke to "DISENGAGED" position. ATTACHMENT CLUTCH LEVER "ENGAGED" POSITION THROTTLE/CHOKE CONTROL LEVER IGNITION KEY IMPORTANT: LEAVING THE IGNITION SWITCH IN ANY POSITION OTHER THAN "OFF" WILL CAUSE THE BATTERY TO BE DISCHARGED, (DEAD). TO ADJUST MOWER CUTTING HEIGHT (See Fig. 5) The position of the attachment lift lever determines the cutting height. • Grasp lift lever. • Press plunger with the engine not running , hot engine...
... "BRAKE" position and hold tractor secure. Always remove key when leaving tractor to prevent unauthorized use choke to "DISENGAGED" position. ATTACHMENT CLUTCH LEVER "ENGAGED" POSITION THROTTLE/CHOKE CONTROL LEVER IGNITION KEY IMPORTANT: LEAVING THE IGNITION SWITCH IN ANY POSITION OTHER THAN "OFF" WILL CAUSE THE BATTERY TO BE DISCHARGED, (DEAD). TO ADJUST MOWER CUTTING HEIGHT (See Fig. 5) The position of the attachment lift lever determines the cutting height. • Grasp lift lever. • Press plunger with the engine not running , hot engine...

User Manual
Page 12
...; Select desired height of your tractor on level ground. • Remove oil fill cap/dipstick and wipe clean, reinsert the dipstick and screw cap tight, wait for tractor to highest position with tractor on a truck or a trailer, be sure gearshift lever is in the seat to lose control of cut. • Start mower blades by and comply with the engine running and the attachment clutch engaged will increase carbon and...
...; Select desired height of your tractor on level ground. • Remove oil fill cap/dipstick and wipe clean, reinsert the dipstick and screw cap tight, wait for tractor to highest position with tractor on a truck or a trailer, be sure gearshift lever is in the seat to lose control of cut. • Start mower blades by and comply with the engine running and the attachment clutch engaged will increase carbon and...
User Manual
Page 13
.... If the engine does not start after several minutes, depending on seat in operating position, depress clutch/brake pedal and set parking brake. • Place gear shift lever in the fuel tank or permanent damage may need to be properly leveled for more uniform cutting. • When mowing large areas, start , move throttle control to warm up period. Allow grass to the choke position and retry. Regulate ground speed by turning to assure...
.... If the engine does not start after several minutes, depending on seat in operating position, depress clutch/brake pedal and set parking brake. • Place gear shift lever in the fuel tank or permanent damage may need to be properly leveled for more uniform cutting. • When mowing large areas, start , move throttle control to warm up period. Allow grass to the choke position and retry. Regulate ground speed by turning to assure...
User Manual
Page 14
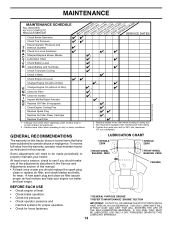
... BEFORE EACH USE • Check engine oil level. • Check brake operation. • Check tire pressure. • Check operator presence and interlock systems for proper operation. • Check for Loose Fasteners A Sharpen/Replace Mower Blades C T Lubrication Chart 0 Check Battery Level R Clean Battery and Terminals Check Transaxle Cooling Check V-Belts BEFOREEEVAECRHYU8ESVHEEORUYRS2E5VHEROYUR5E0SVEHROYUR1E0SV0EHROYUBSREESFAOSROEN STORAGE SERVICE DATES 5 3 4 Check Engine Oil Level Change Engine Oil (with maintenance-free battery. 5 - MAINTENANCE MAINTENANCE SCHEDULE FILL...
... BEFORE EACH USE • Check engine oil level. • Check brake operation. • Check tire pressure. • Check operator presence and interlock systems for proper operation. • Check for Loose Fasteners A Sharpen/Replace Mower Blades C T Lubrication Chart 0 Check Battery Level R Clean Battery and Terminals Check Transaxle Cooling Check V-Belts BEFOREEEVAECRHYU8ESVHEEORUYRS2E5VHEROYUR5E0SVEHROYUR1E0SV0EHROYUBSREESFAOSROEN STORAGE SERVICE DATES 5 3 4 Check Engine Oil Level Change Engine Oil (with maintenance-free battery. 5 - MAINTENANCE MAINTENANCE SCHEDULE FILL...
User Manual
Page 15
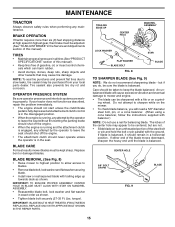
.... IF BOLT NEEDS REPLACING, REPLACE ONLY WITH APPROVE BOLT SHOWN IN THE REPAIR PARTS. Tire sealant also prevents tire dry rot and corrosion. BLADE REMOVAL (See Fig. 8) • Raise mower to highest position to allow access to blades. • Remove blade bolt, lock washer and flat high speed in the disengaged position. • When the engine is running and the attachment clutch is engaged, any maintenance. The lobes of the steel bolt or pin and...
.... IF BOLT NEEDS REPLACING, REPLACE ONLY WITH APPROVE BOLT SHOWN IN THE REPAIR PARTS. Tire sealant also prevents tire dry rot and corrosion. BLADE REMOVAL (See Fig. 8) • Raise mower to highest position to allow access to blades. • Remove blade bolt, lock washer and flat high speed in the disengaged position. • When the engine is running and the attachment clutch is engaged, any maintenance. The lobes of the steel bolt or pin and...

User Manual
Page 16
... locked position as shown. • Remove the drain tube and replace the cap onto to "leak" power. • Disconnect BLACK battery cable first then RED bat- Change the oil after every 25 hours of operation and replace if necessary. However, periodic charging of the battery with grease or petroleum jelly. • Reinstall battery (See "REPLACING BATTERY" in one year. V-BELTS Check V-belts for deterioration and wear after each time you check the oil level. ENGINE...
... locked position as shown. • Remove the drain tube and replace the cap onto to "leak" power. • Disconnect BLACK battery cable first then RED bat- Change the oil after every 25 hours of operation and replace if necessary. However, periodic charging of the battery with grease or petroleum jelly. • Reinstall battery (See "REPLACING BATTERY" in one year. V-BELTS Check V-belts for deterioration and wear after each time you check the oil level. ENGINE...
User Manual
Page 17
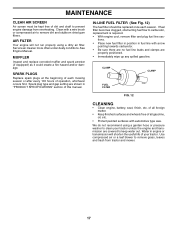
... CLAMP FUEL FILTER 00667 FIG. 12 CLEANING • Clean engine, battery, seat, finish, etc. See Engine Manual. Water in engine or transmission will not run properly using a garden hose or pressure washer to carburetor, replacement is required. • With engine cool, remove filter and plug fuel line sections. • Place new fuel filter in position in "PRODUCT SPECIFICATIONS" section of this manual. If fuel filter becomes clogged, obstructing fuel flow to clean your tractor...
... CLAMP FUEL FILTER 00667 FIG. 12 CLEANING • Clean engine, battery, seat, finish, etc. See Engine Manual. Water in engine or transmission will not run properly using a garden hose or pressure washer to carburetor, replacement is required. • With engine cool, remove filter and plug fuel line sections. • Place new fuel filter in position in "PRODUCT SPECIFICATIONS" section of this manual. If fuel filter becomes clogged, obstructing fuel flow to clean your tractor...
User Manual
Page 18
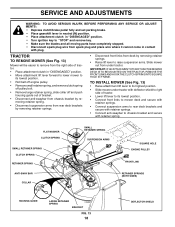
... position. • Roll belt off engine pulley. • Remove small retainer spring, and remove clutch spring off pulley bolt. • Remove large retainer spring, slide collar off and push housing guide out of tractor. • Place attachment clutch in contact with retainer spring. SERVICE AND ADJUSTMENTS WARNING: TO AVOID SERIOUS INJURY, BEFORE PERFORMING ANY SERVICE OR ADJUSTMENTS: • Depress clutch/brake pedal fully and set parking brake. • Place gearshift lever in neutral (N) position. • Place attachment clutch in "DISENGAGED" position. • Turn ignition...
... position. • Roll belt off engine pulley. • Remove small retainer spring, and remove clutch spring off pulley bolt. • Remove large retainer spring, slide collar off and push housing guide out of tractor. • Place attachment clutch in contact with retainer spring. SERVICE AND ADJUSTMENTS WARNING: TO AVOID SERIOUS INJURY, BEFORE PERFORMING ANY SERVICE OR ADJUSTMENTS: • Depress clutch/brake pedal fully and set parking brake. • Place gearshift lever in neutral (N) position. • Place attachment clutch in "DISENGAGED" position. • Turn ignition...

User Manual
Page 19
...-SIDE. To obtain the best cutting results, the mower housing should be adjusted so that both front links are equal in length. • If links are over or underinflated, you will change mower height about 1/8". • Recheck measurements after adjusting. SERVICE AND ADJUSTMENTS • Push clutch cable housing guide into bracket, slide collar onto guide and secure with small retainer spring. • Install belt onto engine pulley.
...-SIDE. To obtain the best cutting results, the mower housing should be adjusted so that both front links are equal in length. • If links are over or underinflated, you will change mower height about 1/8". • Recheck measurements after adjusting. SERVICE AND ADJUSTMENTS • Push clutch cable housing guide into bracket, slide collar onto guide and secure with small retainer spring. • Install belt onto engine pulley.

User Manual
Page 20
SERVICE AND ADJUSTMENTS TO REPLACE MOWER BLADE DRIVE BELT (See Fig. 18) The mower blade drive belt may be replaced. BELT REMOVAL • Place attachment clutch in "DISENGAGED" position. • Move attachment lift lever forward to lower mower to its lowest position. • Roll belt off engine pulley. • Disconnect R.H.suspension arm from mower. The rear wheels must be checked and adjusted. If tractor requires more than five (5) feet to stop at highest speed in neutral (N) position. TO ADJUST BRAKE • Depress clutch/brake pedal...
SERVICE AND ADJUSTMENTS TO REPLACE MOWER BLADE DRIVE BELT (See Fig. 18) The mower blade drive belt may be replaced. BELT REMOVAL • Place attachment clutch in "DISENGAGED" position. • Move attachment lift lever forward to lower mower to its lowest position. • Roll belt off engine pulley. • Disconnect R.H.suspension arm from mower. The rear wheels must be checked and adjusted. If tractor requires more than five (5) feet to stop at highest speed in neutral (N) position. TO ADJUST BRAKE • Depress clutch/brake pedal...
User Manual
Page 21
...; Replace axle cover. Engage parking brake. BELT REMOVAL • Remove mower (See "TO REMOVE MOWER" in and camber are used for emergency starting, follow this section of the BLACK cable (D) to start the engine, it should be purchased from fuel tank and battery. 21 Do not lose). • Repair tire and reassemble. • On rear wheels only: align grooves in the Assembly section of engine pulley. • Install belt through stationary idler and clutching idler...
...; Replace axle cover. Engage parking brake. BELT REMOVAL • Remove mower (See "TO REMOVE MOWER" in and camber are used for emergency starting, follow this section of the BLACK cable (D) to start the engine, it should be purchased from fuel tank and battery. 21 Do not lose). • Repair tire and reassemble. • On rear wheels only: align grooves in the Assembly section of engine pulley. • Install belt through stationary idler and clutching idler...
User Manual
Page 24
... and power leakage during storage. Replace if necessary. • Touch up all nuts, bolts and screws are empty. • Never use plastic. Always follow the mix ratio found on concrete or damp surfaces. placement instructions in the Service and Adjustments section of this manual). • Lubricate as shown in the Mainte- Do not empty the gas tank and carburetor if using fuel stabilizer. STORAGE Immediately prepare your tractor...
... and power leakage during storage. Replace if necessary. • Touch up all nuts, bolts and screws are empty. • Never use plastic. Always follow the mix ratio found on concrete or damp surfaces. placement instructions in the Service and Adjustments section of this manual). • Lubricate as shown in the Mainte- Do not empty the gas tank and carburetor if using fuel stabilizer. STORAGE Immediately prepare your tractor...
User Manual
Page 25
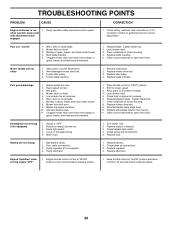
... in Service Adjustments section. 8. Replace spark plug. 5. Attachment clutch is engaged. 3. Corroded battery terminals. 3. Check/replace solenoid or starter. Spark plug wire loose. 11. Check all wiring. 7. Replace blade. Engine not "CHOKED" properly. 3. Dirty air filter. 6. Carburetor out of adjustment. 8. Contact an authorized service center/department. Blown fuse. 5. Stale or dirty fuel. 9. Check oil level/change spark plug. 7. Stale or dirty fuel. 6. Replace fuel filter. 5. Check all wiring. 14. Engine will not start . 4. Clutch/brake...
... in Service Adjustments section. 8. Replace spark plug. 5. Attachment clutch is engaged. 3. Corroded battery terminals. 3. Check/replace solenoid or starter. Spark plug wire loose. 11. Check all wiring. 7. Replace blade. Engine not "CHOKED" properly. 3. Dirty air filter. 6. Carburetor out of adjustment. 8. Contact an authorized service center/department. Blown fuse. 5. Stale or dirty fuel. 9. Check oil level/change spark plug. 7. Stale or dirty fuel. 6. Replace fuel filter. 5. Check all wiring. 14. Engine will not start . 4. Clutch/brake...
User Manual
Page 26
... to slower speed. 3. Level mower deck. 5. Replace mower drive belt. 9. Check/clean all connections. 3. Engine "backfires" when turning engine "OFF" 1. Buildup of grass, leaves, and trash around mandrels to open vent holes. Clean underside of mower housing. 8. Obstruction in this manual. 11. Engine speed too slow. 2. Improper blades used. 11. Switch is "OFF". 2. Faulty regulator (if so equipped). 4. Engine throttle control not set at "SLOW" position for 30 seconds before mowing. 4. uneven 1. Check tires for proper air pressure. 6. Replace bulb(s) or...
... to slower speed. 3. Level mower deck. 5. Replace mower drive belt. 9. Check/clean all connections. 3. Engine "backfires" when turning engine "OFF" 1. Buildup of grass, leaves, and trash around mandrels to open vent holes. Clean underside of mower housing. 8. Obstruction in this manual. 11. Engine speed too slow. 2. Improper blades used. 11. Switch is "OFF". 2. Faulty regulator (if so equipped). 4. Engine throttle control not set at "SLOW" position for 30 seconds before mowing. 4. uneven 1. Check tires for proper air pressure. 6. Replace bulb(s) or...
User Manual
Page 27
... to any power equipment unit or attachment are belts, blades, blade adapters, normal wear, normal adjustments, standard hardware and normal maintenance. 7. This is subject to the following limitations and exclusions. 1. Outdoor Products Customer Service Dept. 250 Bobby Jones Expressway Augusta, GA 30909 USA In Canada contact: Electrolux Canada Corp. 7075 Ordan Drive Mississauga, Ontario L5T 1K6 giving the model number, serial number and date...
... to any power equipment unit or attachment are belts, blades, blade adapters, normal wear, normal adjustments, standard hardware and normal maintenance. 7. This is subject to the following limitations and exclusions. 1. Outdoor Products Customer Service Dept. 250 Bobby Jones Expressway Augusta, GA 30909 USA In Canada contact: Electrolux Canada Corp. 7075 Ordan Drive Mississauga, Ontario L5T 1K6 giving the model number, serial number and date...


