
User Manual
Page 2
... slope. Keep clear of a load, while on a slope. Always turn off engine and wait for all times. • Only allow the mower deck to lose control of bystanders before and while backing. • Never direct discharged material toward the operator. Do not allow responsible adults, who ... chute, or other hidden objects. Use common sense when towing. I. Always look down slopes, not across. • Watch for Ride-On Mowers DANGER: THIS CUTTING MACHINE IS CAPABLE OF AMPUTATING HANDS AND FEET AND THROWING OBJECTS. Do not shift to neutral and coast downhill. • Avoid...
... slope. Keep clear of a load, while on a slope. Always turn off engine and wait for all times. • Only allow the mower deck to lose control of bystanders before and while backing. • Never direct discharged material toward the operator. Do not allow responsible adults, who ... chute, or other hidden objects. Use common sense when towing. I. Always look down slopes, not across. • Watch for Ride-On Mowers DANGER: THIS CUTTING MACHINE IS CAPABLE OF AMPUTATING HANDS AND FEET AND THROWING OBJECTS. Do not shift to neutral and coast downhill. • Avoid...
User Manual
Page 3
...or backed over by the machine. • Keep children out of the mowing area and in contact with manufacturer's recommended parts, when necessary. • Mower blades are sharp. V. Wrap the blade or wear gloves, and use extra caution when servicing them . • Keep children out of the mowing ...injured or interfere with plastic liner. Children who have been given rides in the past may suddenly appear in the mowing area for Ride-On Mowers III. Always place containers on a truck or trailer bed with safe machine operation. Replace gas cap and tighten securely. Clean oil or ...
...or backed over by the machine. • Keep children out of the mowing area and in contact with manufacturer's recommended parts, when necessary. • Mower blades are sharp. V. Wrap the blade or wear gloves, and use extra caution when servicing them . • Keep children out of the mowing ...injured or interfere with plastic liner. Children who have been given rides in the past may suddenly appear in the mowing area for Ride-On Mowers III. Always place containers on a truck or trailer bed with safe machine operation. Replace gas cap and tighten securely. Clean oil or ...
User Manual
Page 7
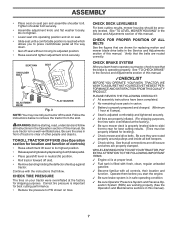
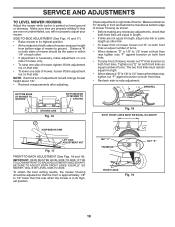
... neutral (N) position. • Roll tractor forward off the skid. WARNING: Before starting, read, understand and follow . See "TO LEVEL MOWER HOUSING" in the Operation section of this manual. Verify that the brake is adjusted comfortably and tightened securely. ✓ All tires are routed...your tractor off skid. • Remove banding holding the deflector shield up against tractor. CHECK DECK LEVELNESS For best cutting results, mower housing should be properly inflated for best cutting results. (Tires must be properly leveled. PLEASE REVIEW THE FOLLOWING CHECKLIST: ✓ All...
... neutral (N) position. • Roll tractor forward off the skid. WARNING: Before starting, read, understand and follow . See "TO LEVEL MOWER HOUSING" in the Operation section of this manual. Verify that the brake is adjusted comfortably and tightened securely. ✓ All tires are routed...your tractor off skid. • Remove banding holding the deflector shield up against tractor. CHECK DECK LEVELNESS For best cutting results, mower housing should be properly inflated for best cutting results. (Tires must be properly leveled. PLEASE REVIEW THE FOLLOWING CHECKLIST: ✓ All...
User Manual
Page 8
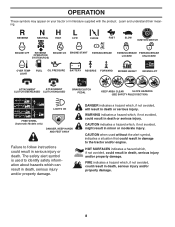
... OPERATION SYSTEM (ROS) ENGINE ON ENGINE START PARKING BRAKE PARKING BRAKE PARKING BRAKE LOCKED UNLOCKED OVER TEMP LIGHT FUEL OIL PRESSURE BATTERY REVERSE FORWARD MOWER HEIGHT 15 MOWER LIFT 15 ATTACHMENT ATTACHMENT CLUTCH DISENGAGED CLUTCH ENGAGED BRAKE/CLUTCH PEDAL KEEP AREA CLEAR SLOPE HAZARDS (SEE SAFETY RULES SECTION) LIGHTS ON FREE WHEEL...
... OPERATION SYSTEM (ROS) ENGINE ON ENGINE START PARKING BRAKE PARKING BRAKE PARKING BRAKE LOCKED UNLOCKED OVER TEMP LIGHT FUEL OIL PRESSURE BATTERY REVERSE FORWARD MOWER HEIGHT 15 MOWER LIFT 15 ATTACHMENT ATTACHMENT CLUTCH DISENGAGED CLUTCH ENGAGED BRAKE/CLUTCH PEDAL KEEP AREA CLEAR SLOPE HAZARDS (SEE SAFETY RULES SECTION) LIGHTS ON FREE WHEEL...
User Manual
Page 9
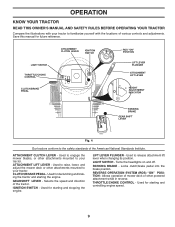
Used to engage the mower blades, or other attachments mounted to familiarize yourself with your tractor. Selects the speed and direction of mower deck or other powered attachment while in reverse. IGNITION SWITCH - LIGHT SWITCH - Turns the headlights on and off. Used for ...starting and controlling engine speed. 9 Used to raise, lower, and adjust the mower deck or other attachments mounted to your tractor to your tractor. PARKING BRAKE - Locks clutch/brake pedal into the brake position. ATTACHMENT LIFT LEVER ...
Used to engage the mower blades, or other attachments mounted to familiarize yourself with your tractor. Selects the speed and direction of mower deck or other powered attachment while in reverse. IGNITION SWITCH - LIGHT SWITCH - Turns the headlights on and off. Used for ...starting and controlling engine speed. 9 Used to raise, lower, and adjust the mower deck or other attachments mounted to your tractor to your tractor. PARKING BRAKE - Locks clutch/brake pedal into the brake position. ATTACHMENT LIFT LEVER ...
User Manual
Page 10
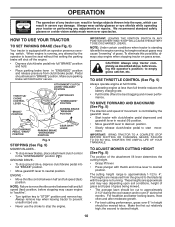
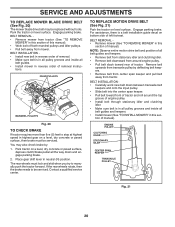
... completely, as described above, before stopping may cause engine to "backfire". • Turn ignition key to desired position. ment. TO ADJUST MOWER CUTTING HEIGHT (See Fig. 5) The position of the attachment lift lever determines the cutting height. • Grasp lift lever. •... PARKING BRAKE "ENGAGED" POSITION CLUTCH/BRAKE PEDAL "DRIVE" POSITION PARKING BRAKE "DISENGAGED" POSITION GEAR SHIFT LEVER Fig. 5 STOPPING (See Fig. 5) MOWER BLADES - • To stop the engine. mance. To eliminate this possibility, always stop ground drive, depress clutch/brake pedal into the eyes, ...
... completely, as described above, before stopping may cause engine to "backfire". • Turn ignition key to desired position. ment. TO ADJUST MOWER CUTTING HEIGHT (See Fig. 5) The position of the attachment lift lever determines the cutting height. • Grasp lift lever. •... PARKING BRAKE "ENGAGED" POSITION CLUTCH/BRAKE PEDAL "DRIVE" POSITION PARKING BRAKE "DISENGAGED" POSITION GEAR SHIFT LEVER Fig. 5 STOPPING (See Fig. 5) MOWER BLADES - • To stop the engine. mance. To eliminate this possibility, always stop ground drive, depress clutch/brake pedal into the eyes, ...
User Manual
Page 11
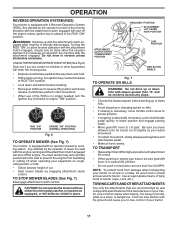
...room for tractor to tractor (rope, cord, etc.). ROS "ON" POSITION 02828 ENGINE "ON" POSITION (NORMAL OPERATING) Fig. 6 TO OPERATE MOWER (See Fig. 7) Your tractor is equipped with a Reverse Operation System (ROS). TO TRANSPORT • Raise attachment lift to reposition the machine... drive across any slope. • Choose the slowest speed before starting up with specifications of the manufacturer of your tractor. TO STOP MOWER BLADES (See Fig. 7) Disengage attachment clutch control. Tires can lose traction with the engine running , turn ignition key counterclockwise to ROS...
...room for tractor to tractor (rope, cord, etc.). ROS "ON" POSITION 02828 ENGINE "ON" POSITION (NORMAL OPERATING) Fig. 6 TO OPERATE MOWER (See Fig. 7) Your tractor is equipped with a Reverse Operation System (ROS). TO TRANSPORT • Raise attachment lift to reposition the machine... drive across any slope. • Choose the slowest speed before starting up with specifications of the manufacturer of your tractor. TO STOP MOWER BLADES (See Fig. 7) Disengage attachment clutch control. Tires can lose traction with the engine running , turn ignition key counterclockwise to ROS...
User Manual
Page 13
...properly leveled for trimming. • Drive so that clippings are discharged onto the area that clippings will suit the terrain and give the mower cutting performance as well as the quality of cut . Wet grass will result in the opposite direction making left hand side of the...desired. • When operating attachments, select a ground speed that will discharge away from dried clippings. Have the cut relatively high; See "TO LEVEL MOWER HOUSING" in the Service and Adjustments section of this manual. • The left hand turns until finished (See Fig. 8). Allow grass to dry before...
...properly leveled for trimming. • Drive so that clippings are discharged onto the area that clippings will suit the terrain and give the mower cutting performance as well as the quality of cut . Wet grass will result in the opposite direction making left hand side of the...desired. • When operating attachments, select a ground speed that will discharge away from dried clippings. Have the cut relatively high; See "TO LEVEL MOWER HOUSING" in the Service and Adjustments section of this manual. • The left hand turns until finished (See Fig. 8). Allow grass to dry before...
User Manual
Page 14
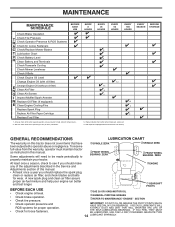
... pressure. • Check operator presence and ROS systems for proper operation. • Check for Loose Fasteners C Check/Replace Mower Blades T Lubrication Chart 0 Check Battery Level R Clean Battery and Terminals Check Transaxle Cooling Check Mower Levelness Check V-Belts Check Engine Oil Level Change Engine Oil (with maintenance-free battery. LUBRICATION CHART dSPINDLE ZERK...
... pressure. • Check operator presence and ROS systems for proper operation. • Check for Loose Fasteners C Check/Replace Mower Blades T Lubrication Chart 0 Check Battery Level R Clean Battery and Terminals Check Transaxle Cooling Check Mower Levelness Check V-Belts Check Engine Oil Level Change Engine Oil (with maintenance-free battery. LUBRICATION CHART dSPINDLE ZERK...
User Manual
Page 15
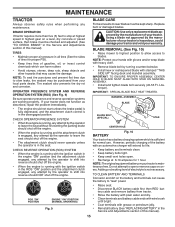
... that may be checked and adjusted. (See "TO CHECK BRAKE" in the disengaged position. BLADE REMOVAL (See Fig. 10) • Raise mower to highest position to allow access to slow leaks, tire sealant may cause tire damage. CHECK REVERSE OPERATION (ROS) SYSTEM • When the ... battery (See "REPLACING BATTERY" in the engine "ON" position and the attachment clutch engaged, any maintenance. Lbs. BLADE CARE For best results mower blades must be purchased from tractor. • Rinse the battery with plain water and dry. • Clean terminals and battery cable ends with wire...
... that may be checked and adjusted. (See "TO CHECK BRAKE" in the disengaged position. BLADE REMOVAL (See Fig. 10) • Raise mower to highest position to allow access to slow leaks, tire sealant may cause tire damage. CHECK REVERSE OPERATION (ROS) SYSTEM • When the ... battery (See "REPLACING BATTERY" in the engine "ON" position and the attachment clutch engaged, any maintenance. Lbs. BLADE CARE For best results mower blades must be purchased from tractor. • Rinse the battery with plain water and dry. • Clean terminals and battery cable ends with wire...
User Manual
Page 17
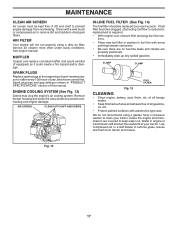
... "PRODUCT SPECIFICATIONS" section of all gasoline, oil, etc. • Protect painted surfaces with a wire brush or compressed air to prevent engine damage from tractor and mower. 02744 Fig. 13 17 Clean with automotive type wax. If fuel filter becomes clogged, obstructing fuel flow to keep water out. ENGINE COOLING SYSTEM (See...
... "PRODUCT SPECIFICATIONS" section of all gasoline, oil, etc. • Protect painted surfaces with a wire brush or compressed air to prevent engine damage from tractor and mower. 02744 Fig. 13 17 Clean with automotive type wax. If fuel filter becomes clogged, obstructing fuel flow to keep water out. ENGINE COOLING SYSTEM (See...
User Manual
Page 18
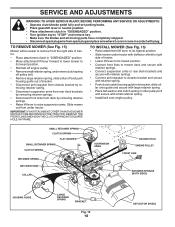
...retainer springs. • Disconnect front links from deck by removing retainer springs. • Raise lift lever to raise suspension arms. Slide mower out from spark plug and place wire where it cannot come in "DISENGAGED" position. • Move attachment lift lever forward to lower... mower to its lowest position. • Connect front links to mower deck and secure with retainer springs.. • Connect suspension arms to rear deck brackets and secure with retainer springs....
...retainer springs. • Disconnect front links from deck by removing retainer springs. • Raise lift lever to raise suspension arms. Slide mower out from spark plug and place wire where it cannot come in "DISENGAGED" position. • Move attachment lift lever forward to lower... mower to its lowest position. • Connect front links to mower deck and secure with retainer springs.. • Connect suspension arms to rear deck brackets and secure with retainer springs....
User Manual
Page 19
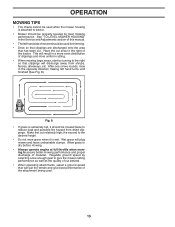
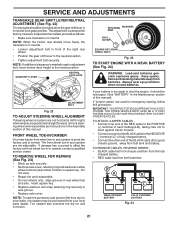
... an equal number of both front links. • Recheck side-to-side adjustment. SIDE-TO-SIDE ADJUSTMENT (See Figs. 16 and 17) • Raise mower to its highest position. MANDREL "D" "D" Fig. 18 BOTH FRONT LINKS MUST BE EQUAL IN LENGTH SUSPENSION ARM LIFT LINK ADJUSTMENT NUT Fig. 17 FRONT-TO...-TO-SIDE. The two front links must remain equal in length. • When distance "D" is in front and behind the mandrel at bottom edge of mower housing as shown. • Before making any necessary adjustments, check that side. • To lower one link to same length as other . • If...
... an equal number of both front links. • Recheck side-to-side adjustment. SIDE-TO-SIDE ADJUSTMENT (See Figs. 16 and 17) • Raise mower to its highest position. MANDREL "D" "D" Fig. 18 BOTH FRONT LINKS MUST BE EQUAL IN LENGTH SUSPENSION ARM LIFT LINK ADJUSTMENT NUT Fig. 17 FRONT-TO...-TO-SIDE. The two front links must remain equal in length. • When distance "D" is in front and behind the mandrel at bottom edge of mower housing as shown. • Before making any necessary adjustments, check that side. • To lower one link to same length as other . • If...
User Manual
Page 20
... around engine pulley. • Pull belt slack toward rear of removal instruc- Contact a qualified service center. BELT REMOVAL • Remove mower (See "TO REMOVE MOWER" in this section of this section of removal. • Make sure belt is a belt installation guide decal on a level, dry ... needs to manually push the tractor forward. For assistance, there is in all pulley grooves and inside all belt guides. • Install mower in neutral (N) position. You may be serviced. BELT INSTALLATION • Install new belt in reverse order of manual). Park tractor on bottom...
... around engine pulley. • Pull belt slack toward rear of removal instruc- Contact a qualified service center. BELT REMOVAL • Remove mower (See "TO REMOVE MOWER" in this section of this section of removal. • Make sure belt is a belt installation guide decal on a level, dry ... needs to manually push the tractor forward. For assistance, there is in all pulley grooves and inside all belt guides. • Install mower in neutral (N) position. You may be serviced. BELT INSTALLATION • Install new belt in reverse order of manual). Park tractor on bottom...
User Manual
Page 21
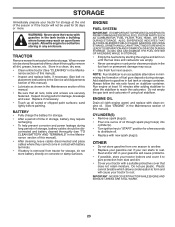
... additional clearance is in neutral (lock gate) position. WEAK OR DEAD BATTERY FULLY CHARGED BATTERY Fig. 24 21 NOTE: When the tractor rear wheels move mower deck height to slow leaks, tire sealant may be recharged. (See "BATTERY" in the Maintenance section of the right rear wheel. • Position the gear...
... additional clearance is in neutral (lock gate) position. WEAK OR DEAD BATTERY FULLY CHARGED BATTERY Fig. 24 21 NOTE: When the tractor rear wheels move mower deck height to slow leaks, tire sealant may be recharged. (See "BATTERY" in the Maintenance section of the right rear wheel. • Position the gear...
User Manual
Page 23
...WARNING: Never store the tractor with a suitable protective cover that all nuts, bolts and screws are empty. • Never use plastic. When mower is removed from tractor for winter storage. sand lightly before storing in the tank inside a building where fumes may occur. • Use fresh...; OTHER • Do not store gasoline from dust and dirt. • Cover your tractor with gasoline in any enclosure. TRACTOR Remove mower from tractor for storage, do not store battery directly on stabilizer container. NOTE: Fuel stabilizer is an acceptable alternative in contact with new...
...WARNING: Never store the tractor with a suitable protective cover that all nuts, bolts and screws are empty. • Never use plastic. When mower is removed from tractor for winter storage. sand lightly before storing in the tank inside a building where fumes may occur. • Use fresh...; OTHER • Do not store gasoline from dust and dirt. • Cover your tractor with gasoline in any enclosure. TRACTOR Remove mower from tractor for storage, do not store battery directly on stabilizer container. NOTE: Fuel stabilizer is an acceptable alternative in contact with new...

User Manual
Page 24
Engine flooded. 4. Hard to start Loss of mower housing. 4. Stale or dirty fuel. 6. Clutch/brake pedal not depressed. 2. Attachment clutch is engaged. 3. Corroded battery terminals. 6. Faulty operator presence switch(es). ... fuel tank and refill tank with fresh gasoline and replace fuel filter. 10. Check all wiring. 7. Engine valves out of grass, leaves and trash under mower. 4. Faulty ignition switch. 8. Recharge or replace battery. 4. Stale or dirty fuel. 9. Disengage attachment clutch. 3. Replace fuse. 5. Clean battery terminals. 3. Out of ...
Engine flooded. 4. Hard to start Loss of mower housing. 4. Stale or dirty fuel. 6. Clutch/brake pedal not depressed. 2. Attachment clutch is engaged. 3. Corroded battery terminals. 6. Faulty operator presence switch(es). ... fuel tank and refill tank with fresh gasoline and replace fuel filter. 10. Check all wiring. 7. Engine valves out of grass, leaves and trash under mower. 4. Faulty ignition switch. 8. Recharge or replace battery. 4. Stale or dirty fuel. 9. Disengage attachment clutch. 3. Replace fuse. 5. Clean battery terminals. 3. Out of ...
User Manual
Page 25
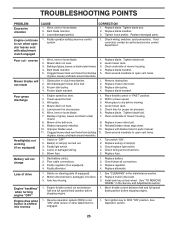
...(s) or lamp(s). 3. Check wiring and connections. 5. Poor cable connections. 3. Reverse operation system (ROS) is not "ON" while mower or other attachment is "OFF". 2. Replace motion drive belt. 3. Install axle key at rear wheel. TROUBLESHOOTING POINTS PROBLEM Excessive vibration CAUSE... 1. Faulty operator-safety presence control system. 1. Obstruction in "FAST" position. 2. Clean underside of mower housing. 8. Place throttle control in clutch mechanism. 2. Travel speed too fast. 2. Allow grass to run when operator leaves seat...
...(s) or lamp(s). 3. Check wiring and connections. 5. Poor cable connections. 3. Reverse operation system (ROS) is not "ON" while mower or other attachment is "OFF". 2. Replace motion drive belt. 3. Install axle key at rear wheel. TROUBLESHOOTING POINTS PROBLEM Excessive vibration CAUSE... 1. Faulty operator-safety presence control system. 1. Obstruction in "FAST" position. 2. Clean underside of mower housing. 8. Place throttle control in clutch mechanism. 2. Travel speed too fast. 2. Allow grass to run when operator leaves seat...

Parts Manual
Page 2
... tractor can be found on his/her tractor when ordering repair parts. "PO14542LT (96012011900)" • Part Number • Part Description TABLE OF CONTENTS SCHEMATIC ...3 ELECTRICAL ...4-5 CHASSIS ...6-7 DRIVE...8-9 ENGINE ...10-11 STEERING ...12-13 SEAT ...14 DECALS...15 MOWER DECK ...16-17 MOWER LIFT...18 WARRANTY...20 2 Each tractor has its own model number...
... tractor can be found on his/her tractor when ordering repair parts. "PO14542LT (96012011900)" • Part Number • Part Description TABLE OF CONTENTS SCHEMATIC ...3 ELECTRICAL ...4-5 CHASSIS ...6-7 DRIVE...8-9 ENGINE ...10-11 STEERING ...12-13 SEAT ...14 DECALS...15 MOWER DECK ...16-17 MOWER LIFT...18 WARRANTY...20 2 Each tractor has its own model number...

Parts Manual
Page 7
NO. inches 1 inch = 25.4 mm. 7 Pivot Mower 39 532 18 75-68 Bracket Pivot 64 532 15 47-98 Dash Lower 142 532 17 57-02 Plate Reinforcement 145 532 40 91-...-06 Bolt Rdhd Sht Sqnk 3/8-16 x 3/4 37 817 49 05-08 Screw Thdrol 5/16-18 x 1/2 TYT 38 532 17 57-10 Bracket Asm. MODEL NUMBER PO14542LT (96012011900), PRODUCT NO. 960 12 01-19 CHASSIS KEY PART NO.
NO. inches 1 inch = 25.4 mm. 7 Pivot Mower 39 532 18 75-68 Bracket Pivot 64 532 15 47-98 Dash Lower 142 532 17 57-02 Plate Reinforcement 145 532 40 91-...-06 Bolt Rdhd Sht Sqnk 3/8-16 x 3/4 37 817 49 05-08 Screw Thdrol 5/16-18 x 1/2 TYT 38 532 17 57-10 Bracket Asm. MODEL NUMBER PO14542LT (96012011900), PRODUCT NO. 960 12 01-19 CHASSIS KEY PART NO.


