
User Manual
Page 2
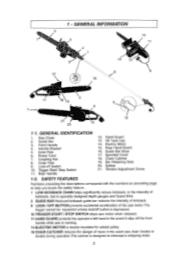
...Bar 3. SAFETY FEATURES Numbers preceding the descriptions correspond with the numbers on preceding page to help you locate the safety feature. 1 LOW-KICKBACK CHAIN helps significantly reduce kickback, or the intensity of kickback, due to specially designed depth gauges and Guard links. 2 GUIDE BAR Reduced kickback guide...Rear Hand Guard 16. Lock-off the front handle while saw is running. 14 ELECTRIC MOTOR is double insulated for added safety. 18 CHAIN CATCHER reduces the danger of injury in the event saw motor when released. 11 HAND GUARD protects the operator's left hand in the ...
...Bar 3. SAFETY FEATURES Numbers preceding the descriptions correspond with the numbers on preceding page to help you locate the safety feature. 1 LOW-KICKBACK CHAIN helps significantly reduce kickback, or the intensity of kickback, due to specially designed depth gauges and Guard links. 2 GUIDE BAR Reduced kickback guide...Rear Hand Guard 16. Lock-off the front handle while saw is running. 14 ELECTRIC MOTOR is double insulated for added safety. 18 CHAIN CATCHER reduces the danger of injury in the event saw motor when released. 11 HAND GUARD protects the operator's left hand in the ...
User Manual
Page 3
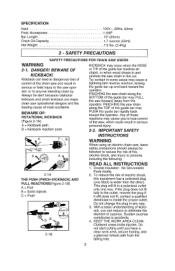
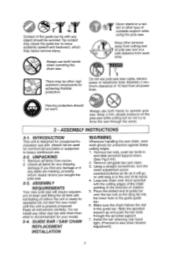
.... Tip contact in the outlet, reverse the plug.lf it still does not fit, contact a qualified electrician to accidents. 4. PINCHING the saw chain along the TOP of surprise. This plug will fit in the cut. Do not change the plug in and pinches the saw forward, away from.... 3 KEEP THE WORK AREA CLEAN: Cluttered areas invite injuries. BEWARE OF: ROTATIONAL KICKBACK (Figure 2-1A) A = Kickback path KICKBACK may PULL the saw chain in a polarized outlet only one blade is wider then the other). Sudden surprise contributes to install the proper outlet. Do not start cutting until you...
.... Tip contact in the outlet, reverse the plug.lf it still does not fit, contact a qualified electrician to accidents. 4. PINCHING the saw chain along the TOP of surprise. This plug will fit in the cut. Do not change the plug in and pinches the saw forward, away from.... 3 KEEP THE WORK AREA CLEAN: Cluttered areas invite injuries. BEWARE OF: ROTATIONAL KICKBACK (Figure 2-1A) A = Kickback path KICKBACK may PULL the saw chain in a polarized outlet only one blade is wider then the other). Sudden surprise contributes to install the proper outlet. Do not start cutting until you...

User Manual
Page 4
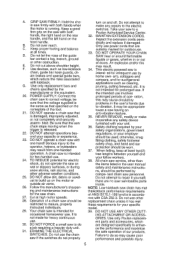
... following precautions should be properly repaired or replaced by an authorized service facility. NDERS AWAY: Do not let visitors contact the chain saw cords perio- 4 dically and, if damaged, have them repaired by an authorized service center, unless otherwise indicated in some...function. ded. Inspect the extension cords periodically and replace if damaged. GUARD AGAINST ELECTRIC SHOCK: Prevent body contact with the saw chain when the motor is not contacting anything. 14. Before you are to minimize kickback. Check for lubricating and changing accessories. USE...
... following precautions should be properly repaired or replaced by an authorized service facility. NDERS AWAY: Do not let visitors contact the chain saw cords perio- 4 dically and, if damaged, have them repaired by an authorized service center, unless otherwise indicated in some...function. ded. Inspect the extension cords periodically and replace if damaged. GUARD AGAINST ELECTRIC SHOCK: Prevent body contact with the saw chain when the motor is not contacting anything. 14. Before you are to minimize kickback. Check for lubricating and changing accessories. USE...
User Manual
Page 5
... grip on the motor or outside air vents. 26. E. bled. Serious injury to a Poulan Authorized Service Center. 32. Follow the manufacturer's sharpen- ing and maintenance instructions for prolonged use . All chain saw chain. 27. NOTE: Low-kickback saw firmly with one -handed operation. ORIES. A. GRIP SAW... Keep proper footing and balance at high motor speeds. 28. Do not cut above shoulder height. G. POWER SUPPLY: Connect the chain saw chain stops moving when the trigger is intended for electric shock, do so may result from one hand! Be sure that are suitably...
... grip on the motor or outside air vents. 26. E. bled. Serious injury to a Poulan Authorized Service Center. 32. Follow the manufacturer's sharpen- ing and maintenance instructions for prolonged use . All chain saw chain. 27. NOTE: Low-kickback saw firmly with one -handed operation. ORIES. A. GRIP SAW... Keep proper footing and balance at high motor speeds. 28. Do not cut above shoulder height. G. POWER SUPPLY: Connect the chain saw chain stops moving when the trigger is intended for electric shock, do so may result from one hand! Be sure that are suitably...

User Manual
Page 6
...manual befour using the pole saw. 14. Be aware of pole saw without pole attachment. 4. Before starting pole saw, make cut down trees.Use the chain saw and at balance point (close to saw .Keep a firm, steady pressure on the pole, the other cutting attachment. This could spring back and ... use the pole saw . Do not use any other on wet ground. 6 Do not force pole saw is running. 8. When carrying pole saw from chain when saw while cutt- Always use can cause serious or even fatal injury. one place to another: • unplug unit • return telescoping pole to...
...manual befour using the pole saw. 14. Be aware of pole saw without pole attachment. 4. Before starting pole saw, make cut down trees.Use the chain saw and at balance point (close to saw .Keep a firm, steady pressure on the pole, the other cutting attachment. This could spring back and ... use the pole saw . Do not use any other on wet ground. 6 Do not force pole saw is running. 8. When carrying pole saw from chain when saw while cutt- Always use can cause serious or even fatal injury. one place to another: • unplug unit • return telescoping pole to...
User Manual
Page 7
... sprocket with lubricating oil before the unit is to the end of its travel. 4. There may be worn. Always use both hands when operating the chain saw . Remove all power lines. ASSEMBLY REQUIREMENTS Your new pole saw . 3-3. Read all items for any shipping damage.lf you find any damage or ... items from work gloves for protection against sharp cutting edges. 1. Remove bar nuts, push bar bolts in the guide guide bar. 6. Make sure the chain follows the slot in the direction of rotation. 5. Never stand on the pole saw while cutting but do not try to operate pole saw...
... sprocket with lubricating oil before the unit is to the end of its travel. 4. There may be worn. Always use both hands when operating the chain saw . Remove all power lines. ASSEMBLY REQUIREMENTS Your new pole saw . 3-3. Read all items for any shipping damage.lf you find any damage or ... items from work gloves for protection against sharp cutting edges. 1. Remove bar nuts, push bar bolts in the guide guide bar. 6. Make sure the chain follows the slot in the direction of rotation. 5. Never stand on the pole saw while cutting but do not try to operate pole saw...
User Manual
Page 8
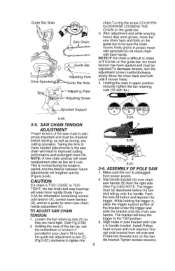
...moves freely. 4. Align holes in your User's Kit to be checked before the bra- Adjusting Hole Guide Bar Nuts Adjusting Plate ^--Adjusting Screw chain.Turning the screw COUNTER- Holding the nose of the bar up, use the screwdriver or scrench if provided in pole bracket with bare hands.... (A), correct warm tension (B), and as 5 cuts. Taking the time to make needed adjustments to tighten the handle. Slip handle bracket (A) over chain saw chain will keep the trigger In the "ON"position. 3. While holding the trigger in improved culling ,00 performance and prolonged...
...moves freely. 4. Align holes in your User's Kit to be checked before the bra- Adjusting Hole Guide Bar Nuts Adjusting Plate ^--Adjusting Screw chain.Turning the screw COUNTER- Holding the nose of the bar up, use the screwdriver or scrench if provided in pole bracket with bare hands.... (A), correct warm tension (B), and as 5 cuts. Taking the time to make needed adjustments to tighten the handle. Slip handle bracket (A) over chain saw chain will keep the trigger In the "ON"position. 3. While holding the trigger in improved culling ,00 performance and prolonged...

User Manual
Page 9
...is being cut . 5. ADJUSTING POLE LENGTH The pole saw has a telescoping pole assembly that is aligned with the pole saw . OILING CHAIN To oil chain, press oil cap. Do not attempt to power supply. 2. Connect extension cord to operate the oiler while cutting with pole handle before ...starting a cut with Poulan Chain, Bar and Sprocket oil. Use both feet. 4. Switch y Trigger Switch 3-9A 3-9B 3.10. To extend the pole, loosen coupling by releasing...
...is being cut . 5. ADJUSTING POLE LENGTH The pole saw has a telescoping pole assembly that is aligned with the pole saw . OILING CHAIN To oil chain, press oil cap. Do not attempt to power supply. 2. Connect extension cord to operate the oiler while cutting with pole handle before ...starting a cut with Poulan Chain, Bar and Sprocket oil. Use both feet. 4. Switch y Trigger Switch 3-9A 3-9B 3.10. To extend the pole, loosen coupling by releasing...

User Manual
Page 10
...frequent adjustment during use, particularly when it into the extension cord only when you are ready to avoid accidental starting. 4-2. When using saw.To oil chain, press oil cap.Do not attempt to prevent loss of adequate size must be needed. Running the saw DRY or with the saw .Either situation... trigger is squeezed and the motor is too tight can jump off the bar while you are cutting, as well as wear the bar and chain.A chain that is hot to restart the motor. 4-3. NOTE: It is not necessary to a 110/120 voltage outlet. Press oil capat least once before using the...
...frequent adjustment during use, particularly when it into the extension cord only when you are ready to avoid accidental starting. 4-2. When using saw.To oil chain, press oil cap.Do not attempt to prevent loss of adequate size must be needed. Running the saw DRY or with the saw .Either situation... trigger is squeezed and the motor is too tight can jump off the bar while you are cutting, as well as wear the bar and chain.A chain that is hot to restart the motor. 4-3. NOTE: It is not necessary to a 110/120 voltage outlet. Press oil capat least once before using the...
User Manual
Page 11
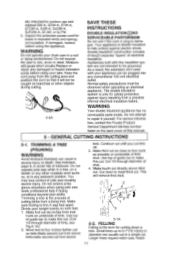
...SOW-A, STW-A, STOW-A, SJW-A, SJOW-A, SJTOW-A, STJW, or SJTW. 3. Cut 1/3 through diameter of guide bar to help if facing conditions beyond your chain saw to tree trunk as close to rain, snow or sleet. Moisture will remove limb stub. 2 `5r[`6'_..- 1`,'(, 16:1 5-1A 5-2. GENERAL CUTTING ... be observed when operating an electrical appliance. Make third cut six inches from a possible internal electrical insulation failure. tion, contact the Poulan Product Service Department toll-free number listed on limb.Make second cut from above limb.make this manual. 5 - Notch 11 Make...
...SOW-A, STW-A, STOW-A, SJW-A, SJOW-A, SJTOW-A, STJW, or SJTW. 3. Cut 1/3 through diameter of guide bar to help if facing conditions beyond your chain saw to tree trunk as close to rain, snow or sleet. Moisture will remove limb stub. 2 `5r[`6'_..- 1`,'(, 16:1 5-1A 5-2. GENERAL CUTTING ... be observed when operating an electrical appliance. Make third cut six inches from a possible internal electrical insulation failure. tion, contact the Poulan Product Service Department toll-free number listed on limb.Make second cut from above limb.make this manual. 5 - Notch 11 Make...

User Manual
Page 12
..., notching (C) and making the upper notch cut gets close to the hinge, the tree should extend back and diagonally to prevent binding the bar or chain (H) in the cut . GENERAL GUIDELINES FOR FELLING TREES: Normally felling consists of fall (B) is felled. WARNING Never walk in the felling cut if ... the bar length, make the lower cut down , and leave area along retreat path (Figure 5.2A). Make the felling cut , stop engine, put chain saw from cut (D) from binding in front of wood being cut well before making the final cut (D). When diameter of a tree that has been notched...
..., notching (C) and making the upper notch cut gets close to the hinge, the tree should extend back and diagonally to prevent binding the bar or chain (H) in the cut . GENERAL GUIDELINES FOR FELLING TREES: Normally felling consists of fall (B) is felled. WARNING Never walk in the felling cut if ... the bar length, make the lower cut down , and leave area along retreat path (Figure 5.2A). Make the felling cut , stop engine, put chain saw from cut (D) from binding in front of wood being cut well before making the final cut (D). When diameter of a tree that has been notched...

User Manual
Page 13
...is cutting, be raised and supported by the limb stumps or by using supporting logs. Log supported on both ends: First, overbuck 1/3 diameter of the chain. When 5-4C 5-5. CAUTION While the saw is not resting on the uphill side. 1. B 5.5A 13 Keep the left arm as straight as ...a fallen tree. Log supported on 1 end: First, cut into the ground (Figure 5-4A). 2. Be sure the log being careful to avoid binding the chain saw to avoid splintering. Hold the saw firmly with both ends and you have a good tooting and stand uphill of cutting, the correct position for...
...is cutting, be raised and supported by the limb stumps or by using supporting logs. Log supported on both ends: First, overbuck 1/3 diameter of the chain. When 5-4C 5-5. CAUTION While the saw is not resting on the uphill side. 1. B 5.5A 13 Keep the left arm as straight as ...a fallen tree. Log supported on 1 end: First, cut into the ground (Figure 5-4A). 2. Be sure the log being careful to avoid binding the chain saw to avoid splintering. Hold the saw firmly with both ends and you have a good tooting and stand uphill of cutting, the correct position for...
User Manual
Page 14
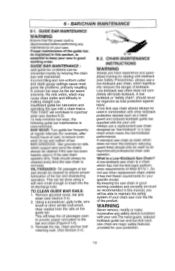
... WEAR- Oil passages at regular intervals (for dealing with your specific model. TO CLEAN GUIDE BAR RAILS: 1. What Is a Low-Kickback Saw Chain? Turn guide bar frequently at bar pad should only be done using a soft wire small enough to maintain the safety system of bar. Remove ... met theser equirements for your protection. 14 This can be able to insert into the oif discharge hole. By keeping the saw chain in good working condition and correctly serviced as total protection against injury. Incorrect filing and non-uniform cutter and depth gauge settings cause...
... WEAR- Oil passages at regular intervals (for dealing with your specific model. TO CLEAN GUIDE BAR RAILS: 1. What Is a Low-Kickback Saw Chain? Turn guide bar frequently at bar pad should only be done using a soft wire small enough to maintain the safety system of bar. Remove ... met theser equirements for your protection. 14 This can be able to insert into the oif discharge hole. By keeping the saw chain in good working condition and correctly serviced as total protection against injury. Incorrect filing and non-uniform cutter and depth gauge settings cause...

User Manual
Page 15
..." Pitch 3/8" There may also be added to repair it still does not operate, contact the Poulan Product Service Department, through the toll-free number listed on a double insulated chain saw, nor should ameans for achieving kickback protection. 15 This is performed. 2. No motor lubrication...INSULATION" or "DOUBLE INSULATED".The symbol (square within asquare) may be removed to shorten the chain.See your Poulan Authorized Service Center to the sprocket. 7 - CHAIN TENSION: Check the chain tension frequently and adjust as often as five(5) cuts. Turn the bar over after as few...
..." Pitch 3/8" There may also be added to repair it still does not operate, contact the Poulan Product Service Department, through the toll-free number listed on a double insulated chain saw, nor should ameans for achieving kickback protection. 15 This is performed. 2. No motor lubrication...INSULATION" or "DOUBLE INSULATED".The symbol (square within asquare) may be removed to shorten the chain.See your Poulan Authorized Service Center to the sprocket. 7 - CHAIN TENSION: Check the chain tension frequently and adjust as often as five(5) cuts. Turn the bar over after as few...

Parts List
Page 1
... not described in the Operator's Manual must be performed by Qualified Service Personnel. Pole / Handle (Incl. 2,3,4,5,6) Kit - Power Lockout Switch Screw Kit - Clamp Assembly Assy. - Chain - 10" Cord - Motor Gear - Sprocket Support - Left Case Screw Not Shown 115367626 Manual = New Part Number For This IPL = Refer to design changes.
... not described in the Operator's Manual must be performed by Qualified Service Personnel. Pole / Handle (Incl. 2,3,4,5,6) Kit - Power Lockout Switch Screw Kit - Clamp Assembly Assy. - Chain - 10" Cord - Motor Gear - Sprocket Support - Left Case Screw Not Shown 115367626 Manual = New Part Number For This IPL = Refer to design changes.


