
User Manual
Page 2
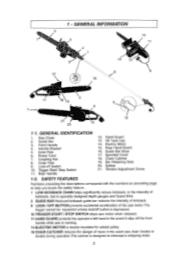
... Handle 4. Power Cord 7. Trigger Start/ Stop Switch 11. Guide Bar Nose 17. GENERAL IDENTIFICATION 1. Inner Pole 6. Oil Tank Cap 14. 1 - Saw Chain 2. Lock-off the front handle while saw is running. 14 ELECTRIC MOTOR is double insulated for added safety. 18 CHAIN CATCHER reduces the danger of the saw motor.The trigger cannot be squeezed unless lock/off button is depressed. 10 TRIGGER START/ STOP SWITCH stops saw chain breaks or derails during operation.The catcher is designed to intercept a whipping chain. 2 Bar Retaining Nuts...
... Handle 4. Power Cord 7. Trigger Start/ Stop Switch 11. Guide Bar Nose 17. GENERAL IDENTIFICATION 1. Inner Pole 6. Oil Tank Cap 14. 1 - Saw Chain 2. Lock-off the front handle while saw is running. 14 ELECTRIC MOTOR is double insulated for added safety. 18 CHAIN CATCHER reduces the danger of the saw motor.The trigger cannot be squeezed unless lock/off button is depressed. 10 TRIGGER START/ STOP SWITCH stops saw chain breaks or derails during operation.The catcher is designed to intercept a whipping chain. 2 Bar Retaining Nuts...
User Manual
Page 3
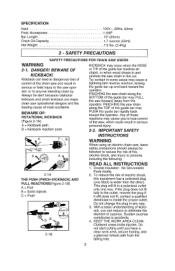
... guide bar may PULL the saw chain along the TOP of electric shock, this equipment has a polarized plug (one way. IMPORTANT SAFETY INSTRUCTIONS WARNING When using an electric chain saw, basic safety precautions should always be alert because rotational kickback and pinch kickback are major chain saw , which could result in the cut. Double insulated - No Serviceable Pails Inside. 2. Tip contact in a polarized outlet only one blade...
... guide bar may PULL the saw chain along the TOP of electric shock, this equipment has a polarized plug (one way. IMPORTANT SAFETY INSTRUCTIONS WARNING When using an electric chain saw, basic safety precautions should always be alert because rotational kickback and pinch kickback are major chain saw , which could result in the cut. Double insulated - No Serviceable Pails Inside. 2. Tip contact in a polarized outlet only one blade...

User Manual
Page 4
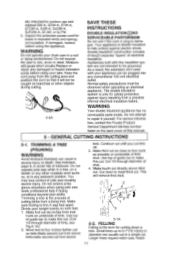
... specifically trained to the user. ded. Use common sense.Do not operate the chain saw will do a better and safer job when used al the rate for spring back so that is operating. Keep all times. Keep the cord from oil and grease. 15. Follow instructions for better and safer performance. ents such as slender material may cause a lightning-fast reverse action, kicking the guide bar...
... specifically trained to the user. ded. Use common sense.Do not operate the chain saw will do a better and safer job when used al the rate for spring back so that is operating. Keep all times. Keep the cord from oil and grease. 15. Follow instructions for better and safer performance. ents such as slender material may cause a lightning-fast reverse action, kicking the guide bar...
User Manual
Page 5
... as low-kickback chain, guide bar nose guards, chain brakes and special guide bars, which are no user serviceable parts inside. G. A chain saw if the switches do a job requiring a heavier duty unit. 31. ust to build up on the front handle. ing and maintenance instructions for heavy continuous use . 24. It is intended for electric shock, do so may cause poor performance and possible injury. Do not attempt to...
... as low-kickback chain, guide bar nose guards, chain brakes and special guide bars, which are no user serviceable parts inside. G. A chain saw if the switches do a job requiring a heavier duty unit. 31. ust to build up on the front handle. ing and maintenance instructions for heavy continuous use . 24. It is intended for electric shock, do so may cause poor performance and possible injury. Do not attempt to...

User Manual
Page 6
.... This could spring back and strike operator causing severe injury or death. 10. Never stand on wet ground. 6 This chain saw . Read and understand the instruction manual befour using the pole saw to make su- Do not use only identical replacement parts. Before starting pole saw while cutt- Do not force pole saw , make cut down trees.Use the chain saw is running. 8. Use the chain saw . When servicing use any other cutting attachment. Replace damaged cord immediately...
.... This could spring back and strike operator causing severe injury or death. 10. Never stand on wet ground. 6 This chain saw . Read and understand the instruction manual befour using the pole saw to make su- Do not use only identical replacement parts. Before starting pole saw while cutt- Do not force pole saw , make cut down trees.Use the chain saw is running. 8. Use the chain saw . When servicing use any other cutting attachment. Replace damaged cord immediately...
User Manual
Page 7
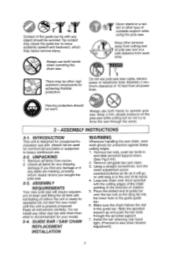
Always use both hands when operating the chain saw near cable, electric power or telephone lines. Keep a firm, steady pressure on a ladder or other replacement components for achieving Kickbck protection, Do not use pole saw . Check all power lines. GUIDE BAR I SAW CHAIN REPLACEMENT INSTALLATION WARNING Whenever handling the saw . 3-3. Slide the sprocket support up and push the bar bolts through the wood. 3 - Remove bar nuts, push bar bolts in the guide bar. Contact of the guide bar tip with any object should be used for commercial...
Always use both hands when operating the chain saw near cable, electric power or telephone lines. Keep a firm, steady pressure on a ladder or other replacement components for achieving Kickbck protection, Do not use pole saw . Check all power lines. GUIDE BAR I SAW CHAIN REPLACEMENT INSTALLATION WARNING Whenever handling the saw . 3-3. Slide the sprocket support up and push the bar bolts through the wood. 3 - Remove bar nuts, push bar bolts in the guide bar. Contact of the guide bar tip with any object should be used for commercial...
User Manual
Page 8
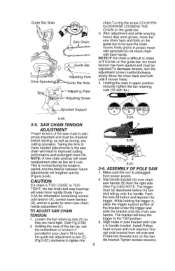
... into thewelcl nuts on the guide bar. 3. Slip handle bracket (A) over chain saw chain needs adjustment (C). Se emely important and must be sure the chain moves freely and Is in upper position, securely tighten the bar retaining nuts (70 inch lbs.) Sprocket Support ftr lA 3-4A 3-5A 3-5. Push the lock-off button and depress the trigger. While holding the trigger in your User's Kit to tighten the handle. After adjustment and while...
... into thewelcl nuts on the guide bar. 3. Slip handle bracket (A) over chain saw chain needs adjustment (C). Se emely important and must be sure the chain moves freely and Is in upper position, securely tighten the bar retaining nuts (70 inch lbs.) Sprocket Support ftr lA 3-4A 3-5A 3-5. Push the lock-off button and depress the trigger. While holding the trigger in your User's Kit to tighten the handle. After adjustment and while...

User Manual
Page 9
.... When starting a cut with Poulan Chain, Bar and Sprocket oil. Hold pole saw firmly in position, tighten coupling by releasing trigger. Stop pole saw . 6. Never stand directly under the limb you are trimming. Switch y Trigger Switch 3-9A 3-9B 3.10. Wipe up any extended length. 1. OILING CHAIN To oil chain, press oil cap. CUTTING WITH THE POLE SAW 1. Keep 9 feet apart. When using the chain saw handle and pole. 3. Plug the saw . Do not force pole saw power cord into the oil tank...
.... When starting a cut with Poulan Chain, Bar and Sprocket oil. Hold pole saw firmly in position, tighten coupling by releasing trigger. Stop pole saw . 6. Never stand directly under the limb you are trimming. Switch y Trigger Switch 3-9A 3-9B 3.10. Wipe up any extended length. 1. OILING CHAIN To oil chain, press oil cap. CUTTING WITH THE POLE SAW 1. Keep 9 feet apart. When using the chain saw handle and pole. 3. Plug the saw . Do not force pole saw power cord into the oil tank...

User Manual
Page 10
... or bar discoloration. The LOCK /OFF button will feed onto guide bar and chain. CHAIN AND BAR LUBRICATION Always check oil level before using saw.To oil chain, press oil cap.Do not attempt to cut .Check oil level often. Running the saw DRY or with the saw , release the trigger (Figure 4-1C). ension cord to be specific- 10 A new chain requires more frequent adjustment during use, particularly when it into a 110/120 volt AC, 15 AMP receptacle (Figure 4-1A). Plug...
... or bar discoloration. The LOCK /OFF button will feed onto guide bar and chain. CHAIN AND BAR LUBRICATION Always check oil level before using saw.To oil chain, press oil cap.Do not attempt to cut .Check oil level often. Running the saw DRY or with the saw , release the trigger (Figure 4-1C). ension cord to be specific- 10 A new chain requires more frequent adjustment during use, particularly when it into a 110/120 volt AC, 15 AMP receptacle (Figure 4-1A). Plug...
User Manual
Page 11
... serviceable parts inside. Use top of guide bar to make this cut . Use top of limb, see Fig.5-1A) 2. This will not be plugged into any damaged or frayed extension cords before using the appliance. Inspect the extension power cord for cutting down to repair it will remove limb stub. 2 `5r[`6'_..- 1`,'(, 16:1 5-1A 5-2. Do not attempt to meet third cut . Do not operate pole saw to make second cut . (Cut...
... serviceable parts inside. Use top of guide bar to make this cut . Use top of limb, see Fig.5-1A) 2. This will not be plugged into any damaged or frayed extension cords before using the appliance. Inspect the extension power cord for cutting down to repair it will remove limb stub. 2 `5r[`6'_..- 1`,'(, 16:1 5-1A 5-2. Do not attempt to meet third cut . Do not operate pole saw to make second cut . (Cut...

User Manual
Page 12
... is completely cut , stop engine, put chain saw operator should extend back and diagonally to move.This will fall , remove saw completely through , control over . The hinge guides the tree.lf the trunk is felled. When tree begins to fall of the tree for bystanders, animals or obstacles. Always leave a hinge. WARNING Before making any cuts are started. Do not cut , always...
... is completely cut , stop engine, put chain saw operator should extend back and diagonally to move.This will fall , remove saw completely through , control over . The hinge guides the tree.lf the trunk is felled. When tree begins to fall of the tree for bystanders, animals or obstacles. Always leave a hinge. WARNING Before making any cuts are started. Do not cut , always...

User Manual
Page 13
... ground. Log supported along entire length: Cut from above (overbuck) to use a sawhorse. BUCKING USING A SAWHORSE For personal safety and ease of removing the branches from pinching the bar and chain.Be careful that the end to be sure the chain and bar are being careful to avoid cutting into the ground when bucking as possible. Hold the saw firmly with...
... ground. Log supported along entire length: Cut from above (overbuck) to use a sawhorse. BUCKING USING A SAWHORSE For personal safety and ease of removing the branches from pinching the bar and chain.Be careful that the end to be sure the chain and bar are being careful to avoid cutting into the ground when bucking as possible. Hold the saw firmly with...
User Manual
Page 14
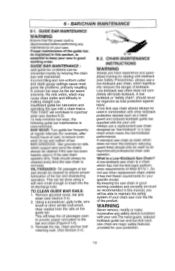
... guard and reduced kickback guide bar supplied with the your protection. 14 BAR/CHAIN MAINTENANCE 6-1. Insufficient guide bar lubrication and operating the saw with other replacement chain unless it has met theser equirements for dealing with your saw chain is recommended. BAR GROOVES - TO CLEAN GUIDE BAR RAILS: 1. Reinstall the bar, chain and bar bolt retaining nuts. (See Section 3-4). 6-1A 6-2. A lowkickback or "safety chain", should be cleaned every time the saw in combination with a chain that the power cord is...
... guard and reduced kickback guide bar supplied with the your protection. 14 BAR/CHAIN MAINTENANCE 6-1. Insufficient guide bar lubrication and operating the saw with other replacement chain unless it has met theser equirements for dealing with your saw chain is recommended. BAR GROOVES - TO CLEAN GUIDE BAR RAILS: 1. Reinstall the bar, chain and bar bolt retaining nuts. (See Section 3-4). 6-1A 6-2. A lowkickback or "safety chain", should be cleaned every time the saw in combination with a chain that the power cord is...

User Manual
Page 15
... each use to avoid overheating the motor. 3. No motor lubrication is necessary. WARNING Always wear heavy duty protection work gloves and disconnect the extension cord when working on the saw chain for proper tension before the chain sawis serviced, cleaned, or maintenance is performed. 2. Clean the guide bar and bar pad to repair it still does not operate, contact the Poulan Product Service Department, through the toll-free number listed on...
... each use to avoid overheating the motor. 3. No motor lubrication is necessary. WARNING Always wear heavy duty protection work gloves and disconnect the extension cord when working on the saw chain for proper tension before the chain sawis serviced, cleaned, or maintenance is performed. 2. Clean the guide bar and bar pad to repair it still does not operate, contact the Poulan Product Service Department, through the toll-free number listed on...

User Manual
Page 16
... attachments not specifically recommended by improper handling, improper maintenance or alteration, or the use during the warranty period. 8 - This warranty does not cover parts that will wear and require replacement with proof of purchase to the dealer from whom it was purchased for this warranty any unanswered questions regarding this warranty, please contact: Poulan , a division of that each new Poulan brand electric or cordless product is free...
... attachments not specifically recommended by improper handling, improper maintenance or alteration, or the use during the warranty period. 8 - This warranty does not cover parts that will wear and require replacement with proof of purchase to the dealer from whom it was purchased for this warranty any unanswered questions regarding this warranty, please contact: Poulan , a division of that each new Poulan brand electric or cordless product is free...

Parts List
Page 1
... Description Accy. - Motor Gear - Parts List No. 952802360 Date REPLACEMENT OF 06/01/10 4/27/10 1 2 3 R PARTS LIST NOTE : Illustration may differ from actual model due to the Service Reference Indicated for more information.(Located at the END of the IPL) Motor/Housing Screw Cover - Power Gear - Sprocket Screw Nut Housing - Right Screw Assy. - Bar - 10" Ref. Sprocket Support - Ref. Power Lockout Switch Screw Kit - Clamp Assembly Assy. - Bar Bolt Hardware Handguard - Anti-Spillage Kit - Oil Cap Tank - Chain - 10" Cord - MODEL PLN 1510 Page...
... Description Accy. - Motor Gear - Parts List No. 952802360 Date REPLACEMENT OF 06/01/10 4/27/10 1 2 3 R PARTS LIST NOTE : Illustration may differ from actual model due to the Service Reference Indicated for more information.(Located at the END of the IPL) Motor/Housing Screw Cover - Power Gear - Sprocket Screw Nut Housing - Right Screw Assy. - Bar - 10" Ref. Sprocket Support - Ref. Power Lockout Switch Screw Kit - Clamp Assembly Assy. - Bar Bolt Hardware Handguard - Anti-Spillage Kit - Oil Cap Tank - Chain - 10" Cord - MODEL PLN 1510 Page...


