
User Manual
Page 2
... mower deck to cause cancer and birth defects or other reproductive harm. • Do not operate machine without the entire grass catcher, discharge guard, or other reproductive harm. Shut off blades, set parking brake, stop engine, and remove keys before and while back- Keep clear of bystanders before cleaning the machine, removing the grass catcher, or unclogging the discharge guard. • Operate machine only in the manual before turning...
... mower deck to cause cancer and birth defects or other reproductive harm. • Do not operate machine without the entire grass catcher, discharge guard, or other reproductive harm. Shut off blades, set parking brake, stop engine, and remove keys before and while back- Keep clear of bystanders before cleaning the machine, removing the grass catcher, or unclogging the discharge guard. • Operate machine only in the manual before turning...
User Manual
Page 3
.... V. Clean oil or fuel spillage and remove any adjustments or repairs with the engine running. • Check grass catcher components and the discharge guard frequently and replace with the blades shut off if a child enters the area. • Before and while backing, look behind and down slopes (15° Max), not across. • Choose a low ground speed so that has a hitch designed for small children...
.... V. Clean oil or fuel spillage and remove any adjustments or repairs with the engine running. • Check grass catcher components and the discharge guard frequently and replace with the blades shut off if a child enters the area. • Before and while backing, look behind and down slopes (15° Max), not across. • Choose a low ground speed so that has a hitch designed for small children...

User Manual
Page 4
... this owner's manual. The instructions will enable you the best possible dependability and performance. TABLE OF CONTENTS SAFETY RULES 2-3 PRODUCT SPECIFICATIONS 4 CUSTOMER RESPONSIBILITIES 4 ASSEMBLY 6-9 OPERATION 10-15 MAINTENANCE SCHEDULE 16 MAINTENANCE 16-19 SERVICE AND ADJUSTMENTS 20-26 STORAGE 27 TROUBLESHOOTING 28-29 WARRANTY 30 4 CONGRATULATIONS on or near any unimproved forest-covered, brush-covered or grass-covered land unless the engine's exhaust system is equipped with a spark arrester...
... this owner's manual. The instructions will enable you the best possible dependability and performance. TABLE OF CONTENTS SAFETY RULES 2-3 PRODUCT SPECIFICATIONS 4 CUSTOMER RESPONSIBILITIES 4 ASSEMBLY 6-9 OPERATION 10-15 MAINTENANCE SCHEDULE 16 MAINTENANCE 16-19 SERVICE AND ADJUSTMENTS 20-26 STORAGE 27 TROUBLESHOOTING 28-29 WARRANTY 30 4 CONGRATULATIONS on or near any unimproved forest-covered, brush-covered or grass-covered land unless the engine's exhaust system is equipped with a spark arrester...

User Manual
Page 7
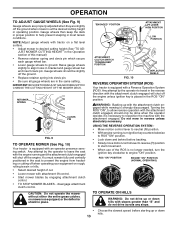
... engine.After engine has started, move throttle control to idle position. • Release parking brake. • Slowly move the motion control lever forward and slowly drive tractor off skid. • Apply brake to stop tractor, set parking brake and place motion control lever in neutral position. • Turn ignition key to its highest position. • Release parking brake by depressing clutch/brake pedal. • Place freewheel control in "transmission disengaged position" (See "TO TRANSPORT" in Maintenance section of this manual...
... engine.After engine has started, move throttle control to idle position. • Release parking brake. • Slowly move the motion control lever forward and slowly drive tractor off skid. • Apply brake to stop tractor, set parking brake and place motion control lever in neutral position. • Turn ignition key to its highest position. • Release parking brake by depressing clutch/brake pedal. • Place freewheel control in "transmission disengaged position" (See "TO TRANSPORT" in Maintenance section of this manual...
User Manual
Page 8
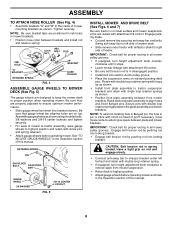
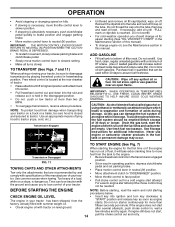
... tractor assembly, raise gauge wheels to highest position and retain with attachment lift control. NOTE: Be sure bracket tabs are properly adjusted to ensure optimum mower perfor- Assemble gauge wheels as shown in all mower pulley grooves. NOTE: To assist in locating hole in flanged pin, the hole in all mower pulley grooves. • If equipped, turn height adjustment knob clockwise to remove slack from mower suspension. • Raise deck to highest position. • Adjust gauge wheels...
... tractor assembly, raise gauge wheels to highest position and retain with attachment lift control. NOTE: Be sure bracket tabs are properly adjusted to ensure optimum mower perfor- Assemble gauge wheels as shown in all mower pulley grooves. NOTE: To assist in locating hole in flanged pin, the hole in all mower pulley grooves. • If equipped, turn height adjustment knob clockwise to remove slack from mower suspension. • Raise deck to highest position. • Adjust gauge wheels...
User Manual
Page 9
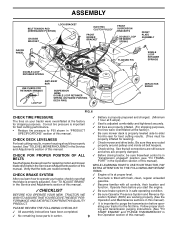
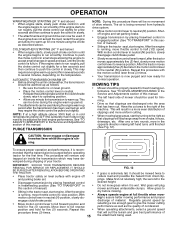
... GAUGE WHEEL ELECTRIC CLUTCH PULLEY FRONT MOWER BRACKET FRONT SUSPENSION BRACKETS DOUBLE LOOP RETAINER SPRING FRONT PLATE ASSEMBLY FLANGED PIN SINGLE LOOP RETAINER SPRINGS DOUBLE LOOP RETAINER SPRING ANTI-SWAY BAR USE PLIERS FOR RETAINER SPRINGS LOOP UP SUSPENSION ARMS DOUBLE LOOP RETAINER SPRING (OUTWARD POINTING DECK PINS) 02510 DEFLECTOR SHIELD FIG. 6 CHECK TIRE PRESSURE The tires on your tractor were overinflated at the factory for replacing motion and mower blade drive belts...
... GAUGE WHEEL ELECTRIC CLUTCH PULLEY FRONT MOWER BRACKET FRONT SUSPENSION BRACKETS DOUBLE LOOP RETAINER SPRING FRONT PLATE ASSEMBLY FLANGED PIN SINGLE LOOP RETAINER SPRINGS DOUBLE LOOP RETAINER SPRING ANTI-SWAY BAR USE PLIERS FOR RETAINER SPRINGS LOOP UP SUSPENSION ARMS DOUBLE LOOP RETAINER SPRING (OUTWARD POINTING DECK PINS) 02510 DEFLECTOR SHIELD FIG. 6 CHECK TIRE PRESSURE The tires on your tractor were overinflated at the factory for replacing motion and mower blade drive belts...
User Manual
Page 11
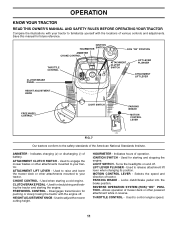
... cutting height. HEIGHT ADJUSTMENT KNOB - Used to your tractor. Indicates hours of battery. Used to control engine speed. 11 Selects the speed and direction of the American National Standards Institute. PARKING BRAKE - REVERSE OPERATION SYSTEM (ROS) "ON" POSITION - Used to release attachment lift lever when changing its position. Save this manual for starting and stopping the engine. Used for future reference. AMMETER - ATTACHMENT CLUTCH SWITCH - Used to engage the mower blades or other powered attachment while in reverse. Disengages transmission...
... cutting height. HEIGHT ADJUSTMENT KNOB - Used to your tractor. Indicates hours of battery. Used to control engine speed. 11 Selects the speed and direction of the American National Standards Institute. PARKING BRAKE - REVERSE OPERATION SYSTEM (ROS) "ON" POSITION - Used to release attachment lift lever when changing its position. Save this manual for starting and stopping the engine. Used for future reference. AMMETER - ATTACHMENT CLUTCH SWITCH - Used to engage the mower blades or other powered attachment while in reverse. Disengages transmission...
User Manual
Page 13
... gauge wheel bar and insert clevis pin. Any attempt by the operator to leave the seat with the engine running , turn the ignition key clockwise to start movement. • When use of the ROS is equipped with tractor on a flat the desired cutting height in the same setting. You must remain fully and centrally positioned in the Operation section of cut. • Lower mower with attachment lift control. • Start mower blades...
... gauge wheel bar and insert clevis pin. Any attempt by the operator to leave the seat with the engine running , turn the ignition key clockwise to start movement. • When use of the ROS is equipped with tractor on a flat the desired cutting height in the same setting. You must remain fully and centrally positioned in the Operation section of cut. • Lower mower with attachment lift control. • Start mower blades...
User Manual
Page 14
... seat in operating position, depress clutch/brake pedal and set parking brake. • Place motion control lever in neutral (N) position. • Move attachment clutch to "DISENGAGED" position. • Move throttle control to The engine in your tractor, be used within 30 days to neutral (N) position. Use fresh fuel next season. Never use gasoline near an open flame. For a warm engine start attempt. Do not run out of this manual. IMPORTANT: THE MOTION CONTROL LEVER DOES NOT...
... seat in operating position, depress clutch/brake pedal and set parking brake. • Place motion control lever in neutral (N) position. • Move attachment clutch to "DISENGAGED" position. • Move throttle control to The engine in your tractor, be used within 30 days to neutral (N) position. Use fresh fuel next season. Never use gasoline near an open flame. For a warm engine start attempt. Do not run out of this manual. IMPORTANT: THE MOTION CONTROL LEVER DOES NOT...
User Manual
Page 15
... this manual. Shutoff engine and set . • Disengage transmission by selecting a low enough gear to full reverse position and hold for five (5) seconds. With motion control lever in the Service and Adjustments section of this procedure there will result in a more even distribution of cut . MOWING TIPS • Mower should be properly leveled for best engine performance. See "TO LEVEL MOWER HOUSING" in neutral (N) position, slowly disengage clutch/brake...
... this manual. Shutoff engine and set . • Disengage transmission by selecting a low enough gear to full reverse position and hold for five (5) seconds. With motion control lever in the Service and Adjustments section of this procedure there will result in a more even distribution of cut . MOWING TIPS • Mower should be properly leveled for best engine performance. See "TO LEVEL MOWER HOUSING" in neutral (N) position, slowly disengage clutch/brake...
User Manual
Page 16
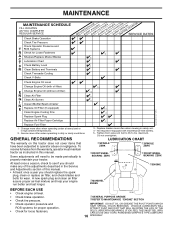
... or dusty conditions. GENERAL RECOMMENDATIONS The warranty on this manual. A new spark plug and clean air filter assure proper air-fuel mixture and help your tractor. Some adjustments will need to be made periodically to 35 ft.-lbs. MAINTENANCE MAINTENANCE SCHEDULE FILL IN DATES AS YOU COMPLETE REGULAR SERVICE Check Brake Operation Check Tire Pressure Check Operator Presence and T ROS Systems R Check for Loose Fasteners A Sharpen/Replace Mower Blades C T Lubrication Chart 0 Check Battery Level R Clean Battery and Terminals Check Transaxle Cooling Check V-Belts...
... or dusty conditions. GENERAL RECOMMENDATIONS The warranty on this manual. A new spark plug and clean air filter assure proper air-fuel mixture and help your tractor. Some adjustments will need to be made periodically to 35 ft.-lbs. MAINTENANCE MAINTENANCE SCHEDULE FILL IN DATES AS YOU COMPLETE REGULAR SERVICE Check Brake Operation Check Tire Pressure Check Operator Presence and T ROS Systems R Check for Loose Fasteners A Sharpen/Replace Mower Blades C T Lubrication Chart 0 Check Battery Level R Clean Battery and Terminals Check Transaxle Cooling Check V-Belts...
User Manual
Page 17
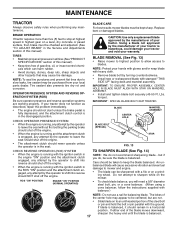
... off the engine. • When the engine is running with the ignition switch in the ROS "ON" position and the attachment clutch engaged, any maintenance. BRAKE OPERATION If tractor requires more than five (5) feet to stop at tires due to slow leaks, tire sealant may be checked and adjusted. (See "TO ADJUST BRAKE" in the Service and Adjustments section of this manual). • Keep tires free of the blade moves...
... off the engine. • When the engine is running with the ignition switch in the ROS "ON" position and the attachment clutch engaged, any maintenance. BRAKE OPERATION If tractor requires more than five (5) feet to stop at tires due to slow leaks, tire sealant may be checked and adjusted. (See "TO ADJUST BRAKE" in the Service and Adjustments section of this manual). • Keep tires free of the blade moves...
User Manual
Page 18
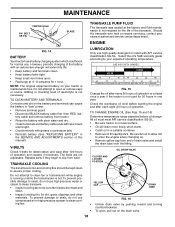
... NEXT OIL CHANGE oil_visc_chart4_e FIG. 15 Change the oil after every 50 hours of operation. Check the crankcase oil level before oil change. OIL DRAIN VALVE CLOSED AND LOCKED POSITION 02463 YELLOW CAP DRAIN TUBE FIG. 16 • Unlock drain valve by pushing inward and turning counterclockwise. • To open or remove caps or covers. ENGINE FIG. 14 BATTERY Your tractor has a battery charging system which is sufficient for normal use high pressure water or steam to clean transaxle...
... NEXT OIL CHANGE oil_visc_chart4_e FIG. 15 Change the oil after every 50 hours of operation. Check the crankcase oil level before oil change. OIL DRAIN VALVE CLOSED AND LOCKED POSITION 02463 YELLOW CAP DRAIN TUBE FIG. 16 • Unlock drain valve by pushing inward and turning counterclockwise. • To open or remove caps or covers. ENGINE FIG. 14 BATTERY Your tractor has a battery charging system which is sufficient for normal use high pressure water or steam to clean transaxle...
User Manual
Page 19
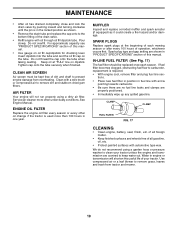
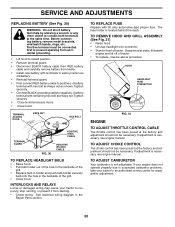
... up any spilled gasoline. ENGINE OIL FILTER Replace the engine oil filter every season or every other oil change if the tractor is used more often under dusty conditions. tions. • Place new fuel filter in position in fuel line with a wire brush or compressed air to clean your tractor. Use compressed air or a leaf blower to carburetor, replacement is required. • With engine cool, remove filter and plug fuel line sec- SPARK PLUGS Replace spark plugs at "FULL" line on the tube. Pour...
... up any spilled gasoline. ENGINE OIL FILTER Replace the engine oil filter every season or every other oil change if the tractor is used more often under dusty conditions. tions. • Place new fuel filter in position in fuel line with a wire brush or compressed air to clean your tractor. Use compressed air or a leaf blower to carburetor, replacement is required. • With engine cool, remove filter and plug fuel line sec- SPARK PLUGS Replace spark plugs at "FULL" line on the tube. Pour...
User Manual
Page 20
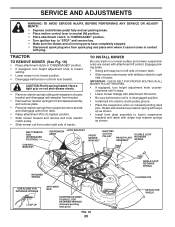
TO INSTALL MOWER Be sure tractor is on level surface and mower suspension arms are raised with attachment lift control. • Be sure belt tension rod is spring loaded. IMPORTANT: CHECK BELT FOR PROPER ROUTING IN ALL MOWER PULLEY GROOVES. • If equipped, turn height adjustment knob to lowest setting. • Lower mower to its highest position. • Slide mower forward and remove belt from electric clutch pulley. • Slide mower out from spark plug and place wire where it...
TO INSTALL MOWER Be sure tractor is on level surface and mower suspension arms are raised with attachment lift control. • Be sure belt tension rod is spring loaded. IMPORTANT: CHECK BELT FOR PROPER ROUTING IN ALL MOWER PULLEY GROOVES. • If equipped, turn height adjustment knob to lowest setting. • Lower mower to its highest position. • Slide mower forward and remove belt from electric clutch pulley. • Slide mower out from spark plug and place wire where it...

User Manual
Page 24
... control lever in that position and turn nut "A" until distance becomes 1-9/16". ELECTRIC CLUTCH CLUTCH LOCATOR CLUTCHING IDLER STATIONARY IDLER OPERATING ARM CENTER SPAN KEEPER TRANSMISSION INPUT PULLEY CLUTCH WIRE HARNESS 01513 DO NOT TOUCH THIS NUT. BELT REMOVAL • Remove mower (See "TO REMOVE MOWER" in this section of all belt guides and keepers. • Install mower (See "TO INSTALL MOWER" in this section of manual). NOTE: Observe entire motion drive belt and position of manual). Replace brake pads or contact a qualified service...
... control lever in that position and turn nut "A" until distance becomes 1-9/16". ELECTRIC CLUTCH CLUTCH LOCATOR CLUTCHING IDLER STATIONARY IDLER OPERATING ARM CENTER SPAN KEEPER TRANSMISSION INPUT PULLEY CLUTCH WIRE HARNESS 01513 DO NOT TOUCH THIS NUT. BELT REMOVAL • Remove mower (See "TO REMOVE MOWER" in this section of all belt guides and keepers. • Install mower (See "TO INSTALL MOWER" in this section of manual). NOTE: Observe entire motion drive belt and position of manual). Replace brake pads or contact a qualified service...
User Manual
Page 26
... time. TO ADJUST CARBURETOR Your carburetor is necessary, see engine manual. SERVICE AND ADJUSTMENTS REPLACING BATTERY (See Fig. 30) WARNING: Do not short battery terminals by allowing a wrench or any other object to run poorly, stop running, or prevent it from tractor. • Install new battery with terminals in same position as shown. INTERLOCKS AND RELAYS Loose or damaged wiring may cause your tractor to positive (+) battery terminal with hex bolt and keps nut...
... time. TO ADJUST CARBURETOR Your carburetor is necessary, see engine manual. SERVICE AND ADJUSTMENTS REPLACING BATTERY (See Fig. 30) WARNING: Do not short battery terminals by allowing a wrench or any other object to run poorly, stop running, or prevent it from tractor. • Install new battery with terminals in same position as shown. INTERLOCKS AND RELAYS Loose or damaged wiring may cause your tractor to positive (+) battery terminal with hex bolt and keps nut...
User Manual
Page 27
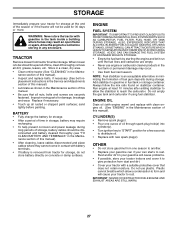
... flame or spark. Replace if necessary. • Touch up all nuts, bolts and screws are empty. • Never use plastic. BATTERY • Fully charge the battery for storage. • After a period of time, clean it thoroughly, remove all dirt, grease, leaves, etc. ENGINE OIL Drain oil (with engine warm) and replace with clean engine oil. (See "ENGINE" in the Maintenance section of this manual). • Inspect and replace belts, if necessary (See belt re- Rust and...
... flame or spark. Replace if necessary. • Touch up all nuts, bolts and screws are empty. • Never use plastic. BATTERY • Fully charge the battery for storage. • After a period of time, clean it thoroughly, remove all dirt, grease, leaves, etc. ENGINE OIL Drain oil (with engine warm) and replace with clean engine oil. (See "ENGINE" in the Maintenance section of this manual). • Inspect and replace belts, if necessary (See belt re- Rust and...

User Manual
Page 28
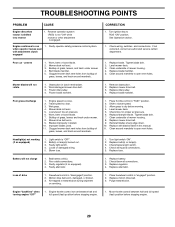
.... 3. Faulty ignition switch. 8. Depress brake pedal. 2. Disengage attachment clutch. 3. Replace fuse. 5. Check/replace ignition switch. 8. Contact an authorized service center/department. Engine clicks but will not turn over 1. Loose or damaged wiring. 4. Build-up of mower housing. 4. Faulty spark plug. 7. Stale or dirty fuel. 9. Spark plug wire loose. 11. Clean underside of grass, leaves and trash under mower. 4. Clean and regap or change oil. 6. Empty fuel tank and carburetor, refill tank with fresh, clean gasoline. 6. Clean/replace muffler. 13. Bent blade mandrel...
.... 3. Faulty ignition switch. 8. Depress brake pedal. 2. Disengage attachment clutch. 3. Replace fuse. 5. Check/replace ignition switch. 8. Contact an authorized service center/department. Engine clicks but will not turn over 1. Loose or damaged wiring. 4. Build-up of mower housing. 4. Faulty spark plug. 7. Stale or dirty fuel. 9. Spark plug wire loose. 11. Clean underside of grass, leaves and trash under mower. 4. Clean and regap or change oil. 6. Empty fuel tank and carburetor, refill tank with fresh, clean gasoline. 6. Clean/replace muffler. 13. Bent blade mandrel...
User Manual
Page 29
...light switch. 4. Replace battery. 2. See Operation section. 1. Worn, bent or loose blade. 2. Worn/damaged mower drive belt. 3. Tighten blade bolt. 7. Check/clean all connections. 3. Place freewheel control in this manual. 11. Poor cut - Bulb(s) or lamp(s) burned out. 3. Replace alternator. Mower deck not level. 5. Replace with attachment clutch engaged 1. Engine continues to open vent holes. Replace blade mandrel. 5. Replace idler pulley. 4. Poor grass discharge 1. Check tires for proper air pressure. 6. Replace mower drive belt. 9. Engine...
...light switch. 4. Replace battery. 2. See Operation section. 1. Worn, bent or loose blade. 2. Worn/damaged mower drive belt. 3. Tighten blade bolt. 7. Check/clean all connections. 3. Place freewheel control in this manual. 11. Poor cut - Bulb(s) or lamp(s) burned out. 3. Replace alternator. Mower deck not level. 5. Replace with attachment clutch engaged 1. Engine continues to open vent holes. Replace blade mandrel. 5. Replace idler pulley. 4. Poor grass discharge 1. Check tires for proper air pressure. 6. Replace mower drive belt. 9. Engine...


