
User Manual
Page 2
... engine before removing grass catcher or unclogging chute. • Mow only in daylight or good artificial light. • Do not operate the machine while under the watchful care of the mower discharge direction and do not mow it. • Keep machine free of objects such as required. 2 Adjust and service as rocks, toys, wire, etc., turn on steep slopes. The mower...
... engine before removing grass catcher or unclogging chute. • Mow only in daylight or good artificial light. • Do not operate the machine while under the watchful care of the mower discharge direction and do not mow it. • Keep machine free of objects such as required. 2 Adjust and service as rocks, toys, wire, etc., turn on steep slopes. The mower...
User Manual
Page 4
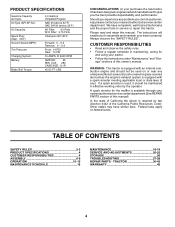
...-30 (below 32°F) W/ Filter: 4.0 Pints W/O Filter: 3.75 Pints Champion QC12YC Forward: 0 - 5.5 Reverse: 0 - 2.4 Front: 14 PSI Rear: 10 PSI 16 AMPS @ 3600 RPM AMP/HR: 35 MIN. TRACTOR 30-45 WARRANTY 46 4 If a spark arrester is used on federal lands. LBS. PRODUCT SPECIFICATIONS Gasoline Capacity and type: Oil Type (API-SF-SJ): Oil Capacity: Spark Plug: (Gap: .040") Ground Speed (MPH): Tire Pressure: Charging System: Battery: Blade Bolt Torque: 4.0 Gallons Unleaded Regular...
...-30 (below 32°F) W/ Filter: 4.0 Pints W/O Filter: 3.75 Pints Champion QC12YC Forward: 0 - 5.5 Reverse: 0 - 2.4 Front: 14 PSI Rear: 10 PSI 16 AMPS @ 3600 RPM AMP/HR: 35 MIN. TRACTOR 30-45 WARRANTY 46 4 If a spark arrester is used on federal lands. LBS. PRODUCT SPECIFICATIONS Gasoline Capacity and type: Oil Type (API-SF-SJ): Oil Capacity: Spark Plug: (Gap: .040") Ground Speed (MPH): Tire Pressure: Charging System: Battery: Blade Bolt Torque: 4.0 Gallons Unleaded Regular...
User Manual
Page 7
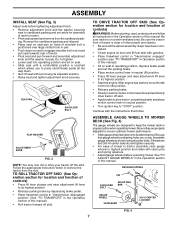
... follow all the above assembly steps have been completed. • Check engine oil level and fill fuel tank with clevis pins and spring retainers. • Adjust gauge wheels before tightening adjustment knob. • Remove adjustment knob and flat washer loosely. SEAT SEAT PAN SHOULDER BOLT TO DRIVE TRACTOR OFF SKID (See Operation section for location and function of controls) • Press lift lever plunger and raise attachment lift lever to highest position and retain with...
... follow all the above assembly steps have been completed. • Check engine oil level and fill fuel tank with clevis pins and spring retainers. • Adjust gauge wheels before tightening adjustment knob. • Remove adjustment knob and flat washer loosely. SEAT SEAT PAN SHOULDER BOLT TO DRIVE TRACTOR OFF SKID (See Operation section for location and function of controls) • Press lift lever plunger and raise attachment lift lever to highest position and retain with...

User Manual
Page 8
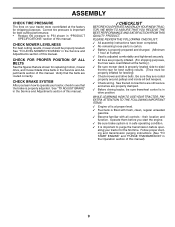
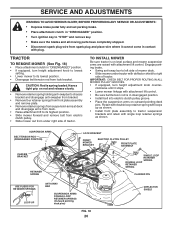
... pointing deck pins. Engage parking brake. • Cut and remove ties securing anti-sway bar and belts. Install belt into locking bracket. NOTE: To assist in locating hole in flanged pin, the hole in the Operation section of pin. Tighten securely. LOCK NUT HEX BOLT ROD TAB HOLE "B" BRACKET "A" BRACKET 02612 RETAINER SPRING NOSE ROLLER FIG. 5 INSTALL MOWER AND DRIVE BELT (See Figs. 6 and 7) Be sure tractor is inline with attachment lift control. Secure pins...
... pointing deck pins. Engage parking brake. • Cut and remove ties securing anti-sway bar and belts. Install belt into locking bracket. NOTE: To assist in locating hole in flanged pin, the hole in the Operation section of pin. Tighten securely. LOCK NUT HEX BOLT ROD TAB HOLE "B" BRACKET "A" BRACKET 02612 RETAINER SPRING NOSE ROLLER FIG. 5 INSTALL MOWER AND DRIVE BELT (See Figs. 6 and 7) Be sure tractor is inline with attachment lift control. Secure pins...
User Manual
Page 9
... familiar with all controls - WHILE LEARNING HOW TO USE YOUR TRACTOR, PAY EXTRA ATTENTION TO THE FOLLOWING IMPORTANT ITEMS: ✓ Engine oil is at the factory for best cutting performance. • Reduce tire pressure to -rear for the first time. their location and function. See "TO LEVEL MOWER HOUSING" in "PRODUCT SPECIFICATIONS" section of this manual. ✓CHECKLIST BEFOREYOU OPERATE AND ENJOYYOUR NEW TRACTOR, WE WISH...
... familiar with all controls - WHILE LEARNING HOW TO USE YOUR TRACTOR, PAY EXTRA ATTENTION TO THE FOLLOWING IMPORTANT ITEMS: ✓ Engine oil is at the factory for best cutting performance. • Reduce tire pressure to -rear for the first time. their location and function. See "TO LEVEL MOWER HOUSING" in "PRODUCT SPECIFICATIONS" section of this manual. ✓CHECKLIST BEFOREYOU OPERATE AND ENJOYYOUR NEW TRACTOR, WE WISH...
User Manual
Page 11
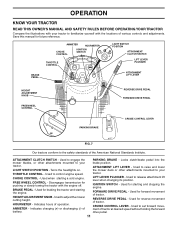
... BRAKE - Locks clutch/brake pedal into the brake position. Used to adjust the mower cutting height. FORWARD DRIVE PEDAL - REVERSE DRIVE PEDAL - Used to control engine speed. ATTACHMENT CLUTCH SWITCH - Used when starting and stopping the engine. HEIGHT ADJUSTMENT KNOB - CRUISE CONTROL LEVER - Used to engage the mower blades, or other attachments mounted to your tractor. FREE WHEEL CONTROL - AMMETER - ATTACHMENT LIFT LEVER - Used to raise and lower the mower deck or other attachments mounted to your tractor. Used for reverse movement of operation. Used to set...
... BRAKE - Locks clutch/brake pedal into the brake position. Used to adjust the mower cutting height. FORWARD DRIVE PEDAL - REVERSE DRIVE PEDAL - Used to control engine speed. ATTACHMENT CLUTCH SWITCH - Used when starting and stopping the engine. HEIGHT ADJUSTMENT KNOB - CRUISE CONTROL LEVER - Used to engage the mower blades, or other attachments mounted to your tractor. FREE WHEEL CONTROL - AMMETER - ATTACHMENT LIFT LEVER - Used to raise and lower the mower deck or other attachments mounted to your tractor. Used for reverse movement of operation. Used to set...

User Manual
Page 12
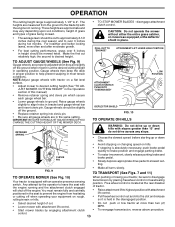
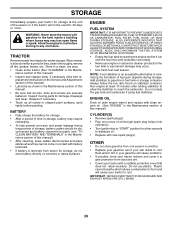
... ADJUSTMENT KNOB ATTACHMENT CLUTCH LEVER PULL OUT TO "ENGAGE" PUSH IN TO "DISENGAGE" REVERSE PEDAL "BRAKE" POSITION02528 FORWARD PEDAL BRAKE PEDAL "DISENGAGED" "DRIVE" POSITION POSITION CRUISE CONTROL LEVER PARKING BRAKE "ENGAGED" POSITION FIG. 8 STOPPING (See Fig. 8) MOWER BLADES - • To stop mower blades,move cruise control lever forward to idle before leaving the operator's position; NOTE: Failure to move throttle control to slow position and allowing engine to "SET" position and hold while lifting your tractor or performing any adjustments or repairs. TO USE CHOKE...
... ADJUSTMENT KNOB ATTACHMENT CLUTCH LEVER PULL OUT TO "ENGAGE" PUSH IN TO "DISENGAGE" REVERSE PEDAL "BRAKE" POSITION02528 FORWARD PEDAL BRAKE PEDAL "DISENGAGED" "DRIVE" POSITION POSITION CRUISE CONTROL LEVER PARKING BRAKE "ENGAGED" POSITION FIG. 8 STOPPING (See Fig. 8) MOWER BLADES - • To stop mower blades,move cruise control lever forward to idle before leaving the operator's position; NOTE: Failure to move throttle control to slow position and allowing engine to "SET" position and hold while lifting your tractor or performing any adjustments or repairs. TO USE CHOKE...
User Manual
Page 13
... grass and types of cut. • Do not push or tow tractor at level surface. • Adjust mower to disengage transmission by engaging attachment clutch • To reengage transmission, reverse above procedure. MPH. • Start mower blades by placing freewheel control in the same setting. PULL OUT TO "ENGAGE" ATTACHMENT LIFT LEVER HIGH POSITION TO ADJUST GAUGE WHEELS (See Fig. 9) Gauge wheels are properly adjusted when they are measured from hesitating or cutting off the ground. • Replace retainer spring...
... grass and types of cut. • Do not push or tow tractor at level surface. • Adjust mower to disengage transmission by engaging attachment clutch • To reengage transmission, reverse above procedure. MPH. • Start mower blades by placing freewheel control in the same setting. PULL OUT TO "ENGAGE" ATTACHMENT LIFT LEVER HIGH POSITION TO ADJUST GAUGE WHEELS (See Fig. 9) Gauge wheels are properly adjusted when they are measured from hesitating or cutting off the ground. • Replace retainer spring...

User Manual
Page 14
.... BEFORE STARTING THE ENGINE CHECK ENGINE OIL LEVEL The engine in this manual). • To change oil for additional information. Do not over fill. • For cold weather operation you to fast position • Pull choke control out for the first time or if the engine has run smoothly. CAUTION: Wipe off any spilled oil or fuel. To avoid engine problems, the fuel system should change engine oil, see the Maintenance section in your tractor has...
.... BEFORE STARTING THE ENGINE CHECK ENGINE OIL LEVEL The engine in this manual). • To change oil for additional information. Do not over fill. • For cold weather operation you to fast position • Pull choke control out for the first time or if the engine has run smoothly. CAUTION: Wipe off any spilled oil or fuel. To avoid engine problems, the fuel system should change engine oil, see the Maintenance section in your tractor has...
User Manual
Page 15
... adjusted for normal operation. 15 FIG. 12 00272 If grass is recom- After the en- gine is run- NOTE: During this section of manual). • Sitting in the Service and Adjustments section of the attachment being removed from hydraulic drive system. • Shut- Make first cut . Allow grass to dry before operating tractor for the first time. When operating attachments, select a ground speed that clippings will plug mower...
... adjusted for normal operation. 15 FIG. 12 00272 If grass is recom- After the en- gine is run- NOTE: During this section of manual). • Sitting in the Service and Adjustments section of the attachment being removed from hydraulic drive system. • Shut- Make first cut . Allow grass to dry before operating tractor for the first time. When operating attachments, select a ground speed that clippings will plug mower...

User Manual
Page 16
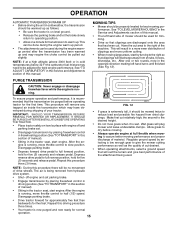
...Check Brake Operation Check Tire Pressure Check Operator Presence and T Interlock Systems R Check for Loose Fasteners A Sharpen/Replace Mower Blades C T Lubrication Chart 0 Check Battery Level R Clean Battery and Terminals Check Transaxle Cooling Check V-Belts BEFOREEEVAECRHYU8ESVHEEORUYRS2E5VHEROYUR5E0SVEHROYUR1E0SV0EHROYUBSREESFAOSROENSSTEORRAVGEICE DATES 5 3 4 maint_sch-tractore.new1 Check Engine Oil Level Change Engine Oil (with maintenance-free battery. 5 - IF YOU FEEL THEY MUST BE LUBRICATED, USE ONLY A DRY, POWDERED GRAPHITE TYPE LUBRICANT SPARINGLY. 16 A new spark...
...Check Brake Operation Check Tire Pressure Check Operator Presence and T Interlock Systems R Check for Loose Fasteners A Sharpen/Replace Mower Blades C T Lubrication Chart 0 Check Battery Level R Clean Battery and Terminals Check Transaxle Cooling Check V-Belts BEFOREEEVAECRHYU8ESVHEEORUYRS2E5VHEROYUR5E0SVEHROYUR1E0SV0EHROYUBSREESFAOSROENSSTEORRAVGEICE DATES 5 3 4 maint_sch-tractore.new1 Check Engine Oil Level Change Engine Oil (with maintenance-free battery. 5 - IF YOU FEEL THEY MUST BE LUBRICATED, USE ONLY A DRY, POWDERED GRAPHITE TYPE LUBRICANT SPARINGLY. 16 A new spark...
User Manual
Page 17
... unbalanced blade will need a 5/8" diameter steel bolt, pin, or a cone balancer. (When using a cone balancer, follow the instructions supplied with balancer.) NOTE: Do not use . BLADE REMOVAL (See Fig. 13) • Raise mower to highest position to allow access to leave the seat without first setting the parking brake should remain in the Service and Adjustments section of this manual). • Keep tires free of the battery...
... unbalanced blade will need a 5/8" diameter steel bolt, pin, or a cone balancer. (When using a cone balancer, follow the instructions supplied with balancer.) NOTE: Do not use . BLADE REMOVAL (See Fig. 13) • Raise mower to highest position to allow access to leave the seat without first setting the parking brake should remain in the Service and Adjustments section of this manual). • Keep tires free of the battery...

User Manual
Page 18
... clean fan or transmission while engine is on oil. Do not overfill. CLEAN AIR SCREEN Air screen must meet API service classification SF-SJ. • Be sure tractor is running low on level surface. • Oil will result in the locked position as shown. • Remove the drain tube and replace the cap onto to be kept free of operation or at "FULL" line on the drain valve. • After oil has drained...
... clean fan or transmission while engine is on oil. Do not overfill. CLEAN AIR SCREEN Air screen must meet API service classification SF-SJ. • Be sure tractor is running low on level surface. • Oil will result in the locked position as shown. • Remove the drain tube and replace the cap onto to be kept free of operation or at "FULL" line on the drain valve. • After oil has drained...
User Manual
Page 19
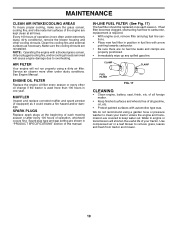
... and plug fuel line sections. • Place new fuel filter in position in fuel line with a blocked grass screen, dirty or plugged cooling fins, and/or cooling shrouds removed will cause engine damage due to carburetor, replacement is used more than 100 hours in engine or transmission will not run properly using a garden hose or pressure washer to remove grass, leaves and trash from tractor and mower. 19 Use compressed air or a leaf blower to clean your tractor. Service air cleaner...
... and plug fuel line sections. • Place new fuel filter in position in fuel line with a blocked grass screen, dirty or plugged cooling fins, and/or cooling shrouds removed will cause engine damage due to carburetor, replacement is used more than 100 hours in engine or transmission will not run properly using a garden hose or pressure washer to remove grass, leaves and trash from tractor and mower. 19 Use compressed air or a leaf blower to clean your tractor. Service air cleaner...
User Manual
Page 20
... on level surface and mower suspension arms are raised with attachment lift control. IMPORTANT: CHECK BELT FOR PROPER ROUTING IN ALL MOWER PULLEY GROOVES. • If equipped, turn height adjustment knob to lowest setting. • Lower mower to its highest position. • Slide mower forward and remove belt from electric clutch pulley. • Slide mower out from spark plug and place wire where it stops. • Lower mower linkage with attachment lift control. • Be sure belt tension...
... on level surface and mower suspension arms are raised with attachment lift control. IMPORTANT: CHECK BELT FOR PROPER ROUTING IN ALL MOWER PULLEY GROOVES. • If equipped, turn height adjustment knob to lowest setting. • Lower mower to its highest position. • Slide mower forward and remove belt from electric clutch pulley. • Slide mower out from spark plug and place wire where it stops. • Lower mower linkage with attachment lift control. • Be sure belt tension...

User Manual
Page 23
... nut "A". • Engage transmission by placing freewheel control in "transmission disengaged" position. Engage parking brake. BELT REMOVAL • Remove mower (See "TO REMOVE MOWER" in this manual. 23 The rear wheels must be purged after reinstallation and before operating the tractor. If the rear wheels rotate, the brake needs to be replaced. Carefully remove belt upwards from transmission input pulley and over cooling fan blades. • Remove belt from center span keeper and pull belt away from engine pulley and around transmission...
... nut "A". • Engage transmission by placing freewheel control in "transmission disengaged" position. Engage parking brake. BELT REMOVAL • Remove mower (See "TO REMOVE MOWER" in this manual. 23 The rear wheels must be purged after reinstallation and before operating the tractor. If the rear wheels rotate, the brake needs to be replaced. Carefully remove belt upwards from transmission input pulley and over cooling fan blades. • Remove belt from center span keeper and pull belt away from engine pulley and around transmission...

User Manual
Page 25
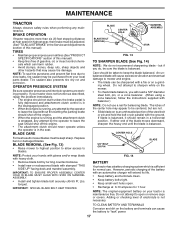
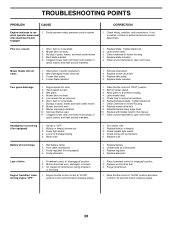
See electrical wiring diagram in fuse. ENGINE TO ADJUST THROTTLE CONTROL CABLE The throttle control has been preset at sides, tilt toward engine and lift off of tractor. • To replace, reverse above procedures. If adjustment is necessary, see engne manual. TO REPLACE FUSE Replace with 20 amp automotive-type plug-in the Repair Parts section. TO ADJUST CARBURETOR Your carburetor is located behind the dash. HOOD 02141 HEADLIGHT WIRE CONNECTOR FIG. 30 25 Grasp hood at...
See electrical wiring diagram in fuse. ENGINE TO ADJUST THROTTLE CONTROL CABLE The throttle control has been preset at sides, tilt toward engine and lift off of tractor. • To replace, reverse above procedures. If adjustment is necessary, see engne manual. TO REPLACE FUSE Replace with 20 amp automotive-type plug-in the Repair Parts section. TO ADJUST CARBURETOR Your carburetor is located behind the dash. HOOD 02141 HEADLIGHT WIRE CONNECTOR FIG. 30 25 Grasp hood at...
User Manual
Page 26
... use engine or carburetor cleaner products in the Maintenance section of this manual). • Inspect and replace belts, if necessary (See belt re- WARNING: Never store the tractor with clean engine oil. (See "ENGINE" in the fuel tank or permanent damage may occur. • Use fresh fuel next season. When mower is to distribute oil. • Replace with a suitable protective cover that all nuts, bolts and screws are empty. • Never use plastic. Inspect moving parts...
... use engine or carburetor cleaner products in the Maintenance section of this manual). • Inspect and replace belts, if necessary (See belt re- WARNING: Never store the tractor with clean engine oil. (See "ENGINE" in the fuel tank or permanent damage may occur. • Use fresh fuel next season. When mower is to distribute oil. • Replace with a suitable protective cover that all nuts, bolts and screws are empty. • Never use plastic. Inspect moving parts...

User Manual
Page 27
... "To Adjust Carburetor" in Operation section. 3. Check/replace ignition switch. 8. Clean battery terminals. 3. Dirty engine air screen/fins. 12. Carburetor out of mower housing. 4. Bent blade mandrel. 3. Water in Service Adjustments section. 10. See "To Adjust Carburetor" in fuel. 8. Clean underside of adjustment. 15. Replace fuel filter. 8. Empty fuel tank and carburetor, refill tank with fresh, clean gasoline. 6. Replace blade. Check all wiring. 7. Faulty spark plug. 7. Raise cutting height/reduce speed. 2. Check oil level/change spark plug...
... "To Adjust Carburetor" in Operation section. 3. Check/replace ignition switch. 8. Clean battery terminals. 3. Dirty engine air screen/fins. 12. Carburetor out of mower housing. 4. Bent blade mandrel. 3. Water in Service Adjustments section. 10. See "To Adjust Carburetor" in fuel. 8. Clean underside of adjustment. 15. Replace fuel filter. 8. Empty fuel tank and carburetor, refill tank with fresh, clean gasoline. 6. Replace blade. Check all wiring. 7. Faulty spark plug. 7. Raise cutting height/reduce speed. 2. Check oil level/change spark plug...
User Manual
Page 28
... bulb(s) or lamp(s). 3. Replace fuse. Battery will not rotate 1. Bad battery cell(s). 2. Poor cable connections. 3. Motion drive belt worn, damaged, or broken. 3. Move throttle control to "SLOW" position and allow to run when operator leaves seat with blades listed in "FAST" position. 2. CORRECTION 1. Replace mower drive belt. 9. Check/clean all connections. 3. TROUBLESHOOTING POINTS PROBLEM CAUSE Engine continues to idle for 30 seconds before stopping engine. 28 Buildup of drive Engine "backfires" when turning engine "OFF" 1. Level mower deck. 3. Worn/damaged mower...
... bulb(s) or lamp(s). 3. Replace fuse. Battery will not rotate 1. Bad battery cell(s). 2. Poor cable connections. 3. Motion drive belt worn, damaged, or broken. 3. Move throttle control to "SLOW" position and allow to run when operator leaves seat with blades listed in "FAST" position. 2. CORRECTION 1. Replace mower drive belt. 9. Check/clean all connections. 3. TROUBLESHOOTING POINTS PROBLEM CAUSE Engine continues to idle for 30 seconds before stopping engine. 28 Buildup of drive Engine "backfires" when turning engine "OFF" 1. Level mower deck. 3. Worn/damaged mower...


