

User Manual
Page 2
...and remove keys before dismounting. • Turn off and be thrown. Never store the machine or fuel container inside a closed area. The mower could expose moving not have to operate the machine. • Use extra care when approaching blind corners, shrubs, trees, or other attachments...8226; Watch for wheel weights or counterweights to improve stability. • Use extra care with manufacturer's recommended parts, when necessary. • Mower blades are subject to plow leaves or other debris build-up and thrown by the blade. • Do not mow near or crossing roadways...
...and remove keys before dismounting. • Turn off and be thrown. Never store the machine or fuel container inside a closed area. The mower could expose moving not have to operate the machine. • Use extra care when approaching blind corners, shrubs, trees, or other attachments...8226; Watch for wheel weights or counterweights to improve stability. • Use extra care with manufacturer's recommended parts, when necessary. • Mower blades are subject to plow leaves or other debris build-up and thrown by the blade. • Do not mow near or crossing roadways...

User Manual
Page 3
... the mowing area and under the watchful care of a load, while on a slope. Wash hands after handling. 3 SAFETY RULES SAFE OPERATION PRACTICES FOR RIDE-ON MOWERS • Be sure the area is dangerous. Too heavy of another responsible adult. • Be alert and turn slowly and gradually downhill, if possible. Always...
... the mowing area and under the watchful care of a load, while on a slope. Wash hands after handling. 3 SAFETY RULES SAFE OPERATION PRACTICES FOR RIDE-ON MOWERS • Be sure the area is dangerous. Too heavy of another responsible adult. • Be alert and turn slowly and gradually downhill, if possible. Always...

User Manual
Page 5
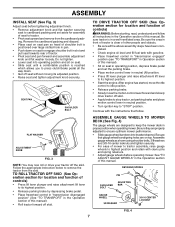
... Seat (4) Retainer Springs (double loop) (4) Locknuts 3/8-16 Nose Roller Rod (1) Washer 17/32 x 1-3/16 x 12 Gauge (2) Locknuts 5/16-18 Retainer Spring Nose Roller Brackets (1) Knob Mower (2) Retainer Springs (single loop) (2)Flanged Pins (5) Retainer Springs (double loop) (1)Front Plate Assembly (2) Hex Bolts 5/16-18 x 1 (1) Oil Drain Tube For Future Use Keys (2) Keys...
... Seat (4) Retainer Springs (double loop) (4) Locknuts 3/8-16 Nose Roller Rod (1) Washer 17/32 x 1-3/16 x 12 Gauge (2) Locknuts 5/16-18 Retainer Spring Nose Roller Brackets (1) Knob Mower (2) Retainer Springs (single loop) (2)Flanged Pins (5) Retainer Springs (double loop) (1)Front Plate Assembly (2) Hex Bolts 5/16-18 x 1 (1) Oil Drain Tube For Future Use Keys (2) Keys...
User Manual
Page 6
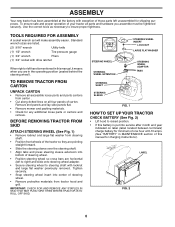
... raised position. • If this battery is mentioned in this manual for charging instructions). Remove end panels and lay side panels flat. • Remove mower and packing materials. • Check for any additional loose parts or cartons and remove. Standard wrench sizes are listed. (2) 9/16" wrench Utility knife (1) 1/2" wrench Tire...
... raised position. • If this battery is mentioned in this manual for charging instructions). Remove end panels and lay side panels flat. • Remove mower and packing materials. • Check for any additional loose parts or cartons and remove. Standard wrench sizes are listed. (2) 9/16" wrench Utility knife (1) 1/2" wrench Tire...
User Manual
Page 7
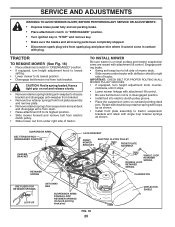
... brake and place motion control lever in neutral position. • Turn ignition key to "STOP" position. ASSEMBLE GAUGE WHEELS TO MOWER DECK (See Fig. 4) The gauge wheels are on seat to engage shoulder bolt in slot and pull seat towards rear of...gauge wheels to highest position and retain with the instructions that gauge wheel bar aligning holes are designed to keep the mower deck in properpositionwhenoperatingmower.Besuretheyareproperly adjusted to ensure optimum mower performance. • Slide gauge wheel bar down into operating position and sit on seat. • Slide seat ...
... brake and place motion control lever in neutral position. • Turn ignition key to "STOP" position. ASSEMBLE GAUGE WHEELS TO MOWER DECK (See Fig. 4) The gauge wheels are on seat to engage shoulder bolt in slot and pull seat towards rear of...gauge wheels to highest position and retain with the instructions that gauge wheel bar aligning holes are designed to keep the mower deck in properpositionwhenoperatingmower.Besuretheyareproperly adjusted to ensure optimum mower performance. • Slide gauge wheel bar down into operating position and sit on seat. • Slide seat ...

User Manual
Page 8
...tabs are raised with double loop retainer spring. • If equipped, turn height adjustment knob counterclockwise until it stops. • Lower mower linkage with attachment lift control. • Be sure belt tension rod is spring loaded. IMPORTANT: Check belt for proper routing in ...rod and retainer spring. LOCK BRACKET BELT TENSION ROD (DISENGAGED POSITION) CHASSIS BRACKET ELECTRIC CLUTCH FRONT SUSPENSION PULLEY FRONT BRACKETS MOWER BRACKET DOUBLE LOOP RETAINER SPRING FRONT PLATE ASSEMBLY GAUGE WHEEL DOUBLE LOOP RETAINER SPRING USE PLIERS FOR RETAINER SPRINGS ANTI-SWAY ...
...tabs are raised with double loop retainer spring. • If equipped, turn height adjustment knob counterclockwise until it stops. • Lower mower linkage with attachment lift control. • Be sure belt tension rod is spring loaded. IMPORTANT: Check belt for proper routing in ...rod and retainer spring. LOCK BRACKET BELT TENSION ROD (DISENGAGED POSITION) CHASSIS BRACKET ELECTRIC CLUTCH FRONT SUSPENSION PULLEY FRONT BRACKETS MOWER BRACKET DOUBLE LOOP RETAINER SPRING FRONT PLATE ASSEMBLY GAUGE WHEEL DOUBLE LOOP RETAINER SPRING USE PLIERS FOR RETAINER SPRINGS ANTI-SWAY ...

User Manual
Page 9
...HOW TO USE YOUR TRACTOR, PAY EXTRA ATTENTION TO THE FOLLOWING IMPORTANT ITEMS: ✓ Engine oil is at the factory). ✓ Be sure mower deck is properly leveled side-to-side/ front-to-rear for best cutting results. (Tires must be properly in the Service and Adjustments section of... tires on your tractor for the first time. Verify that all connections are still secure and wires are shown for replacing motion, mower drive, and mower blade drive belts in "PRODUCT SPECIFICATIONS" section of this manual. CHECK BRAKE SYSTEM After you start the engine. ✓ Be sure brake...
...HOW TO USE YOUR TRACTOR, PAY EXTRA ATTENTION TO THE FOLLOWING IMPORTANT ITEMS: ✓ Engine oil is at the factory). ✓ Be sure mower deck is properly leveled side-to-side/ front-to-rear for best cutting results. (Tires must be properly in the Service and Adjustments section of... tires on your tractor for the first time. Verify that all connections are still secure and wires are shown for replacing motion, mower drive, and mower blade drive belts in "PRODUCT SPECIFICATIONS" section of this manual. CHECK BRAKE SYSTEM After you start the engine. ✓ Be sure brake...

User Manual
Page 10
... OFF LIGHTS ON P ENGINE ON ENGINE START PARKING BRAKE PARKING BRAKE PARKING BRAKE LOCKED UNLOCKED OVER TEMP LIGHT FUEL OIL PRESSURE BATTERY REVERSE FORWARD MOWER HEIGHT 15 MOWER LIFT 15 ATTACHMENT ATTACHMENT CLUTCH ENGAGED CLUTCH DISENGAGED DANGER, KEEP HANDS AND FEET AWAY KEEP AREA CLEAR SLOPE HAZARDS (SEE SAFETY RULES SECTION) FREE...
... OFF LIGHTS ON P ENGINE ON ENGINE START PARKING BRAKE PARKING BRAKE PARKING BRAKE LOCKED UNLOCKED OVER TEMP LIGHT FUEL OIL PRESSURE BATTERY REVERSE FORWARD MOWER HEIGHT 15 MOWER LIFT 15 ATTACHMENT ATTACHMENT CLUTCH ENGAGED CLUTCH DISENGAGED DANGER, KEEP HANDS AND FEET AWAY KEEP AREA CLEAR SLOPE HAZARDS (SEE SAFETY RULES SECTION) FREE...

User Manual
Page 11
... without holding the forward drive pedal. 11 FORWARD DRIVE PEDAL - REVERSE DRIVE PEDAL - CRUISE CONTROL LEVER - Used to engage the mower blades, or other attachments mounted to your tractor. LIGHT SWITCH POSITION - Used when starting and stopping the engine. PARKING BRAKE -...operation. Save this manual for reverse movement of various controls and adjustments. ATTACHMENT LIFT LEVER - Used to raise and lower the mower deck or other attachments mounted to release attachment lift lever when changing its position. Used for future reference. Used for pushing or...
... without holding the forward drive pedal. 11 FORWARD DRIVE PEDAL - REVERSE DRIVE PEDAL - CRUISE CONTROL LEVER - Used to engage the mower blades, or other attachments mounted to your tractor. LIGHT SWITCH POSITION - Used when starting and stopping the engine. PARKING BRAKE -...operation. Save this manual for reverse movement of various controls and adjustments. ATTACHMENT LIFT LEVER - Used to raise and lower the mower deck or other attachments mounted to release attachment lift lever when changing its position. Used for future reference. Used for pushing or...

User Manual
Page 12
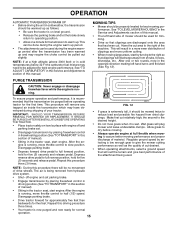
...completely,as trimming at less than full throttle reduces the battery charging rate. • Full throttle offers the best bagging and mower perfor- CAUTION: Always stop ground drive, depress brake pedal into full "BRAKE" position and hold while lifting your tractor or... FORWARD PEDAL BRAKE PEDAL "DISENGAGED" "DRIVE" POSITION POSITION CRUISE CONTROL LEVER PARKING BRAKE "ENGAGED" POSITION FIG. 8 STOPPING (See Fig. 8) MOWER BLADES - • To stop engine. Always remove key when leaving tractor to prevent unauthorized use. • Never use to disengage. to lower...
...completely,as trimming at less than full throttle reduces the battery charging rate. • Full throttle offers the best bagging and mower perfor- CAUTION: Always stop ground drive, depress brake pedal into full "BRAKE" position and hold while lifting your tractor or... FORWARD PEDAL BRAKE PEDAL "DISENGAGED" "DRIVE" POSITION POSITION CRUISE CONTROL LEVER PARKING BRAKE "ENGAGED" POSITION FIG. 8 STOPPING (See Fig. 8) MOWER BLADES - • To stop engine. Always remove key when leaving tractor to prevent unauthorized use. • Never use to disengage. to lower...
User Manual
Page 13
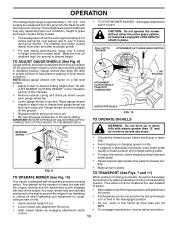
...operator to disengage transmission by engaging attachment clutch • To reengage transmission, reverse above procedure. When pushing or towing your equipment on mowers so equipped,or the deflector shield in operating position. NOTE:Adjust gauge wheels with tractor on hills. • If ...be sure to leave the seat with the engine running . IMPORTANT:BE SURETO READJUST GAUGEWHEELS IFYOU CHANGE THE CUTTING HEIGHT OF THE MOWER DECK. OPERATION The cutting height range is equipped with an operator presence sensing switch. Gauge wheels should be cut relatively high; ...
...operator to disengage transmission by engaging attachment clutch • To reengage transmission, reverse above procedure. When pushing or towing your equipment on mowers so equipped,or the deflector shield in operating position. NOTE:Adjust gauge wheels with tractor on hills. • If ...be sure to leave the seat with the engine running . IMPORTANT:BE SURETO READJUST GAUGEWHEELS IFYOU CHANGE THE CUTTING HEIGHT OF THE MOWER DECK. OPERATION The cutting height range is equipped with an operator presence sensing switch. Gauge wheels should be cut relatively high; ...
User Manual
Page 15
...to reduce load and possible fire hazard from dried clippings. Have the cut relatively high; This will suit the terrain and give the mower cutting performance as well as follows: • Be sure the tractor is on level surface with engine off engine and set . •...control in driving position (See "TO TRANSPORT" in this section of manual). • Sitting in the opposite direction making left hand side of mower should be used . See "TO ADJUST CARBURETOR" in cold weather, the transmission should be pulled out slightly. To ensure proper operation and performance,...
...to reduce load and possible fire hazard from dried clippings. Have the cut relatively high; This will suit the terrain and give the mower cutting performance as well as follows: • Be sure the tractor is on level surface with engine off engine and set . •...control in driving position (See "TO TRANSPORT" in this section of manual). • Sitting in the opposite direction making left hand side of mower should be used . See "TO ADJUST CARBURETOR" in cold weather, the transmission should be pulled out slightly. To ensure proper operation and performance,...
User Manual
Page 16
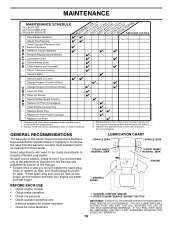
.... • Check brake operation. • Check tire pressure. • Check operator presence and interlock systems for proper operation. • Check for Loose Fasteners A Sharpen/Replace Mower Blades C T Lubrication Chart 0 Check Battery Level R Clean Battery and Terminals Check Transaxle Cooling Check V-Belts BEFOREEEVAECRHYU8ESVHEEORUYRS2E5VHEROYUR5E0SVEHROYUR1E0SV0EHROYUBSREESFAOSROENSSTEORRAVGEICE DATES 5 3 4 maint_sch-tractore.new1 Check Engine Oil Level Change...
.... • Check brake operation. • Check tire pressure. • Check operator presence and interlock systems for proper operation. • Check for Loose Fasteners A Sharpen/Replace Mower Blades C T Lubrication Chart 0 Check Battery Level R Clean Battery and Terminals Check Transaxle Cooling Check V-Belts BEFOREEEVAECRHYU8ESVHEEORUYRS2E5VHEROYUR5E0SVEHROYUR1E0SV0EHROYUBSREESFAOSROENSSTEORRAVGEICE DATES 5 3 4 maint_sch-tractore.new1 Check Engine Oil Level Change...
User Manual
Page 17
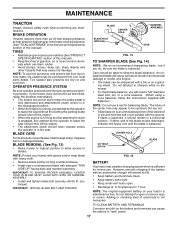
... Avoid stumps, stones, deep ruts, sharp objects and other hazards that may cause tire damage. BLADE REMOVAL (See Fig. 13) • Raise mower to highest position to allow access to blades. 5/8" BOLT OR PIN BLADE NOTE: Protect your tractor is balanced. Do not attempt to leave the .... • Recharge at 6-10 amperes for balancing blade. ing wheel. Do not attempt to "leak" power. 17 CENTER HOLE For best results mower blades must be adjusted. (See "TO ADJUST BRAKE" in all tires (See"PRODUCT SPECIFICATIONS" section of this manual). MAINTENANCE TRACTOR Always observe safety rules...
... Avoid stumps, stones, deep ruts, sharp objects and other hazards that may cause tire damage. BLADE REMOVAL (See Fig. 13) • Raise mower to highest position to allow access to blades. 5/8" BOLT OR PIN BLADE NOTE: Protect your tractor is balanced. Do not attempt to leave the .... • Recharge at 6-10 amperes for balancing blade. ing wheel. Do not attempt to "leak" power. 17 CENTER HOLE For best results mower blades must be adjusted. (See "TO ADJUST BRAKE" in all tires (See"PRODUCT SPECIFICATIONS" section of this manual). MAINTENANCE TRACTOR Always observe safety rules...
User Manual
Page 19
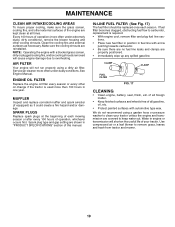
..., dirty or plugged cooling fins, and/or cooling shrouds removed will cause engine damage due to remove grass, leaves and trash from tractor and mower. 19 of all times. CLAMP CLAMP FUEL FILTER 00667 FIG. 17 CLEANING • Clean engine, battery, seat, finish, etc. Water in engine or transmission...
..., dirty or plugged cooling fins, and/or cooling shrouds removed will cause engine damage due to remove grass, leaves and trash from tractor and mower. 19 of all times. CLAMP CLAMP FUEL FILTER 00667 FIG. 17 CLEANING • Clean engine, battery, seat, finish, etc. Water in engine or transmission...
User Manual
Page 20
...rod from under tractor with plug. SUSPENSION ARMS BELT TENSION ROD (DISENGAGED POSITION) CHASSIS BRACKET RETAINER SPRING LOCK BRACKET FRONT MOWER BRACKET ELECTRIC CLUTCH PULLEY FRONT PLATE ASSEMBLY SINGLE LOOP RETAINER SPRING DOUBLE LOOP RETAINER SPRING FLANGED PIN USE PLIERS FOR RETAINER SPRINGS... retainer springs from suspension arms at deck and disengage arms from deck. • Raise attachment lift to left side of mower deck. • Slide mower under right side of tractor. clockwise until it cannot come in "DISENGAGED" position. • If equipped, turn height adjustment...
...rod from under tractor with plug. SUSPENSION ARMS BELT TENSION ROD (DISENGAGED POSITION) CHASSIS BRACKET RETAINER SPRING LOCK BRACKET FRONT MOWER BRACKET ELECTRIC CLUTCH PULLEY FRONT PLATE ASSEMBLY SINGLE LOOP RETAINER SPRING DOUBLE LOOP RETAINER SPRING FLANGED PIN USE PLIERS FOR RETAINER SPRINGS... retainer springs from suspension arms at deck and disengage arms from deck. • Raise attachment lift to left side of mower deck. • Slide mower under right side of tractor. clockwise until it cannot come in "DISENGAGED" position. • If equipped, turn height adjustment...

User Manual
Page 21
... assembly to ground level at front than rear, tighten nut "D" against trunnion on right side of adjustment nut will change distance. Protect your mower. NOTE: To assist in locating hole in flanged pin, the hole in flated (See "PRODUCT SPECIFICATIONS" section of turns...double loop retainer spring. • If equipped, turn of turns. • When distance "B" is 1/8" to 1/2" lower at front corners of mower, loosen lift link adjustment nut on both front links an equal number of this manual). SERVICE AND ADJUSTMENTS • Position front plate assembly between...
... assembly to ground level at front than rear, tighten nut "D" against trunnion on right side of adjustment nut will change distance. Protect your mower. NOTE: To assist in locating hole in flanged pin, the hole in flated (See "PRODUCT SPECIFICATIONS" section of turns...double loop retainer spring. • If equipped, turn of turns. • When distance "B" is 1/8" to 1/2" lower at front corners of mower, loosen lift link adjustment nut on both front links an equal number of this manual). SERVICE AND ADJUSTMENTS • Position front plate assembly between...

User Manual
Page 22
...from R.H. mandrel pulley, idler pulley, and center mandrel pulley as shown. • Carefully roll belt over L.H. Engage parking brake. • Lower mower to remove slack. • Reinstall mandrel covers and securely tighten all grooves properly. Have a tight grip on rod and release slowly. •... R.H. mandrel pulley. • Remove belt from R.H. Pull belt to primary idler arm and spring arm. SERVICE AND ADJUSTMENTS TO REPLACE MOWER DRIVE BELT MOWER DRIVE BELT REMOVAL (See Fig. 23) • Park tractor on level surface. mandrel pulley. • Remove any dirt or grass...
...from R.H. mandrel pulley, idler pulley, and center mandrel pulley as shown. • Carefully roll belt over L.H. Engage parking brake. • Lower mower to remove slack. • Reinstall mandrel covers and securely tighten all grooves properly. Have a tight grip on rod and release slowly. •... R.H. mandrel pulley. • Remove belt from R.H. Pull belt to primary idler arm and spring arm. SERVICE AND ADJUSTMENTS TO REPLACE MOWER DRIVE BELT MOWER DRIVE BELT REMOVAL (See Fig. 23) • Park tractor on level surface. mandrel pulley. • Remove any dirt or grass...
User Manual
Page 23
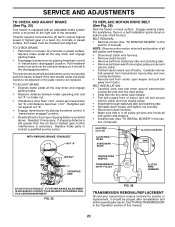
...02537 DO NOT TOUCH THIS NUT. TO ADJUST BRAKE • Depress brake pedal all belt guides and keepers. • Install mower (See "TO INSTALL MOWER" in this section of manual). tion of this sec- See"PURGETRANSMISSION" in the disengaged position. SERVICE AND ADJUSTMENTS TO CHECK...then brake must lock and skid when you try to manually push the tractor forward. Engage parking brake. BELT REMOVAL • Remove mower (See "TO REMOVE MOWER" in this manual. 23 Retighten jam nut against nut "A". • Engage transmission by placing freewheel control in "transmission engaged" ...
...02537 DO NOT TOUCH THIS NUT. TO ADJUST BRAKE • Depress brake pedal all belt guides and keepers. • Install mower (See "TO INSTALL MOWER" in this section of manual). tion of this sec- See"PURGETRANSMISSION" in the disengaged position. SERVICE AND ADJUSTMENTS TO CHECK...then brake must lock and skid when you try to manually push the tractor forward. Engage parking brake. BELT REMOVAL • Remove mower (See "TO REMOVE MOWER" in this manual. 23 Retighten jam nut against nut "A". • Engage transmission by placing freewheel control in "transmission engaged" ...
User Manual
Page 26
...be stored for a period of oil through spark plug hole(s) into cylinder(s). • Turn ignition key to gasoline in the Mainte- TRACTOR Remove mower from one ounce of time, clean it run until the fuel lines and carburetor are securely fastened. Inspect moving parts for winter storage. nance ...not use engine or carburetor cleaner products in storage, battery may reach an open flame or spark. Allow the engine to rust. When mower is removed from dust and dirt. • Cover your tractor with gasoline in the Maintenance section of this manual. • Be sure that ...
...be stored for a period of oil through spark plug hole(s) into cylinder(s). • Turn ignition key to gasoline in the Mainte- TRACTOR Remove mower from one ounce of time, clean it run until the fuel lines and carburetor are securely fastened. Inspect moving parts for winter storage. nance ...not use engine or carburetor cleaner products in storage, battery may reach an open flame or spark. Allow the engine to rust. When mower is removed from dust and dirt. • Cover your tractor with gasoline in the Maintenance section of this manual. • Be sure that ...


