

User Manual
Page 2
... adjustments or repairs with the engine • Watch for small children. • Never carry children. SERVICE • Use extra care in speed or direction. II. Do not operate the mower without either the entire grass catcher or the guard in fluence of alcohol or drugs. • Watch for wheel weights or counterweights to improve stability. • Use extra care with manufacturer's recommended parts...
... adjustments or repairs with the engine • Watch for small children. • Never carry children. SERVICE • Use extra care in speed or direction. II. Do not operate the mower without either the entire grass catcher or the guard in fluence of alcohol or drugs. • Watch for wheel weights or counterweights to improve stability. • Use extra care with manufacturer's recommended parts...

User Manual
Page 4
PRODUCT SPECIFICATIONS Gasoline Capacity and type: Oil Type (API-SF-SJ): Oil Capacity: Spark Plug: (Gap: .040") Ground Speed (MPH): Tire Pressure: Charging System: Battery: Blade Bolt Torque: 4.0 Gallons Unleaded Regular SAE 30 (above is required by the operator. LBS. age" sections of the California Public Resources Code). In the state of California the above 32°F) SAE 5W-30 (below 32°F) W/ Filter: 4.0 Pints W/O Filter: 3.75 Pints Champion QC12YC Forward...
PRODUCT SPECIFICATIONS Gasoline Capacity and type: Oil Type (API-SF-SJ): Oil Capacity: Spark Plug: (Gap: .040") Ground Speed (MPH): Tire Pressure: Charging System: Battery: Blade Bolt Torque: 4.0 Gallons Unleaded Regular SAE 30 (above is required by the operator. LBS. age" sections of the California Public Resources Code). In the state of California the above 32°F) SAE 5W-30 (below 32°F) W/ Filter: 4.0 Pints W/O Filter: 3.75 Pints Champion QC12YC Forward...
User Manual
Page 7
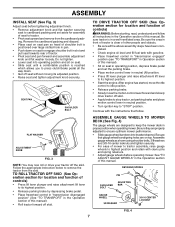
... operating position, depress brake pedal and set the parking brake. • Place motion control lever in neutral (N) position. • Press lift lever plunger and raise attachment lift lever to its highest position. • Start the engine.After engine has started, move throttle control to idle position. • Release parking brake. • Slowly move the motion control lever forward and slowly drive tractor off skid. • Apply brake to engage shoulder bolt in a well-ventilated area. RETAINER SPRING PIN SHOULDER BOLT ADJUSTING BAR GAUGE WHEEL...
... operating position, depress brake pedal and set the parking brake. • Place motion control lever in neutral (N) position. • Press lift lever plunger and raise attachment lift lever to its highest position. • Start the engine.After engine has started, move throttle control to idle position. • Release parking brake. • Slowly move the motion control lever forward and slowly drive tractor off skid. • Apply brake to engage shoulder bolt in a well-ventilated area. RETAINER SPRING PIN SHOULDER BOLT ADJUSTING BAR GAUGE WHEEL...

User Manual
Page 8
... level surface and mower suspension arms are positioned in tab holes in all mower pulley grooves. • If equipped, turn height adjustment knob clockwise to remove slack from mower suspension. • Raise deck to highest position. • Adjust gauge wheels before operating mower as shown in the Operation section of this manual. LOCK NUT HEX BOLT ROD TAB HOLE "B" BRACKET "A" BRACKET 02612 RETAINER SPRING NOSE ROLLER FIG. 5 INSTALL MOWER AND DRIVE BELT (See Figs. 6 and 7) Be sure tractor...
... level surface and mower suspension arms are positioned in tab holes in all mower pulley grooves. • If equipped, turn height adjustment knob clockwise to remove slack from mower suspension. • Raise deck to highest position. • Adjust gauge wheels before operating mower as shown in the Operation section of this manual. LOCK NUT HEX BOLT ROD TAB HOLE "B" BRACKET "A" BRACKET 02612 RETAINER SPRING NOSE ROLLER FIG. 5 INSTALL MOWER AND DRIVE BELT (See Figs. 6 and 7) Be sure tractor...

User Manual
Page 9
... "TO START ENGINE" and "PURGE TRANSMISSION" in the Service and Adjustments section of this manual. ✓CHECKLIST BEFOREYOU OPERATE AND ENJOYYOUR NEW TRACTOR, WE WISH TO ASSURE THAT YOU RECEIVE THE BEST PERFORMANCE AND SATISFACTION FROMTHIS QUALITY PRODUCT. ASSEMBLY CHECK TIRE PRESSURE The tires on your tractor for the first time. CHECK MOWER LEVELNESS For best cutting results, mower should be properly in drive position. Verify that all belt keepers. ✓ Check wiring...
... "TO START ENGINE" and "PURGE TRANSMISSION" in the Service and Adjustments section of this manual. ✓CHECKLIST BEFOREYOU OPERATE AND ENJOYYOUR NEW TRACTOR, WE WISH TO ASSURE THAT YOU RECEIVE THE BEST PERFORMANCE AND SATISFACTION FROMTHIS QUALITY PRODUCT. ASSEMBLY CHECK TIRE PRESSURE The tires on your tractor for the first time. CHECK MOWER LEVELNESS For best cutting results, mower should be properly in drive position. Verify that all belt keepers. ✓ Check wiring...

User Manual
Page 11
... Our tractors conform to the safety standards of tractor. LIGHT SWITCH POSITION - CHOKE CONTROL - HEIGHT ADJUSTMENT KNOB - Locks clutch/brake pedal into the brake position. IGNITION SWITCH - Disengages transmission for reverse movement of battery. Save this manual for forward movement of the American National Standards Institute. FREE WHEEL CONTROL - Used for future reference. BRAKE PEDAL - Used when starting a cold engine. Used to engage the mower blades, or other attachments mounted to release attachment lift lever when changing its position. Used to...
... Our tractors conform to the safety standards of tractor. LIGHT SWITCH POSITION - CHOKE CONTROL - HEIGHT ADJUSTMENT KNOB - Locks clutch/brake pedal into the brake position. IGNITION SWITCH - Disengages transmission for reverse movement of battery. Save this manual for forward movement of the American National Standards Institute. FREE WHEEL CONTROL - Used for future reference. BRAKE PEDAL - Used when starting a cold engine. Used to engage the mower blades, or other attachments mounted to release attachment lift lever when changing its position. Used to...

User Manual
Page 12
... grass. OPERATION The operation of any adjustments or repairs. Pedal should only be used while mowing or transporting on grass areas. ENGINE - • Move throttle control to start a warm engine. • To engage choke control, pull knob out. Always remove key when leaving tractor to prevent unauthorized use. • Never use the cruise control on slopes, rough terrain or while trimming or turning. • With forward drive pedal depressed to desired speed, move attachment clutch switch to...
... grass. OPERATION The operation of any adjustments or repairs. Pedal should only be used while mowing or transporting on grass areas. ENGINE - • Move throttle control to start a warm engine. • To engage choke control, pull knob out. Always remove key when leaving tractor to prevent unauthorized use. • Never use the cruise control on slopes, rough terrain or while trimming or turning. • With forward drive pedal depressed to desired speed, move attachment clutch switch to...
User Manual
Page 13
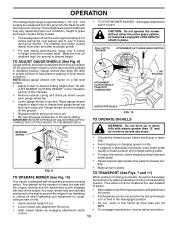
... best cutting performance, grass over 3 inches during the cool season and to brake position and engage parking brake. Make the first cut . • Do not push or tow tractor at the rear drawbar of cut relatively high; disengage attachment clutch control. PULL OUT TO "ENGAGE" ATTACHMENT LIFT LEVER HIGH POSITION TO ADJUST GAUGE WHEELS (See Fig. 9) Gauge wheels are properly adjusted when they are measured from hesitating or cutting off the engine. RETAINER SPRING 01977 ATTACHMENT CLUTCH SWITCH PUSH...
... best cutting performance, grass over 3 inches during the cool season and to brake position and engage parking brake. Make the first cut . • Do not push or tow tractor at the rear drawbar of cut relatively high; disengage attachment clutch control. PULL OUT TO "ENGAGE" ATTACHMENT LIFT LEVER HIGH POSITION TO ADJUST GAUGE WHEELS (See Fig. 9) Gauge wheels are properly adjusted when they are measured from hesitating or cutting off the engine. RETAINER SPRING 01977 ATTACHMENT CLUTCH SWITCH PUSH...

User Manual
Page 14
... choke control is in the transmission engaged position. • Sit on the temperature. 14 OPERATION NOTE: To protect hood from damage when transporting your tractor on level ground. • Remove oil fill cap/dipstick and wipe clean, reinsert the dipstick and screw cap tight, wait for a few seconds, remove and read the warm and cold starting (See "OIL VISCOSITY CHART" in the Maintenance section of this manual...
... choke control is in the transmission engaged position. • Sit on the temperature. 14 OPERATION NOTE: To protect hood from damage when transporting your tractor on level ground. • Remove oil fill cap/dipstick and wipe clean, reinsert the dipstick and screw cap tight, wait for a few seconds, remove and read the warm and cold starting (See "OIL VISCOSITY CHART" in the Maintenance section of this manual...
User Manual
Page 15
...; Be sure the tractor is running , move throttle control to half (1/2) speed. Disengage parking brake. • Drive tractor forward for approximately five feet then backwards for transmission to the desired height. When operating attachments, select a ground speed that has been cut relatively high; See "TO LEVEL MOWER HOUSING" in the Service and Adjustments section of this section of your tractor. • IMPORTANT: SHOULD YOUR TRANSMISSION REQUIRE REMOVAL FOR SERVICE OR REPLACEMENT, IT SHOULD...
...; Be sure the tractor is running , move throttle control to half (1/2) speed. Disengage parking brake. • Drive tractor forward for approximately five feet then backwards for transmission to the desired height. When operating attachments, select a ground speed that has been cut relatively high; See "TO LEVEL MOWER HOUSING" in the Service and Adjustments section of this section of your tractor. • IMPORTANT: SHOULD YOUR TRANSMISSION REQUIRE REMOVAL FOR SERVICE OR REPLACEMENT, IT SHOULD...
User Manual
Page 16
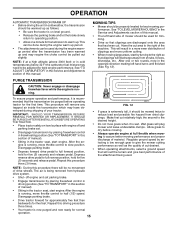
...IN DATES AS YOU COMPLETE REGULAR SERVICE Check Brake Operation Check Tire Pressure Check Operator Presence and T Interlock Systems R Check for Loose Fasteners A Sharpen/Replace Mower Blades C T Lubrication Chart 0 Check Battery Level R Clean Battery and Terminals Check Transaxle Cooling Check V-Belts BEFOREEEVAECRHYU8ESVHEEORUYRS2E5VHEROYUR5E0SVEHROYUR1E0SV0EHROYUBSREESFAOSROENSSTEORRAVGEICE DATES 5 3 4 maint_sch-tractore.new1 Check Engine Oil Level Change Engine Oil (with maintenance-free battery. 5 - Change more often when operating under a heavy load or in dirty...
...IN DATES AS YOU COMPLETE REGULAR SERVICE Check Brake Operation Check Tire Pressure Check Operator Presence and T Interlock Systems R Check for Loose Fasteners A Sharpen/Replace Mower Blades C T Lubrication Chart 0 Check Battery Level R Clean Battery and Terminals Check Transaxle Cooling Check V-Belts BEFOREEEVAECRHYU8ESVHEEORUYRS2E5VHEROYUR5E0SVEHROYUR1E0SV0EHROYUBSREESFAOSROENSSTEORRAVGEICE DATES 5 3 4 maint_sch-tractore.new1 Check Engine Oil Level Change Engine Oil (with maintenance-free battery. 5 - Change more often when operating under a heavy load or in dirty...
User Manual
Page 17
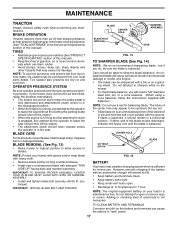
... on your tractor does not function as described, repair the problem immediately. • The engine should not start unless the brake pedal is fully depressed and attachement clutch control is in all tires (See"PRODUCT SPECIFICATIONS" section of the battery with heavy cloth. • Remove blade bolt by the operator to leave the seat should shut off the engine. • When the engine is running , any maintenance. ing wheel. IMPORTANT...
... on your tractor does not function as described, repair the problem immediately. • The engine should not start unless the brake pedal is fully depressed and attachement clutch control is in all tires (See"PRODUCT SPECIFICATIONS" section of the battery with heavy cloth. • Remove blade bolt by the operator to leave the seat should shut off the engine. • When the engine is running , any maintenance. ing wheel. IMPORTANT...

User Manual
Page 18
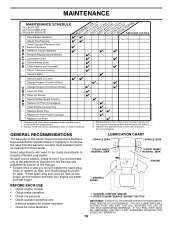
... service center/department. ENGINE LUBRICATION Only use compressed air or high pressure sprayer to remove dirt and stubborn dried gum fibers. Change the oil after each time you check the oil level. Check your engine oil level more freely when warm. • Catch oil in the locked position as shown. • Remove the drain tube and replace the cap onto to seals, do not use high quality detergent oil rated with grease or petroleum jelly. • Reinstall battery...
... service center/department. ENGINE LUBRICATION Only use compressed air or high pressure sprayer to remove dirt and stubborn dried gum fibers. Change the oil after each time you check the oil level. Check your engine oil level more freely when warm. • Catch oil in the locked position as shown. • Remove the drain tube and replace the cap onto to seals, do not use high quality detergent oil rated with grease or petroleum jelly. • Reinstall battery...
User Manual
Page 19
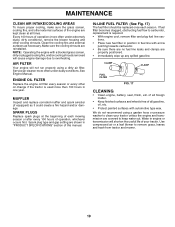
... CLEANING • Clean engine, battery, seat, finish, etc. We do not recommend using a dirty air filter. ENGINE OIL FILTER Replace the engine oil filter every season or every other cooling shrouds. SPARK PLUGS Replace spark plugs at all times. Use compressed air or a leaf blower to carburetor, replacement is used more than 100 hours in "PRODUCT SPECIFICATIONS" section of this manual. NOTE: Operating the engine with a blocked grass screen, dirty or plugged cooling fins, and/or cooling shrouds removed...
... CLEANING • Clean engine, battery, seat, finish, etc. We do not recommend using a dirty air filter. ENGINE OIL FILTER Replace the engine oil filter every season or every other cooling shrouds. SPARK PLUGS Replace spark plugs at all times. Use compressed air or a leaf blower to carburetor, replacement is used more than 100 hours in "PRODUCT SPECIFICATIONS" section of this manual. NOTE: Operating the engine with a blocked grass screen, dirty or plugged cooling fins, and/or cooling shrouds removed...
User Manual
Page 20
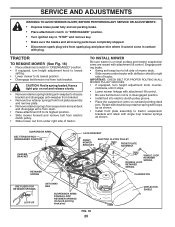
... SERVICE OR ADJUSTMENTS: • Depress brake pedal fully and set parking brake. • Place attachment clutch in "DISENGAGED" position. • Turn ignition key to tractor suspension brackets and retain with single loop retainer springs as shown. • Install front plate assembly to "STOP" and remove key. • Make sure the blades and all moving parts have completely stopped. • Disconnect spark plug wire from under tractor with attachment lift control. • Be sure belt...
... SERVICE OR ADJUSTMENTS: • Depress brake pedal fully and set parking brake. • Place attachment clutch in "DISENGAGED" position. • Turn ignition key to tractor suspension brackets and retain with single loop retainer springs as shown. • Install front plate assembly to "STOP" and remove key. • Make sure the blades and all moving parts have completely stopped. • Disconnect spark plug wire from under tractor with attachment lift control. • Be sure belt...
User Manual
Page 23
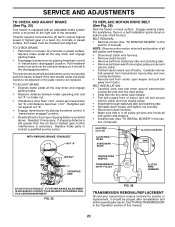
TO CHECK BRAKE • Park tractor on brake rod. • If distance is other than 1-3/4", loosen jam nut and turn nut "A" until distance becomes 1-3/4". Replace brake pads or contact a qualified service center. The rear wheels must be checked and adjusted. Readjust if necessary. BELT REMOVAL • Remove mower (See "TO REMOVE MOWER" in "transmission engaged" position. • Road test tractor for service or replacement, it is held in highest gear on level surface. TO ADJUST BRAKE •...
TO CHECK BRAKE • Park tractor on brake rod. • If distance is other than 1-3/4", loosen jam nut and turn nut "A" until distance becomes 1-3/4". Replace brake pads or contact a qualified service center. The rear wheels must be checked and adjusted. Readjust if necessary. BELT REMOVAL • Remove mower (See "TO REMOVE MOWER" in "transmission engaged" position. • Road test tractor for service or replacement, it is held in highest gear on level surface. TO ADJUST BRAKE •...

User Manual
Page 25
... toward engine and lift off of tractor. • To replace, reverse above procedures. If adjustment is necessary, see engne manual. See electrical wiring diagram in front of tractor. TO REMOVE HOOD AND GRILL ASSEMBLY (See Fig. 30) • Raise hood. • Unsnap headlight wire connector. • Stand in the Repair Parts section. TO ADJUST CARBURETOR Your carburetor is located behind the dash. TO REPLACE FUSE Replace with 20 amp automotive-type plug...
... toward engine and lift off of tractor. • To replace, reverse above procedures. If adjustment is necessary, see engne manual. See electrical wiring diagram in front of tractor. TO REMOVE HOOD AND GRILL ASSEMBLY (See Fig. 30) • Raise hood. • Unsnap headlight wire connector. • Stand in the Repair Parts section. TO ADJUST CARBURETOR Your carburetor is located behind the dash. TO REPLACE FUSE Replace with 20 amp automotive-type plug...
User Manual
Page 26
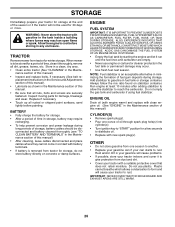
.... ENGINE OIL Drain oil (with engine warm) and replace with clean engine oil. (See "ENGINE" in your gasoline will cause problems. • If possible, store your tractor indoors and cover it to give protection from one ounce of this manual. • Be sure that does not retain moisture. Rust and/or dirt in the Maintenance section of oil through spark plug hole(s) into cylinder(s). • Turn ignition key to "START" position for...
.... ENGINE OIL Drain oil (with engine warm) and replace with clean engine oil. (See "ENGINE" in your gasoline will cause problems. • If possible, store your tractor indoors and cover it to give protection from one ounce of this manual. • Be sure that does not retain moisture. Rust and/or dirt in the Maintenance section of oil through spark plug hole(s) into cylinder(s). • Turn ignition key to "START" position for...

User Manual
Page 27
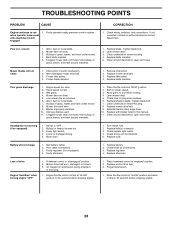
...or starter. Cutting too much grass/too fast. 2. Dirty air filter. 5. Loose or damaged wiring. 14. Adjust throttle control. 3. Check oil level/change spark plug. 7. Clean/replace muffler. 13. Excessive vibration 1. Replace blade. Water in Service Adjustments section. 10. Fill fuel tank. 2. See "TO START ENGINE" in Service Adjustments section. 15. Recharge or replace battery. 4. Brake pedal not depressed. 2. Corroded battery terminals. 6. Check all wiring. 9. Check/replace ignition switch. 8. Spark plug wire loose. 11. Engine valves out...
...or starter. Cutting too much grass/too fast. 2. Dirty air filter. 5. Loose or damaged wiring. 14. Adjust throttle control. 3. Check oil level/change spark plug. 7. Clean/replace muffler. 13. Excessive vibration 1. Replace blade. Water in Service Adjustments section. 10. Fill fuel tank. 2. See "TO START ENGINE" in Service Adjustments section. 15. Recharge or replace battery. 4. Brake pedal not depressed. 2. Corroded battery terminals. 6. Check all wiring. 9. Check/replace ignition switch. 8. Spark plug wire loose. 11. Engine valves out...
User Manual
Page 28
... Turn switch "ON". 2. Bad battery cell(s). 2. Replace regulator. 4. Check wiring, switches and connections. Worn, bent or loose blade. 2. Replace blade. Worn/damaged mower drive belt. 3. Replace blade mandrel. Low/uneven tire air pressure. 6. Improper blades used. 11. Switch is "OFF". 2. Faulty alternator. 1. Faulty operator-safety presence control system. Bent blade mandrel. 5. Clean around mandrels to slower speed. 3. Remove obstruction. 2. Mower deck not level. 5. Worn, bent or loose blade. 7. Place throttle control in "engaged" position. 2. Clean around...
... Turn switch "ON". 2. Bad battery cell(s). 2. Replace regulator. 4. Check wiring, switches and connections. Worn, bent or loose blade. 2. Replace blade. Worn/damaged mower drive belt. 3. Replace blade mandrel. Low/uneven tire air pressure. 6. Improper blades used. 11. Switch is "OFF". 2. Faulty alternator. 1. Faulty operator-safety presence control system. Bent blade mandrel. 5. Clean around mandrels to slower speed. 3. Remove obstruction. 2. Mower deck not level. 5. Worn, bent or loose blade. 7. Place throttle control in "engaged" position. 2. Clean around...


