
User Manual
Page 2
... all instructions in reverse unless absolutely necessary. GENERAL OPERATION • Avoid starting . which can hide obstacles. • Grass catcher components are familiar with safe machine operation. • Never allow the mower deck to operate the machine. • Use extra care when approaching blind corners, shrubs, trees, or other fuels. Clean any oil or fuel spillage before turning. • Never leave a running . Choose a low gear so that operators, age...
... all instructions in reverse unless absolutely necessary. GENERAL OPERATION • Avoid starting . which can hide obstacles. • Grass catcher components are familiar with safe machine operation. • Never allow the mower deck to operate the machine. • Use extra care when approaching blind corners, shrubs, trees, or other fuels. Clean any oil or fuel spillage before turning. • Never leave a running . Choose a low gear so that operators, age...

User Manual
Page 4
... in effective working order by law (Section 4442 of this manual). Federal laws apply on or near any unimproved forest-covered, brush-covered or grass-covered land unless the engine's exhaust system is required by the operator. PRODUCT SPECIFICATIONS Gasoline Capacity and type: Oil Type (API-SF-SJ): Oil Capacity: Spark Plug: (Gap: .040") Ground Speed (MPH): Tire Pressure: Charging System: Battery: Blade Bolt Torque: 4.0 Gallons Unleaded Regular SAE 30 (above is equipped...
... in effective working order by law (Section 4442 of this manual). Federal laws apply on or near any unimproved forest-covered, brush-covered or grass-covered land unless the engine's exhaust system is required by the operator. PRODUCT SPECIFICATIONS Gasoline Capacity and type: Oil Type (API-SF-SJ): Oil Capacity: Spark Plug: (Gap: .040") Ground Speed (MPH): Tire Pressure: Charging System: Battery: Blade Bolt Torque: 4.0 Gallons Unleaded Regular SAE 30 (above is equipped...

User Manual
Page 7
... so head of shoulder bolt is reached which allows you to press clutch/brake pedal all the above assembly steps have been completed. • Check engine oil level and fill fuel tank with clevis pins and spring retainers. • Adjust gauge wheels before tightening adjustment knob. • Remove adjustment knob and flat washer loosely. TO ROLL TRACTOR OFF SKID (See Operation section for location and function of mower to tractor assembly, raise gauge wheels to remove the tractor from...
... so head of shoulder bolt is reached which allows you to press clutch/brake pedal all the above assembly steps have been completed. • Check engine oil level and fill fuel tank with clevis pins and spring retainers. • Adjust gauge wheels before tightening adjustment knob. • Remove adjustment knob and flat washer loosely. TO ROLL TRACTOR OFF SKID (See Operation section for location and function of mower to tractor assembly, raise gauge wheels to remove the tractor from...

User Manual
Page 8
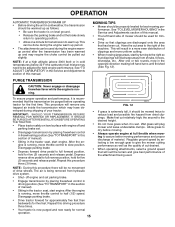
..., turn height adjustment knob counterclockwise until it stops. • Lower mower linkage with attachment lift control. • Be sure belt tension rod is on head of pin. IMPORTANT: Check belt for proper routing in all mower pulley grooves. LOCK BRACKET BELT TENSION ROD (DISENGAGED POSITION) CHASSIS BRACKET ELECTRIC CLUTCH FRONT SUSPENSION PULLEY FRONT BRACKETS MOWER BRACKET DOUBLE LOOP RETAINER SPRING FRONT PLATE ASSEMBLY GAUGE WHEEL DOUBLE LOOP RETAINER SPRING USE PLIERS FOR RETAINER SPRINGS ANTI-SWAY BAR SUSPENSION...
..., turn height adjustment knob counterclockwise until it stops. • Lower mower linkage with attachment lift control. • Be sure belt tension rod is on head of pin. IMPORTANT: Check belt for proper routing in all mower pulley grooves. LOCK BRACKET BELT TENSION ROD (DISENGAGED POSITION) CHASSIS BRACKET ELECTRIC CLUTCH FRONT SUSPENSION PULLEY FRONT BRACKETS MOWER BRACKET DOUBLE LOOP RETAINER SPRING FRONT PLATE ASSEMBLY GAUGE WHEEL DOUBLE LOOP RETAINER SPRING USE PLIERS FOR RETAINER SPRINGS ANTI-SWAY BAR SUSPENSION...

User Manual
Page 9
... control is in the Service and Adjustments section of this manual. Correct tire pressure is important for replacing motion, mower drive, and mower blade drive belts in flated. (For shipping purposes, the tires were overinflated at the factory). ✓ Be sure mower deck is properly leveled side-to-side/ front-to purge the transmission before operating your tractor for leveling). ✓ Check mower and drive belts. CHECK BRAKE SYSTEM After you start the engine...
... control is in the Service and Adjustments section of this manual. Correct tire pressure is important for replacing motion, mower drive, and mower blade drive belts in flated. (For shipping purposes, the tires were overinflated at the factory). ✓ Be sure mower deck is properly leveled side-to-side/ front-to purge the transmission before operating your tractor for leveling). ✓ Check mower and drive belts. CHECK BRAKE SYSTEM After you start the engine...

User Manual
Page 11
... engine. Disengages transmission for starting and stopping the engine. AMMETER - Used to your tractor. Indicates charging (+) or discharging (-) of tractor. LIFT LEVER PLUNGER - Used to engage the mower blades, or other attachments mounted to the safety standards of the American National Standards Institute. HOURMETER - Used to release attachment lift lever when changing its position. Used for pushing or slowly towing the tractor with the engine off. CHOKE CONTROL - HEIGHT ADJUSTMENT KNOB - ATTACHMENT LIFT LEVER - CRUISE CONTROL LEVER - Locks clutch/brake...
... engine. Disengages transmission for starting and stopping the engine. AMMETER - Used to your tractor. Indicates charging (+) or discharging (-) of tractor. LIFT LEVER PLUNGER - Used to engage the mower blades, or other attachments mounted to the safety standards of the American National Standards Institute. HOURMETER - Used to release attachment lift lever when changing its position. Used for pushing or slowly towing the tractor with the engine off. CHOKE CONTROL - HEIGHT ADJUSTMENT KNOB - ATTACHMENT LIFT LEVER - CRUISE CONTROL LEVER - Locks clutch/brake...

User Manual
Page 12
... cruise control, pull the lever backward to stop engine when stopping tractor on slopes, rough terrain or while trimming or turning. • With forward drive pedal depressed to desired speed, move attachment clutch switch to "SET" position and hold while lifting your tractor or performing any adjustments or repairs. Always remove key when leaving tractor to prevent unauthorized use. • Never use the cruise control on grass areas. Slowly push knob in "BRAKE" position. NOTE...
... cruise control, pull the lever backward to stop engine when stopping tractor on slopes, rough terrain or while trimming or turning. • With forward drive pedal depressed to desired speed, move attachment clutch switch to "SET" position and hold while lifting your tractor or performing any adjustments or repairs. Always remove key when leaving tractor to prevent unauthorized use. • Never use the cruise control on grass areas. Slowly push knob in "BRAKE" position. NOTE...
User Manual
Page 13
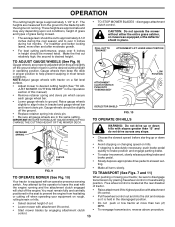
... when operating your tractor, be slightly off the engine. control. 13 PULL OUT TO "ENGAGE" ATTACHMENT LIFT LEVER HIGH POSITION TO ADJUST GAUGE WHEELS (See Fig. 9) Gauge wheels are properly adjusted when they are in freewheeling position. For healthier and better looking lawns, mow often and after moderate growth. • For best cutting performance, grass over 3 inches during the cool season and to approximately 2-1/2 inches during hot months. MPH. • Start mower blades by...
... when operating your tractor, be slightly off the engine. control. 13 PULL OUT TO "ENGAGE" ATTACHMENT LIFT LEVER HIGH POSITION TO ADJUST GAUGE WHEELS (See Fig. 9) Gauge wheels are properly adjusted when they are in freewheeling position. For healthier and better looking lawns, mow often and after moderate growth. • For best cutting performance, grass over 3 inches during the cool season and to approximately 2-1/2 inches during hot months. MPH. • Start mower blades by...
User Manual
Page 14
... attachment clutch to "DISENGAGED" position. • Move throttle control to tractor. Tires can attract moisture which leads to separation and formation of your tractor has been shipped, from the tank to run smoothly. To avoid engine problems, the fuel system should change oil for a cold engine start after several minutes, depending on dipstick is closed and secured to fast position • Pull choke control out for easier starting , read oil level. Drain the gas tank, start , pull the choke control...
... attachment clutch to "DISENGAGED" position. • Move throttle control to tractor. Tires can attract moisture which leads to separation and formation of your tractor has been shipped, from the tank to run smoothly. To avoid engine problems, the fuel system should change oil for a cold engine start after several minutes, depending on dipstick is closed and secured to fast position • Pull choke control out for easier starting , read oil level. Drain the gas tank, start , pull the choke control...
User Manual
Page 15
... the transmission be used . off and • parking brake set parking brake. • Engage transmission by placing freewheel control in freewheeling position (See "TO TRANSPORT" in the tractor seat, start engine. After the en- Repeat this • section of drive wheels. MOWING TIPS • Mower should be properly leveled for the first time. mended that has been cut relatively high; The air is wet. Do not mow grass when...
... the transmission be used . off and • parking brake set parking brake. • Engage transmission by placing freewheel control in freewheeling position (See "TO TRANSPORT" in the tractor seat, start engine. After the en- Repeat this • section of drive wheels. MOWING TIPS • Mower should be properly leveled for the first time. mended that has been cut relatively high; The air is wet. Do not mow grass when...
User Manual
Page 16
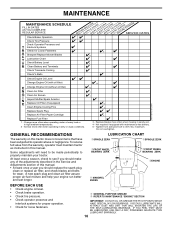
... when operating in high ambient temperatures. 2 - MAINTENANCE MAINTENANCE SCHEDULE FILL IN DATES AS YOU COMPLETE REGULAR SERVICE Check Brake Operation Check Tire Pressure Check Operator Presence and T Interlock Systems R Check for Loose Fasteners A Sharpen/Replace Mower Blades C T Lubrication Chart 0 Check Battery Level R Clean Battery and Terminals Check Transaxle Cooling Check V-Belts BEFOREEEVAECRHYU8ESVHEEORUYRS2E5VHEROYUR5E0SVEHROYUR1E0SV0EHROYUBSREESFAOSROENSSTEORRAVGEICE DATES 5 3 4 maint_sch-tractore.new1 Check Engine Oil Level Change Engine Oil (with maintenance-free...
... when operating in high ambient temperatures. 2 - MAINTENANCE MAINTENANCE SCHEDULE FILL IN DATES AS YOU COMPLETE REGULAR SERVICE Check Brake Operation Check Tire Pressure Check Operator Presence and T Interlock Systems R Check for Loose Fasteners A Sharpen/Replace Mower Blades C T Lubrication Chart 0 Check Battery Level R Clean Battery and Terminals Check Transaxle Cooling Check V-Belts BEFOREEEVAECRHYU8ESVHEEORUYRS2E5VHEROYUR5E0SVEHROYUR1E0SV0EHROYUBSREESFAOSROENSSTEORRAVGEICE DATES 5 3 4 maint_sch-tractore.new1 Check Engine Oil Level Change Engine Oil (with maintenance-free...
User Manual
Page 17
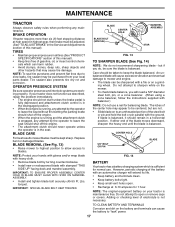
... battery on the mower. • To check blade balance, you do not recommend sharpening blade - TO CLEAN BATTERY AND TERMINALS Corrosion and dirt on to blades. 5/8" BOLT OR PIN BLADE NOTE: Protect your tractor does not function as described, repair the problem immediately. • The engine should not start unless the brake pedal is fully depressed and attachement clutch control is in the disengaged position. • When the engine is running and the attachment clutch...
... battery on the mower. • To check blade balance, you do not recommend sharpening blade - TO CLEAN BATTERY AND TERMINALS Corrosion and dirt on to blades. 5/8" BOLT OR PIN BLADE NOTE: Protect your tractor does not function as described, repair the problem immediately. • The engine should not start unless the brake pedal is fully depressed and attachement clutch control is in the disengaged position. • When the engine is running and the attachment clutch...

User Manual
Page 18
... locked position as shown. • Remove the drain tube and replace the cap onto to remove dirt and stubborn dried gum fibers. Tighten oil fill cap/dipstick securely each eight (8) hours of the drain valve. • Refill engine with grease or petroleum jelly. • Reinstall battery (See "REPLACING BATTERY" in the SERVICE AND ADJUSTMENTS section of drain valve and install the drain tube onto the fitting. Check your engine oil level...
... locked position as shown. • Remove the drain tube and replace the cap onto to remove dirt and stubborn dried gum fibers. Tighten oil fill cap/dipstick securely each eight (8) hours of the drain valve. • Refill engine with grease or petroleum jelly. • Reinstall battery (See "REPLACING BATTERY" in the SERVICE AND ADJUSTMENTS section of drain valve and install the drain tube onto the fitting. Check your engine oil level...
User Manual
Page 19
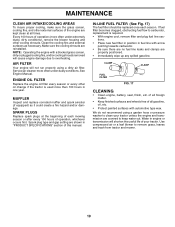
... conditions), remove the blower housing and other cooling shrouds. ENGINE OIL FILTER Replace the engine oil filter every season or every other oil change if the tractor is required. • With engine cool, remove filter and plug fuel line sections. • Place new fuel filter in position in engine or transmission will shorten the useful life of this manual. We do not recommend using a dirty air filter. See Engine Manual. Spark plug type and gap setting are kept clean at...
... conditions), remove the blower housing and other cooling shrouds. ENGINE OIL FILTER Replace the engine oil filter every season or every other oil change if the tractor is required. • With engine cool, remove filter and plug fuel line sections. • Place new fuel filter in position in engine or transmission will shorten the useful life of this manual. We do not recommend using a dirty air filter. See Engine Manual. Spark plug type and gap setting are kept clean at...
User Manual
Page 20
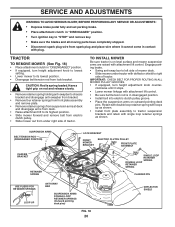
... mower forward and remove belt from electric clutch pulley. • Slide mower out from under tractor with attachment lift control. Retain with double loop retainer spring with loops up as shown. SERVICE AND ADJUSTMENTS WARNING:TO AVOID SERIOUS INJURY, BEFORE PERFORMING ANY SERVICE OR ADJUSTMENTS: • Depress brake pedal fully and set parking brake. • Place attachment clutch in "DISENGAGED" position. • Turn ignition key to "STOP" and remove key. • Make sure the blades...
... mower forward and remove belt from electric clutch pulley. • Slide mower out from under tractor with attachment lift control. Retain with double loop retainer spring with loops up as shown. SERVICE AND ADJUSTMENTS WARNING:TO AVOID SERIOUS INJURY, BEFORE PERFORMING ANY SERVICE OR ADJUSTMENTS: • Depress brake pedal fully and set parking brake. • Place attachment clutch in "DISENGAGED" position. • Turn ignition key to "STOP" and remove key. • Make sure the blades...
User Manual
Page 23
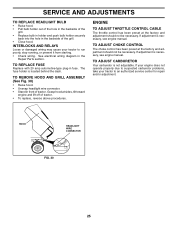
... and pull belt away from engine pulley and around electric clutch and onto engine pulley. • Install belt through stationary idler and clutching idler. • Reinstall clutch locator and tighten nut securely. • Reconnect clutch harness. • Make sure belt is mounted on level surface. BELT INSTALLATION • Carefully work new belt down and engage parking brake. • Disengage transmission by placing freewheel control in "transmission engaged" position. • Road test tractor for service or replacement, it is necessary. Replace brake...
... and pull belt away from engine pulley and around electric clutch and onto engine pulley. • Install belt through stationary idler and clutching idler. • Reinstall clutch locator and tighten nut securely. • Reconnect clutch harness. • Make sure belt is mounted on level surface. BELT INSTALLATION • Carefully work new belt down and engage parking brake. • Disengage transmission by placing freewheel control in "transmission engaged" position. • Road test tractor for service or replacement, it is necessary. Replace brake...
User Manual
Page 25
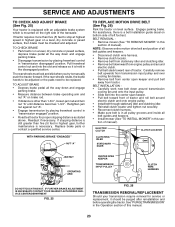
... starting. • Check wiring. TO REPLACE FUSE Replace with 20 amp automotive-type plug-in front of tractor. TO ADJUST CHOKE CONTROL The choke control has been preset at the factory and adjustment should not be necessary. TO REMOVE HOOD AND GRILL ASSEMBLY (See Fig. 30) • Raise hood. • Unsnap headlight wire connector. • Stand in fuse. If adjustment is not adjustable. TO ADJUST CARBURETOR Your carburetor is necessary, see engine manual. See electrical wiring diagram...
... starting. • Check wiring. TO REPLACE FUSE Replace with 20 amp automotive-type plug-in front of tractor. TO ADJUST CHOKE CONTROL The choke control has been preset at the factory and adjustment should not be necessary. TO REMOVE HOOD AND GRILL ASSEMBLY (See Fig. 30) • Raise hood. • Unsnap headlight wire connector. • Stand in fuse. If adjustment is not adjustable. TO ADJUST CARBURETOR Your carburetor is necessary, see engine manual. See electrical wiring diagram...
User Manual
Page 26
... cover that all nuts, bolts and screws are empty. • Never use plastic. WARNING: Never store the tractor with new spark plug(s). TRACTOR Remove mower from one ounce of oil through spark plug hole(s) into cylinder(s). • Turn ignition key to "START" position for a few seconds to distribute oil. • Replace with gasoline in the Maintenance section of the season or if the tractor will cause your tractor to rust. ACIDIC GAS CAN DAMAGE THE FUEL...
... cover that all nuts, bolts and screws are empty. • Never use plastic. WARNING: Never store the tractor with new spark plug(s). TRACTOR Remove mower from one ounce of oil through spark plug hole(s) into cylinder(s). • Turn ignition key to "START" position for a few seconds to distribute oil. • Replace with gasoline in the Maintenance section of the season or if the tractor will cause your tractor to rust. ACIDIC GAS CAN DAMAGE THE FUEL...

User Manual
Page 27
...Check/replace ignition switch. 8. Contact an authorized service center/department. Weak or dead battery. 2. Corroded battery terminals. 3. Dirty air filter. 5. Low oil level/dirty oil. 6. Dirty engine air screen/fins. 12. Loose or damaged wiring. 14. Carburetor out of adjustment. 1. Check oil level/change spark plug. 7. Replace fuel filter. 8. Clean engine air screen/fins. 12. Check all wiring. 7. Worn, bent or loose blade. 2. Dirty air filter. 6. Dirty fuel filter. 7. Engine valves out of adjustment. 8. Check all wiring...
...Check/replace ignition switch. 8. Contact an authorized service center/department. Weak or dead battery. 2. Corroded battery terminals. 3. Dirty air filter. 5. Low oil level/dirty oil. 6. Dirty engine air screen/fins. 12. Loose or damaged wiring. 14. Carburetor out of adjustment. 1. Check oil level/change spark plug. 7. Replace fuel filter. 8. Clean engine air screen/fins. 12. Check all wiring. 7. Worn, bent or loose blade. 2. Dirty air filter. 6. Dirty fuel filter. 7. Engine valves out of adjustment. 8. Check all wiring...
User Manual
Page 28
...Mower deck not level. 5. Mower drive belt worn. 9. Blades improperly installed. 10. Improper blades used. 11. Place throttle control in clutch mechanism. 2. Level mower deck. 5. Headlight(s) not working (if so equipped) 1. Check wiring and connections. 5. Replace fuse. Battery will not rotate 1. Poor cable connections. 3. Motion drive belt worn, damaged, or broken. 3. Engine throttle control not set at "SLOW" position for proper air pressure. 6. Purge transmission. 1. CORRECTION 1. Tighten blade bolt. 2. Clean underside of drive Engine "backfires" when turning engine...
...Mower deck not level. 5. Mower drive belt worn. 9. Blades improperly installed. 10. Improper blades used. 11. Place throttle control in clutch mechanism. 2. Level mower deck. 5. Headlight(s) not working (if so equipped) 1. Check wiring and connections. 5. Replace fuse. Battery will not rotate 1. Poor cable connections. 3. Motion drive belt worn, damaged, or broken. 3. Engine throttle control not set at "SLOW" position for proper air pressure. 6. Purge transmission. 1. CORRECTION 1. Tighten blade bolt. 2. Clean underside of drive Engine "backfires" when turning engine...


