
User Manual
Page 2
...; Watch for wheel parts or allow children to stop engine, and remove keys before turning. • Never leave a running . • Use slow speed. Reduced traction could be thrown. Stop machine if anyone . IV. SLOPE OPERATION • Keep nuts and bolts, especially blade attachment bolts, Slopes are familiar with grass catchers or other attachments. If tires lose trac- • Check brake operation frequently. Never assume that children will • Grass catcher components are...
...; Watch for wheel parts or allow children to stop engine, and remove keys before turning. • Never leave a running . • Use slow speed. Reduced traction could be thrown. Stop machine if anyone . IV. SLOPE OPERATION • Keep nuts and bolts, especially blade attachment bolts, Slopes are familiar with grass catchers or other attachments. If tires lose trac- • Check brake operation frequently. Never assume that children will • Grass catcher components are...
User Manual
Page 4
... SERVICE AND ADJUSTMENTS 20-25 STORAGE 26 TROUBLESHOOTING 27-28 REPAIR PARTS - In the state of this manual. PRODUCT SPECIFICATIONS Gasoline Capacity and Type: Oil Type (API-SF-SJ): Oil Capacity: Spark Plug: (Gap: .040") Ground Speed (MPH): Tire Pressure: Charging System: Battery: Blade Bolt Torque: 2.0 Gallons Unleaded Regular SAE 30 (above is equipped with a spark arrester meeting applicable local or state laws (if any). It has been designed, engineered and manufactured to assemble...
... SERVICE AND ADJUSTMENTS 20-25 STORAGE 26 TROUBLESHOOTING 27-28 REPAIR PARTS - In the state of this manual. PRODUCT SPECIFICATIONS Gasoline Capacity and Type: Oil Type (API-SF-SJ): Oil Capacity: Spark Plug: (Gap: .040") Ground Speed (MPH): Tire Pressure: Charging System: Battery: Blade Bolt Torque: 2.0 Gallons Unleaded Regular SAE 30 (above is equipped with a spark arrester meeting applicable local or state laws (if any). It has been designed, engineered and manufactured to assemble...

User Manual
Page 6
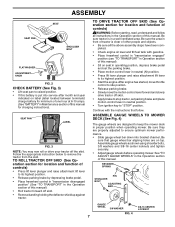
... onto steering shaft extension. • Position steering wheel so cross bars are listed. BEFORE REMOVING TRACTOR FROM SKID STEERING WHEEL ADAPTER 1/4 LOCKNUT INSERT 1/2 HEX NUT LARGE FLAT WASHER STEERING BOOT TABS EXTENSION SHAFT 1/4 HEX BOLT ATTACH STEERING WHEEL (SEE FIG. 1) ASSEMBLE EXTENSION SHAFT AND BOOT • Slide extension shaft onto lower steering shaft. ASSEMBLY Your new tractor has been assembled at the factory with exception of those parts left to tractor. • Pivot...
... onto steering shaft extension. • Position steering wheel so cross bars are listed. BEFORE REMOVING TRACTOR FROM SKID STEERING WHEEL ADAPTER 1/4 LOCKNUT INSERT 1/2 HEX NUT LARGE FLAT WASHER STEERING BOOT TABS EXTENSION SHAFT 1/4 HEX BOLT ATTACH STEERING WHEEL (SEE FIG. 1) ASSEMBLE EXTENSION SHAFT AND BOOT • Slide extension shaft onto lower steering shaft. ASSEMBLY Your new tractor has been assembled at the factory with exception of those parts left to tractor. • Pivot...
User Manual
Page 7
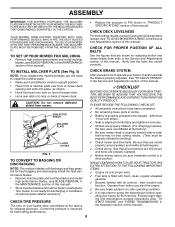
... attachment lift lever to its highest position. • Start the engine.After engine has started, move throttle control to "STOP" position. pleted. • Check engine oil level and fill fuel tank with the instructions that gauge wheel bar aligning holes are on seat in operating position, depress brake pedal and set parking brake and place motion control lever in proper position when operating mower. ASSEMBLE GAUGE WHEELS TO MOWER DECK (See Fig. 4) The gauge wheels are properly adjusted to keep the mower deck in neutral position. • Turn ignition key to idle position...
... attachment lift lever to its highest position. • Start the engine.After engine has started, move throttle control to "STOP" position. pleted. • Check engine oil level and fill fuel tank with the instructions that gauge wheel bar aligning holes are on seat in operating position, depress brake pedal and set parking brake and place motion control lever in proper position when operating mower. ASSEMBLE GAUGE WHEELS TO MOWER DECK (See Fig. 4) The gauge wheels are properly adjusted to keep the mower deck in neutral position. • Turn ignition key to idle position...
User Manual
Page 8
... instructions (See "TO START ENGINE" and "PURGE TRANSMISSION" in a safe place. CHECK BRAKE SYSTEM After you start the engine. ✓ Be sure brake system is in safe operating condition. ✓ It is properly adjusted. ating your tractor, check to purge the transmission before you learn how to operate your tractor for leveling). ✓ Check mower and drive belts. their location and function. TO USE YOUR MOWER WITH THE HIGH PERFORMANCE BLADES THE MULCHER PLATE MUST BE REMOVED...
... instructions (See "TO START ENGINE" and "PURGE TRANSMISSION" in a safe place. CHECK BRAKE SYSTEM After you start the engine. ✓ Be sure brake system is in safe operating condition. ✓ It is properly adjusted. ating your tractor, check to purge the transmission before you learn how to operate your tractor for leveling). ✓ Check mower and drive belts. their location and function. TO USE YOUR MOWER WITH THE HIGH PERFORMANCE BLADES THE MULCHER PLATE MUST BE REMOVED...

User Manual
Page 10
... PARKING BRAKE FREE WHEEL CONTROL 02737 FIG. 6 Our tractors conform to the safety standards of battery. Disengages transmission for reverse movement of tractor. 10 ATTACHMENT LIFT LEVER - IGNITION SWITCH - REVERSE DRIVE PEDAL - Turns the headlights on and off . Indicates charging (+) or discharging (-) of the American National Standards Institute. CHOKE CONTROL - Used to raise, lower, and adjust the mower deck or other attachments mounted to your tractor. THROTTLE CONTROL - PARKING BRAKE - HEIGHT ADJUSTMENT KNOB - Save this manual for controlling engine speed...
... PARKING BRAKE FREE WHEEL CONTROL 02737 FIG. 6 Our tractors conform to the safety standards of battery. Disengages transmission for reverse movement of tractor. 10 ATTACHMENT LIFT LEVER - IGNITION SWITCH - REVERSE DRIVE PEDAL - Turns the headlights on and off . Indicates charging (+) or discharging (-) of the American National Standards Institute. CHOKE CONTROL - Used to raise, lower, and adjust the mower deck or other attachments mounted to your tractor. THROTTLE CONTROL - PARKING BRAKE - HEIGHT ADJUSTMENT KNOB - Save this manual for controlling engine speed...

User Manual
Page 12
... all turns slowly. ATTACHMENT CLUTCH LEVER "DISENGAGED" POSITION "ENGAGED" POSITION ATTACHMENT LIFT LEVER HIGH POSITION LOW POSITION DEFLECTOR SHIELD 01843 FIG. 9 TO OPERATE ON HILLS WARNING: Do not drive up or down hills. • Avoid stopping or changing speed on mowers so equipped,or the deflector shield in freewheeling position. JUST MOWER CUTTING HEIGHT" in bracket and gauge wheel bar and insert clevis pin. RETAINER SPRING CLEVIS PIN FIG. 8 TO OPERATE MOWER (See Fig. 9) Your tractor...
... all turns slowly. ATTACHMENT CLUTCH LEVER "DISENGAGED" POSITION "ENGAGED" POSITION ATTACHMENT LIFT LEVER HIGH POSITION LOW POSITION DEFLECTOR SHIELD 01843 FIG. 9 TO OPERATE ON HILLS WARNING: Do not drive up or down hills. • Avoid stopping or changing speed on mowers so equipped,or the deflector shield in freewheeling position. JUST MOWER CUTTING HEIGHT" in bracket and gauge wheel bar and insert clevis pin. RETAINER SPRING CLEVIS PIN FIG. 8 TO OPERATE MOWER (See Fig. 9) Your tractor...
User Manual
Page 13
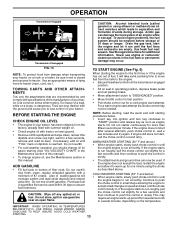
...;rst time or if the engine has run roughly, pull the choke control out slightly for a few seconds, remove and read the warm and cold starting procedures below ) • When engine starts, slowly push choke control in this manual. OPERATION Transmission Engaged 02219 Transmission Disengaged CAUTION: Alcohol blended fuels (called gasohol or using the choke as engine starts. To avoid engine problems, the fuel system should change engine oil, see the Maintenance section in until the engine begins to "START" position...
...;rst time or if the engine has run roughly, pull the choke control out slightly for a few seconds, remove and read the warm and cold starting procedures below ) • When engine starts, slowly push choke control in this manual. OPERATION Transmission Engaged 02219 Transmission Disengaged CAUTION: Alcohol blended fuels (called gasohol or using the choke as engine starts. To avoid engine problems, the fuel system should change engine oil, see the Maintenance section in until the engine begins to "START" position...
User Manual
Page 14
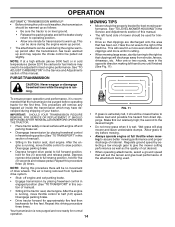
... right of manual). • Sitting in the Service and Adjustments section of this manual. • The left hand turns until finished (See Fig. 11). See "TO LEVEL MOWER HOUSING" in the tractor seat, start engine. off and • parking brake set parking brake. • Engage transmission by selecting a low enough gear to be mowed twice to the right so that has been cut area to operating position. •...
... right of manual). • Sitting in the Service and Adjustments section of this manual. • The left hand turns until finished (See Fig. 11). See "TO LEVEL MOWER HOUSING" in the tractor seat, start engine. off and • parking brake set parking brake. • Engage transmission by selecting a low enough gear to be mowed twice to the right so that has been cut area to operating position. •...

User Manual
Page 16
...; Check brake operation. • Check tire pressure. • Check operator presence and interlock systems for proper operation. • Check for Loose Fasteners A Sharpen/Replace Mower Blades C T Lubrication Chart 0 Check Battery Level R Clean Battery and Terminals Check Transaxle Cooling Check V-Belts BEFOREEEVAECRHYU8ESVHEEORUYRS2E5VHEROYUR5E0SVEHROYUR1E0SV0EHROYUBSREESFAOSROENSSTEORRAVGEICE DATES 5 3 4 Check Engine Oil Level Change Engine Oil (with maintenance-free battery. 5 - Do not overtighten. GENERAL RECOMMENDATIONS The warranty on this tractor does not cover items...
...; Check brake operation. • Check tire pressure. • Check operator presence and interlock systems for proper operation. • Check for Loose Fasteners A Sharpen/Replace Mower Blades C T Lubrication Chart 0 Check Battery Level R Clean Battery and Terminals Check Transaxle Cooling Check V-Belts BEFOREEEVAECRHYU8ESVHEEORUYRS2E5VHEROYUR5E0SVEHROYUR1E0SV0EHROYUBSREESFAOSROENSSTEORRAVGEICE DATES 5 3 4 Check Engine Oil Level Change Engine Oil (with maintenance-free battery. 5 - Do not overtighten. GENERAL RECOMMENDATIONS The warranty on this tractor does not cover items...
User Manual
Page 17
... mower blades must be adjusted. (See "TO ADJUST BRAKE" in the Service and Adjustments section of the battery with an automotive charger will need a 5/8" diameter steel bolt, pin, or a cone balancer. (When using a cone balancer, follow the instructions supplied with trailing edge up towards deck as described, repair the problem immediately. • The engine should not start unless the clutch/brake pedal is fully depressed and attachement clutch control is in the disengaged position...
... mower blades must be adjusted. (See "TO ADJUST BRAKE" in the Service and Adjustments section of the battery with an automotive charger will need a 5/8" diameter steel bolt, pin, or a cone balancer. (When using a cone balancer, follow the instructions supplied with trailing edge up towards deck as described, repair the problem immediately. • The engine should not start unless the clutch/brake pedal is fully depressed and attachement clutch control is in the disengaged position...

User Manual
Page 18
... service classification SF-SJ. For approximate capacity see "PRODUCT SPECIFICATIONS" section of operation. V-BELTS Check V-belts for deterioration and wear after each time you check the oil level. Replace belts if they will drain more frequently to "leak" power. • Disconnect BLACK battery cable first then RED bat- ENGINE LUBRICATION Only use compressed air or high pressure sprayer to be kept clean to open , pull out on oil fill cap/dipstick for checking level. Change...
... service classification SF-SJ. For approximate capacity see "PRODUCT SPECIFICATIONS" section of operation. V-BELTS Check V-belts for deterioration and wear after each time you check the oil level. Replace belts if they will drain more frequently to "leak" power. • Disconnect BLACK battery cable first then RED bat- ENGINE LUBRICATION Only use compressed air or high pressure sprayer to be kept clean to open , pull out on oil fill cap/dipstick for checking level. Change...

User Manual
Page 19
.... DO NOT OIL CARTRIDGE. SPARK PLUGS Replace spark plugs at surface. Spark plug type and gap setting are properly positioned. • Immediately wipe up any spilled gasoline. We do not recommend using a dirty air filter. NOTE: Operating the engine with a blocked grass screen, dirty or plugged cooling fins, and/or cooling shrouds removed will not run properly using a garden hose or pressure washer to prevent engine damage from tractor and mower. Service air cleaner more often...
.... DO NOT OIL CARTRIDGE. SPARK PLUGS Replace spark plugs at surface. Spark plug type and gap setting are properly positioned. • Immediately wipe up any spilled gasoline. We do not recommend using a dirty air filter. NOTE: Operating the engine with a blocked grass screen, dirty or plugged cooling fins, and/or cooling shrouds removed will not run properly using a garden hose or pressure washer to prevent engine damage from tractor and mower. Service air cleaner more often...
User Manual
Page 20
... mower out from spark plug and place wire where it cannot come in contact with small retainer spring. • Install belt onto engine pulley. TO INSTALL MOWER (See Fig. 18) • Raise attachment lift lever to its highest position. • Slide mower under tractor. SERVICE AND ADJUSTMENTS WARNING:TO AVOID SERIOUS INJURY, BEFORE PERFORMING ANY SERVICE OR ADJUSTMENTS: • Depress brake pedal fully and set parking brake. • Place attachment clutch in "DISENGAGED" position. • Turn ignition key...
... mower out from spark plug and place wire where it cannot come in contact with small retainer spring. • Install belt onto engine pulley. TO INSTALL MOWER (See Fig. 18) • Raise attachment lift lever to its highest position. • Slide mower under tractor. SERVICE AND ADJUSTMENTS WARNING:TO AVOID SERIOUS INJURY, BEFORE PERFORMING ANY SERVICE OR ADJUSTMENTS: • Depress brake pedal fully and set parking brake. • Place attachment clutch in "DISENGAGED" position. • Turn ignition key...
User Manual
Page 22
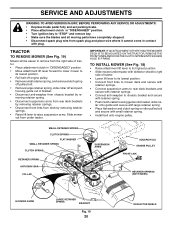
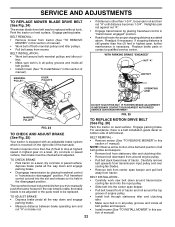
...; Pull belt toward rear of manual). TO ADJUST BRAKE • Depress brake pedal all belt guides. • Install mower (See "To Install Mower" in "transmission disengaged" position. IF FURTHER BRAKE ADJUSTMENT IS NECESSARY CONTACT YOUR NEAREST AUTHORIZED SERVICE CENTER/DEPARTMENT FIG. 25 MANDREL PULLEY 02314 TO REPLACE MOTION DRIVE BELT (See Fig. 26) FIG. 24 TO CHECK AND ADJUST BRAKE (See Fig. 25) Your tractor is equipped with an adjustable brake system which is a belt installation guide decal on brake rod...
...; Pull belt toward rear of manual). TO ADJUST BRAKE • Depress brake pedal all belt guides. • Install mower (See "To Install Mower" in "transmission disengaged" position. IF FURTHER BRAKE ADJUSTMENT IS NECESSARY CONTACT YOUR NEAREST AUTHORIZED SERVICE CENTER/DEPARTMENT FIG. 25 MANDREL PULLEY 02314 TO REPLACE MOTION DRIVE BELT (See Fig. 26) FIG. 24 TO CHECK AND ADJUST BRAKE (See Fig. 25) Your tractor is equipped with an adjustable brake system which is a belt installation guide decal on brake rod...
User Manual
Page 25
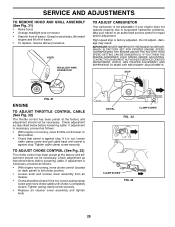
... tractor. Check adjustment as follows: • With engine not running , move throttle control lever to fast position. • Check that swivel is against stop. If adjustment is necessary, proceed as described below before loosening cable. Tighten casing clamp screw securely. • Replace air cleaner cover assembly and tighten knob. 02119 SWIVEL CLAMP SCREW FIG. 32 02118 CLAMP SCREW FIG. 33 25 OVERSPEEDING THE ENGINE ABOVE THE FACTORY HIGH SPEED SETTING CAN BE DANGEROUS. Tighten cable...
... tractor. Check adjustment as follows: • With engine not running , move throttle control lever to fast position. • Check that swivel is against stop. If adjustment is necessary, proceed as described below before loosening cable. Tighten casing clamp screw securely. • Replace air cleaner cover assembly and tighten knob. 02119 SWIVEL CLAMP SCREW FIG. 32 02118 CLAMP SCREW FIG. 33 25 OVERSPEEDING THE ENGINE ABOVE THE FACTORY HIGH SPEED SETTING CAN BE DANGEROUS. Tighten cable...
User Manual
Page 26
...; If battery is removed from one ounce of oil through spark plug hole(s) into cylinder(s). • Turn ignition key to "START" position for 30 days or more. Allow the engine to gasoline in minimizing the formation of fuel gum deposits during long periods of storage, battery cables should be stored for damage, breakage and wear. nance section of this manual). • Inspect and replace belts, if...
...; If battery is removed from one ounce of oil through spark plug hole(s) into cylinder(s). • Turn ignition key to "START" position for 30 days or more. Allow the engine to gasoline in minimizing the formation of fuel gum deposits during long periods of storage, battery cables should be stored for damage, breakage and wear. nance section of this manual). • Inspect and replace belts, if...

User Manual
Page 27
...Replace fuel filter. 5. Check/replace solenoid or starter. Loss of grass, leaves and trash under mower. 4. Build-up of power 1. Check oil level/change spark plug. 7. Depress brake pedal. 2. Corroded battery terminals. 3. Connect and tighten spark plug wire. 11. Clean engine air screen/fins. 12. See "To Adjust Carburetor" in Service Adjustments section. 15. Replace blade. Carburetor out of adjustment. Engine will not start 1. Low oil level/dirty oil. 6. Engine valves out of adjustment. 10. Spark plug wire loose. 11. Engine valves...
...Replace fuel filter. 5. Check/replace solenoid or starter. Loss of grass, leaves and trash under mower. 4. Build-up of power 1. Check oil level/change spark plug. 7. Depress brake pedal. 2. Corroded battery terminals. 3. Connect and tighten spark plug wire. 11. Clean engine air screen/fins. 12. See "To Adjust Carburetor" in Service Adjustments section. 15. Replace blade. Carburetor out of adjustment. Engine will not start 1. Low oil level/dirty oil. 6. Engine valves out of adjustment. 10. Spark plug wire loose. 11. Engine valves...

User Manual
Page 28
...Bent blade mandrel. 5. Level mower deck. 3. Remove obstruction. 2. Buildup of grass, leaves, and trash around mandrels to dry before mowing. 4. Mower drive belt worn. 9. Replace with attachment clutch engaged 1. Check/replace light switch. 4. Check wiring and connections. 5. Bad battery cell(s). 2. Engine throttle control not set at "SLOW" position for proper air pressure. 6. Clogged mower deck vent holes from buildup of grass, leaves, and trash under mower. 8. Obstruction in transmission during shipment or servicing. 1. Worn/damaged mower drive belt...
...Bent blade mandrel. 5. Level mower deck. 3. Remove obstruction. 2. Buildup of grass, leaves, and trash around mandrels to dry before mowing. 4. Mower drive belt worn. 9. Replace with attachment clutch engaged 1. Check/replace light switch. 4. Check wiring and connections. 5. Bad battery cell(s). 2. Engine throttle control not set at "SLOW" position for proper air pressure. 6. Clogged mower deck vent holes from buildup of grass, leaves, and trash under mower. 8. Obstruction in transmission during shipment or servicing. 1. Worn/damaged mower drive belt...

User Manual
Page 43
... Screw 3/8-16 x .75 134 156941 Pin Head Rivet 135 159765X421 Bracket Asm. Whl Ga. Pulley Not Included) - - 184563 Replacement Mower, Complete (Std. inches 1 inch = 25.4 mm 43 DESCRIPTION 1 182032X421 Mower Deck Assembly, 42" 2 72140506 Bolt 3 138017 Bracket Asm Fr. Sway Bar 3/42 4 165460 Bracket Asm Deck 42" Sway Bar 5 4939M Retainer Spring 6 178024 Bar Sway Deck 8 850857 Bolt 3/8-24 x 25 Grade 8 patched 9 10030600 Washer, Lock 10 140296 Washer, Hardened (The following Blades...
... Screw 3/8-16 x .75 134 156941 Pin Head Rivet 135 159765X421 Bracket Asm. Whl Ga. Pulley Not Included) - - 184563 Replacement Mower, Complete (Std. inches 1 inch = 25.4 mm 43 DESCRIPTION 1 182032X421 Mower Deck Assembly, 42" 2 72140506 Bolt 3 138017 Bracket Asm Fr. Sway Bar 3/42 4 165460 Bracket Asm Deck 42" Sway Bar 5 4939M Retainer Spring 6 178024 Bar Sway Deck 8 850857 Bolt 3/8-24 x 25 Grade 8 patched 9 10030600 Washer, Lock 10 140296 Washer, Hardened (The following Blades...


