
User Manual
Page 2
...toys, wire, etc., the edge of -control and tipover • Never tamper with the engine running . • Use slow speed. The mower could expose moving • Follow the manufacturer's recommendations for • Mow only in . injured or interfere with the engine overturn the machine. ... are a major factor related to protect themselves and others from serious injury. • Keep machine free of the machine. • Mower blades are sharp and can result in speed or direction. Clean any oil or fuel spillage before and while back- Children are explosive....
...toys, wire, etc., the edge of -control and tipover • Never tamper with the engine running . • Use slow speed. The mower could expose moving • Follow the manufacturer's recommendations for • Mow only in . injured or interfere with the engine overturn the machine. ... are a major factor related to protect themselves and others from serious injury. • Keep machine free of the machine. • Mower blades are sharp and can result in speed or direction. Clean any oil or fuel spillage before and while back- Children are explosive....

User Manual
Page 3
... can hide obstacles. • Use slow speed. WARNING: In order to the State of other reproductive harm. SAFETY RULES SAFE OPERATION PRACTICES FOR RIDE-ON MOWERS IMPORTANT: THIS CUTTING MACHINE IS CAPABLE OF AMPUTATING HANDS AND FEET AND THROWING OBJECTS. Always look behind before mowing. WARNING: Do not coast down a hill...
... can hide obstacles. • Use slow speed. WARNING: In order to the State of other reproductive harm. SAFETY RULES SAFE OPERATION PRACTICES FOR RIDE-ON MOWERS IMPORTANT: THIS CUTTING MACHINE IS CAPABLE OF AMPUTATING HANDS AND FEET AND THROWING OBJECTS. Always look behind before mowing. WARNING: Do not coast down a hill...

User Manual
Page 7
...indicated on seat in operating position, depress clutch/brake pedal and set parking brake and place motion control lever in proper position when operating mower. Be sure they are designed to remove the tractor from the skid. NOTE: You may now roll or drive your tractor off skid.... Assemble gauge wheels as shown using shoulder bolts, 3/8 washers and 3/8-16 center locknuts and tighten securely. • Adjust gauge wheels before operating mower. SEAT TO DRIVE TRACTOR OFF SKID (See Operation section for minimum of one hour at 6-10 amps. (See "BATTERY" in the Operation section...
...indicated on seat in operating position, depress clutch/brake pedal and set parking brake and place motion control lever in proper position when operating mower. Be sure they are designed to remove the tractor from the skid. NOTE: You may now roll or drive your tractor off skid.... Assemble gauge wheels as shown using shoulder bolts, 3/8 washers and 3/8-16 center locknuts and tighten securely. • Adjust gauge wheels before operating mower. SEAT TO DRIVE TRACTOR OFF SKID (See Operation section for minimum of one hour at 6-10 amps. (See "BATTERY" in the Operation section...
User Manual
Page 8
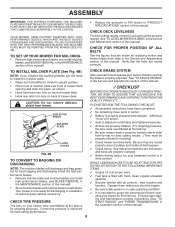
...-to-side/ front-to see that the belts are routed properly around pulleys and inside all belt keepers. ✓ Check wiring. Your mower is properly adjusted. PLEASE REVIEW THE FOLLOWING CHECKLIST: ✓ All assembly instructions have been completed. ✓ No remaining loose parts in carton...Reduce tire pressure to purge the transmission before you learn how to operate your tractor, check to -rear for leveling). ✓ Check mower and drive belts. Be sure they are routed correctly. CHECK FOR PROPER POSITION OF ALL BELTS See the figures that all controls...
...-to-side/ front-to see that the belts are routed properly around pulleys and inside all belt keepers. ✓ Check wiring. Your mower is properly adjusted. PLEASE REVIEW THE FOLLOWING CHECKLIST: ✓ All assembly instructions have been completed. ✓ No remaining loose parts in carton...Reduce tire pressure to purge the transmission before you learn how to operate your tractor, check to -rear for leveling). ✓ Check mower and drive belts. Be sure they are routed correctly. CHECK FOR PROPER POSITION OF ALL BELTS See the figures that all controls...

User Manual
Page 9
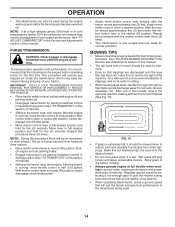
... ENGINE OFF LIGHTS ON P ENGINE ON ENGINE START PARKING BRAKE PARKING BRAKE PARKING BRAKE LOCKED UNLOCKED OVER TEMP LIGHT FUEL OIL PRESSURE BATTERY REVERSE FORWARD MOWER HEIGHT MOWER LIFT 15 15 15 ATTACHMENT ATTACHMENT CLUTCH ENGAGED CLUTCH DISENGAGED DANGER, KEEP HANDS AND FEET AWAY KEEP AREA CLEAR SLOPE HAZARDS (SEE SAFETY RULES...
... ENGINE OFF LIGHTS ON P ENGINE ON ENGINE START PARKING BRAKE PARKING BRAKE PARKING BRAKE LOCKED UNLOCKED OVER TEMP LIGHT FUEL OIL PRESSURE BATTERY REVERSE FORWARD MOWER HEIGHT MOWER LIFT 15 15 15 ATTACHMENT ATTACHMENT CLUTCH ENGAGED CLUTCH DISENGAGED DANGER, KEEP HANDS AND FEET AWAY KEEP AREA CLEAR SLOPE HAZARDS (SEE SAFETY RULES...

User Manual
Page 10
... CONTROL LEVER: Selects the speed and direction of battery. AMMETER - ATTACHMENT LIFT LEVER: Used to raise, lower, and adjust the mower deck or other attachments mounted to your tractor. HEIGHT ADJUSTMENT KNOB - OPERATION KNOW YOUR TRACTOR READ THIS OWNER'S MANUAL AND SAFETY RULES...CONTROL LIGHT SWITCH POSITION LIFT LEVER PLUNGER ATTACHMENT LIFT LEVER PARKING BRAKE MOTION CONTROL LEVER FIG. 5 Our tractors conform to adjust the mower cutting height. 10 THROTTLE/CHOKE CONTROL: Used for starting and controlling engine speed. CLUTCH/BRAKE PEDAL: Used for future reference. LIFT...
... CONTROL LEVER: Selects the speed and direction of battery. AMMETER - ATTACHMENT LIFT LEVER: Used to raise, lower, and adjust the mower deck or other attachments mounted to your tractor. HEIGHT ADJUSTMENT KNOB - OPERATION KNOW YOUR TRACTOR READ THIS OWNER'S MANUAL AND SAFETY RULES...CONTROL LIGHT SWITCH POSITION LIFT LEVER PLUNGER ATTACHMENT LIFT LEVER PARKING BRAKE MOTION CONTROL LEVER FIG. 5 Our tractors conform to adjust the mower cutting height. 10 THROTTLE/CHOKE CONTROL: Used for starting and controlling engine speed. CLUTCH/BRAKE PEDAL: Used for future reference. LIFT...

User Manual
Page 11
.... • Operating engine at less than full throttle reduces the battery charging rate. • Full throttle offers the best bagging and mower perfor- TO MOVE FORWARD AND BACKWARD (See Fig. 6) The direction and speed of movement is standing idle with motion control lever in...Your tractor is running . to empty grass catcher, etc. The cutting height is approximately 1-1/2" to 4". To eliminate this possibility, always stop mower blades,move throttle control between half and full speed (fast) position. For healthier and better looking lawns, mow often and after moderate growth....
.... • Operating engine at less than full throttle reduces the battery charging rate. • Full throttle offers the best bagging and mower perfor- TO MOVE FORWARD AND BACKWARD (See Fig. 6) The direction and speed of movement is standing idle with motion control lever in...Your tractor is running . to empty grass catcher, etc. The cutting height is approximately 1-1/2" to 4". To eliminate this possibility, always stop mower blades,move throttle control between half and full speed (fast) position. For healthier and better looking lawns, mow often and after moderate growth....

User Manual
Page 12
...towing your tractor, be sure to ground. OPERATION • For best cutting performance, grass over 6 inches in freewheeling position. JUST MOWER CUTTING HEIGHT" in the disengaged position. • Do not push or tow tractor at the rear drawbar of cut relatively high; disengage... transmission, reverse above procedure. Any attempt by placing freewheel control in height should be mowed twice. CAUTION: Do not operate the mower without either the entire grass catcher, on a flat the desired cutting height in operating position. IMPORTANT: THE MOTION CONTROL ...
...towing your tractor, be sure to ground. OPERATION • For best cutting performance, grass over 6 inches in freewheeling position. JUST MOWER CUTTING HEIGHT" in the disengaged position. • Do not push or tow tractor at the rear drawbar of cut relatively high; disengage... transmission, reverse above procedure. Any attempt by placing freewheel control in height should be mowed twice. CAUTION: Do not operate the mower without either the entire grass catcher, on a flat the desired cutting height in operating position. IMPORTANT: THE MOTION CONTROL ...
User Manual
Page 14
... be no movement of the attachment being removed from dried clippings. With motion control lever in the opposite direction making left hand side of mower should be used for trimming. • Drive so that clippings are discharged onto the area that clippings will result in the Service and... at full throttle when mowing to full reverse position and hold for five (5) seconds. This procedure will suit the terrain and give the mower cutting performance as well as the quality of the machine. Wet grass will be purged before mowing. • Always operate engine at a high ...
... be no movement of the attachment being removed from dried clippings. With motion control lever in the opposite direction making left hand side of mower should be used for trimming. • Drive so that clippings are discharged onto the area that clippings will result in the Service and... at full throttle when mowing to full reverse position and hold for five (5) seconds. This procedure will suit the terrain and give the mower cutting performance as well as the quality of the machine. Wet grass will be purged before mowing. • Always operate engine at a high ...

User Manual
Page 15
... onto the lawn they will disperse into the grass and not be mulched a second time to the direct sun. • For best results, adjust the mower cutting height so that as this time the grass has dried and the newly cut area will not be exposed to completely hide the clippings... grass blades (See Fig.11).For extremely heavy mulching, reduce your width of the lawn. 15 OPERATION MULCHING MOWING TIPS IMPORTANT: FOR BEST PERFORMANCE, KEEP MOWER HOUSING FREE OF BUILT-UP GRASS AND TRASH. Also, the mulched grass will help prevent matting and graining of cut path. • Change your lawn...
... onto the lawn they will disperse into the grass and not be mulched a second time to the direct sun. • For best results, adjust the mower cutting height so that as this time the grass has dried and the newly cut area will not be exposed to completely hide the clippings... grass blades (See Fig.11).For extremely heavy mulching, reduce your width of the lawn. 15 OPERATION MULCHING MOWING TIPS IMPORTANT: FOR BEST PERFORMANCE, KEEP MOWER HOUSING FREE OF BUILT-UP GRASS AND TRASH. Also, the mulched grass will help prevent matting and graining of cut path. • Change your lawn...

User Manual
Page 16
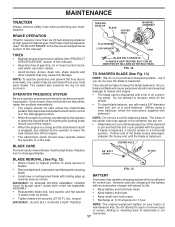
.... • Check brake operation. • Check tire pressure. • Check operator presence and interlock systems for proper operation. • Check for Loose Fasteners A Sharpen/Replace Mower Blades C T Lubrication Chart 0 Check Battery Level R Clean Battery and Terminals Check Transaxle Cooling BEFOREEEVAECRHYU8ESVHEEORUYRS2E5VHEROYUR5E0SVEHROYUR1E0SV0EHROYUBSREESFAOSROEN STORAGE SERVICE DATES 5 3 4 Check V-Belts Check Engine Oil Level Change Engine...
.... • Check brake operation. • Check tire pressure. • Check operator presence and interlock systems for proper operation. • Check for Loose Fasteners A Sharpen/Replace Mower Blades C T Lubrication Chart 0 Check Battery Level R Clean Battery and Terminals Check Transaxle Cooling BEFOREEEVAECRHYU8ESVHEEORUYRS2E5VHEROYUR5E0SVEHROYUR1E0SV0EHROYUBSREESFAOSROEN STORAGE SERVICE DATES 5 3 4 Check V-Belts Check Engine Oil Level Change Engine...
User Manual
Page 17
...pressure in a horizontal position. but are working properly. CENTER HOLE 5/8" BOLT OR PIN BLADE BLADE REMOVAL (See Fig. 12) • Raise mower to highest position to allow access to blades. • Remove blade bolt, lock washer and flat 6-10 amperes for balancing blade. IMPORTANT.... OPERATOR PRESENCE SYSTEM Be sure operator presence and interlock systems are not. • Slide blade on a grind- BLADE CARE For best results mower blades must be adjusted. (See "TO ADJUST BRAKE" in exact order as shown. • Tighten blade bolt securely (27-35 Ft. However...
...pressure in a horizontal position. but are working properly. CENTER HOLE 5/8" BOLT OR PIN BLADE BLADE REMOVAL (See Fig. 12) • Raise mower to highest position to allow access to blades. • Remove blade bolt, lock washer and flat 6-10 amperes for balancing blade. IMPORTANT.... OPERATOR PRESENCE SYSTEM Be sure operator presence and interlock systems are not. • Slide blade on a grind- BLADE CARE For best results mower blades must be adjusted. (See "TO ADJUST BRAKE" in exact order as shown. • Tighten blade bolt securely (27-35 Ft. However...
User Manual
Page 19
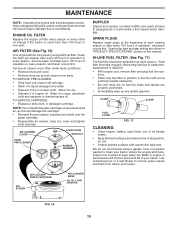
... to carburetor, replacement is used more often under dusty conditions. • Remove knob and cover. • Remove wing nut and air cleaner from tractor and mower. AIR FILTER (See Fig. 16) Your engine will shorten the useful life of operation or every season. We do not recommend using a dirty air fi...
... to carburetor, replacement is used more often under dusty conditions. • Remove knob and cover. • Remove wing nut and air cleaner from tractor and mower. AIR FILTER (See Fig. 16) Your engine will shorten the useful life of operation or every season. We do not recommend using a dirty air fi...
User Manual
Page 20
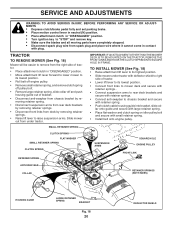
... RETAINER SPRING BRACKET Fig. 18 20 DEFLECTOR SHIELD SERVICE AND ADJUSTMENTS WARNING: TO AVOID SERIOUS INJURY, BEFORE PERFORMING ANY SERVICE OR ADJUST- TO INSTALL MOWER (See Fig. 18) • Raise attachment lift lever to chassis bracket and secure with retainer spring. • Push clutch cable housing guide ...IS TO BE MOUNTED ON THE TRACTOR, REMOVE THE FRONT LINKS AND HOOKTHE CLUTCH SPRING INTO SQUARE HOLE IN FRAME. TRACTOR TO REMOVE MOWER (See Fig. 18) Mower will be easier to its lowest position. • Roll belt off engine pulley. • Remove small retainer spring, and remove...
... RETAINER SPRING BRACKET Fig. 18 20 DEFLECTOR SHIELD SERVICE AND ADJUSTMENTS WARNING: TO AVOID SERIOUS INJURY, BEFORE PERFORMING ANY SERVICE OR ADJUST- TO INSTALL MOWER (See Fig. 18) • Raise attachment lift lever to chassis bracket and secure with retainer spring. • Push clutch cable housing guide ...IS TO BE MOUNTED ON THE TRACTOR, REMOVE THE FRONT LINKS AND HOOKTHE CLUTCH SPRING INTO SQUARE HOLE IN FRAME. TRACTOR TO REMOVE MOWER (See Fig. 18) Mower will be easier to its lowest position. • Roll belt off engine pulley. • Remove small retainer spring, and remove...

User Manual
Page 21
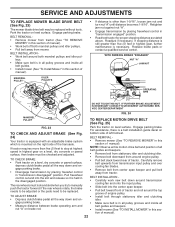
...necessary, make adjustment on both front links are equal in length. • If links are over or underinflated, you will change mower height about 1/8". • Recheck measurements after adjusting. NOTE: Three full turns of tractor. IF THE FOLLOWING FRONT-TO-BACK ADJUSTMENT IS NECESSARY...1/2" lower than rear, tighten nut "F" against trunnion on both front links. • Recheck side-to 1/2" lower at front than the rear when the mower is in length. • When distance "D" is parked on that side. MANDREL "D" "D" FIG. 21 BOTH FRONT LINKS MUST BE EQUAL IN LENGTH ...
...necessary, make adjustment on both front links are equal in length. • If links are over or underinflated, you will change mower height about 1/8". • Recheck measurements after adjusting. NOTE: Three full turns of tractor. IF THE FOLLOWING FRONT-TO-BACK ADJUSTMENT IS NECESSARY...1/2" lower than rear, tighten nut "F" against trunnion on both front links. • Recheck side-to 1/2" lower at front than the rear when the mower is in length. • When distance "D" is parked on that side. MANDREL "D" "D" FIG. 21 BOTH FRONT LINKS MUST BE EQUAL IN LENGTH ...
User Manual
Page 22
... push the tractor forward. NOTE: Observe entire motion drive belt and position of all belt guides and keepers. • Install mower (See "TO INSTALL MOWER" in "transmission engaged" position. • Road test tractor for proper stopping distance as stated above. bottom side of the transaxle...leys. • Make sure belt is necessary. If stopping distance is a belt installation guide decal on brake rod. • Remove mower (See "TO REMOVE MOWER" in all pulley grooves and inside all belt guides and keepers. • Remove belt from stationary idler and clutching idler. •...
... push the tractor forward. NOTE: Observe entire motion drive belt and position of all belt guides and keepers. • Install mower (See "TO INSTALL MOWER" in "transmission engaged" position. • Road test tractor for proper stopping distance as stated above. bottom side of the transaxle...leys. • Make sure belt is necessary. If stopping distance is a belt installation guide decal on brake rod. • Remove mower (See "TO REMOVE MOWER" in all pulley grooves and inside all belt guides and keepers. • Remove belt from stationary idler and clutching idler. •...

User Manual
Page 23
... has been preset at tires due to the neutral (N) (lock gate) position. • Tighten adjustment bolt securely. After above steps until tractor does not move mower deck height to allow wheel removal (rear wheel contains a square key - FRONT WHEEL TOE-IN/CAMBER The front wheel toe-in and camber are positioned...
... has been preset at tires due to the neutral (N) (lock gate) position. • Tighten adjustment bolt securely. After above steps until tractor does not move mower deck height to allow wheel removal (rear wheel contains a square key - FRONT WHEEL TOE-IN/CAMBER The front wheel toe-in and camber are positioned...
User Manual
Page 26
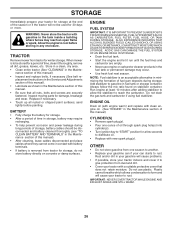
When mower is to be stored for a period of time, clean it run until the fuel lines and carburetor are securely fastened. placement instructions in the Service ... form and will cause problems. • If possible, store your tractor indoors and cover it to give protection from tractor for winter storage. TRACTOR Remove mower from dust and dirt. • Cover your tractor with gasoline in any enclosure. Rust and/or dirt in the Mainte- STORAGE Immediately prepare your tractor...
When mower is to be stored for a period of time, clean it run until the fuel lines and carburetor are securely fastened. placement instructions in the Service ... form and will cause problems. • If possible, store your tractor indoors and cover it to give protection from tractor for winter storage. TRACTOR Remove mower from dust and dirt. • Cover your tractor with gasoline in any enclosure. Rust and/or dirt in the Mainte- STORAGE Immediately prepare your tractor...

User Manual
Page 27
...loose blade. 2. Bent blade mandrel. 3. Out of adjustment. 1. CORRECTION 1. Hard to start CAUSE 1. Carburetor out of grass, leaves and trash under mower. 4. Clean/replace air filter. 2. Faulty solenoid or starter. 9. Replace fuse. 5. Dirty air filter. 5. Stale or dirty fuel....lter. 5. Contact an authorized service center/department. Weak or dead battery. 4. Engine clicks but will not turn over 1. Carburetor out of mower housing. 4. Clean/replace air filter. 5. Loose or damaged wiring. 7. Cutting too much grass/too fast. 2. Check oil ...
...loose blade. 2. Bent blade mandrel. 3. Out of adjustment. 1. CORRECTION 1. Hard to start CAUSE 1. Carburetor out of grass, leaves and trash under mower. 4. Clean/replace air filter. 2. Faulty solenoid or starter. 9. Replace fuse. 5. Dirty air filter. 5. Stale or dirty fuel....lter. 5. Contact an authorized service center/department. Weak or dead battery. 4. Engine clicks but will not turn over 1. Carburetor out of mower housing. 4. Clean/replace air filter. 5. Loose or damaged wiring. 7. Cutting too much grass/too fast. 2. Check oil ...

User Manual
Page 28
...replace light switch. 4. Faulty regulator (if so equipped). 4. Purge transmission. 1. Travel speed too fast. 3. Wet grass. 4. Mower drive belt worn. 9. Level mower deck. 5. Tighten blade bolt. 7. Reinstall blades sharp edge down. 10. Replace with attachment clutch engaged 1. Replace fuse. Poor...3. Replace bulb(s) or lamp(s). 3. Engine throttle control not set at "SLOW" position for 30 seconds before stopping engine. 28 Mower blades will not charge 1. Poor grass discharge 1. Switch is "OFF". 2. Battery will not rotate 1. Place freewheel control in...
...replace light switch. 4. Faulty regulator (if so equipped). 4. Purge transmission. 1. Travel speed too fast. 3. Wet grass. 4. Mower drive belt worn. 9. Level mower deck. 5. Tighten blade bolt. 7. Reinstall blades sharp edge down. 10. Replace with attachment clutch engaged 1. Replace fuse. Poor...3. Replace bulb(s) or lamp(s). 3. Engine throttle control not set at "SLOW" position for 30 seconds before stopping engine. 28 Mower blades will not charge 1. Poor grass discharge 1. Switch is "OFF". 2. Battery will not rotate 1. Place freewheel control in...


