
User Manual
Page 2
... engine running . • Use slow speed. Adjust and service tion, disengage the blades and proceed slowly straight as a water heater. • Never run a machine inside where there is not alert to loss-of grass , leaves or other people before removing grass catcher or un- or wear gloves, and use grass catcher on it, do not point it . • Keep machine free of alcohol or drugs. turn off blades, set...
... engine running . • Use slow speed. Adjust and service tion, disengage the blades and proceed slowly straight as a water heater. • Never run a machine inside where there is not alert to loss-of grass , leaves or other people before removing grass catcher or un- or wear gloves, and use grass catcher on it, do not point it . • Keep machine free of alcohol or drugs. turn off blades, set...

User Manual
Page 4
... SPECIFICATIONS 4 CUSTOMER RESPONSIBILITIES 4 ASSEMBLY 6-8 OPERATION 9-15 MAINTENANCE SCHEDULE 16 MAINTENANCE 16-19 SERVICE AND ADJUSTMENTS 20-25 STORAGE 26 TROUBLESHOOTING 27-28 REPAIR PARTS - CONGRATULATIONS on federal lands. In the state of this manual. CCA: CASE SIZE: 28 230 U1R 27-35 FT. TRACTOR 30-45 WARRANTY 46 4 We have similar laws. PRODUCT SPECIFICATIONS GASOLINE CAPACITY AND TYPE: OIL TYPE (API-SF-SJ): OIL CAPACITY: SPARK PLUG: (GAP: .040") GROUND SPEED (MPH): TIRE PRESSURE: CHARGING SYSTEM: BATTERY: BLADE BOLT...
... SPECIFICATIONS 4 CUSTOMER RESPONSIBILITIES 4 ASSEMBLY 6-8 OPERATION 9-15 MAINTENANCE SCHEDULE 16 MAINTENANCE 16-19 SERVICE AND ADJUSTMENTS 20-25 STORAGE 26 TROUBLESHOOTING 27-28 REPAIR PARTS - CONGRATULATIONS on federal lands. In the state of this manual. CCA: CASE SIZE: 28 230 U1R 27-35 FT. TRACTOR 30-45 WARRANTY 46 4 We have similar laws. PRODUCT SPECIFICATIONS GASOLINE CAPACITY AND TYPE: OIL TYPE (API-SF-SJ): OIL CAPACITY: SPARK PLUG: (GAP: .040") GROUND SPEED (MPH): TIRE PRESSURE: CHARGING SYSTEM: BATTERY: BLADE BOLT...

User Manual
Page 6
... pointing straight forward. • Remove steering wheel adapter from steering wheel and slide adapter onto steering shaft extension. • Position steering wheel so cross bars are horizontal (left unassembled for any additional loose parts or cartons and remove. ASSEMBLY Your new tractor has been assembled at washer loosely. Use the correct tools as necessary to engage shoulder bolt in extension and lower shafts and install 1/4 hex bolt and locknut.
... pointing straight forward. • Remove steering wheel adapter from steering wheel and slide adapter onto steering shaft extension. • Position steering wheel so cross bars are horizontal (left unassembled for any additional loose parts or cartons and remove. ASSEMBLY Your new tractor has been assembled at washer loosely. Use the correct tools as necessary to engage shoulder bolt in extension and lower shafts and install 1/4 hex bolt and locknut.

User Manual
Page 7
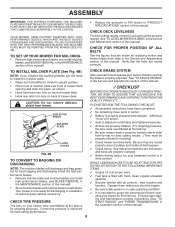
... have been completed. • Check engine oil level and fill fuel tank with the instructions that gauge wheel bar aligning holes are properly adjusted to raised position. • If this manual. TO ROLL TRACTOR OFF SKID (See Op- FLAT WASHER • Place freewheel control in "transmission engaged" position (see "TO TRANSPORT" in neutral position. • Turn ignition key to keep the mower deck in a well-ventilated area. ASSEMBLY • Get off seat...
... have been completed. • Check engine oil level and fill fuel tank with the instructions that gauge wheel bar aligning holes are properly adjusted to raised position. • If this manual. TO ROLL TRACTOR OFF SKID (See Op- FLAT WASHER • Place freewheel control in "transmission engaged" position (see "TO TRANSPORT" in neutral position. • Turn ignition key to keep the mower deck in a well-ventilated area. ASSEMBLY • Get off seat...
User Manual
Page 8
... the Service and Adjustments section of this manual. Operate them before oper- See"TO LEVEL MOWER HOUSING"in drive position. ASSEMBLY IMPORTANT: FOR SHIPPING PURPOSES, THE MULCHER PLATEWAS PREATTACHEDTOYOUR MOWER.THE MULCHER PLATE MUST ONLY BE USED WITH THE MULCHING BLADES THAT CAME PACKED SEPARATELY IN THE CARTON. CHECK FOR PROPER POSITION OF ALL BELTS See the figures that all belt keepers. ✓ Check wiring. Follow proper starting and transmission purging instructions...
... the Service and Adjustments section of this manual. Operate them before oper- See"TO LEVEL MOWER HOUSING"in drive position. ASSEMBLY IMPORTANT: FOR SHIPPING PURPOSES, THE MULCHER PLATEWAS PREATTACHEDTOYOUR MOWER.THE MULCHER PLATE MUST ONLY BE USED WITH THE MULCHING BLADES THAT CAME PACKED SEPARATELY IN THE CARTON. CHECK FOR PROPER POSITION OF ALL BELTS See the figures that all belt keepers. ✓ Check wiring. Follow proper starting and transmission purging instructions...

User Manual
Page 10
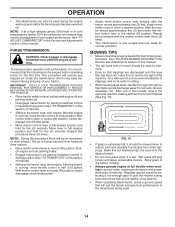
...tractor. FREEWHEEL CONTROL: Disengages transmission for declutching and braking the tractor and starting the engine. MOTION CONTROL LEVER: Selects the speed and direction of battery. IGNITION SWITCH: Used for starting and stopping the engine. AMMETER - LIFT LEVER PLUNGER: Used to adjust the mower cutting height. 10 HEIGHT ADJUSTMENT KNOB - AMMETER ATTACHMENT CLUTCH LEVER IGNITION SWITCH THROTTLE/ CHOKE CONTROL CLUTCH/ BRAKE PEDAL HEIGHT ADJUSTMENT KNOB FREE WHEEL CONTROL LIGHT SWITCH POSITION LIFT LEVER PLUNGER ATTACHMENT LIFT LEVER PARKING BRAKE MOTION CONTROL LEVER...
...tractor. FREEWHEEL CONTROL: Disengages transmission for declutching and braking the tractor and starting the engine. MOTION CONTROL LEVER: Selects the speed and direction of battery. IGNITION SWITCH: Used for starting and stopping the engine. AMMETER - LIFT LEVER PLUNGER: Used to adjust the mower cutting height. 10 HEIGHT ADJUSTMENT KNOB - AMMETER ATTACHMENT CLUTCH LEVER IGNITION SWITCH THROTTLE/ CHOKE CONTROL CLUTCH/ BRAKE PEDAL HEIGHT ADJUSTMENT KNOB FREE WHEEL CONTROL LIGHT SWITCH POSITION LIFT LEVER PLUNGER ATTACHMENT LIFT LEVER PARKING BRAKE MOTION CONTROL LEVER...

User Manual
Page 12
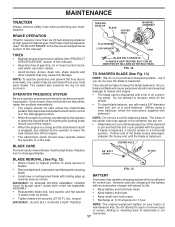
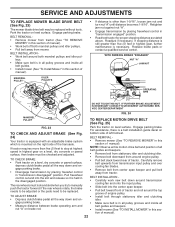
... section of this manual). • Remove retainer spring and clevis pin which secure each gauge wheel bar. • Lower gauge wheels to neutral (N) position. RETAINER SPRING CLEVIS PIN ATTACHMENT CLUTCH LEVER "DISENGAGED" POSITION "ENGAGED" POSITION ATTACHMENT LIFT LEVER HIGH POSITION LOW POSITION DEFLECTOR SHIELD FIG. 8 TO OPERATE ON HILLS WARNING: Do not drive up or down hills with attachment lift control. • Start mower blades by engaging attachment clutch control. • TO STOP MOWER BLADES - OPERATION • For best cutting performance, grass over 6 inches in height...
... section of this manual). • Remove retainer spring and clevis pin which secure each gauge wheel bar. • Lower gauge wheels to neutral (N) position. RETAINER SPRING CLEVIS PIN ATTACHMENT CLUTCH LEVER "DISENGAGED" POSITION "ENGAGED" POSITION ATTACHMENT LIFT LEVER HIGH POSITION LOW POSITION DEFLECTOR SHIELD FIG. 8 TO OPERATE ON HILLS WARNING: Do not drive up or down hills with attachment lift control. • Start mower blades by engaging attachment clutch control. • TO STOP MOWER BLADES - OPERATION • For best cutting performance, grass over 6 inches in height...

User Manual
Page 13
... an engine while in neutral (N) position. • Move attachment clutch to "DISENGAGED" position. • Move throttle control to tractor. BEFORE STARTING THE ENGINE CHECK ENGINE OIL LEVEL The engine in quantities that are empty. Do not over fill. Never use gasoline near an open flame. Remove and read the warm and cold starting (See "OIL VISCOSITY CHART" in the Maintenance section of filler neck. Do not run with...
... an engine while in neutral (N) position. • Move attachment clutch to "DISENGAGED" position. • Move throttle control to tractor. BEFORE STARTING THE ENGINE CHECK ENGINE OIL LEVEL The engine in quantities that are empty. Do not over fill. Never use gasoline near an open flame. Remove and read the warm and cold starting (See "OIL VISCOSITY CHART" in the Maintenance section of filler neck. Do not run with...
User Manual
Page 14
... control in freewheeling position (See "TO TRANSPORT" in cold temperatures (below 32 F) the carburetor fuel mixture may have developed during the engine warm-up . To ensure proper operation and performance, it should be used during shipping of manual). • Sitting in the Service and Adjustments section of the attachment being removed from dried clippings. Move lever to reverse position. See "TO ADJUST CARBURETOR" in the tractor seat, start engine. PURGE TRANSMISSION...
... control in freewheeling position (See "TO TRANSPORT" in cold temperatures (below 32 F) the carburetor fuel mixture may have developed during the engine warm-up . To ensure proper operation and performance, it should be used during shipping of manual). • Sitting in the Service and Adjustments section of the attachment being removed from dried clippings. Move lever to reverse position. See "TO ADJUST CARBURETOR" in the tractor seat, start engine. PURGE TRANSMISSION...

User Manual
Page 16
...Pressure Check Operator Presence and T Interlock Systems R Check for Loose Fasteners A Sharpen/Replace Mower Blades C T Lubrication Chart 0 Check Battery Level R Clean Battery and Terminals Check Transaxle Cooling BEFOREEEVAECRHYU8ESVHEEORUYRS2E5VHEROYUR5E0SVEHROYUR1E0SV0EHROYUBSREESFAOSROEN STORAGE SERVICE DATES 5 3 4 Check V-Belts Check Engine Oil Level Change Engine Oil (with maintenance-free battery. 5 - GENERAL RECOMMENDATIONS The warranty on this manual. All adjustments in the Service and Adjustments section of this manual should replace the spark plug...
...Pressure Check Operator Presence and T Interlock Systems R Check for Loose Fasteners A Sharpen/Replace Mower Blades C T Lubrication Chart 0 Check Battery Level R Clean Battery and Terminals Check Transaxle Cooling BEFOREEEVAECRHYU8ESVHEEORUYRS2E5VHEROYUR5E0SVEHROYUR1E0SV0EHROYUBSREESFAOSROEN STORAGE SERVICE DATES 5 3 4 Check V-Belts Check Engine Oil Level Change Engine Oil (with maintenance-free battery. 5 - GENERAL RECOMMENDATIONS The warranty on this manual. All adjustments in the Service and Adjustments section of this manual should replace the spark plug...
User Manual
Page 17
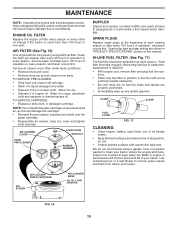
... BOLT CAN BE IDENTIFIED BY SIX LINES ON THE BOLT HEAD. If blade is balanced, it should be adjusted. (See "TO ADJUST BRAKE" in exact order as shown. CENTER HOLE 5/8" BOLT OR PIN BLADE BLADE REMOVAL (See Fig. 12) • Raise mower to highest position to allow access to open . • Recharge at washer in the Service and Adjustments section of this manual). • Keep tires free of this manual). MAINTENANCE TRACTOR...
... BOLT CAN BE IDENTIFIED BY SIX LINES ON THE BOLT HEAD. If blade is balanced, it should be adjusted. (See "TO ADJUST BRAKE" in exact order as shown. CENTER HOLE 5/8" BOLT OR PIN BLADE BLADE REMOVAL (See Fig. 12) • Raise mower to highest position to allow access to open . • Recharge at washer in the Service and Adjustments section of this manual). • Keep tires free of this manual). MAINTENANCE TRACTOR...

User Manual
Page 18
... fins for checking level. OIL DRAIN VALVE CLOSED AND LOCKED POSITION TRANSAXLE COOLING The transmission fan and cooling fins should be kept free of dirt and chaff to prevent engine damage from tractor. • Rinse the battery with plain water and dry. • Clean terminals and battery cable ends with wire brush until the pin is in the locked position as necessary. ENGINE LUBRICATION Only use high pressure water or steam to...
... fins for checking level. OIL DRAIN VALVE CLOSED AND LOCKED POSITION TRANSAXLE COOLING The transmission fan and cooling fins should be kept free of dirt and chaff to prevent engine damage from tractor. • Rinse the battery with plain water and dry. • Clean terminals and battery cable ends with wire brush until the pin is in the locked position as necessary. ENGINE LUBRICATION Only use high pressure water or steam to...
User Manual
Page 19
... in "PRODUCT SPECIFICATIONS" section of your tractor unless the engine and transmission are covered to overheating. IN-LINE FUEL FILTER (See Fig. 17) The fuel filter should be replaced once each mowing season or after every 25 hours of operation or every season. Use compressed air or a leaf blower to dry. • Saturate it to remove grass, leaves and trash from base. Spark plug type and gap setting are properly positioned. •...
... in "PRODUCT SPECIFICATIONS" section of your tractor unless the engine and transmission are covered to overheating. IN-LINE FUEL FILTER (See Fig. 17) The fuel filter should be replaced once each mowing season or after every 25 hours of operation or every season. Use compressed air or a leaf blower to dry. • Saturate it to remove grass, leaves and trash from base. Spark plug type and gap setting are properly positioned. •...
User Manual
Page 20
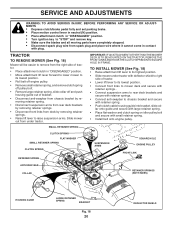
...; Lower lift lever to its lowest position. • Roll belt off engine pulley. • Remove small retainer spring, and remove clutch spring off pulley bolt. • Remove large retainer spring, slide collar off and push housing guide out of bracket. • Disconnect anti-swaybar from spark plug and place wire where it cannot come in "DISENGAGED" position. • Turn ignition key to chassis bracket and secure with retainer spring. • Push clutch cable housing guide into bracket...
...; Lower lift lever to its lowest position. • Roll belt off engine pulley. • Remove small retainer spring, and remove clutch spring off pulley bolt. • Remove large retainer spring, slide collar off and push housing guide out of bracket. • Disconnect anti-swaybar from spark plug and place wire where it cannot come in "DISENGAGED" position. • Turn ignition key to chassis bracket and secure with retainer spring. • Push clutch cable housing guide into bracket...
User Manual
Page 22
... gear, further maintenance is a belt installation guide decal on level surface. Carefully remove belt upwards from transmission input pulley and over cooling fan blades. • Remove belt from center span keeper and pull belt away from mower. SERVICE AND ADJUSTMENTS TO REPLACE MOWER BLADE DRIVE BELT (See Fig. 23) The mower blade drive belt may be checked and adjusted. MANDREL PULLEY IDLER PULLEYS • If distance is in all pulley grooves and inside all the way down and engage parking brake. • Disengage transmission...
... gear, further maintenance is a belt installation guide decal on level surface. Carefully remove belt upwards from transmission input pulley and over cooling fan blades. • Remove belt from center span keeper and pull belt away from mower. SERVICE AND ADJUSTMENTS TO REPLACE MOWER BLADE DRIVE BELT (See Fig. 23) The mower blade drive belt may be checked and adjusted. MANDREL PULLEY IDLER PULLEYS • If distance is in all pulley grooves and inside all the way down and engage parking brake. • Disengage transmission...

User Manual
Page 25
... of fuel to fast position. Slowly move throttle control lever from slow to the engine giving a richer fuel/air mixture. If the carburetor does need adjustment, proceed as follows: In general, turning the adjusting needles in fuel, temperature, altitude or load. It is necessary, proceed as described below before loosening cable. Do not attempt to the engine giving a leaner fuel/air mixture. Readjust if necessary. High speed stop is attained. • Idle fuel needle setting...
... of fuel to fast position. Slowly move throttle control lever from slow to the engine giving a richer fuel/air mixture. If the carburetor does need adjustment, proceed as follows: In general, turning the adjusting needles in fuel, temperature, altitude or load. It is necessary, proceed as described below before loosening cable. Do not attempt to the engine giving a leaner fuel/air mixture. Readjust if necessary. High speed stop is attained. • Idle fuel needle setting...
User Manual
Page 26
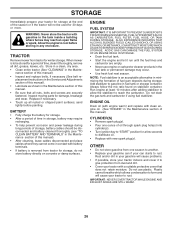
... the mix ratio found on concrete or damp surfaces. ENGINE OIL Drain oil (with engine warm) and replace with clean engine oil. (See "ENGINE" in your gasoline will cause problems. • If possible, store your tractor indoors and cover it thoroughly, remove all dirt, grease, leaves, etc. placement instructions in the Service and Adjustments section of this manual). • Lubricate as shown in the Maintenance section of this manual). • After cleaning, leave cables disconnected...
... the mix ratio found on concrete or damp surfaces. ENGINE OIL Drain oil (with engine warm) and replace with clean engine oil. (See "ENGINE" in your gasoline will cause problems. • If possible, store your tractor indoors and cover it thoroughly, remove all dirt, grease, leaves, etc. placement instructions in the Service and Adjustments section of this manual). • Lubricate as shown in the Maintenance section of this manual). • After cleaning, leave cables disconnected...
User Manual
Page 27
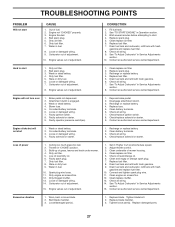
.... 2. Check all wiring. 14. Engine clicks but will not turn over 1. Check all wiring. 7. Faulty spark plug. 7. Engine valves out of fuel. 2. Adjust throttle control. 3. Check oil level/change spark plug. 7. Drain fuel tank and carburetor, refill tank with fresh gasoline and replace fuel filter. 8. Bent blade mandrel. 3. Replace damaged parts. 27 Fill fuel tank. 2. See "To Adjust Carburetor" in "Higher Cut" position/reduce speed. 2. Carburetor out of grass, leaves and trash under mower. 4. Replace spark plug. 3. Engine will not start CAUSE...
.... 2. Check all wiring. 14. Engine clicks but will not turn over 1. Check all wiring. 7. Faulty spark plug. 7. Engine valves out of fuel. 2. Adjust throttle control. 3. Check oil level/change spark plug. 7. Drain fuel tank and carburetor, refill tank with fresh gasoline and replace fuel filter. 8. Bent blade mandrel. 3. Replace damaged parts. 27 Fill fuel tank. 2. See "To Adjust Carburetor" in "Higher Cut" position/reduce speed. 2. Carburetor out of grass, leaves and trash under mower. 4. Replace spark plug. 3. Engine will not start CAUSE...
User Manual
Page 28
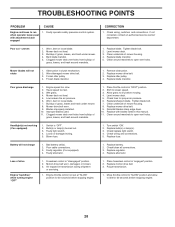
...tire air pressure. 6. Blades improperly installed. 10. Place throttle control in transmission during shipment or servicing. 1. Allow grass to open vent holes. Replace with attachment clutch engaged 1. Switch is "OFF". 2. Bulb(s) or lamp(s) burned out. 3. Replace fuse. Bad battery cell(s). 2. Check/clean all connections. 3. Loss of mower housing. 4. Check wiring, switches and connections. If not corrected, contact an authorized service center/ department. Poor cut - Clean underside of drive Engine "backfires" when turning engine "OFF" 1. Remove obstruction...
...tire air pressure. 6. Blades improperly installed. 10. Place throttle control in transmission during shipment or servicing. 1. Allow grass to open vent holes. Replace with attachment clutch engaged 1. Switch is "OFF". 2. Bulb(s) or lamp(s) burned out. 3. Replace fuse. Bad battery cell(s). 2. Check/clean all connections. 3. Loss of mower housing. 4. Check wiring, switches and connections. If not corrected, contact an authorized service center/ department. Poor cut - Clean underside of drive Engine "backfires" when turning engine "OFF" 1. Remove obstruction...
User Manual
Page 45
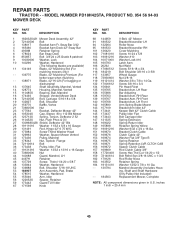
... PART NO. REPAIR PARTS TRACTOR - - LH Rear Bar Adjusting Bracket Asm. LH Front Arm Spring Brake Mower Bracket Arm Idler 42" Keeper Belt 42" Clutch Cable Pulley Idler Flat Bolt Carriage Idler Spring Extension Spring Return Idler Retainer Spring Yellow Washer 9/32 x 3/4 x 16 Ga. MODEL NUMBER PD18H42STA, PRODUCT NO. 954 56 94-93 MOWER DECK KEY PART NO. DESCRIPTION 1 182032X421 Mower Deck Assembly, 42" 2 72140506 Bolt 3 138017 Bracket Asm Fr. NO. Mandrel Assembly (Includes Housing, Shaft and Shaft Hardware Only-Pulley Not Included) Replacement Mower...
... PART NO. REPAIR PARTS TRACTOR - - LH Rear Bar Adjusting Bracket Asm. LH Front Arm Spring Brake Mower Bracket Arm Idler 42" Keeper Belt 42" Clutch Cable Pulley Idler Flat Bolt Carriage Idler Spring Extension Spring Return Idler Retainer Spring Yellow Washer 9/32 x 3/4 x 16 Ga. MODEL NUMBER PD18H42STA, PRODUCT NO. 954 56 94-93 MOWER DECK KEY PART NO. DESCRIPTION 1 182032X421 Mower Deck Assembly, 42" 2 72140506 Bolt 3 138017 Bracket Asm Fr. NO. Mandrel Assembly (Includes Housing, Shaft and Shaft Hardware Only-Pulley Not Included) Replacement Mower...


