
User Manual
Page 2
... and replace with the engine • Remove obstacles such as required. • Avoid starting . • Only allow the mower deck to cool before operating or • Never run a machine inside where or other objects that • Slow down the slope. 2 Adjust and service Do not make adjustments or repairs with manufacturer's recom- • Follow the manufacturer's recommendations for Ride-On Mowers IMPORTANT: THIS CUTTING...
... and replace with the engine • Remove obstacles such as required. • Avoid starting . • Only allow the mower deck to cool before operating or • Never run a machine inside where or other objects that • Slow down the slope. 2 Adjust and service Do not make adjustments or repairs with manufacturer's recom- • Follow the manufacturer's recommendations for Ride-On Mowers IMPORTANT: THIS CUTTING...

User Manual
Page 4
... purchase of a new tractor. TRACTOR 28-41 WARRANTY 42 4 If a spark arrester is available through your nearest authorized service center/department (See REPAIR PARTS section of this tractor. PRODUCT SPECIFICATIONS GASOLINE CAPACITY AND TYPE: 2.0 GALLONS UNLEADED REGULAR OIL TYPE (API-SF-SJ): SAE 30 (above 32°F) SAE 5W-30 (below 32°F) OIL CAPACITY: W/ FILTER 3.5 PINTS W/O FILTER 3.0 PINTS SPARK PLUG: (GAP: .030") CHAMPION RC12YC GROUND SPEED (MPH): FORWARD: 5.5 REVERSE: 2.4 TIRE PRESSURE: FRONT: REAR...
... purchase of a new tractor. TRACTOR 28-41 WARRANTY 42 4 If a spark arrester is available through your nearest authorized service center/department (See REPAIR PARTS section of this tractor. PRODUCT SPECIFICATIONS GASOLINE CAPACITY AND TYPE: 2.0 GALLONS UNLEADED REGULAR OIL TYPE (API-SF-SJ): SAE 30 (above 32°F) SAE 5W-30 (below 32°F) OIL CAPACITY: W/ FILTER 3.5 PINTS W/O FILTER 3.0 PINTS SPARK PLUG: (GAP: .030") CHAMPION RC12YC GROUND SPEED (MPH): FORWARD: 5.5 REVERSE: 2.4 TIRE PRESSURE: FRONT: REAR...
User Manual
Page 6
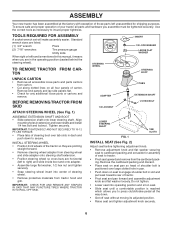
.... INSTALL STEERING WHEEL • Position front wheels of the tractor so they are pointing straight forward. • Remove steering wheel adapter from steering wheel and slide adapter onto steering shaft extension. • Position steering wheel so cross bars are in slot and pull seat towards rear of tractor. • Pivot seat and pan forward and assemble adjustment knob and flat . • Check for any additional loose parts or...
.... INSTALL STEERING WHEEL • Position front wheels of the tractor so they are pointing straight forward. • Remove steering wheel adapter from steering wheel and slide adapter onto steering shaft extension. • Position steering wheel so cross bars are in slot and pull seat towards rear of tractor. • Pivot seat and pan forward and assemble adjustment knob and flat . • Check for any additional loose parts or...

User Manual
Page 7
... 02464 ADJUSTMENT KNOB FIG. 2 CHECK BATTERY (See Fig. 3) • Lift seat pan to raised position. • If this battery is put into bracket channel, Be sure that follow all the above assembly steps have been completed. • Check engine oil level and fill fuel tank with the instructions that gauge wheel bar aligning holes are designed to keep the mower deck in the Operation section of this manual). • Roll tractor...
... 02464 ADJUSTMENT KNOB FIG. 2 CHECK BATTERY (See Fig. 3) • Lift seat pan to raised position. • If this battery is put into bracket channel, Be sure that follow all the above assembly steps have been completed. • Check engine oil level and fill fuel tank with the instructions that gauge wheel bar aligning holes are designed to keep the mower deck in the Operation section of this manual). • Roll tractor...

User Manual
Page 8
... the Service and Adjustments section of this manual. See"TO LEVEL MOWER HOUSING"in the Service and Adjustments section of this manual. See "TO ADJUST BRAKE" in the Service and Adjustments section of this manual. ✓CHECKLIST BEFOREYOU OPERATE AND ENJOYYOUR NEW TRACTOR, WE WISH TO ASSURE THAT YOU RECEIVE THE BEST PERFORMANCE AND SATISFACTION FROM THIS QUALITY PRODUCT. ASSEMBLY RETAINER SPRING PIN SHOULDER BOLT ADJUSTING BAR CHECK TIRE PRESSURE The tires on back of mower deck...
... the Service and Adjustments section of this manual. See"TO LEVEL MOWER HOUSING"in the Service and Adjustments section of this manual. See "TO ADJUST BRAKE" in the Service and Adjustments section of this manual. ✓CHECKLIST BEFOREYOU OPERATE AND ENJOYYOUR NEW TRACTOR, WE WISH TO ASSURE THAT YOU RECEIVE THE BEST PERFORMANCE AND SATISFACTION FROM THIS QUALITY PRODUCT. ASSEMBLY RETAINER SPRING PIN SHOULDER BOLT ADJUSTING BAR CHECK TIRE PRESSURE The tires on back of mower deck...

User Manual
Page 11
... the blade tip with the engine running . These heights are approximate and may cause engine to "backfire". • Turn ignition key to idle before leaving the operator's position; NOTE:Adjust gauge wheels with thumb and move motion control lever to "DISENGAGED" position. the second to neutral (N) position. HOW TO USE YOUR TRACTOR TO SET PARKING BRAKE (See Fig. 7) Your tractor is at less than full throttle reduces the battery charging rate...
... the blade tip with the engine running . These heights are approximate and may cause engine to "backfire". • Turn ignition key to idle before leaving the operator's position; NOTE:Adjust gauge wheels with thumb and move motion control lever to "DISENGAGED" position. the second to neutral (N) position. HOW TO USE YOUR TRACTOR TO SET PARKING BRAKE (See Fig. 7) Your tractor is at less than full throttle reduces the battery charging rate...

User Manual
Page 12
... or cutting off when operating your tractor. Use common sense when towing. OPERATION • Adjust mower to desired cutting height (See "TO ADJUST MOWER CUTTING HEIGHT" in freewheeling position. Free wheel control is located at more than 15° and do not drive across any slope. • Choose the slowest speed before starting up or down hills with the engine running and the attachment clutch engaged will shut off the ground. • Replace retainer spring...
... or cutting off when operating your tractor. Use common sense when towing. OPERATION • Adjust mower to desired cutting height (See "TO ADJUST MOWER CUTTING HEIGHT" in freewheeling position. Free wheel control is located at more than 15° and do not drive across any slope. • Choose the slowest speed before starting up or down hills with the engine running and the attachment clutch engaged will shut off the ground. • Replace retainer spring...

User Manual
Page 13
... the engine has run with tractor on seat in operating position, depress clutch/brake pedal and set the parking brake. • Sitting in the Service and Adjustments section of this manual. • Insert key into ignition and turn key clockwise to the fast position. • The attachments and ground drive can damage the fuel system of filler neck. If necessary, add oil until the engine runs roughly, then move throttle control to operating position...
... the engine has run with tractor on seat in operating position, depress clutch/brake pedal and set the parking brake. • Sitting in the Service and Adjustments section of this manual. • Insert key into ignition and turn key clockwise to the fast position. • The attachments and ground drive can damage the fuel system of filler neck. If necessary, add oil until the engine runs roughly, then move throttle control to operating position...

User Manual
Page 15
...oil filter) E Change Engine Oil (without oil filter) N Clean Air Filter G Clean Air Screen I N Inspect Muffler/Spark Arrester E Replace Oil Filter (If equipped) Clean Engine Cooling Fins Replace Spark Plug Replace Air Filter Paper Cartridge Replace Fuel Filter 1 - Do not overtighten. MAINTENANCE MAINTENANCE SCHEDULE FILL IN DATES AS YOU COMPLETE REGULAR SERVICE Check Brake Operation Check Tire Pressure Check Operator Presence and T Interlock Systems R Check for Loose Fasteners A Sharpen/Replace Mower Blades C T Lubrication Chart 0 Check Battery Level R Clean Battery...
...oil filter) E Change Engine Oil (without oil filter) N Clean Air Filter G Clean Air Screen I N Inspect Muffler/Spark Arrester E Replace Oil Filter (If equipped) Clean Engine Cooling Fins Replace Spark Plug Replace Air Filter Paper Cartridge Replace Fuel Filter 1 - Do not overtighten. MAINTENANCE MAINTENANCE SCHEDULE FILL IN DATES AS YOU COMPLETE REGULAR SERVICE Check Brake Operation Check Tire Pressure Check Operator Presence and T Interlock Systems R Check for Loose Fasteners A Sharpen/Replace Mower Blades C T Lubrication Chart 0 Check Battery Level R Clean Battery...
User Manual
Page 16
... damage. If your tractor is maintenance free. but are working properly. NOTE: Do not use . BRAKE OPERATION If tractor requires more than six (6) feet stopping distance at washer in exact order as described, repair the problem immediately. • The engine should not start unless the brake pedal is fully depressed and attachement clutch control is in the disengaged position. • When the engine is running, any attempt by...
... damage. If your tractor is maintenance free. but are working properly. NOTE: Do not use . BRAKE OPERATION If tractor requires more than six (6) feet stopping distance at washer in exact order as described, repair the problem immediately. • The engine should not start unless the brake pedal is fully depressed and attachement clutch control is in the disengaged position. • When the engine is running, any attempt by...

User Manual
Page 17
Check V-belts for accurate reading. CLOSED AND LOCKED POSITION OIL DRAIN VALVE Do not attempt to clean fan or transmission while engine is running low on oil fill cap/dipstick for checking level. To prevent damage to seals, do not use high pressure water or steam to clean transaxle. • Inspect cooling fan to be sure fan blades are not adjustable. Should the transaxle ever leak or require servicing, contact your expected...
Check V-belts for accurate reading. CLOSED AND LOCKED POSITION OIL DRAIN VALVE Do not attempt to clean fan or transmission while engine is running low on oil fill cap/dipstick for checking level. To prevent damage to seals, do not use high pressure water or steam to clean transaxle. • Inspect cooling fan to be sure fan blades are not adjustable. Should the transaxle ever leak or require servicing, contact your expected...

User Manual
Page 19
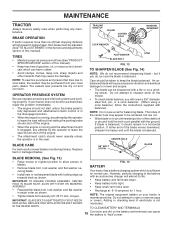
... position. • Slide mower under tractor. TRACTOR TO REMOVE MOWER (See Fig. 18) Mower will not properly adjust your mower. SERVICE AND ADJUSTMENTS WARNING: TO AVOID SERIOUS INJURY, BEFORE PERFORMING ANY SERVICE OR ADJUSTMENTS: • Depress clutch/brake pedal fully and set parking brake. • Place motion control lever in neutral (N) position. • Place attachment clutch in "DISENGAGED" position. • Turn ignition key to its lowest position. • Roll belt off engine pulley. • Remove small retainer spring, and remove clutch spring off pulley bolt. • Remove...
... position. • Slide mower under tractor. TRACTOR TO REMOVE MOWER (See Fig. 18) Mower will not properly adjust your mower. SERVICE AND ADJUSTMENTS WARNING: TO AVOID SERIOUS INJURY, BEFORE PERFORMING ANY SERVICE OR ADJUSTMENTS: • Depress clutch/brake pedal fully and set parking brake. • Place motion control lever in neutral (N) position. • Place attachment clutch in "DISENGAGED" position. • Turn ignition key to its lowest position. • Roll belt off engine pulley. • Remove small retainer spring, and remove clutch spring off pulley bolt. • Remove...

User Manual
Page 20
... LENGTH NUT "F" TRUNNION NUT "E" "A" GROUND LINE "A" FIG. 19 SUSPENSION ARM FRONT LINKS FIG. 22 TO REPLACE MOWER BLADE DRIVE BELT (See Fig. 23) LIFT LINK ADJUSTMENT NUT FIG. 20 FRONT-TO-BACK ADJUSTMENT (See Figs. 21 and 22) IMPORTANT: DECK MUST BE LEVEL SIDE-TO-SIDE. BELT REMOVAL • Remove mower from tractor (See "TO REMOVE MOWER" in its highest position. • At the midpoint of both mandrel pulleys and idler pulleys. • Pull belt...
... LENGTH NUT "F" TRUNNION NUT "E" "A" GROUND LINE "A" FIG. 19 SUSPENSION ARM FRONT LINKS FIG. 22 TO REPLACE MOWER BLADE DRIVE BELT (See Fig. 23) LIFT LINK ADJUSTMENT NUT FIG. 20 FRONT-TO-BACK ADJUSTMENT (See Figs. 21 and 22) IMPORTANT: DECK MUST BE LEVEL SIDE-TO-SIDE. BELT REMOVAL • Remove mower from tractor (See "TO REMOVE MOWER" in its highest position. • At the midpoint of both mandrel pulleys and idler pulleys. • Pull belt...

User Manual
Page 21
... and nut "A" on brake rod. • If distance is needed to get to adjustment bolt, move forward or backward. • Hold motion control lever in that position and turn nut "A" until distance becomes 1-9/16". Replace brake pads or contact a qualified service center. Carefully remove belt upwards from transmission input pulley. • Loosen adjustment bolt in front of tractor. tion of left footrest. BELT REMOVAL • Remove mower (See "TO REMOVE MOWER" in highest gear, further maintenance...
... and nut "A" on brake rod. • If distance is needed to get to adjustment bolt, move forward or backward. • Hold motion control lever in that position and turn nut "A" until distance becomes 1-9/16". Replace brake pads or contact a qualified service center. Carefully remove belt upwards from transmission input pulley. • Loosen adjustment bolt in front of tractor. tion of left footrest. BELT REMOVAL • Remove mower (See "TO REMOVE MOWER" in highest gear, further maintenance...
User Manual
Page 23
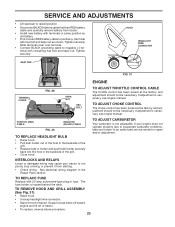
... your engine does not operate properly due to suspected carburetor problems, take your tractor to positive (+) terminal with hex bolt and keps nut as old battery. • First connect RED battery cable to run poorly, stop running, or prevent it from starting. • Check wiring. See electrical wiring diagram in fuse. SERVICE AND ADJUSTMENTS • Lift seat pan to raised position. • Disconnect BLACK battery cable first then RED battery cable and carefully remove battery from tractor. • Install new battery...
... your engine does not operate properly due to suspected carburetor problems, take your tractor to positive (+) terminal with hex bolt and keps nut as old battery. • First connect RED battery cable to run poorly, stop running, or prevent it from starting. • Check wiring. See electrical wiring diagram in fuse. SERVICE AND ADJUSTMENTS • Lift seat pan to raised position. • Disconnect BLACK battery cable first then RED battery cable and carefully remove battery from tractor. • Install new battery...
User Manual
Page 24
...;ame or spark. Do not use engine or carburetor cleaner products in the Maintenance section of fuel gum deposits during long periods of oil through spark plug hole(s) into cylinder(s). • Turn ignition key to "START" position for 30 days or more. When mower is an acceptable alternative in the tank inside a building where fumes may occur. • Use fresh fuel next season. ENGINE OIL Drain oil (with engine warm) and replace with...
...;ame or spark. Do not use engine or carburetor cleaner products in the Maintenance section of fuel gum deposits during long periods of oil through spark plug hole(s) into cylinder(s). • Turn ignition key to "START" position for 30 days or more. When mower is an acceptable alternative in the tank inside a building where fumes may occur. • Use fresh fuel next season. ENGINE OIL Drain oil (with engine warm) and replace with...

User Manual
Page 25
...To Adjust Carburetor" in Service Adjustments section. 15. Brake pedal not depressed. 2. Attachment clutch is engaged. 3. Faulty solenoid or starter. 9. Clean battery terminals. 6. Check/replace solenoid or starter. 9. Cutting too much grass/too fast. 2. Dirty air filter. 5. Faulty spark plug. 7. Adjust throttle control. 3. Clean/replace air filter. 5. Check oil level/change spark plug. 7. Clean and regap or change oil. 6. Contact an authorized service center/department. Tighten blade bolt. 2. Engine valves out of fuel. 2. Hard to start 1. Dirty...
...To Adjust Carburetor" in Service Adjustments section. 15. Brake pedal not depressed. 2. Attachment clutch is engaged. 3. Faulty solenoid or starter. 9. Clean battery terminals. 6. Check/replace solenoid or starter. 9. Cutting too much grass/too fast. 2. Dirty air filter. 5. Faulty spark plug. 7. Adjust throttle control. 3. Clean/replace air filter. 5. Check oil level/change spark plug. 7. Clean and regap or change oil. 6. Contact an authorized service center/department. Tighten blade bolt. 2. Engine valves out of fuel. 2. Hard to start 1. Dirty...
User Manual
Page 26
... blade. Tighten blade bolt. 7. Turn switch "ON". 2. Replace bulb(s) or lamp(s). 3. Poor cut - Buildup of grass, leaves and trash under mower. 4. Level mower deck. 3. Remove obstruction. 2. Low/uneven tire air pressure. 6. Worn, bent or loose blade. 7. Headlight(s) not working (if so equipped) 1. Bulb(s) or lamp(s) burned out. 3. Blown fuse. 1. Air trapped in "FAST" position. 2. Place throttle control in transmission during shipment or servicing. 1. Allow grass to dry before stopping engine. 1. Clean around mandrels to open vent holes. Battery...
... blade. Tighten blade bolt. 7. Turn switch "ON". 2. Replace bulb(s) or lamp(s). 3. Poor cut - Buildup of grass, leaves and trash under mower. 4. Level mower deck. 3. Remove obstruction. 2. Low/uneven tire air pressure. 6. Worn, bent or loose blade. 7. Headlight(s) not working (if so equipped) 1. Bulb(s) or lamp(s) burned out. 3. Blown fuse. 1. Air trapped in "FAST" position. 2. Place throttle control in transmission during shipment or servicing. 1. Allow grass to dry before stopping engine. 1. Clean around mandrels to open vent holes. Battery...

User Manual
Page 41
... Screw 5/16-18 x 3/4 116 184219 Bolt, Shoulder 117 133957 Wheel, Gauge 118 73930600 Nut Centerlock 3/8-16 119 19121414 Washer 3/8 x 7/8 x 14 Ga. 134 156941 Pin Head Rivet 135 159765X421 Bracket Asm. Whl Ga. Whl Ga. Pulley Not Included) - - 186917 Replacement Mower, Complete (Std. NO. R LH 136 155986 Bar Adjusting Gauge Wheel 138 159763X421 Bracket Asm Whl Ga. ing Shaft and Shaft Hardware Only - NO. inches 1 inch = 25.4 mm 41 deck Order separately mulcher cover and gauge wheel...
... Screw 5/16-18 x 3/4 116 184219 Bolt, Shoulder 117 133957 Wheel, Gauge 118 73930600 Nut Centerlock 3/8-16 119 19121414 Washer 3/8 x 7/8 x 14 Ga. 134 156941 Pin Head Rivet 135 159765X421 Bracket Asm. Whl Ga. Whl Ga. Pulley Not Included) - - 186917 Replacement Mower, Complete (Std. NO. R LH 136 155986 Bar Adjusting Gauge Wheel 138 159763X421 Bracket Asm Whl Ga. ing Shaft and Shaft Hardware Only - NO. inches 1 inch = 25.4 mm 41 deck Order separately mulcher cover and gauge wheel...

User Manual
Page 45
... consumer purchaser, we will exchange the Battery, charging you 1/12 of the price of a new Battery for replacement under this product as noted below) or components parts thereof. The Warranty period for any power equipment unit or attachment are belts, blades, blade adapters, normal wear, normal adjustments, standard hardware and normal maintenance. 7. In the event you . THIS WARRANTY DOES NOT APPLY TO INCIDENTAL OR...
... consumer purchaser, we will exchange the Battery, charging you 1/12 of the price of a new Battery for replacement under this product as noted below) or components parts thereof. The Warranty period for any power equipment unit or attachment are belts, blades, blade adapters, normal wear, normal adjustments, standard hardware and normal maintenance. 7. In the event you . THIS WARRANTY DOES NOT APPLY TO INCIDENTAL OR...


