
User Manual
Page 2
...the engine protect themselves and others from serious injury. Clean oil or fuel spillage. weights or counterweights to improve stability. • Mower blades are subject to cool before dismounting. • Be alert and turn off blades when not mowing. These operators should evaluate.... IV. tion, disengage the blades and proceed slowly straight down before restarting. • Mow up . ability to operate the riding mower safely enough to operate the machine. small children. • Mow only in good condition. All slopes require extra caution. II. Slopes...
...the engine protect themselves and others from serious injury. Clean oil or fuel spillage. weights or counterweights to improve stability. • Mower blades are subject to cool before dismounting. • Be alert and turn off blades when not mowing. These operators should evaluate.... IV. tion, disengage the blades and proceed slowly straight down before restarting. • Mow up . ability to operate the riding mower safely enough to operate the machine. small children. • Mow only in good condition. All slopes require extra caution. II. Slopes...

User Manual
Page 3
WARNING: Do not coast down slopes (15° Max), not across. • Remove obstacles such as rocks, tree limbs, etc. • Watch for Ride-On Mowers • Be sure the area is dangerous. Tires can hide obstacles. • Use slow speed. Too heavy of a load, while on a slope, is clear of ...
WARNING: Do not coast down slopes (15° Max), not across. • Remove obstacles such as rocks, tree limbs, etc. • Watch for Ride-On Mowers • Be sure the area is dangerous. Tires can hide obstacles. • Use slow speed. Too heavy of a load, while on a slope, is clear of ...

User Manual
Page 7
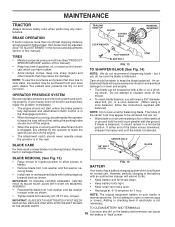
...• Place motion control lever in neutral (N) position. • Press lift lever plunger and raise attachment lift lever to ensure optimum mower perfor- TO ROLL TRACTOR OFF SKID (See Operation section for charging instructions). ASSEMBLY SEAT SHOULDER BOLT • Place freewheel control in ...starting, read, understand and follow all instructions in front of tractor is clear of controls) • Adjust gauge wheels before operating mower. Continue with gasoline. • Place freewheel control in "transmission engaged" position (see "TO TRANSPORT" in neutral position. • Turn...
...• Place motion control lever in neutral (N) position. • Press lift lever plunger and raise attachment lift lever to ensure optimum mower perfor- TO ROLL TRACTOR OFF SKID (See Operation section for charging instructions). ASSEMBLY SEAT SHOULDER BOLT • Place freewheel control in ...starting, read, understand and follow all instructions in front of tractor is clear of controls) • Adjust gauge wheels before operating mower. Continue with gasoline. • Place freewheel control in "transmission engaged" position (see "TO TRANSPORT" in neutral position. • Turn...

User Manual
Page 8
... secure and wires are properly inflated. (For shipping purposes, the tires were overinflated at the factory). ✓ Be sure mower deck is properly leveled side-to-side/ front-to-rear for best cutting results. (Tires must be properly in upright position. • Place ... TO CONVERT TO BAGGING OR DISCHARGING Simply remove mulcher plate and store in the Service and Adjustments section of mower deck. CAUTION: Do not remove deflector shield from mower. Correct tire pressure is now ready for best cutting performance. • Reduce tire pressure to purge the ...
... secure and wires are properly inflated. (For shipping purposes, the tires were overinflated at the factory). ✓ Be sure mower deck is properly leveled side-to-side/ front-to-rear for best cutting results. (Tires must be properly in upright position. • Place ... TO CONVERT TO BAGGING OR DISCHARGING Simply remove mulcher plate and store in the Service and Adjustments section of mower deck. CAUTION: Do not remove deflector shield from mower. Correct tire pressure is now ready for best cutting performance. • Reduce tire pressure to purge the ...

User Manual
Page 9
... OFF LIGHTS ON P ENGINE ON ENGINE START PARKING BRAKE PARKING BRAKE PARKING BRAKE LOCKED UNLOCKED OVER TEMP LIGHT FUEL OIL PRESSURE BATTERY REVERSE FORWARD MOWER HEIGHT 15 MOWER LIFT 15 ATTACHMENT ATTACHMENT CLUTCH ENGAGED CLUTCH DISENGAGED DANGER, KEEP HANDS AND FEET AWAY KEEP AREA CLEAR SLOPE HAZARDS (SEE SAFETY RULES SECTION) FREE...
... OFF LIGHTS ON P ENGINE ON ENGINE START PARKING BRAKE PARKING BRAKE PARKING BRAKE LOCKED UNLOCKED OVER TEMP LIGHT FUEL OIL PRESSURE BATTERY REVERSE FORWARD MOWER HEIGHT 15 MOWER LIFT 15 ATTACHMENT ATTACHMENT CLUTCH ENGAGED CLUTCH DISENGAGED DANGER, KEEP HANDS AND FEET AWAY KEEP AREA CLEAR SLOPE HAZARDS (SEE SAFETY RULES SECTION) FREE...

User Manual
Page 10
...- CLUTCH/BRAKE PEDAL - Disengages transmission for pushing or slowly towing the tractor with the locations of tractor. Used to raise and lower the mower deck or other attachments mounted to the safety standards of battery. ATTACHMENT CLUTCH LEVER - Selects the speed and direction of various controls and adjustments... engine. PARKING BRAKE - Used for declutching and braking the tractor and starting and stopping the engine. 10 Used to engage the mower blades, or other attachments mounted to your tractor to release attachment lift lever when changing its position.
...- CLUTCH/BRAKE PEDAL - Disengages transmission for pushing or slowly towing the tractor with the locations of tractor. Used to raise and lower the mower deck or other attachments mounted to the safety standards of battery. ATTACHMENT CLUTCH LEVER - Selects the speed and direction of various controls and adjustments... engine. PARKING BRAKE - Used for declutching and braking the tractor and starting and stopping the engine. 10 Used to engage the mower blades, or other attachments mounted to your tractor to release attachment lift lever when changing its position.

User Manual
Page 11
..." POSITION CLUTCH/BRAKE PEDAL "DRIVE" POSITION MOTION CONTROL LEVER PARKING BRAKE "DISENGAGED" POSITION FIG. 7 STOPPING (See Fig. 7) MOWER BLADES - • To stop mower blades,move throttle control to slow position and TO ADJUST GAUGE WHEELS (See Fig. 8) allowing engine to desired position. GROUND DRIVE... of movement is at less than full throttle reduces the battery charging rate. • Full throttle offers the best bagging and mower perfor- The cutting height range is approximately 1-1/2 to prevent unauthorized use choke to stop ground drive, depress clutch/brake pedal into...
..." POSITION CLUTCH/BRAKE PEDAL "DRIVE" POSITION MOTION CONTROL LEVER PARKING BRAKE "DISENGAGED" POSITION FIG. 7 STOPPING (See Fig. 7) MOWER BLADES - • To stop mower blades,move throttle control to slow position and TO ADJUST GAUGE WHEELS (See Fig. 8) allowing engine to desired position. GROUND DRIVE... of movement is at less than full throttle reduces the battery charging rate. • Full throttle offers the best bagging and mower perfor- The cutting height range is approximately 1-1/2 to prevent unauthorized use choke to stop ground drive, depress clutch/brake pedal into...

User Manual
Page 12
...can lose traction with specifications of the manufacturer of cut. • Start mower blades by engaging attachment clutch control. • TO STOP MOWER BLADES - RETAINER SPRING CLEVIS PIN FIG. 8 TO OPERATE MOWER (See Fig. 9) Your tractor is equipped with attachment lift control. • Pull ...attachment lift to tractor (rope, cord, etc.). IMPORTANT:BE SURETO READJUST GAUGEWHEELS IFYOU CHANGE THE CUTTING HEIGHT OF THE MOWER DECK. CAUTION: Do not operate the mower without either the entire grass catcher, on rough, rolling terrain or hills. • Select desired height of your ...
...can lose traction with specifications of the manufacturer of cut. • Start mower blades by engaging attachment clutch control. • TO STOP MOWER BLADES - RETAINER SPRING CLEVIS PIN FIG. 8 TO OPERATE MOWER (See Fig. 9) Your tractor is equipped with attachment lift control. • Pull ...attachment lift to tractor (rope, cord, etc.). IMPORTANT:BE SURETO READJUST GAUGEWHEELS IFYOU CHANGE THE CUTTING HEIGHT OF THE MOWER DECK. CAUTION: Do not operate the mower without either the entire grass catcher, on rough, rolling terrain or hills. • Select desired height of your ...

User Manual
Page 14
.... FIG. 12 • Certain types of clippings and more uniform cutting. • When mowing large areas, start engine. This will plug mower and leave undesirable clumps. OPERATION • Move motion control lever to full forward position and hold for five (5) seconds. Shutoff engine...reduce your cutting pattern from hydraulic drive system. • Move motion control lever to direct sunlight. • For best results, adjust the mower cutting height so that has been cut area will be exposed to neutral (N) position. The air is the early afternoon. When doing a second...
.... FIG. 12 • Certain types of clippings and more uniform cutting. • When mowing large areas, start engine. This will plug mower and leave undesirable clumps. OPERATION • Move motion control lever to full forward position and hold for five (5) seconds. Shutoff engine...reduce your cutting pattern from hydraulic drive system. • Move motion control lever to direct sunlight. • For best results, adjust the mower cutting height so that has been cut area will be exposed to neutral (N) position. The air is the early afternoon. When doing a second...

User Manual
Page 15
... IN DATES AS YOU COMPLETE REGULAR SERVICE Check Brake Operation Check Tire Pressure Check Operator Presence and T Interlock Systems R Check for Loose Fasteners A Sharpen/Replace Mower Blades C T Lubrication Chart 0 Check Battery Level R Clean Battery and Terminals Check Transaxle Cooling Check V-Belts BEFOREEEVAECRHYU8ESVHEEORUYRS2E5VHEROYUR5E0SVEHROYUR1E0SV0EHROYUBSREESFAOSROEN STORAGE SERVICE DATES 5 3 4 Check Engine Oil Level Change Engine...
... IN DATES AS YOU COMPLETE REGULAR SERVICE Check Brake Operation Check Tire Pressure Check Operator Presence and T Interlock Systems R Check for Loose Fasteners A Sharpen/Replace Mower Blades C T Lubrication Chart 0 Check Battery Level R Clean Battery and Terminals Check Transaxle Cooling Check V-Belts BEFOREEEVAECRHYU8ESVHEEORUYRS2E5VHEROYUR5E0SVEHROYUR1E0SV0EHROYUBSREESFAOSROEN STORAGE SERVICE DATES 5 3 4 Check Engine Oil Level Change Engine...
User Manual
Page 16
... a cone balancer. (When using a cone balancer, follow the instructions supplied with an automotive charger will cause excessive vibration and eventual damage to mower and engine. • The blade can be kept sharp. IMPORTANT: BLADE BOLT IS HEAT TREATED. IF BOLT NEEDS REPLACING, REPLACE ONLY WITH ...IN THE REPAIR PARTS. However, periodic charging of the battery with balancer). TO CLEAN BATTERY AND TERMINALS 16 Corrosion and dirt on the mower. • To check blade balance, you do not recommend sharpening blade - TRAILING EDGE UP BLADE CENTER HOLE LOCK WASHER 01 MANDREL...
... a cone balancer. (When using a cone balancer, follow the instructions supplied with an automotive charger will cause excessive vibration and eventual damage to mower and engine. • The blade can be kept sharp. IMPORTANT: BLADE BOLT IS HEAT TREATED. IF BOLT NEEDS REPLACING, REPLACE ONLY WITH ...IN THE REPAIR PARTS. However, periodic charging of the battery with balancer). TO CLEAN BATTERY AND TERMINALS 16 Corrosion and dirt on the mower. • To check blade balance, you do not recommend sharpening blade - TRAILING EDGE UP BLADE CENTER HOLE LOCK WASHER 01 MANDREL...
User Manual
Page 18
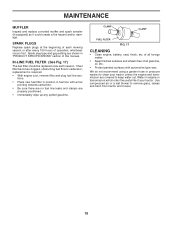
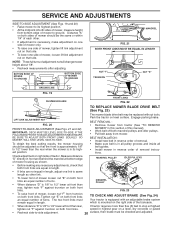
... shorten the useful life of operation, whichever occurs first. Use compressed air or a leaf blower to remove grass, leaves and trash from tractor and mower. 18 MAINTENANCE MUFFLER Inspect and replace corroded muffler and spark arrester (if equipped) as it could create a fire hazard and/or damage...
... shorten the useful life of operation, whichever occurs first. Use compressed air or a leaf blower to remove grass, leaves and trash from tractor and mower. 18 MAINTENANCE MUFFLER Inspect and replace corroded muffler and spark arrester (if equipped) as it could create a fire hazard and/or damage...
User Manual
Page 19
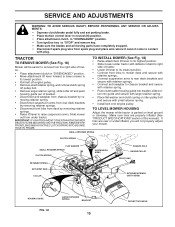
...retainer springs. • Disconnect front links from deck by removing retainer springs. • Raise lift lever to raise suspension arms. Slide mower out from under tractor with deflector shield to right side of bracket. • Disconnect anti-swaybar from chassis bracket by re...suspension arms to rear deck brackets and secure with retainer springs. • Connect anti-swaybar to its highest position. • Slide mower under tractor. TO INSTALL MOWER (See Fig. 18) • Raise attachment lift lever to chassis bracket and secure with retainer spring. • Push clutch cable ...
...retainer springs. • Disconnect front links from deck by removing retainer springs. • Raise lift lever to raise suspension arms. Slide mower out from under tractor with deflector shield to right side of bracket. • Disconnect anti-swaybar from chassis bracket by re...suspension arms to rear deck brackets and secure with retainer springs. • Connect anti-swaybar to its highest position. • Slide mower under tractor. TO INSTALL MOWER (See Fig. 18) • Raise attachment lift lever to chassis bracket and secure with retainer spring. • Push clutch cable ...
User Manual
Page 20
... FIG. 21 BOTH FRONT LINKS MUST BE EQUAL IN LENGTH NUT "F" TRUNNION NUT "E" "A" GROUND LINE "A" FIG. 19 SUSPENSION ARM FRONT LINKS FIG. 22 TO REPLACE MOWER BLADE DRIVE BELT (See Fig. 23) LIFT LINK ADJUSTMENT NUT FIG. 20 FRONT-TO-BACK ADJUSTMENT (See Figs. 21 and 22) IMPORTANT: DECK MUST BE... LEVEL SIDE-TO-SIDE. The mower blade drive belt may be checked and adjusted. BELT INSTALLATION • Install new belt in reverse order of the transaxle. • When distance "D" is ...
... FIG. 21 BOTH FRONT LINKS MUST BE EQUAL IN LENGTH NUT "F" TRUNNION NUT "E" "A" GROUND LINE "A" FIG. 19 SUSPENSION ARM FRONT LINKS FIG. 22 TO REPLACE MOWER BLADE DRIVE BELT (See Fig. 23) LIFT LINK ADJUSTMENT NUT FIG. 20 FRONT-TO-BACK ADJUSTMENT (See Figs. 21 and 22) IMPORTANT: DECK MUST BE... LEVEL SIDE-TO-SIDE. The mower blade drive belt may be checked and adjusted. BELT INSTALLATION • Install new belt in reverse order of the transaxle. • When distance "D" is ...

User Manual
Page 21
... control in "transmission disengaged" position. NOTE: Observe entire motion drive belt and position of all belt guides and keepers. • Install mower (See "TO INSTALL MOWER" in this section of manual). Replace brake pads or contact a qualified service center. tion of the right rear wheel, and...; Tighten adjustment bolt securely. • Start engine and test. • If tractor still creeps, repeat above steps until tractor does not move mower deck height to manually push the tractor forward. DO NOT TOUCH THIS NUT. Engage parking brake. BELT REMOVAL • Remove...
... control in "transmission disengaged" position. NOTE: Observe entire motion drive belt and position of all belt guides and keepers. • Install mower (See "TO INSTALL MOWER" in this section of manual). Replace brake pads or contact a qualified service center. tion of the right rear wheel, and...; Tighten adjustment bolt securely. • Start engine and test. • If tractor still creeps, repeat above steps until tractor does not move mower deck height to manually push the tractor forward. DO NOT TOUCH THIS NUT. Engage parking brake. BELT REMOVAL • Remove...
User Manual
Page 24
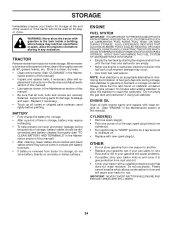
...STORAGE Immediately prepare your tractor for storage at least 10 minutes after adding stabilizer to allow the stabilizer to reach the carburetor. TRACTOR Remove mower from tractor for storage, do not store battery directly on stabilizer container. sand lightly before storing in storage, battery may reach an open... of this manual). WARNING: Never store the tractor with a suitable protective cover that all rusted or chipped paint surfaces; When mower is removed from tractor for damage, breakage and wear. Do not empty the gas tank and carburetor if using fuel stabilizer.
...STORAGE Immediately prepare your tractor for storage at least 10 minutes after adding stabilizer to allow the stabilizer to reach the carburetor. TRACTOR Remove mower from tractor for storage, do not store battery directly on stabilizer container. sand lightly before storing in storage, battery may reach an open... of this manual). WARNING: Never store the tractor with a suitable protective cover that all rusted or chipped paint surfaces; When mower is removed from tractor for damage, breakage and wear. Do not empty the gas tank and carburetor if using fuel stabilizer.

User Manual
Page 25
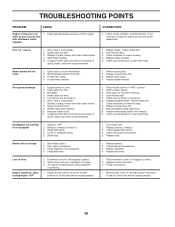
.../fins. 12. Contact an authorized service center/department. Bent blade mandrel. 3. Engine flooded. 4. Engine valves out of mower housing. 4. Contact an authorized service center/department. Check all wiring. 4. Build-up of adjustment. 1. Stale or dirty fuel. ... presence switch(es). 1. Contact an authorized service center/department. Clean battery terminals. 3. Engine valves out of grass, leaves and trash under mower. 4. Adjust throttle control. 3. Replace fuel filter. 8. TROUBLESHOOTING POINTS PROBLEM Will not start 1. Dirty air filter. 6....
.../fins. 12. Contact an authorized service center/department. Bent blade mandrel. 3. Engine flooded. 4. Engine valves out of mower housing. 4. Contact an authorized service center/department. Check all wiring. 4. Build-up of adjustment. 1. Stale or dirty fuel. ... presence switch(es). 1. Contact an authorized service center/department. Clean battery terminals. 3. Engine valves out of grass, leaves and trash under mower. 4. Adjust throttle control. 3. Replace fuel filter. 8. TROUBLESHOOTING POINTS PROBLEM Will not start 1. Dirty air filter. 6....
User Manual
Page 26
... Faulty alternator. 1. Motion drive belt worn, damaged, or broken. 3. Bent blade mandrel. 5. Replace idler pulley. 4. Clogged mower deck vent holes from buildup of grass, leaves, and trash around mandrels. 1. Tighten blade bolt. 7. Reinstall blades sharp edge...Frozen idler pulley. 4. Low/uneven tire air pressure. 6. Shift to idle for 30 seconds before mowing. 4. CORRECTION 1. Mower deck not level. 3. Mower deck not level. 5. Poor cable connections. 3. Faulty operator-safety presence control system. Headlight(s) not working (if so ...
... Faulty alternator. 1. Motion drive belt worn, damaged, or broken. 3. Bent blade mandrel. 5. Replace idler pulley. 4. Clogged mower deck vent holes from buildup of grass, leaves, and trash around mandrels. 1. Tighten blade bolt. 7. Reinstall blades sharp edge...Frozen idler pulley. 4. Low/uneven tire air pressure. 6. Shift to idle for 30 seconds before mowing. 4. CORRECTION 1. Mower deck not level. 3. Mower deck not level. 5. Poor cable connections. 3. Faulty operator-safety presence control system. Headlight(s) not working (if so ...
User Manual
Page 31
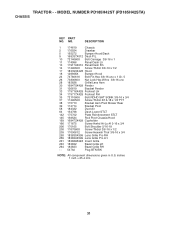
inches 1 inch = 25.4 mm 31 MODEL NUMBER PD185H42ST (PD185H42STA) CHASSIS KEY PART NO. NO. DESCRIPTION 1 174619 Chassis 2 176554 Drawbar 5 155272 Bumper Hood/Dash 9 168337X012 Dash P/L 10 72140608 Bolt Carriage 3/8-16 x 1 11 174996 Panel Dash ... Footrest LH 34 179717X428 Footrest RH 35 72110606 Bolt RDHD SHT SQNK 3/8-16 x 3/4 37 17490508 Screw Thdrol 6/16-18 x 1/2 TYT 38 175710 Bracket Asm Pivot Mower Rear 39 174714 Bracket Pivot 58 184322 Duct Air 64 154798 Dash Lower STLT 142 175702 Plate Reinforcement STLT 145 156524 Rod Pivot Chassis/Hood...
inches 1 inch = 25.4 mm 31 MODEL NUMBER PD185H42ST (PD185H42STA) CHASSIS KEY PART NO. NO. DESCRIPTION 1 174619 Chassis 2 176554 Drawbar 5 155272 Bumper Hood/Dash 9 168337X012 Dash P/L 10 72140608 Bolt Carriage 3/8-16 x 1 11 174996 Panel Dash ... Footrest LH 34 179717X428 Footrest RH 35 72110606 Bolt RDHD SHT SQNK 3/8-16 x 3/4 37 17490508 Screw Thdrol 6/16-18 x 1/2 TYT 38 175710 Bracket Asm Pivot Mower Rear 39 174714 Bracket Pivot 58 184322 Duct Air 64 154798 Dash Lower STLT 142 175702 Plate Reinforcement STLT 145 156524 Rod Pivot Chassis/Hood...

User Manual
Page 39
... Suspension Rear 20 163552 Retainer Spring 31 169865 Bearing Pvt Lift 32 73540600 Nut Crownlock 3/8 - 24 NOTE: All component dimensions given in U.S. MODEL NUMBER PD185H42ST (PD185H42STA) MOWER LIFT 7 8 5 11 19 13 31 32 13 13 4 6 12 13 3 1 2 6 5 4 20 15 1617 18 20 20 19 31 32 20 15 lift-rh.1piece_3 KEY...
... Suspension Rear 20 163552 Retainer Spring 31 169865 Bearing Pvt Lift 32 73540600 Nut Crownlock 3/8 - 24 NOTE: All component dimensions given in U.S. MODEL NUMBER PD185H42ST (PD185H42STA) MOWER LIFT 7 8 5 11 19 13 31 32 13 13 4 6 12 13 3 1 2 6 5 4 20 15 1617 18 20 20 19 31 32 20 15 lift-rh.1piece_3 KEY...


