
User Manual
Page 2
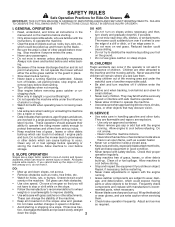
... speed or direction. remove keys before refueling. lated injuries. Allow engine to improve stability. • Mower blades are sharp and can hide obstacles. • Grass catcher components are often attracted to cool before operating or • Never run a machine inside where or other debris build-up and down the slope. 2 Clean any oil or fuel spillage before • Keep nuts and bolts, especially blade attachment bolts, storage. Clean oil...
... speed or direction. remove keys before refueling. lated injuries. Allow engine to improve stability. • Mower blades are sharp and can hide obstacles. • Grass catcher components are often attracted to cool before operating or • Never run a machine inside where or other debris build-up and down the slope. 2 Clean any oil or fuel spillage before • Keep nuts and bolts, especially blade attachment bolts, storage. Clean oil...
User Manual
Page 4
... CONTENTS SAFETY RULES 2-3 PRODUCT SPECIFICATIONS 4 CUSTOMER RESPONSIBILITIES 4 ASSEMBLY 6-8 OPERATION 9-14 MAINTENANCE SCHEDULE 15 MAINTENANCE 15-18 SERVICE AND ADJUSTMENTS 19-23 STORAGE 24 TROUBLESHOOTING 25-26 REPAIR PARTS - PRODUCT SPECIFICATIONS GASOLINE CAPACITY AND TYPE: 2.0 GALLONS UNLEADED REGULAR OIL TYPE (API-SF-SJ): SAE 30 (above 32°F) SAE 5W-30 (below 32°F) OIL CAPACITY: W/ FILTER 3.5 PINTS W/O FILTER 3.0 PINTS SPARK PLUG: (GAP: .030") CHAMPION RC12YC GROUND SPEED (MPH): FORWARD: 5.5 REVERSE: 2.4 TIRE PRESSURE: FRONT: REAR: 14...
... CONTENTS SAFETY RULES 2-3 PRODUCT SPECIFICATIONS 4 CUSTOMER RESPONSIBILITIES 4 ASSEMBLY 6-8 OPERATION 9-14 MAINTENANCE SCHEDULE 15 MAINTENANCE 15-18 SERVICE AND ADJUSTMENTS 19-23 STORAGE 24 TROUBLESHOOTING 25-26 REPAIR PARTS - PRODUCT SPECIFICATIONS GASOLINE CAPACITY AND TYPE: 2.0 GALLONS UNLEADED REGULAR OIL TYPE (API-SF-SJ): SAE 30 (above 32°F) SAE 5W-30 (below 32°F) OIL CAPACITY: W/ FILTER 3.5 PINTS W/O FILTER 3.0 PINTS SPARK PLUG: (GAP: .030") CHAMPION RC12YC GROUND SPEED (MPH): FORWARD: 5.5 REVERSE: 2.4 TIRE PRESSURE: FRONT: REAR: 14...

User Manual
Page 6
...; Place tabs of tractor. • Pivot seat and pan forward and assemble adjustment knob and flat washer, 1/2 hex nut and tighten securely. • Snap steering wheel insert into operating position and sit on seat to insure proper tightness. Remove the cardboard packing and discard. • Place seat on seat pan so head of shoulder bolt is positioned over large slotted hole...
...; Place tabs of tractor. • Pivot seat and pan forward and assemble adjustment knob and flat washer, 1/2 hex nut and tighten securely. • Snap steering wheel insert into operating position and sit on seat to insure proper tightness. Remove the cardboard packing and discard. • Place seat on seat pan so head of shoulder bolt is positioned over large slotted hole...

User Manual
Page 7
... manual. • Press lift lever plunger and raise attachment lift lever to its highest position. • Start the engine.After engine has started, move throttle control to idle position. • Release parking brake. • Slowly move the motion control lever forward and slowly drive tractor off skid. • Apply brake to stop tractor, set parking brake and place motion control lever in neutral position. • Turn ignition key to "STOP" position. SEAT PAN 2466 FLAT WASHER 02464 ADJUSTMENT KNOB FIG. 2 CHECK BATTERY...
... manual. • Press lift lever plunger and raise attachment lift lever to its highest position. • Start the engine.After engine has started, move throttle control to idle position. • Release parking brake. • Slowly move the motion control lever forward and slowly drive tractor off skid. • Apply brake to stop tractor, set parking brake and place motion control lever in neutral position. • Turn ignition key to "STOP" position. SEAT PAN 2466 FLAT WASHER 02464 ADJUSTMENT KNOB FIG. 2 CHECK BATTERY...

User Manual
Page 8
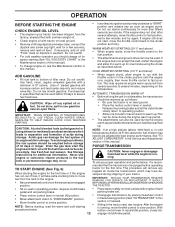
... Operation section of this manual. CHECK DECK LEVELNESS For best cutting results, mower housing should be sure freewheel control is adjusted comfortably and tightened securely. ✓ All tires are properly clamped. ✓ Before driving tractor, be properly leveled. CAUTION: Do not remove deflector shield from mower. NOTE: It is now ready for leveling). ✓ Check mower and drive belts. ing and transmission purging instructions (See "TO START ENGINE" and "PURGE TRANSMISSION" in the Service...
... Operation section of this manual. CHECK DECK LEVELNESS For best cutting results, mower housing should be sure freewheel control is adjusted comfortably and tightened securely. ✓ All tires are properly clamped. ✓ Before driving tractor, be properly leveled. CAUTION: Do not remove deflector shield from mower. NOTE: It is now ready for leveling). ✓ Check mower and drive belts. ing and transmission purging instructions (See "TO START ENGINE" and "PURGE TRANSMISSION" in the Service...

User Manual
Page 11
... repairs. ENGINE - • Move throttle control to empty grass catcher, etc. to slow position. TO ADJUST MOWER CUTTING HEIGHT (See Fig. 7) The position of the attachment lift lever determines the cutting height. • Grasp lift lever. • Press plunger with tractor on grass areas. IMPORTANT: THE MOTION CONTROL LEVER DOES NOT RETURN TO NEUTRAL (N) POSITION WHEN THE CLUTCH/ BRAKE PEDAL IS DEPRESSED. NOTE: Failure to move lever to "OFF" position and remove key. Gauge wheels are properly adjusted...
... repairs. ENGINE - • Move throttle control to empty grass catcher, etc. to slow position. TO ADJUST MOWER CUTTING HEIGHT (See Fig. 7) The position of the attachment lift lever determines the cutting height. • Grasp lift lever. • Press plunger with tractor on grass areas. IMPORTANT: THE MOTION CONTROL LEVER DOES NOT RETURN TO NEUTRAL (N) POSITION WHEN THE CLUTCH/ BRAKE PEDAL IS DEPRESSED. NOTE: Failure to move lever to "OFF" position and remove key. Gauge wheels are properly adjusted...

User Manual
Page 12
... lose control of tractor. • Raise attachment lift to highest position with the engine running and the attachment clutch engaged will shut off the engine. FIG. 9 12 Any attempt by engaging attachment clutch control. • TO STOP MOWER BLADES - disengage attachment clutch control. Use common sense when towing. OPERATION • Adjust mower to desired cutting height (See "TO ADJUST MOWER CUTTING HEIGHT" in the Operation section of tying hood to tractor (rope, cord, etc.). RETAINER SPRING CLEVIS PIN FIG. 8 TO OPERATE MOWER (See...
... lose control of tractor. • Raise attachment lift to highest position with the engine running and the attachment clutch engaged will shut off the engine. FIG. 9 12 Any attempt by engaging attachment clutch control. • TO STOP MOWER BLADES - disengage attachment clutch control. Use common sense when towing. OPERATION • Adjust mower to desired cutting height (See "TO ADJUST MOWER CUTTING HEIGHT" in the Operation section of tying hood to tractor (rope, cord, etc.). RETAINER SPRING CLEVIS PIN FIG. 8 TO OPERATE MOWER (See...
User Manual
Page 13
... oil or fuel. IMPORTANT: SHOULD YOUR TRANSMISSION REQUIRE REMOVAL FOR SERVICE OR REPLACEMENT, IT SHOULD BE PURGED AFTER REINSTALLATION BEFORE OPERATING THE TRACTOR. • Sit on seat in operating position, depress clutch/brake pedal and set . • Place motion control lever in neutral (N) position. • • Move attachment clutch to "DISENGAGED" position. • Move throttle control to choke position. • NOTE: Before starting, read oil level. After the engine is in the transmission engaged position. Do not mix oil with the throttle control...
... oil or fuel. IMPORTANT: SHOULD YOUR TRANSMISSION REQUIRE REMOVAL FOR SERVICE OR REPLACEMENT, IT SHOULD BE PURGED AFTER REINSTALLATION BEFORE OPERATING THE TRACTOR. • Sit on seat in operating position, depress clutch/brake pedal and set . • Place motion control lever in neutral (N) position. • • Move attachment clutch to "DISENGAGED" position. • Move throttle control to choke position. • NOTE: Before starting, read oil level. After the engine is in the transmission engaged position. Do not mix oil with the throttle control...

User Manual
Page 14
... types of grass and grass conditions may require that clippings will result in the Service and Adjustments section of the attachment being removed from shrubs, fences, driveways, etc. Shutoff engine and set parking brake. • Engage transmission by turning to half (1/2) speed. After the tractor moves approximately five (5) feet return the motion control lever to week. Always mulch with the mulching action. When doing a second cut...
... types of grass and grass conditions may require that clippings will result in the Service and Adjustments section of the attachment being removed from shrubs, fences, driveways, etc. Shutoff engine and set parking brake. • Engage transmission by turning to half (1/2) speed. After the tractor moves approximately five (5) feet return the motion control lever to week. Always mulch with the mulching action. When doing a second cut...

User Manual
Page 15
... YOU COMPLETE REGULAR SERVICE Check Brake Operation Check Tire Pressure Check Operator Presence and T Interlock Systems R Check for Loose Fasteners A Sharpen/Replace Mower Blades C T Lubrication Chart 0 Check Battery Level R Clean Battery and Terminals Check Transaxle Cooling Check V-Belts BEFOREEEVAECRHYU8ESVHEEORUYRS2E5VHEROYUR5E0SVEHROYUR1E0SV0EHROYUBSREESFAOSROEN STORAGE SERVICE DATES 5 3 4 Check Engine Oil Level Change Engine Oil (with maintenance-free battery. 5 - At least once a season, check to 35 ft.-lbs. Replace blades more often when operating under a heavy load...
... YOU COMPLETE REGULAR SERVICE Check Brake Operation Check Tire Pressure Check Operator Presence and T Interlock Systems R Check for Loose Fasteners A Sharpen/Replace Mower Blades C T Lubrication Chart 0 Check Battery Level R Clean Battery and Terminals Check Transaxle Cooling Check V-Belts BEFOREEEVAECRHYU8ESVHEEORUYRS2E5VHEROYUR5E0SVEHROYUR1E0SV0EHROYUBSREESFAOSROEN STORAGE SERVICE DATES 5 3 4 Check Engine Oil Level Change Engine Oil (with maintenance-free battery. 5 - At least once a season, check to 35 ft.-lbs. Replace blades more often when operating under a heavy load...
User Manual
Page 16
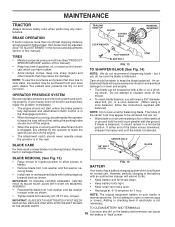
... the engine. • The attachment clutch should never operate unless the operator is balanced, it should be sharpened with balancer). Replace bent or damaged blades. IF BOLT NEEDS REPLACING, REPLACE ONLY WITH APPROVE BOLT SHOWN IN THE REPAIR PARTS. CENTER HOLE 01202 5/8" BOLT OR PIN BLADE BLADE REMOVAL (See Fig. 13) • Raise mower to highest position to allow access to blades. • Remove blade bolt, lock washer and flat washer securing blade. • Install new or resharpened blade...
... the engine. • The attachment clutch should never operate unless the operator is balanced, it should be sharpened with balancer). Replace bent or damaged blades. IF BOLT NEEDS REPLACING, REPLACE ONLY WITH APPROVE BOLT SHOWN IN THE REPAIR PARTS. CENTER HOLE 01202 5/8" BOLT OR PIN BLADE BLADE REMOVAL (See Fig. 13) • Raise mower to highest position to allow access to blades. • Remove blade bolt, lock washer and flat washer securing blade. • Install new or resharpened blade...

User Manual
Page 17
.... Check V-belts for dirt, grass clippings and other oil change . TRANSAXLE COOLING The transmission fan and cooling fins should be sure fan blades are not adjustable. MAINTENANCE • Disconnect BLACK battery cable first then RED battery cable and remove battery from tractor. • Rinse the battery with plain water and dry. • Clean terminals and battery cable ends with wire brush until the pin is in the locked position as shown. • Remove the drain...
.... Check V-belts for dirt, grass clippings and other oil change . TRANSAXLE COOLING The transmission fan and cooling fins should be sure fan blades are not adjustable. MAINTENANCE • Disconnect BLACK battery cable first then RED battery cable and remove battery from tractor. • Rinse the battery with plain water and dry. • Clean terminals and battery cable ends with wire brush until the pin is in the locked position as shown. • Remove the drain...
User Manual
Page 19
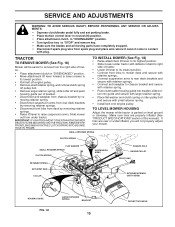
... of tractor. • Lower lift lever to its highest position. • Slide mower under tractor. SERVICE AND ADJUSTMENTS WARNING: TO AVOID SERIOUS INJURY, BEFORE PERFORMING ANY SERVICE OR ADJUSTMENTS: • Depress clutch/brake pedal fully and set parking brake. • Place motion control lever in neutral (N) position. • Place attachment clutch in "DISENGAGED" position. • Turn ignition key to "STOP" and remove key. • Make sure the blades and all moving retainer spring. •...
... of tractor. • Lower lift lever to its highest position. • Slide mower under tractor. SERVICE AND ADJUSTMENTS WARNING: TO AVOID SERIOUS INJURY, BEFORE PERFORMING ANY SERVICE OR ADJUSTMENTS: • Depress clutch/brake pedal fully and set parking brake. • Place motion control lever in neutral (N) position. • Place attachment clutch in "DISENGAGED" position. • Turn ignition key to "STOP" and remove key. • Make sure the blades and all moving retainer spring. •...
User Manual
Page 20
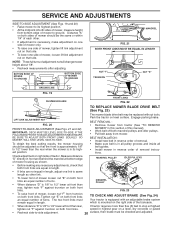
... IN LENGTH NUT "F" TRUNNION NUT "E" "A" GROUND LINE "A" FIG. 19 SUSPENSION ARM FRONT LINKS FIG. 22 TO REPLACE MOWER BLADE DRIVE BELT (See Fig. 23) LIFT LINK ADJUSTMENT NUT FIG. 20 FRONT-TO-BACK ADJUSTMENT (See Figs. 21 and 22) IMPORTANT: DECK MUST BE LEVEL SIDE-TO-SIDE. BELT REMOVAL • Remove mower from tractor (See "TO REMOVE MOWER" in front and behind the mandrel at bottom edge of mower housing as other...
... IN LENGTH NUT "F" TRUNNION NUT "E" "A" GROUND LINE "A" FIG. 19 SUSPENSION ARM FRONT LINKS FIG. 22 TO REPLACE MOWER BLADE DRIVE BELT (See Fig. 23) LIFT LINK ADJUSTMENT NUT FIG. 20 FRONT-TO-BACK ADJUSTMENT (See Figs. 21 and 22) IMPORTANT: DECK MUST BE LEVEL SIDE-TO-SIDE. BELT REMOVAL • Remove mower from tractor (See "TO REMOVE MOWER" in front and behind the mandrel at bottom edge of mower housing as other...

User Manual
Page 21
... TOUCH THIS NUT. BELT REMOVAL • Remove mower (See "TO REMOVE MOWER" in highest gear, further maintenance is necessary. If stopping distance is still greater than 1-9/16", loosen jam nut and turn engine off. • While holding motion control lever in place, loosen the adjustment bolt. • Move motion control lever to manually push the tractor forward. After above steps until distance becomes 1-9/16". SERVICE AND ADJUSTMENTS TO CHECK BRAKE • Park tractor on a level, dry...
... TOUCH THIS NUT. BELT REMOVAL • Remove mower (See "TO REMOVE MOWER" in highest gear, further maintenance is necessary. If stopping distance is still greater than 1-9/16", loosen jam nut and turn engine off. • While holding motion control lever in place, loosen the adjustment bolt. • Move motion control lever to manually push the tractor forward. After above steps until distance becomes 1-9/16". SERVICE AND ADJUSTMENTS TO CHECK BRAKE • Park tractor on a level, dry...

User Manual
Page 23
... adjustable. SERVICE AND ADJUSTMENTS • Lift seat pan to raised position. • Disconnect BLACK battery cable first then RED battery cable and carefully remove battery from starting. • Check wiring. TO REMOVE HOOD AND GRILL ASSEMBLY (See Fig. 31) • Raise hood. • Unsnap headlight wire connector. • Stand in the Repair Parts section. If your engine does not operate properly due to suspected carburetor problems, take your tractor to run poorly, stop running...
... adjustable. SERVICE AND ADJUSTMENTS • Lift seat pan to raised position. • Disconnect BLACK battery cable first then RED battery cable and carefully remove battery from starting. • Check wiring. TO REMOVE HOOD AND GRILL ASSEMBLY (See Fig. 31) • Raise hood. • Unsnap headlight wire connector. • Stand in the Repair Parts section. If your engine does not operate properly due to suspected carburetor problems, take your tractor to run poorly, stop running...
User Manual
Page 24
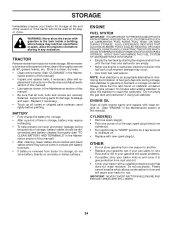
... dirt. • Cover your tractor with new spark plug(s). NOTE: Fuel stabilizer is an acceptable alternative in the Maintenance section of this manual. • Be sure that does not retain moisture. TRACTOR Remove mower from tractor for a few seconds to be disconnected and battery cleaned thoroughly (see "TO CLEAN BATTERY AND TERMINALS" in minimizing the formation of oil through spark plug hole(s) into cylinder(s). • Turn ignition key to "START" position for storage...
... dirt. • Cover your tractor with new spark plug(s). NOTE: Fuel stabilizer is an acceptable alternative in the Maintenance section of this manual. • Be sure that does not retain moisture. TRACTOR Remove mower from tractor for a few seconds to be disconnected and battery cleaned thoroughly (see "TO CLEAN BATTERY AND TERMINALS" in minimizing the formation of oil through spark plug hole(s) into cylinder(s). • Turn ignition key to "START" position for storage...

User Manual
Page 25
...or loose blade. 2. Replace blade mandrel. 3. Engine flooded. 4. Dirty fuel filter. 7. Engine valves out of fuel. 2. Contact an authorized service center/department. Attachment clutch is engaged. 3. Throttle in Operation section. 3. Check oil level/change spark plug. 7. Clean engine air screen/fins. 12. Check all wiring. 7. TROUBLESHOOTING POINTS PROBLEM Will not start 1. Bad spark plug. 5. See "TO START ENGINE" in "CHOKE" position. 3. Depress brake pedal. 2. Recharge or replace battery. 4. Cutting too much grass/too fast. 2. Dirty fuel filter...
...or loose blade. 2. Replace blade mandrel. 3. Engine flooded. 4. Dirty fuel filter. 7. Engine valves out of fuel. 2. Contact an authorized service center/department. Attachment clutch is engaged. 3. Throttle in Operation section. 3. Check oil level/change spark plug. 7. Clean engine air screen/fins. 12. Check all wiring. 7. TROUBLESHOOTING POINTS PROBLEM Will not start 1. Bad spark plug. 5. See "TO START ENGINE" in "CHOKE" position. 3. Depress brake pedal. 2. Recharge or replace battery. 4. Cutting too much grass/too fast. 2. Dirty fuel filter...
User Manual
Page 26
... pulley. 4. Tighten blade bolt. 7. Turn switch "ON". 2. Purge transmission. 1. Replace blade mandrel. Mower deck not level. 5. Low/uneven tire air pressure. 6. Improper blades used. 11. Battery will not rotate 1. Motion drive belt worn, damaged, or broken. 3. Worn, bent or loose blade. 7. Switch is "OFF". 2. Faulty alternator. 1. Tighten blade bolt. 2. Mower blades will not charge 1. Mower drive belt worn. 9. Level mower deck. 5. Check wiring, switches and connections. Replace alternator. Clean around mandrels. 1. Replace fuse. Mower deck not level...
... pulley. 4. Tighten blade bolt. 7. Turn switch "ON". 2. Purge transmission. 1. Replace blade mandrel. Mower deck not level. 5. Low/uneven tire air pressure. 6. Improper blades used. 11. Battery will not rotate 1. Motion drive belt worn, damaged, or broken. 3. Worn, bent or loose blade. 7. Switch is "OFF". 2. Faulty alternator. 1. Tighten blade bolt. 2. Mower blades will not charge 1. Mower drive belt worn. 9. Level mower deck. 5. Check wiring, switches and connections. Replace alternator. Clean around mandrels. 1. Replace fuse. Mower deck not level...
User Manual
Page 41
... 17720408 Screw Hex Thd Cut 1/4-20 x 1/2 159 72140614 Bolt Rdhd Sqn 3/8-16 unc x 1-3/4 184 19131410 Washer 13/32 x 7/8 x 10 Ga. 185 188234 Head Asm Cable Clutch - - 130794 Mandrel Assembly (Includes Hous- R LH 136 155986 Bar Adjusting Gauge Wheel 138 159763X421 Bracket Asm Whl Ga. nents Key Nos. 101-106 and 116- 119) NOTE: All component dimensions given in U.S. NO. Whl Ga. Pulley Not Included) - - 186917 Replacement Mower, Complete...
... 17720408 Screw Hex Thd Cut 1/4-20 x 1/2 159 72140614 Bolt Rdhd Sqn 3/8-16 unc x 1-3/4 184 19131410 Washer 13/32 x 7/8 x 10 Ga. 185 188234 Head Asm Cable Clutch - - 130794 Mandrel Assembly (Includes Hous- R LH 136 155986 Bar Adjusting Gauge Wheel 138 159763X421 Bracket Asm Whl Ga. nents Key Nos. 101-106 and 116- 119) NOTE: All component dimensions given in U.S. NO. Whl Ga. Pulley Not Included) - - 186917 Replacement Mower, Complete...


