
User Manual
Page 2
... mowing activity. Never remove gas cap or add fuel with grass catchers or other attachments. • Mower blades are sharp and can cut. Never store the machine or fuel container inside a closed area. • Keep nuts and bolts, especially blade attachment bolts, II. Uneven terrain could be thrown. Clean oil or fuel spillage. mended parts, when necessary. • Use extra care with the engine running. Do not make adjustments or repairs with the instructions, to protect...
... mowing activity. Never remove gas cap or add fuel with grass catchers or other attachments. • Mower blades are sharp and can cut. Never store the machine or fuel container inside a closed area. • Keep nuts and bolts, especially blade attachment bolts, II. Uneven terrain could be thrown. Clean oil or fuel spillage. mended parts, when necessary. • Use extra care with the engine running. Do not make adjustments or repairs with the instructions, to protect...

User Manual
Page 4
... repair this owner's manual. Always observe the "SAFETY RULES". LBS. We have competent, well-trained technicians and the proper tools to assemble and maintain your tractor properly. If a spark arrester is equipped with a spark arrester meeting applicable local or state laws (if any problem you experience any ). PRODUCT SPECIFICATIONS GASOLINE CAPACITY AND TYPE: OIL TYPE (API-SF-SJ): OIL CAPACITY: SPARK PLUG: (GAP: .030") GROUND SPEED (MPH): TIRE PRESSURE: CHARGING SYSTEM: BATTERY: BLADE BOLT...
... repair this owner's manual. Always observe the "SAFETY RULES". LBS. We have competent, well-trained technicians and the proper tools to assemble and maintain your tractor properly. If a spark arrester is equipped with a spark arrester meeting applicable local or state laws (if any problem you experience any ). PRODUCT SPECIFICATIONS GASOLINE CAPACITY AND TYPE: OIL TYPE (API-SF-SJ): OIL CAPACITY: SPARK PLUG: (GAP: .030") GROUND SPEED (MPH): TIRE PRESSURE: CHARGING SYSTEM: BATTERY: BLADE BOLT...

User Manual
Page 6
... onto steering shaft extension. • Position steering wheel so cross bars are in extension and lower shafts and install 1/4 hex bolt and locknut. ASSEMBLY Your new tractor has been assembled at . • Check for any additional loose parts or cartons and remove. To ensure safe and proper operation of carton. STEERING WHEEL ADAPTER STEERING BOOT TABS EXTENSION SHAFT BEFORE REMOVING TRACTOR FROM SKID ATTACH STEERING WHEEL (See Fig. 1) ASSEMBLE EXTENSION SHAFT AND BOOT...
... onto steering shaft extension. • Position steering wheel so cross bars are in extension and lower shafts and install 1/4 hex bolt and locknut. ASSEMBLY Your new tractor has been assembled at . • Check for any additional loose parts or cartons and remove. To ensure safe and proper operation of carton. STEERING WHEEL ADAPTER STEERING BOOT TABS EXTENSION SHAFT BEFORE REMOVING TRACTOR FROM SKID ATTACH STEERING WHEEL (See Fig. 1) ASSEMBLE EXTENSION SHAFT AND BOOT...

User Manual
Page 7
... and raise attachment lift lever to its highest position. • Start the engine.After engine has started, move throttle control to ensure optimum mower performance. • Slide gauge wheel bar down into bracket channel, Be sure that follow all the above assembly steps have been completed. • Check engine oil level and fill fuel tank with the instructions that gauge wheel bar aligning holes are on label (label located between terminals) charge battery for minimum...
... and raise attachment lift lever to its highest position. • Start the engine.After engine has started, move throttle control to ensure optimum mower performance. • Slide gauge wheel bar down into bracket channel, Be sure that follow all the above assembly steps have been completed. • Check engine oil level and fill fuel tank with the instructions that gauge wheel bar aligning holes are on label (label located between terminals) charge battery for minimum...

User Manual
Page 8
... CHECK TIRE PRESSURE The tires on back of mower deck. Correct tire pressure is important for best cutting performance. • Reduce tire pressure to see that all belt keepers. ✓ Check wiring. See"TO LEVEL MOWER HOUSING"in the Service and Adjustments section of this manual. Verify that are shown for leveling). ✓ Check mower and drive belts. CHECK BRAKE SYSTEM After you start the engine. ✓ Be sure brake system is filled with fresh, clean...
... CHECK TIRE PRESSURE The tires on back of mower deck. Correct tire pressure is important for best cutting performance. • Reduce tire pressure to see that all belt keepers. ✓ Check wiring. See"TO LEVEL MOWER HOUSING"in the Service and Adjustments section of this manual. Verify that are shown for leveling). ✓ Check mower and drive belts. CHECK BRAKE SYSTEM After you start the engine. ✓ Be sure brake system is filled with fresh, clean...
User Manual
Page 11
... certain conditions when tractor is standing idle with the engine not running. The cutting height range is running , hot engine exhaust gases may cause "browning" of grass. When engine is approximately 1-1/2 to start movement. CAUTION: Always stop mower blades,move throttle control to slow position and allowing engine to idle before leaving the operator's position; mance. NOTE: Failure to move attachment clutch lever to "DISENGAGED" position. IMPORTANT: LEAVING THE IGNITION SWITCH IN ANY POSITION OTHER THAN...
... certain conditions when tractor is standing idle with the engine not running. The cutting height range is running , hot engine exhaust gases may cause "browning" of grass. When engine is approximately 1-1/2 to start movement. CAUTION: Always stop mower blades,move throttle control to slow position and allowing engine to idle before leaving the operator's position; mance. NOTE: Failure to move attachment clutch lever to "DISENGAGED" position. IMPORTANT: LEAVING THE IGNITION SWITCH IN ANY POSITION OTHER THAN...

User Manual
Page 12
... ground. • Replace retainer spring into clevis pin. • Be sure all turns slowly. Use common sense when towing. disengage attachment clutch control. OPERATION TO ADJUST GAUGE WHEELS (See Fig. 8) Gauge wheels are properly adjusted when they are in the same setting. NOTE:Adjust gauge wheels with tractor on mowers so equipped,or the deflector shield in most terrain conditions. TO TRANSPORT • Raise attachment lift to desired cutting height (See...
... ground. • Replace retainer spring into clevis pin. • Be sure all turns slowly. Use common sense when towing. disengage attachment clutch control. OPERATION TO ADJUST GAUGE WHEELS (See Fig. 8) Gauge wheels are properly adjusted when they are in the same setting. NOTE:Adjust gauge wheels with tractor on mowers so equipped,or the deflector shield in most terrain conditions. TO TRANSPORT • Raise attachment lift to desired cutting height (See...
User Manual
Page 13
... or using the choke as engine starts. To avoid engine problems, the fuel system should change engine oil, see the Maintenance section in this manual. Drain the gas tank, start the engine and let it to warm up for the first time or if the engine has run with the throttle control in the choke ( ) position until the engine runs roughly, then move fuel from the tank to the engine. • Sit on level ground. • Remove oil fill cap/dipstick...
... or using the choke as engine starts. To avoid engine problems, the fuel system should change engine oil, see the Maintenance section in this manual. Drain the gas tank, start the engine and let it to warm up for the first time or if the engine has run with the throttle control in the choke ( ) position until the engine runs roughly, then move fuel from the tank to the engine. • Sit on level ground. • Remove oil fill cap/dipstick...
User Manual
Page 15
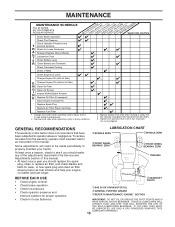
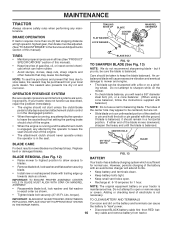
...EACH USE • Check engine oil level. • Check brake operation. • Check tire pressure. • Check operator presence and interlock systems for proper operation. • Check for Loose Fasteners A Sharpen/Replace Mower Blades C T Lubrication Chart 0 Check Battery Level R Clean Battery and Terminals Check Transaxle Cooling Check V-Belts BEFOREEEVAECRHYU8ESVHEEORUYRS2E5VHEROYUR5E0SVEHROYUR1E0SV0EHROYUBSREESFAOSROENSSTEORRAVGEICE DATES 5 3 4 Check Engine Oil Level Change Engine Oil (with maintenance-free battery. 5 - cGEARSHIFT PIVOTS cSAE 30 OR 10W30 MOTOR OIL dGENERAL...
...EACH USE • Check engine oil level. • Check brake operation. • Check tire pressure. • Check operator presence and interlock systems for proper operation. • Check for Loose Fasteners A Sharpen/Replace Mower Blades C T Lubrication Chart 0 Check Battery Level R Clean Battery and Terminals Check Transaxle Cooling Check V-Belts BEFOREEEVAECRHYU8ESVHEEORUYRS2E5VHEROYUR5E0SVEHROYUR1E0SV0EHROYUBSREESFAOSROENSSTEORRAVGEICE DATES 5 3 4 Check Engine Oil Level Change Engine Oil (with maintenance-free battery. 5 - cGEARSHIFT PIVOTS cSAE 30 OR 10W30 MOTOR OIL dGENERAL...
User Manual
Page 16
... BATTERY Your tractor has a battery charging system which can be purchased from tractor. Adding or checking level of electrolyte is sufficient for normal use a nail for 1 hour. IF BOLT NEEDS REPLACING, REPLACE ONLY WITH APPROVE BOLT SHOWN IN THE REPAIR PARTS. If blade is balanced, it should remain in the seat. BLADE REMOVAL (See Fig. 12) • Raise mower to highest position to allow access to blades. • Remove blade bolt, lock...
... BATTERY Your tractor has a battery charging system which can be purchased from tractor. Adding or checking level of electrolyte is sufficient for normal use a nail for 1 hour. IF BOLT NEEDS REPLACING, REPLACE ONLY WITH APPROVE BOLT SHOWN IN THE REPAIR PARTS. If blade is balanced, it should remain in the seat. BLADE REMOVAL (See Fig. 12) • Raise mower to highest position to allow access to blades. • Remove blade bolt, lock...
User Manual
Page 17
... lock the drain valve by pushing inward and turning counterclockwise. • To open, pull out on level surface. • Oil will not run properly using a dirty air filter. MAINTENANCE • Rinse the battery with plain water and dry. • Clean terminals and battery cable ends with wire brush until the pin is not used above 32°F. The belts are not adjustable. Replace belts if they begin to avoid possible engine damage from running...
... lock the drain valve by pushing inward and turning counterclockwise. • To open, pull out on level surface. • Oil will not run properly using a dirty air filter. MAINTENANCE • Rinse the battery with plain water and dry. • Clean terminals and battery cable ends with wire brush until the pin is not used above 32°F. The belts are not adjustable. Replace belts if they begin to avoid possible engine damage from running...
User Manual
Page 19
... and clutch spring on idler pulley bolt and secure with plug. SERVICE AND ADJUSTMENTS WARNING: TO AVOID SERIOUS INJURY, BEFORE PERFORMING ANY SERVICE OR ADJUSTMENTS: • Depress clutch/brake pedal fully and set parking brake. • Place gearshift lever in neutral (N) position. • Place attachment clutch in "DISENGAGED" position. • Turn ignition key to "STOP" and remove key. • Make sure the blades and all moving parts have completely stopped. • Disconnect spark plug wire from spark plug...
... and clutch spring on idler pulley bolt and secure with plug. SERVICE AND ADJUSTMENTS WARNING: TO AVOID SERIOUS INJURY, BEFORE PERFORMING ANY SERVICE OR ADJUSTMENTS: • Depress clutch/brake pedal fully and set parking brake. • Place gearshift lever in neutral (N) position. • Place attachment clutch in "DISENGAGED" position. • Turn ignition key to "STOP" and remove key. • Make sure the blades and all moving parts have completely stopped. • Disconnect spark plug wire from spark plug...
User Manual
Page 20
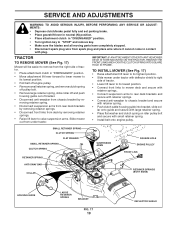
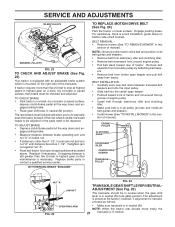
... at front than rear, tighten nut "F" against trunnion on both front links an equal number of turns. To obtain the best cutting results, the mower housing should be replaced without tools. SERVICE AND ADJUSTMENTS TO LEVEL MOWER HOUSING Adjust the mower while tractor is in all pulley grooves and inside all belt guides. • Install mower in reverse order of removal instruc- TO REPLACE MOWER BLADE DRIVE BELT (See Fig. 22) The mower blade drive belt may be the same or...
... at front than rear, tighten nut "F" against trunnion on both front links an equal number of turns. To obtain the best cutting results, the mower housing should be replaced without tools. SERVICE AND ADJUSTMENTS TO LEVEL MOWER HOUSING Adjust the mower while tractor is in all pulley grooves and inside all belt guides. • Install mower in reverse order of removal instruc- TO REPLACE MOWER BLADE DRIVE BELT (See Fig. 22) The mower blade drive belt may be the same or...
User Manual
Page 21
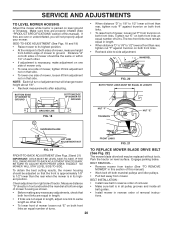
... (N) (lock gate) position. TO ADJUST BRAKE • Depress clutch/brake pedal all belt guides and keepers. • Remove belt from stationary idler and clutching idler. • Remove belt downward from tractor. however, if adjustment is needed, proceed as stated above. NOTE: Observe entire motion drive belt and position of manual). SERVICE AND ADJUSTMENTS IDLER PULLEYS MANDREL PULLEYS FIG. 22 TO CHECK AND ADJUST BRAKE (See Fig. 23) Your tractor is equipped with an adjustable brake system which is mounted on level...
... (N) (lock gate) position. TO ADJUST BRAKE • Depress clutch/brake pedal all belt guides and keepers. • Remove belt from stationary idler and clutching idler. • Remove belt downward from tractor. however, if adjustment is needed, proceed as stated above. NOTE: Observe entire motion drive belt and position of manual). SERVICE AND ADJUSTMENTS IDLER PULLEYS MANDREL PULLEYS FIG. 22 TO CHECK AND ADJUST BRAKE (See Fig. 23) Your tractor is equipped with an adjustable brake system which is mounted on level...

User Manual
Page 23
... from starting. • Check wiring. See electrical wiring diagram in front of tractor. • To replace, reverse above procedure. The fuse holder is not adjustable. FIG. 30 ENGINE TO ADJUST THROTTLE CONTROL CABLE The throttle control has been preset at sides, tilt toward engine and lift off of tractor. TO ADJUST CARBURETOR Your carburetor is located behind the dash. If your engine does not operate properly due to suspected carburetor problems, take your tractor to an authorized service...
... from starting. • Check wiring. See electrical wiring diagram in front of tractor. • To replace, reverse above procedure. The fuse holder is not adjustable. FIG. 30 ENGINE TO ADJUST THROTTLE CONTROL CABLE The throttle control has been preset at sides, tilt toward engine and lift off of tractor. TO ADJUST CARBURETOR Your carburetor is located behind the dash. If your engine does not operate properly due to suspected carburetor problems, take your tractor to an authorized service...
User Manual
Page 24
... protective cover that all rusted or chipped paint surfaces; TRACTOR Remove mower from one ounce of this manual). • Inspect and replace belts, if necessary (See belt re- Replace if necessary. • Touch up all nuts, bolts and screws are empty. • Never use plastic. Always follow the mix ratio found on concrete or damp surfaces. ENGINE OIL Drain oil (with engine warm) and replace with new spark plug(s). STORAGE Immediately prepare your tractor for...
... protective cover that all rusted or chipped paint surfaces; TRACTOR Remove mower from one ounce of this manual). • Inspect and replace belts, if necessary (See belt re- Replace if necessary. • Touch up all nuts, bolts and screws are empty. • Never use plastic. Always follow the mix ratio found on concrete or damp surfaces. ENGINE OIL Drain oil (with engine warm) and replace with new spark plug(s). STORAGE Immediately prepare your tractor for...
User Manual
Page 25
... mower. 4. Replace fuel filter. 8. Clean engine air screen/fins. 12. Loose/damaged part(s). 1. Replace blade mandrel. 3. Dirty fuel filter. 7. Clutch/brake pedal not depressed. 2. Attachment clutch is engaged. 3. Check all wiring. 9. Check/replace solenoid or starter. 9. Corroded battery terminals. 3. Water in Service Adjustments section. 8. Adjust throttle control. 3. Connect and tighten spark plug wire. 11. See "To Adjust Carburetor" in fuel. 8. Engine not "CHOKED" properly. 3. Engine flooded. 4. Fill fuel tank. 2. Clean/replace air...
... mower. 4. Replace fuel filter. 8. Clean engine air screen/fins. 12. Loose/damaged part(s). 1. Replace blade mandrel. 3. Dirty fuel filter. 7. Clutch/brake pedal not depressed. 2. Attachment clutch is engaged. 3. Check all wiring. 9. Check/replace solenoid or starter. 9. Corroded battery terminals. 3. Water in Service Adjustments section. 8. Adjust throttle control. 3. Connect and tighten spark plug wire. 11. See "To Adjust Carburetor" in fuel. 8. Engine not "CHOKED" properly. 3. Engine flooded. 4. Fill fuel tank. 2. Clean/replace air...
User Manual
Page 26
... before stopping engine. 1. Clean underside of mower housing. 4. Clean underside of mower housing. 8. Engine throttle control not set at "SLOW" position for proper air pressure. 6. Poor cut - Level mower deck. 3. Replace blade mandrel. Low/uneven tire air pressure. 6. Clogged mower deck vent holes from buildup of grass, leaves and trash under mower. 4. Check wiring and connections. 5. TROUBLESHOOTING POINTS PROBLEM CAUSE Engine continues to run when operator leaves seat with blades listed in this manual. 11. If not corrected, contact an authorized service center...
... before stopping engine. 1. Clean underside of mower housing. 4. Clean underside of mower housing. 8. Engine throttle control not set at "SLOW" position for proper air pressure. 6. Poor cut - Level mower deck. 3. Replace blade mandrel. Low/uneven tire air pressure. 6. Clogged mower deck vent holes from buildup of grass, leaves and trash under mower. 4. Check wiring and connections. 5. TROUBLESHOOTING POINTS PROBLEM CAUSE Engine continues to run when operator leaves seat with blades listed in this manual. 11. If not corrected, contact an authorized service center...
User Manual
Page 27
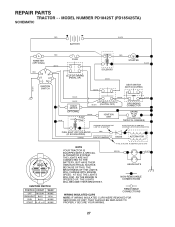
... LIGHTS WILL CHANGE WITH ENGINE SPEED. MODEL NUMBER PD1842ST (PD18542STA) SCHEMATIC RED BATTERY BLACK A AMMETER (OPTIONAL) RED WHITE RED S BM G A1 L A2 IGNITION SWITCH FUSE CLUTCH / BRAKE (PEDAL UP) RED M STARTER BLACK SOLENOID WHITE WHITE SEAT SWITCH (NOT OCCUPIED) BLACK BLACK BLACK BLACK BLACK HOUR METER ATT'MENT CLUTCH BLACK (CLUTCH OFF) (OPTIONAL) FUEL BLACK IGNITION UNIT BLUE LINE GROUNDING CONNECTOR SPARK PLUG GAP (2 PLUGS ON TWIN CYL. REPAIR PARTS TRACTOR - - AS THE ENGINE IS SPEEDED UP, THE...
... LIGHTS WILL CHANGE WITH ENGINE SPEED. MODEL NUMBER PD1842ST (PD18542STA) SCHEMATIC RED BATTERY BLACK A AMMETER (OPTIONAL) RED WHITE RED S BM G A1 L A2 IGNITION SWITCH FUSE CLUTCH / BRAKE (PEDAL UP) RED M STARTER BLACK SOLENOID WHITE WHITE SEAT SWITCH (NOT OCCUPIED) BLACK BLACK BLACK BLACK BLACK HOUR METER ATT'MENT CLUTCH BLACK (CLUTCH OFF) (OPTIONAL) FUEL BLACK IGNITION UNIT BLUE LINE GROUNDING CONNECTOR SPARK PLUG GAP (2 PLUGS ON TWIN CYL. REPAIR PARTS TRACTOR - - AS THE ENGINE IS SPEEDED UP, THE...
User Manual
Page 45
... or attachment are belts, blades, blade adapters, normal wear, normal adjustments, standard hardware and normal maintenance. 7. Exclusions: Excluded from whom it was purchased. Please refer to the following limitations and exclusions. 1. Battery Warranty: On products equipped with the instructions furnished. This Warranty applies only to products which have other than EHP manufactured transaxle/transmission components, battery (except as defined in replacing parts...
... or attachment are belts, blades, blade adapters, normal wear, normal adjustments, standard hardware and normal maintenance. 7. Exclusions: Excluded from whom it was purchased. Please refer to the following limitations and exclusions. 1. Battery Warranty: On products equipped with the instructions furnished. This Warranty applies only to products which have other than EHP manufactured transaxle/transmission components, battery (except as defined in replacing parts...


