
User Manual
Page 2
.... If you cannot back up to cause cancer and birth defects or other reproductive harm. • Keep machine free of riding mower-related injuries. Avoid discharging material against a wall or obstruction. Ma- • terial may lose traction. Operate only at all movement... on a slope. These operators should evaluate their ability to operate the riding mower safely enough to cool before operat- SLOPE OPERATION Battery posts, terminals and related accessories Slopes are familiar with grass • Do ...
.... If you cannot back up to cause cancer and birth defects or other reproductive harm. • Keep machine free of riding mower-related injuries. Avoid discharging material against a wall or obstruction. Ma- • terial may lose traction. Operate only at all movement... on a slope. These operators should evaluate their ability to operate the riding mower safely enough to cool before operat- SLOPE OPERATION Battery posts, terminals and related accessories Slopes are familiar with grass • Do ...
User Manual
Page 3
... than the operator. • Be alert and turn slowly and gradually downhill, if possible. 3 TOWING • Tow only with manufacturer's recommended parts, when necessary. • Mower blades are often attracted to cool before and while backing. • Never carry children, even with safety devices. GENERAL SERVICE • Never operate machine in... and proceed slowly straight down the slope. • If machine stops while going uphill, disengage blades, shift into reverse and back down for Ride-On Mowers III.
... than the operator. • Be alert and turn slowly and gradually downhill, if possible. 3 TOWING • Tow only with manufacturer's recommended parts, when necessary. • Mower blades are often attracted to cool before and while backing. • Never carry children, even with safety devices. GENERAL SERVICE • Never operate machine in... and proceed slowly straight down the slope. • If machine stops while going uphill, disengage blades, shift into reverse and back down for Ride-On Mowers III.
User Manual
Page 8
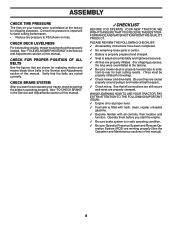
... sections in the Service and Adjustments section of this manual). 8 ASSEMBLY CHECK TIRE PRESSURE The tires on tires. See "TO LEVEL MOWER HOUSING" in the Service and Adjustments section of this manual. ✓CHECKLIST BEFORE YOU OPERATE YOUR NEW TRACTOR, WE WISH TO ASSURE... the belts are routed properly around pulleys and inside all controls, their location and function. CHECK DECK LEVELNESS For best cutting results, mower housing should be properly inflated for best cutting performance. • Reduce tire pressure to PSI shown on your tractor, check to operate...
... sections in the Service and Adjustments section of this manual). 8 ASSEMBLY CHECK TIRE PRESSURE The tires on tires. See "TO LEVEL MOWER HOUSING" in the Service and Adjustments section of this manual. ✓CHECKLIST BEFORE YOU OPERATE YOUR NEW TRACTOR, WE WISH TO ASSURE... the belts are routed properly around pulleys and inside all controls, their location and function. CHECK DECK LEVELNESS For best cutting results, mower housing should be properly inflated for best cutting performance. • Reduce tire pressure to PSI shown on your tractor, check to operate...
User Manual
Page 9
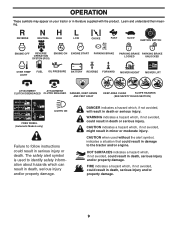
... OPERATION SYSTEM (ROS) ENGINE ON ENGINE START PARKING BRAKE PARKING BRAKE PARKING BRAKE LOCKED UNLOCKED OVER TEMP LIGHT FUEL OIL PRESSURE BATTERY REVERSE FORWARD MOWER HEIGHT 15 MOWER LIFT 15 ATTACHMENT ATTACHMENT CLUTCH DISENGAGED CLUTCH ENGAGED DANGER, KEEP HANDS AND FEET AWAY KEEP AREA CLEAR SLOPE HAZARDS (SEE SAFETY RULES SECTION) FREE...
... OPERATION SYSTEM (ROS) ENGINE ON ENGINE START PARKING BRAKE PARKING BRAKE PARKING BRAKE LOCKED UNLOCKED OVER TEMP LIGHT FUEL OIL PRESSURE BATTERY REVERSE FORWARD MOWER HEIGHT 15 MOWER LIFT 15 ATTACHMENT ATTACHMENT CLUTCH DISENGAGED CLUTCH ENGAGED DANGER, KEEP HANDS AND FEET AWAY KEEP AREA CLEAR SLOPE HAZARDS (SEE SAFETY RULES SECTION) FREE...
User Manual
Page 10
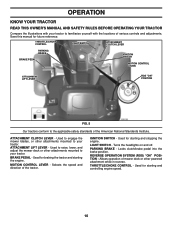
... SWITCH MOTION CONTROL LEVER ATTACHMENT LIFT LEVER ROS "ON" POSITION FIG. 5 Our tractors conform to the applicable safety standards of mower deck or other powered attachment while in reverse. Used for starting the engine. IGNITION SWITCH - Locks clutch/brake pedal into the... brake position. Used to engage the mower blades, or other attachments mounted to familiarize yourself with the locations of the tractor. LIGHT SWITCH - ATTACHMENT LIFT LEVER - REVERSE OPERATION ...
... SWITCH MOTION CONTROL LEVER ATTACHMENT LIFT LEVER ROS "ON" POSITION FIG. 5 Our tractors conform to the applicable safety standards of mower deck or other powered attachment while in reverse. Used for starting the engine. IGNITION SWITCH - Locks clutch/brake pedal into the... brake position. Used to engage the mower blades, or other attachments mounted to familiarize yourself with the locations of the tractor. LIGHT SWITCH - ATTACHMENT LIFT LEVER - REVERSE OPERATION ...
User Manual
Page 11
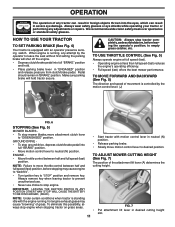
...fast). • Operating engine at less than full speed (fast) reduces the engine's operating efficiency. • Full speed (fast) offers the best mower performance. GROUND DRIVE - • To stop engine when stopping tractor on grass areas. • 11 FIG. 7 Put attachment lift lever in "... glasses or eye shields while operating your tractor or performing any attempt by the motion control lever. (J) FIG. 6 STOPPING (See Fig. 5) MOWER BLADES - • To stop tractor completely, as described above, before stopping may cause "browning" of the attachment lift lever (A) determines the...
...fast). • Operating engine at less than full speed (fast) reduces the engine's operating efficiency. • Full speed (fast) offers the best mower performance. GROUND DRIVE - • To stop engine when stopping tractor on grass areas. • 11 FIG. 7 Put attachment lift lever in "... glasses or eye shields while operating your tractor or performing any attempt by the motion control lever. (J) FIG. 6 STOPPING (See Fig. 5) MOWER BLADES - • To stop tractor completely, as described above, before stopping may cause "browning" of the attachment lift lever (A) determines the...

User Manual
Page 12
... needed, turn ignition key counterclockwise to ROS "ON" position. • Look down hills. • Avoid stopping or changing speed on mowers so equipped, or the deflector shield (S) in reverse unless absolutely necessary. Turning the ROS "ON", to allow reverse operation with the attachment...to neutral (N) position. • With engine running . ROS "ON" POSITION ENGINE "ON" POSITION (NORMAL OPERATING) CAUTION: Do not operate the mower without either the entire grass catcher, on hills. • If slowing is necessary, move throttle control lever to slower position. • If stopping ...
... needed, turn ignition key counterclockwise to ROS "ON" position. • Look down hills. • Avoid stopping or changing speed on mowers so equipped, or the deflector shield (S) in reverse unless absolutely necessary. Turning the ROS "ON", to allow reverse operation with the attachment...to neutral (N) position. • With engine running . ROS "ON" POSITION ENGINE "ON" POSITION (NORMAL OPERATING) CAUTION: Do not operate the mower without either the entire grass catcher, on hills. • If slowing is necessary, move throttle control lever to slower position. • If stopping ...
User Manual
Page 14
... best engine performance. with the motion control lever three (3) times. With motion control lever in the Service and Adjustments section of mower should be purged before mowing. Always operate engine at a high altitude (above 3000 feet) or in this section of this procedure... with engine off engine and set . 2. See "TO LEVEL MOWER HOUSING" in neutral (N) position, slowly disengage clutch/brake pedal. • CAUTION: At any trapped air inside the transmission which may have developed...
... best engine performance. with the motion control lever three (3) times. With motion control lever in the Service and Adjustments section of mower should be purged before mowing. Always operate engine at a high altitude (above 3000 feet) or in this section of this procedure... with engine off engine and set . 2. See "TO LEVEL MOWER HOUSING" in neutral (N) position, slowly disengage clutch/brake pedal. • CAUTION: At any trapped air inside the transmission which may have developed...
User Manual
Page 15
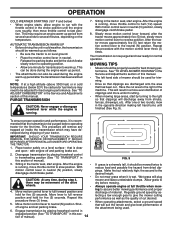
... 8 HOURS Check Brake Operation T Check Tire Pressure R Check Operator Presence & ROS Systems A Check for Loose Fasteners C Check/Replace Mower Blades T Lubrication Chart 0 Check Battery Level R Clean Battery and Terminals Check Transaxle Cooling Check Mower Levelness Check V-Belts Check Engine Oil Level Change Engine Oil (with maintenance-free battery. Change more often when...
... 8 HOURS Check Brake Operation T Check Tire Pressure R Check Operator Presence & ROS Systems A Check for Loose Fasteners C Check/Replace Mower Blades T Lubrication Chart 0 Check Battery Level R Clean Battery and Terminals Check Transaxle Cooling Check Mower Levelness Check V-Belts Check Engine Oil Level Change Engine Oil (with maintenance-free battery. Change more often when...
User Manual
Page 16
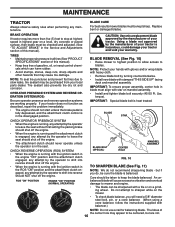
...blade approved by the manufacturer of your hands with gloves and/or wrap blade with heavy cloth. • Remove blade bolt by the operator to mower and engine. • The blade can harm rubber. • Avoid stumps, stones, deep ruts, sharp objects and other hazards that may ... the attachment clutch control is running with balancer.) NOTE: Do not use a nail for balancing blade. BLADE REMOVAL (See Fig. 10) • Raise mower to highest position to allow access to keep the blade balanced. Lbs. ROS "ON" POSITION ENGINE "ON" POSITION (NORMAL OPERATING) BLADE BOLT (SPECIAL) ...
...blade approved by the manufacturer of your hands with gloves and/or wrap blade with heavy cloth. • Remove blade bolt by the operator to mower and engine. • The blade can harm rubber. • Avoid stumps, stones, deep ruts, sharp objects and other hazards that may ... the attachment clutch control is running with balancer.) NOTE: Do not use a nail for balancing blade. BLADE REMOVAL (See Fig. 10) • Raise mower to highest position to allow access to keep the blade balanced. Lbs. ROS "ON" POSITION ENGINE "ON" POSITION (NORMAL OPERATING) BLADE BOLT (SPECIAL) ...
User Manual
Page 18
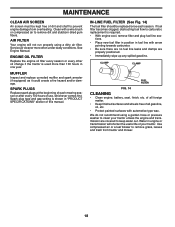
... clogged, obstructing fuel flow to remove dirt and stubborn dried gum fibers. Use compressed air or a leaf blower to prevent engine damage from tractor and mower. 18 See Engine Manual. CLAMP CLAMP FUEL FILTER FIG. 14 CLEANING • Clean engine, battery, seat, finish, etc. MAINTENANCE CLEAN AIR SCREEN Air screen must...
... clogged, obstructing fuel flow to remove dirt and stubborn dried gum fibers. Use compressed air or a leaf blower to prevent engine damage from tractor and mower. 18 See Engine Manual. CLAMP CLAMP FUEL FILTER FIG. 14 CLEANING • Clean engine, battery, seat, finish, etc. MAINTENANCE CLEAN AIR SCREEN Air screen must...
User Manual
Page 19
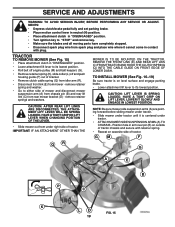
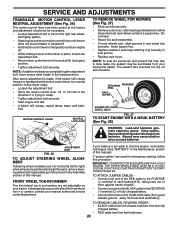
...19) Be sure tractor is on level surface and engage parking brake. • Lower attachment lift lever to it is centered under tractor. • ATTACH MOWER SIDE SUSPENSION ARMS (A) TO CHASSIS - HAVE A TIGHT GRIP ON LIFT LEVER, LOWER IT SLOWLY AND ENGAGE IN LOWEST POSITION. Position hole in arm over pin... (B) on opposite side of tractor. IMPORTANT: IF AN ATTACHMENT OTHER THAN THE MOWER IS TO BE MOUNTED ON THE TRACTOR, REMOVE THE FRONT LINK (E) AND REAR LIFT LIKS (C) FROM TRACTOR AND HOOK THE CLUTCH SPRING (Q) INTO THE ...
...19) Be sure tractor is on level surface and engage parking brake. • Lower attachment lift lever to it is centered under tractor. • ATTACH MOWER SIDE SUSPENSION ARMS (A) TO CHASSIS - HAVE A TIGHT GRIP ON LIFT LEVER, LOWER IT SLOWLY AND ENGAGE IN LOWEST POSITION. Position hole in arm over pin... (B) on opposite side of tractor. IMPORTANT: IF AN ATTACHMENT OTHER THAN THE MOWER IS TO BE MOUNTED ON THE TRACTOR, REMOVE THE FRONT LINK (E) AND REAR LIFT LIKS (C) FROM TRACTOR AND HOOK THE CLUTCH SPRING (Q) INTO THE ...
User Manual
Page 20
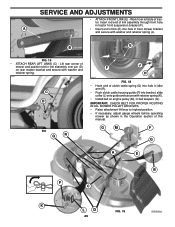
Insert rod end of link (E) into bracket, slide collar (L) onto guide and secure with retainer spring (K). • Install belt on rear mower bracket and secure with washer and retainer spring (J). A • Insert end of link assembly through front hole in tractor front suspension bracket (F)....trac- G M F G A E B P C K LD FIG. 19 20 tor. Work from left side of mower and position slot in link assembly over pin (D) on engine pulley (M), in front mower bracket and secure with washer and retainer spring. B E FIG. 16 • ATTACH REAR LIFT LINKS (C) - SERVICE...
Insert rod end of link (E) into bracket, slide collar (L) onto guide and secure with retainer spring (K). • Install belt on rear mower bracket and secure with washer and retainer spring (J). A • Insert end of link assembly through front hole in tractor front suspension bracket (F)....trac- G M F G A E B P C K LD FIG. 19 20 tor. Work from left side of mower and position slot in link assembly over pin (D) on engine pulley (M), in front mower bracket and secure with washer and retainer spring. B E FIG. 16 • ATTACH REAR LIFT LINKS (C) - SERVICE...

User Manual
Page 21
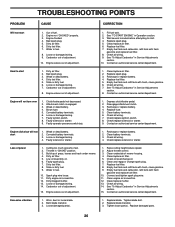
... park tractor on level ground or driveway. Measure distance (B) to the ground at side and measure the distance (A) from bottom edge of mower. ment instructions above. • Recheck measurements, adjust if necessary until both sides are equal. 21 CAUTION: Blades are sharp. PRECISION SIDE-... 3/4" or adjustable wrench, turn lift link adjustment nut (A) to the left to lower LH side of mower, or, counterclockwise (loosen) to lower the front mower. 02548 Turn nut right to raise mower Turn nut left to 1/2" lower than the rear tip. • Hold adjustment nut in Visual Adjust-...
... park tractor on level ground or driveway. Measure distance (B) to the ground at side and measure the distance (A) from bottom edge of mower. ment instructions above. • Recheck measurements, adjust if necessary until both sides are equal. 21 CAUTION: Blades are sharp. PRECISION SIDE-... 3/4" or adjustable wrench, turn lift link adjustment nut (A) to the left to lower LH side of mower, or, counterclockwise (loosen) to lower the front mower. 02548 Turn nut right to raise mower Turn nut left to 1/2" lower than the rear tip. • Hold adjustment nut in Visual Adjust-...
User Manual
Page 22
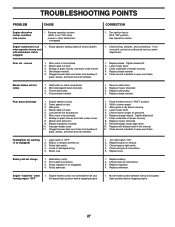
...idler (A) and clutching idler (B). • Remove belt from tractor rear to stop at highest speed in this section of left footrest. MOWER DRIVE BELT INSTALLATION 1. Install belt around idler pulleys (S) as shown. 2. IMPORTANT: Check belt for proper routing in "transmission disengaged" ...over cooling fan blades (D). • Remove belt downward from clutch pulley (M), both mandrel pulleys (R) and around both mandrel pulleys (R) and all mower pulley grooves. 3. ing plate (F) and above clutch brake pedal shaft (G). • Pull belt toward front of tractor and roll belt onto...
...idler (A) and clutching idler (B). • Remove belt from tractor rear to stop at highest speed in this section of left footrest. MOWER DRIVE BELT INSTALLATION 1. Install belt around idler pulleys (S) as shown. 2. IMPORTANT: Check belt for proper routing in "transmission disengaged" ...over cooling fan blades (D). • Remove belt downward from clutch pulley (M), both mandrel pulleys (R) and around both mandrel pulleys (R) and all mower pulley grooves. 3. ing plate (F) and above clutch brake pedal shaft (G). • Pull belt toward front of tractor and roll belt onto...
User Manual
Page 23
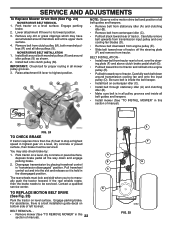
After above steps until tractor does not move mower deck height to right) when wheels are used for emergency starting, follow these steps: • Loosen the adjustment bolt. • Move the motion control lever 1/4 ...
After above steps until tractor does not move mower deck height to right) when wheels are used for emergency starting, follow these steps: • Loosen the adjustment bolt. • Move the motion control lever 1/4 ...

User Manual
Page 25
WARNING: Never store the tractor with gasoline in any enclosure. Allow the engine to rust. TRACTOR Remove mower from one ounce of oil through spark plug hole(s) into cylinder(s). • Turn ignition key to "START" position for 30 days or more. placement ...Replace your gasoline can if your tractor to cool before painting. IMPORTANT: NEVER COVER TRACTOR WHILE ENGINE AND EXHAUST AREAS ARE STILL WARM. 25 When mower is an acceptable alternative in your gasoline will not be stored for storage, do not store battery directly on stabilizer container. ENGINE FUEL SYSTEM IMPORTANT...
WARNING: Never store the tractor with gasoline in any enclosure. Allow the engine to rust. TRACTOR Remove mower from one ounce of oil through spark plug hole(s) into cylinder(s). • Turn ignition key to "START" position for 30 days or more. placement ...Replace your gasoline can if your tractor to cool before painting. IMPORTANT: NEVER COVER TRACTOR WHILE ENGINE AND EXHAUST AREAS ARE STILL WARM. 25 When mower is an acceptable alternative in your gasoline will not be stored for storage, do not store battery directly on stabilizer container. ENGINE FUEL SYSTEM IMPORTANT...
User Manual
Page 26
.... 3. Replace fuse. 5. Contact an authorized service center/department. Faulty solenoid or starter. 1. Low oil level/dirty oil. 6. Carburetor out of mower housing. 4. Replace damaged parts. 26 Dirty fuel filter. 7. Replace spark plug. 5. Hard to start 1. Dirty fuel filter. 5. Build-up of...Will not start . 4. Engine flooded. 4. Check all wiring. 7. Dirty air filter. 2. Engine valves out of grass, leaves and trash under mower. 4. Check all wiring. 7. Dirty engine air screen/fins. 12. Loose or damaged wiring. 9. Weak or dead battery. 4. Loose or damaged...
.... 3. Replace fuse. 5. Contact an authorized service center/department. Faulty solenoid or starter. 1. Low oil level/dirty oil. 6. Carburetor out of mower housing. 4. Replace damaged parts. 26 Dirty fuel filter. 7. Replace spark plug. 5. Hard to start 1. Dirty fuel filter. 5. Build-up of...Will not start . 4. Engine flooded. 4. Check all wiring. 7. Dirty air filter. 2. Engine valves out of grass, leaves and trash under mower. 4. Check all wiring. 7. Dirty engine air screen/fins. 12. Loose or damaged wiring. 9. Weak or dead battery. 4. Loose or damaged...
User Manual
Page 27
...stopping engine. 27 TROUBLESHOOTING POINTS PROBLEM CAUSE CORRECTION Engine dies when tractor is engaged. Low/uneven tire air pressure. 6. Mower drive belt worn. 9. Shift to run 1. Faulty regulator (if so equipped). 4. Faulty operator-safety presence control ... bolt. 2. Obstruction in "FAST" position. 2. Remove obstruction. 2. Travel speed too fast. 3. Buildup of grass, leaves, and trash under mower. 8. Improper blades used. 11. Faulty light switch. 4. Faulty alternator. 1. Replace battery. 2. Frozen blade mandrel. 1. Engine speed too slow...
...stopping engine. 27 TROUBLESHOOTING POINTS PROBLEM CAUSE CORRECTION Engine dies when tractor is engaged. Low/uneven tire air pressure. 6. Mower drive belt worn. 9. Shift to run 1. Faulty regulator (if so equipped). 4. Faulty operator-safety presence control ... bolt. 2. Obstruction in "FAST" position. 2. Remove obstruction. 2. Travel speed too fast. 3. Buildup of grass, leaves, and trash under mower. 8. Improper blades used. 11. Faulty light switch. 4. Faulty alternator. 1. Replace battery. 2. Frozen blade mandrel. 1. Engine speed too slow...


