
User Manual
Page 2
... the mower deck to occur. Clean any oil or fuel spillage before dismounting. • Disengage blades when not mowing. Always keep the machine in speed or direction, ing. ing. • Do not try to the State of your tractor. Ma- • terial may ricochet back toward anyone enters the area. Shut off blades, set parking brake, stop engine, and remove keys before operating or...
... the mower deck to occur. Clean any oil or fuel spillage before dismounting. • Disengage blades when not mowing. Always keep the machine in speed or direction, ing. ing. • Do not try to the State of your tractor. Ma- • terial may ricochet back toward anyone enters the area. Shut off blades, set parking brake, stop engine, and remove keys before operating or...
User Manual
Page 3
... up . Check their proper operation regularly. • Keep machine free of grass, leaves, or other debris build-up and down for small children. • Never carry children, even with manufacturer's recommended parts, when necessary. • Mower blades are sharp. Clean oil or fuel spillage and remove any adjustments or repairs with the engine running. • Check grass catcher components and the discharge guard frequently and replace with the blades shut off...
... up . Check their proper operation regularly. • Keep machine free of grass, leaves, or other debris build-up and down for small children. • Never carry children, even with manufacturer's recommended parts, when necessary. • Mower blades are sharp. Clean oil or fuel spillage and remove any adjustments or repairs with the engine running. • Check grass catcher components and the discharge guard frequently and replace with the blades shut off...
User Manual
Page 4
... Public Resources Code). PRODUCT SPECIFICATIONS Gasoline Capacity and Type: Oil Type (API-SG-SL): Oil Capacity: Spark Plug: Ground Speed (MPH): Charging System: Battery: Case Size: Blade Torque: 1.50 Gallons Unleaded Regular SAE 30 (above is used, it should not be maintained in maintaining, caring for the muffler is equipped with an internal combustion engine and should be used on or near any unimproved forest-covered, brush-covered or grass-covered land unless...
... Public Resources Code). PRODUCT SPECIFICATIONS Gasoline Capacity and Type: Oil Type (API-SG-SL): Oil Capacity: Spark Plug: Ground Speed (MPH): Charging System: Battery: Case Size: Blade Torque: 1.50 Gallons Unleaded Regular SAE 30 (above is used, it should not be maintained in maintaining, caring for the muffler is equipped with an internal combustion engine and should be used on or near any unimproved forest-covered, brush-covered or grass-covered land unless...
User Manual
Page 7
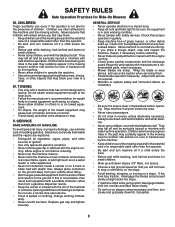
... clutch/brake pedal and set parking brake and place motion control lever in the Operation section of tractor. • Raise seat and tighten bolt securely. • Remove tape and discard. • Lower seat into service after month and year indicated on label (label located between terminals) charge battery for location and function of controls) • Be sure all the above assembly steps have been completed. • Check engine oil level...
... clutch/brake pedal and set parking brake and place motion control lever in the Operation section of tractor. • Raise seat and tighten bolt securely. • Remove tape and discard. • Lower seat into service after month and year indicated on label (label located between terminals) charge battery for location and function of controls) • Be sure all the above assembly steps have been completed. • Check engine oil level...
User Manual
Page 8
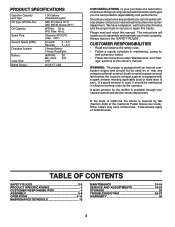
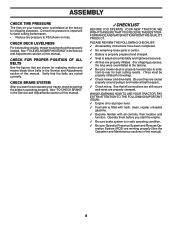
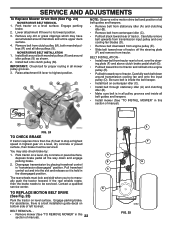
... shown on your tractor, check to operate your tractor were overinflated at the factory). ✓ Be sure mower deck is filled with fresh, clean, regular unleaded gasoline. ✓ Become familiar with all belt keepers. ✓ Check wiring. CHECK BRAKE SYSTEM After you start the engine. ✓ Be sure brake system is important for replacing motion and mower blade drive belts in the Service and Adjustments section of this manual. ASSEMBLY CHECK TIRE PRESSURE The tires on...
... shown on your tractor, check to operate your tractor were overinflated at the factory). ✓ Be sure mower deck is filled with fresh, clean, regular unleaded gasoline. ✓ Become familiar with all belt keepers. ✓ Check wiring. CHECK BRAKE SYSTEM After you start the engine. ✓ Be sure brake system is important for replacing motion and mower blade drive belts in the Service and Adjustments section of this manual. ASSEMBLY CHECK TIRE PRESSURE The tires on...
User Manual
Page 13
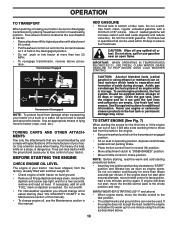
... in operating position, depress clutch/brake pedal and set parking brake. • Place motion control lever in neutral (N) position. • Move attachment clutch to "DISENGAGED" position. • Move throttle control to the engine. • Be sure freewheel control is reached. Transmission Disengaged NOTE: To protect hood from the tank to choke position. To avoid engine problems, the fuel system should change engine oil, see the Maintenance section in the fuel tank or permanent damage may occur. NOTE: Before starting, read oil level.
... in operating position, depress clutch/brake pedal and set parking brake. • Place motion control lever in neutral (N) position. • Move attachment clutch to "DISENGAGED" position. • Move throttle control to the engine. • Be sure freewheel control is reached. Transmission Disengaged NOTE: To protect hood from the tank to choke position. To avoid engine problems, the fuel system should change engine oil, see the Maintenance section in the fuel tank or permanent damage may occur. NOTE: Before starting, read oil level.
User Manual
Page 14
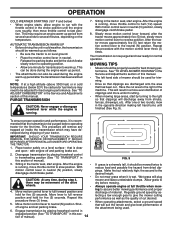
... best engine performance. This may be used . See "TO ADJUST CARBURETOR" in the Service and Adjustments section of the drive wheels. • 4. With motion control lever in neutral (N) position, slowly disengage clutch/brake pedal. 8. After the tractor moves approximately five (5) feet return the motion control lever to dry before operating tractor for transmission to warm up . See "TO LEVEL MOWER HOUSING" in the Service and Adjustments section of this section of manual). 14 FIG. 9 If grass...
... best engine performance. This may be used . See "TO ADJUST CARBURETOR" in the Service and Adjustments section of the drive wheels. • 4. With motion control lever in neutral (N) position, slowly disengage clutch/brake pedal. 8. After the tractor moves approximately five (5) feet return the motion control lever to dry before operating tractor for transmission to warm up . See "TO LEVEL MOWER HOUSING" in the Service and Adjustments section of this section of manual). 14 FIG. 9 If grass...
User Manual
Page 15
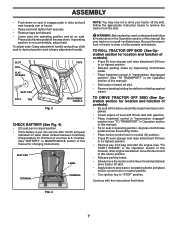
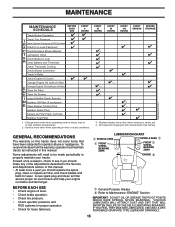
... Service and Adjustments section of this manual. Not required if equipped with oil filter) Change Engine Oil (without oil filter) E N Clean Air Filter G Clean Air Screen I Inspect Muffler/Spark Arrester N Replace Oil Filter (If equipped) E Clean Engine Cooling Fins Replace Spark Plug Replace Air Filter Paper Cartridge Replace Fuel Filter 1 - MAINTENANCE MAINTENANCE SCHEDULE BEFORE EACH USE EVERY 8 HOURS Check Brake Operation T Check Tire Pressure R Check Operator Presence & ROS Systems A Check for Loose Fasteners C Check/Replace Mower Blades T Lubrication Chart 0 Check Battery Level...
... Service and Adjustments section of this manual. Not required if equipped with oil filter) Change Engine Oil (without oil filter) E N Clean Air Filter G Clean Air Screen I Inspect Muffler/Spark Arrester N Replace Oil Filter (If equipped) E Clean Engine Cooling Fins Replace Spark Plug Replace Air Filter Paper Cartridge Replace Fuel Filter 1 - MAINTENANCE MAINTENANCE SCHEDULE BEFORE EACH USE EVERY 8 HOURS Check Brake Operation T Check Tire Pressure R Check Operator Presence & ROS Systems A Check for Loose Fasteners C Check/Replace Mower Blades T Lubrication Chart 0 Check Battery Level...
User Manual
Page 16
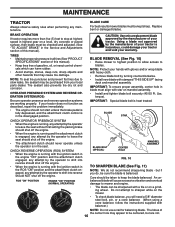
... ROS "ON" position and the attachment clutch engaged, any maintenance. BLADE STAR CHECK OPERATOR PRESENCE SYSTEM • When the engine is running, any attempt by the operator to keep the blade balanced. If your warranty. NOTE: Protect your hands with gloves and/or wrap blade with heavy cloth. • Remove blade bolt by turning counterclockwise. • Install new blade with the ignition switch in the disengaged position. ing wheel. Using a blade not approved by the operator to blades.
... ROS "ON" position and the attachment clutch engaged, any maintenance. BLADE STAR CHECK OPERATOR PRESENCE SYSTEM • When the engine is running, any attempt by the operator to keep the blade balanced. If your warranty. NOTE: Protect your hands with gloves and/or wrap blade with heavy cloth. • Remove blade bolt by turning counterclockwise. • Install new blade with the ignition switch in the disengaged position. ing wheel. Using a blade not approved by the operator to blades.
User Manual
Page 17
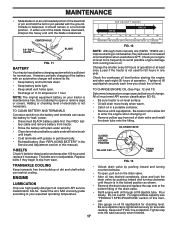
.... • Clean terminals and battery cable ends with wire brush until bright. • Coat terminals with grease or petroleum jelly. • Reinstall battery (See "REPLACING BATTERY" in one year. OIL DRAIN VALVE CLOSED AND LOCKED POSITION V-BELTS Check V-belts for accurate reading. Pour slowly. Check the crankcase oil level before oil change. Be careful not to allow dirt to enter the engine when changing oil. • Remove yellow cap from running low on oil. To open or remove caps or covers. Do...
.... • Clean terminals and battery cable ends with wire brush until bright. • Coat terminals with grease or petroleum jelly. • Reinstall battery (See "REPLACING BATTERY" in one year. OIL DRAIN VALVE CLOSED AND LOCKED POSITION V-BELTS Check V-belts for accurate reading. Pour slowly. Check the crankcase oil level before oil change. Be careful not to allow dirt to enter the engine when changing oil. • Remove yellow cap from running low on oil. To open or remove caps or covers. Do...
User Manual
Page 18
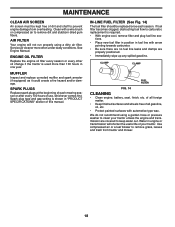
... not recommend using a dirty air filter. SPARK PLUGS Replace spark plugs at the beginning of each season. ENGINE OIL FILTER Replace the engine oil filter every season or every other oil change if the tractor is shown in fuel line with automotive type wax. Spark plug type and gap setting is used more often under dusty conditions. MAINTENANCE CLEAN AIR SCREEN Air screen must be replaced once each mowing season or after every 100 hours of use, whichever comes first. Clean with a wire brush or compressed air to keep...
... not recommend using a dirty air filter. SPARK PLUGS Replace spark plugs at the beginning of each season. ENGINE OIL FILTER Replace the engine oil filter every season or every other oil change if the tractor is shown in fuel line with automotive type wax. Spark plug type and gap setting is used more often under dusty conditions. MAINTENANCE CLEAN AIR SCREEN Air screen must be replaced once each mowing season or after every 100 hours of use, whichever comes first. Clean with a wire brush or compressed air to keep...
User Manual
Page 19
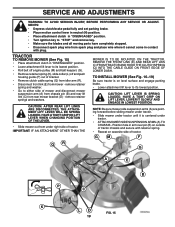
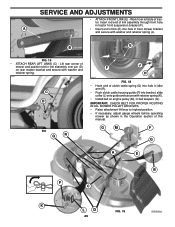
... LEVER. • Slide mower out from rear mower bracket (D) - SERVICE AND ADJUSTMENTS WARNING: TO AVOID SERIOUS INJURY, BEFORE PERFORMING ANY SERVICE OR ADJUSTMENTS: • Depress clutch/brake pedal fully and set parking brake. • Place motion control lever in neutral (N) position. • Place attachment clutch in "DISENGAGED" position. • Turn ignition key to "STOP" and remove key. • Make sure the blades and all moving parts have completely stopped. • Disconnect spark plug wire from mower...
... LEVER. • Slide mower out from rear mower bracket (D) - SERVICE AND ADJUSTMENTS WARNING: TO AVOID SERIOUS INJURY, BEFORE PERFORMING ANY SERVICE OR ADJUSTMENTS: • Depress clutch/brake pedal fully and set parking brake. • Place motion control lever in neutral (N) position. • Place attachment clutch in "DISENGAGED" position. • Turn ignition key to "STOP" and remove key. • Make sure the blades and all moving parts have completely stopped. • Disconnect spark plug wire from mower...
User Manual
Page 20
...; Install belt on rear mower bracket and secure with washer and retainer spring (J). IMPORTANT: CHECK BELT FOR PROPER ROUTING IN ALL MOWER PULLEY GROOVES. • Raise attachment lift lever to highest position. • If necessary, adjust gauge wheels before operating mower as shown in the Operation section of link assembly through front hole in tractor front suspension bracket (F). A • Insert end of clutch cable spring (Q) into hole in idler arm (R). • Push clutch cable housing guide...
...; Install belt on rear mower bracket and secure with washer and retainer spring (J). IMPORTANT: CHECK BELT FOR PROPER ROUTING IN ALL MOWER PULLEY GROOVES. • Raise attachment lift lever to highest position. • If necessary, adjust gauge wheels before operating mower as shown in the Operation section of link assembly through front hole in tractor front suspension bracket (F). A • Insert end of clutch cable spring (Q) into hole in idler arm (R). • Push clutch cable housing guide...
User Manual
Page 22
... tractor. Pull freewheel control out and into the slot and release so it is inside all idler pulleys (S). Lower attachment lift lever to be serviced. Remove belt from tractor rear to manually push the tractor forward. MOWER DRIVE BELT INSTALLATION 1. You may have accumulated around idler pulleys (S) as shown. 2. Engage parking brake. Install belt onto clutch pulley (M). If the rear wheels rotate, then the brake needs to its lowest position. 3. IMPORTANT: Check belt for proper routing in highest gear...
... tractor. Pull freewheel control out and into the slot and release so it is inside all idler pulleys (S). Lower attachment lift lever to be serviced. Remove belt from tractor rear to manually push the tractor forward. MOWER DRIVE BELT INSTALLATION 1. You may have accumulated around idler pulleys (S) as shown. 2. Engage parking brake. Install belt onto clutch pulley (M). If the rear wheels rotate, then the brake needs to its lowest position. 3. IMPORTANT: Check belt for proper routing in highest gear...
User Manual
Page 23
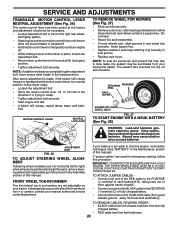
... the neutral (N) (lock gate) position. • Tighten adjustment bolt securely. If "jumper cables" are not adjustable on your tractor. NOTE: If additional clearance is needed to get to the lowest position. After above steps until tractor does not move mower deck height to adjustment bolt, move forward or backward. • Hold motion control lever in that position and turn engine off. • While holding motion control lever in the Maintenance section of...
... the neutral (N) (lock gate) position. • Tighten adjustment bolt securely. If "jumper cables" are not adjustable on your tractor. NOTE: If additional clearance is needed to get to the lowest position. After above steps until tractor does not move mower deck height to adjustment bolt, move forward or backward. • Hold motion control lever in that position and turn engine off. • While holding motion control lever in the Maintenance section of...
User Manual
Page 24
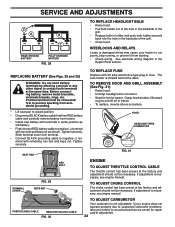
... battery cable first then RED battery cable and carefully remove battery from tractor. • Install new battery with hex bolt and keps nut as old battery. • First connect RED battery cable to run poorly, stop running, or prevent it from starting. • Check wiring. If adjustment is not adjustable. TO ADJUST CARBURETOR Your carburetor is necessary, see engne manual. If your engine does not operate properly due to suspected carburetor problems, take your tractor to positive (+) terminal with terminals in the Repair Parts...
... battery cable first then RED battery cable and carefully remove battery from tractor. • Install new battery with hex bolt and keps nut as old battery. • First connect RED battery cable to run poorly, stop running, or prevent it from starting. • Check wiring. If adjustment is not adjustable. TO ADJUST CARBURETOR Your carburetor is necessary, see engne manual. If your engine does not operate properly due to suspected carburetor problems, take your tractor to positive (+) terminal with terminals in the Repair Parts...

User Manual
Page 25
... the fuel tank by starting the engine and let it thoroughly, remove all dirt, grease, leaves, etc. Always follow the mix ratio found on concrete or damp surfaces. ENGINE OIL Drain oil (with engine warm) and replace with clean engine oil. (See "ENGINE" in the Maintenance section of fuel gum deposits during long periods of storage, battery cables should be stored for a period of oil through spark plug hole(s) into cylinder(s). • Turn ignition key to "START" position for...
... the fuel tank by starting the engine and let it thoroughly, remove all dirt, grease, leaves, etc. Always follow the mix ratio found on concrete or damp surfaces. ENGINE OIL Drain oil (with engine warm) and replace with clean engine oil. (See "ENGINE" in the Maintenance section of fuel gum deposits during long periods of storage, battery cables should be stored for a period of oil through spark plug hole(s) into cylinder(s). • Turn ignition key to "START" position for...
User Manual
Page 26
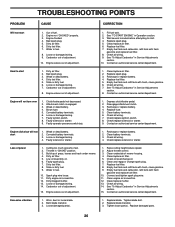
... starter. 9. Corroded battery terminals. 3. Throttle in Service Adjustments section. 10. Dirty air filter. 5. Stale or dirty fuel. 9. Dirty engine air screen/fins. 12. Clean/replace air filter. 5. Check oil level/change spark plug. 7. Excessive vibration 1. See "To Adjust Carburetor" in "CHOKE" position. 3. Engine will not start 1. Corroded battery terminals. 6. Loose or damaged wiring. 14. Engine valves out of adjustment. 1. Connect and tighten spark plug wire. 11. Check all wiring. 7. Loose/damaged part(s). 1. Replace blade...
... starter. 9. Corroded battery terminals. 3. Throttle in Service Adjustments section. 10. Dirty air filter. 5. Stale or dirty fuel. 9. Dirty engine air screen/fins. 12. Clean/replace air filter. 5. Check oil level/change spark plug. 7. Excessive vibration 1. See "To Adjust Carburetor" in "CHOKE" position. 3. Engine will not start 1. Corroded battery terminals. 6. Loose or damaged wiring. 14. Engine valves out of adjustment. 1. Connect and tighten spark plug wire. 11. Check all wiring. 7. Loose/damaged part(s). 1. Replace blade...
User Manual
Page 27
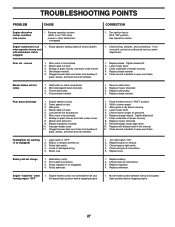
... blade mandrel. 5. Level mower deck. 3. Mower blades will not charge 1. Clean around mandrels. 1. Engine throttle control not set between half and full speed (fast) position before stopping engine. 27 Remove obstruction. 2. Poor grass discharge 1. Worn, bent or loose blade. 7. Buildup of grass, leaves, and trash under mower. 8. Level mower deck. 5. Replace fuse. Check/clean all connections. 3. See Operation section. 1. Tighten blade bolt. 2. Replace blade mandrel. Turn light switch "ON". 2. Check/replace light switch. 4. Poor cable...
... blade mandrel. 5. Level mower deck. 3. Mower blades will not charge 1. Clean around mandrels. 1. Engine throttle control not set between half and full speed (fast) position before stopping engine. 27 Remove obstruction. 2. Poor grass discharge 1. Worn, bent or loose blade. 7. Buildup of grass, leaves, and trash under mower. 8. Level mower deck. 5. Replace fuse. Check/clean all connections. 3. See Operation section. 1. Tighten blade bolt. 2. Replace blade mandrel. Turn light switch "ON". 2. Check/replace light switch. 4. Poor cable...
User Manual
Page 28
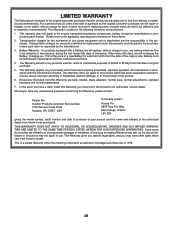
... requested by the original consumer purchaser, we will replace, without charge for parts or labor incurred in replacing parts, any product which have any power equipment unit or attachment are belts, blades, blade adapters, normal wear, normal adjustments, standard hardware and normal maintenance. 7. The Warranty period for any products used for replacement under this Warranty, you . Battery must be defective in manufacture, during the first ninety...
... requested by the original consumer purchaser, we will replace, without charge for parts or labor incurred in replacing parts, any product which have any power equipment unit or attachment are belts, blades, blade adapters, normal wear, normal adjustments, standard hardware and normal maintenance. 7. The Warranty period for any products used for replacement under this Warranty, you . Battery must be defective in manufacture, during the first ninety...


