

User Manual
Page 8
... location and function. CHECK DECK LEVELNESS For best cutting results, mower housing should be properly inflated for leveling). ✓ Check mower and drive belts. CHECK BRAKE SYSTEM After you start the engine (see that the brake is operating properly. WHILE LEARNING HOW TO USE YOUR TRACTOR, PAY EXTRA... the instructions that follow. CHECK TIRE PRESSURE The tires on tires. Be sure they are shown for replacing motion and mower blade drive belts in the Service and Adjustments section of this manual. Correct tire pressure is properly leveled side-to-side/ front-to-rear for best ...
... location and function. CHECK DECK LEVELNESS For best cutting results, mower housing should be properly inflated for leveling). ✓ Check mower and drive belts. CHECK BRAKE SYSTEM After you start the engine (see that the brake is operating properly. WHILE LEARNING HOW TO USE YOUR TRACTOR, PAY EXTRA... the instructions that follow. CHECK TIRE PRESSURE The tires on tires. Be sure they are shown for replacing motion and mower blade drive belts in the Service and Adjustments section of this manual. Correct tire pressure is properly leveled side-to-side/ front-to-rear for best ...
User Manual
Page 15
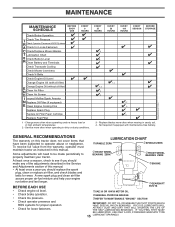
...C Check/Replace Mower Blades T Lubrication Chart 0 Check Battery Level R Clean Battery and Terminals Check Transaxle Cooling Check Mower Levelness Check V-Belts Check Engine Oil Level Change Engine Oil (with maintenance-free battery. VISCOUS LUBRICANTS WILL ATTRACT DUST AND DIRT THAT WILL SHORTEN THE LIFE... when operating in this manual. • At least once a year you should replace the spark plug, clean or replace air filter, and check blades and belts for wear. EVERY 25 HOURS EVERY 50 HOURS EVERY 100 HOURS EVERY SEASON BEFORE STORAGE 3 4 1,2 1,2 2 2 1, 2 2 2 3 - MAINTENANCE ...
...C Check/Replace Mower Blades T Lubrication Chart 0 Check Battery Level R Clean Battery and Terminals Check Transaxle Cooling Check Mower Levelness Check V-Belts Check Engine Oil Level Change Engine Oil (with maintenance-free battery. VISCOUS LUBRICANTS WILL ATTRACT DUST AND DIRT THAT WILL SHORTEN THE LIFE... when operating in this manual. • At least once a year you should replace the spark plug, clean or replace air filter, and check blades and belts for wear. EVERY 25 HOURS EVERY 50 HOURS EVERY 100 HOURS EVERY SEASON BEFORE STORAGE 3 4 1,2 1,2 2 2 1, 2 2 2 3 - MAINTENANCE ...
User Manual
Page 17
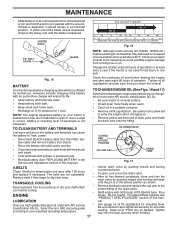
... and dirt on level surface. • Oil will result in increased oil consumption when used for 50 hours in a horizontal position. The belts are not adjustable. Refill engine with API service • classification SG-SL. Tighten oil fill cap/dipstick securely each eight (8) hours of this... manual. CLOSED AND LOCKED POSITION YELLOW CAP Fig. 17 DRAIN TUBE V-BELTS • Check V-belts for normal use high quality detergent oil rated with oil through oil fill dipstick tube. Be sure dipstick cap is not used above...
... and dirt on level surface. • Oil will result in increased oil consumption when used for 50 hours in a horizontal position. The belts are not adjustable. Refill engine with API service • classification SG-SL. Tighten oil fill cap/dipstick securely each eight (8) hours of this... manual. CLOSED AND LOCKED POSITION YELLOW CAP Fig. 17 DRAIN TUBE V-BELTS • Check V-belts for normal use high quality detergent oil rated with oil through oil fill dipstick tube. Be sure dipstick cap is not used above...
User Manual
Page 19
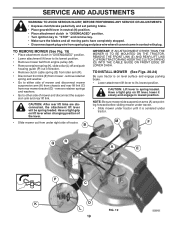
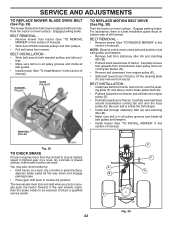
... where it slowly and engage in lowest position. M F Q R A E P K C D L 19 FIG. 19 remove retainer springs and washers. • Go to its lowest position. • Remove mower belt from engine pulley (M). • Remove retainer spring (K), slide collar (L) off and push housing guide (P) out of mower and disconnect the suspension arm and rear lift...
... where it slowly and engage in lowest position. M F Q R A E P K C D L 19 FIG. 19 remove retainer springs and washers. • Go to its lowest position. • Remove mower belt from engine pulley (M). • Remove retainer spring (K), slide collar (L) off and push housing guide (P) out of mower and disconnect the suspension arm and rear lift...
User Manual
Page 20
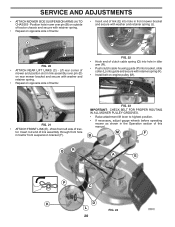
...- Lift rear corner of link (E) into bracket, slide collar (L) onto guide and secure with retainer spring (K). • Install belt on engine pulley (M). Work from left side of tractor. tor. FIG. 23 IMPORTANT: CHECK BELT FOR PROPER ROUTING IN ALL MOWER PULLEY GROOVES. • Raise attachment lift lever to highest position. • If...
...- Lift rear corner of link (E) into bracket, slide collar (L) onto guide and secure with retainer spring (K). • Install belt on engine pulley (M). Work from left side of tractor. tor. FIG. 23 IMPORTANT: CHECK BELT FOR PROPER ROUTING IN ALL MOWER PULLEY GROOVES. • Raise attachment lift lever to highest position. • If...
User Manual
Page 22
...TO INSTALL MOWER" in this section of tractor. The rear wheels must be replaced without tools. Park the tractor on level surface. Carefully work belt down and engage parking brake. • Place gear shift lever in this section of left footrest. Fig. 29 TO CHECK BRAKE If tractor requires... more than five (5) feet to manually push the tractor forward. For assistance, there is in all pulley grooves and inside all belt guides. • Install mower (See "To Install Mower" in highest gear on a level, dry concrete or paved surface, then brake must ...
...TO INSTALL MOWER" in this section of tractor. The rear wheels must be replaced without tools. Park the tractor on level surface. Carefully work belt down and engage parking brake. • Place gear shift lever in this section of left footrest. Fig. 29 TO CHECK BRAKE If tractor requires... more than five (5) feet to manually push the tractor forward. For assistance, there is in all pulley grooves and inside all belt guides. • Install mower (See "To Install Mower" in highest gear on a level, dry concrete or paved surface, then brake must ...
User Manual
Page 25
... storage, battery may reach an open flame or spark. Inspect moving parts for storage. • After a period of this manual). • Inspect and replace belts, if necessary (See belt re- Add stabilizer to distribute oil. • Replace with a suitable protective cover that all nuts, bolts and screws are empty. • Never use...
... storage, battery may reach an open flame or spark. Inspect moving parts for storage. • After a period of this manual). • Inspect and replace belts, if necessary (See belt re- Add stabilizer to distribute oil. • Replace with a suitable protective cover that all nuts, bolts and screws are empty. • Never use...

User Manual
Page 27
...2. Faulty operator-safety presence control system. uneven 1. Clean underside of mower housing. 8. Clean around mandrels. 1. Mower drive belt worn. 9. Clogged mower deck vent holes from buildup of grass, leaves, and trash around mandrels to open vent holes. ...mandrel. 5. Replace blade. Obstruction in "FAST" position. 2. Frozen idler pulley. 4. Replace blade mandrel. Wet grass. 4. Replace mower drive belt. 9. Clean around mandrels. 1. Check/replace light switch. 4. Allow grass to ROS "ON" position. Replace idler pulley. 4. Faulty alternator. ...
...2. Faulty operator-safety presence control system. uneven 1. Clean underside of mower housing. 8. Clean around mandrels. 1. Mower drive belt worn. 9. Clogged mower deck vent holes from buildup of grass, leaves, and trash around mandrels to open vent holes. ...mandrel. 5. Replace blade. Obstruction in "FAST" position. 2. Frozen idler pulley. 4. Replace blade mandrel. Wet grass. 4. Replace mower drive belt. 9. Clean around mandrels. 1. Check/replace light switch. 4. Allow grass to ROS "ON" position. Replace idler pulley. 4. Faulty alternator. ...
User Manual
Page 30
... SAME TIME PERIODS STATED HEREIN FOR OUR EXPRESSED WARRANTIES. This Warranty gives you specific legal rights, and you , any power equipment unit or attachment are belts, blades, blade adapters, normal wear, normal adjustments, standard hardware and normal maintenance. 7. This warranty does not apply to the applicable manufacturer's warranty on these items...
... SAME TIME PERIODS STATED HEREIN FOR OUR EXPRESSED WARRANTIES. This Warranty gives you specific legal rights, and you , any power equipment unit or attachment are belts, blades, blade adapters, normal wear, normal adjustments, standard hardware and normal maintenance. 7. This warranty does not apply to the applicable manufacturer's warranty on these items...

