
User Manual
Page 5
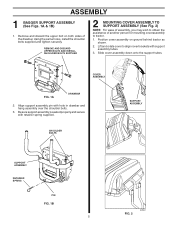
... 02531 FIG. 1A DRAWBAR 2. Be sure support assembly is seated properly and secure with hole in drawbar and hang assembly over the shoulder bolts. 3. ASSEMBLY 1 BAGGER SUPPORT ASSEMBLY (See Figs. 1A & 1B) 1. Align support assembly pin with retainer spring supplied. Remove and discard the upper bolt on ground behind tractor as...
... 02531 FIG. 1A DRAWBAR 2. Be sure support assembly is seated properly and secure with hole in drawbar and hang assembly over the shoulder bolts. 3. ASSEMBLY 1 BAGGER SUPPORT ASSEMBLY (See Figs. 1A & 1B) 1. Align support assembly pin with retainer spring supplied. Remove and discard the upper bolt on ground behind tractor as...
User Manual
Page 8
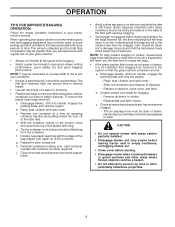
... and latch chutes c. Check to clear. NOTE: It may be sticky and adhere to the walls of the flow path causing clogging. • Your bagger is an indication that clogging has occurred in its side and slide the filled bag from the container. To remove the plastic trash bags...
... and latch chutes c. Check to clear. NOTE: It may be sticky and adhere to the walls of the flow path causing clogging. • Your bagger is an indication that clogging has occurred in its side and slide the filled bag from the container. To remove the plastic trash bags...

User Manual
Page 9
Frequently check components and replace with plug. Replace bent or damaged blades. • See BLADE CARE instructions in bagger containers. STORAGE When grass catcher is to be thrown. CAUTION: Do not leave grass in your tractor owner's manual. CUSTOMER RESPONSIBILITIES GENERAL RECOMMENDATIONS Always observe ...
Frequently check components and replace with plug. Replace bent or damaged blades. • See BLADE CARE instructions in bagger containers. STORAGE When grass catcher is to be thrown. CAUTION: Do not leave grass in your tractor owner's manual. CUSTOMER RESPONSIBILITIES GENERAL RECOMMENDATIONS Always observe ...
