
User Manual
Page 1
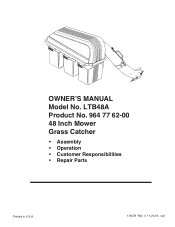
.... Use only DWoAnoRt oNpeIrNatGe mower unless a recommended replacement container. Check bag frequently. LTB48A Product No. 964 77 62-00 48 Inch Mower Grass Catcher • Assembly • Operation • Customer Responsibilities • Repair Parts Printed in U.S.A. 178478 Rev. 4 11.20.03 rad DWoAnoRt oNpeIrNatGe mower unless container is properlyissubject to wear and detierioration. Replace whencracked or damaged. Use only a recommended replacement container. 02079 OWNER'S MANUAL Model No. Use only a recommended replacement container...
.... Use only DWoAnoRt oNpeIrNatGe mower unless a recommended replacement container. Check bag frequently. LTB48A Product No. 964 77 62-00 48 Inch Mower Grass Catcher • Assembly • Operation • Customer Responsibilities • Repair Parts Printed in U.S.A. 178478 Rev. 4 11.20.03 rad DWoAnoRt oNpeIrNatGe mower unless container is properlyissubject to wear and detierioration. Replace whencracked or damaged. Use only a recommended replacement container. 02079 OWNER'S MANUAL Model No. Use only a recommended replacement container...
User Manual
Page 2
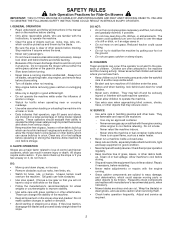
... not make adjustments or repairs with the engine running. • Grass catcher components are familiar with grass catchers or other people before turning. • Never leave a running . DO NOT: • Do not turn off blades, set parking brake, stop or shift while on a slope. The mower could be picked up to the presence of other attachments. Do not smoke. - Allow machine to improve stability. • Use extra...
... not make adjustments or repairs with the engine running. • Grass catcher components are familiar with grass catchers or other people before turning. • Never leave a running . DO NOT: • Do not turn off blades, set parking brake, stop or shift while on a slope. The mower could be picked up to the presence of other attachments. Do not smoke. - Allow machine to improve stability. • Use extra...
User Manual
Page 3
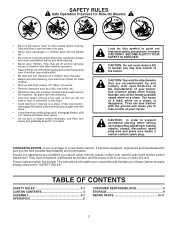
... of a new Grass Catcher. Should you experience any problems you to stop or shift while on the slope. • Avoid starting when setting up and down for small children. • Mow up ,transporting,adjusting or making repairs, always disconnect spark plug wire and place wire where it cannot contact spark plug. Always look behind before mowing. Please read and retain this manual.The instructions will not...
... of a new Grass Catcher. Should you experience any problems you to stop or shift while on the slope. • Avoid starting when setting up and down for small children. • Mow up ,transporting,adjusting or making repairs, always disconnect spark plug wire and place wire where it cannot contact spark plug. Always look behind before mowing. Please read and retain this manual.The instructions will not...
User Manual
Page 4
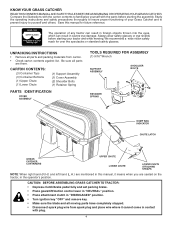
... with the parts before starting the assembly. CAUTION: BEFORE ASSEMBLING GRASS CATCHER TO TRACTOR: • Depress clutch/brake pedal fully and set parking brake. • Place gearshift/motion control lever in "NEUTRAL" position. • Place attachment clutch in "DISENGAGED" position. • Turn ignition key "OFF" and remove key. • Make sure the blade and all moving parts have completely stopped. • Disconnect spark plug wire from carton. • Check carton contents against list. Save this manual, it cannot...
... with the parts before starting the assembly. CAUTION: BEFORE ASSEMBLING GRASS CATCHER TO TRACTOR: • Depress clutch/brake pedal fully and set parking brake. • Place gearshift/motion control lever in "NEUTRAL" position. • Place attachment clutch in "DISENGAGED" position. • Turn ignition key "OFF" and remove key. • Make sure the blade and all moving parts have completely stopped. • Disconnect spark plug wire from carton. • Check carton contents against list. Save this manual, it cannot...
User Manual
Page 5
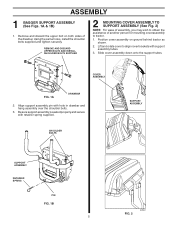
... tractor. 1. Align support assembly pin with retainer spring supplied. REMOVE AND DISCARD UPPER BOLTS AND INSTALL SHOULDER BOLTS SUPPLIED 2 MOUNTING COVER ASSEMBLY TO SUPPORT ASSEMBLY (See Fig. 2) NOTE: For ease of assembly, you may wish to obtain the assistance of the drawbar. SHOULDER BOLTS SUPPORT ASSEMBLY SUPPORT ASSEMBLY RETAINER SPRING PIN FIG. 1B 5 02530 FIG. 2 02532 Position cover assembly on both sides of another person for mounting coverassembly to align cover brackets with support assembly tubes. 3. Slide cover assembly...
... tractor. 1. Align support assembly pin with retainer spring supplied. REMOVE AND DISCARD UPPER BOLTS AND INSTALL SHOULDER BOLTS SUPPLIED 2 MOUNTING COVER ASSEMBLY TO SUPPORT ASSEMBLY (See Fig. 2) NOTE: For ease of assembly, you may wish to obtain the assistance of the drawbar. SHOULDER BOLTS SUPPORT ASSEMBLY SUPPORT ASSEMBLY RETAINER SPRING PIN FIG. 1B 5 02530 FIG. 2 02532 Position cover assembly on both sides of another person for mounting coverassembly to align cover brackets with support assembly tubes. 3. Slide cover assembly...
User Manual
Page 6
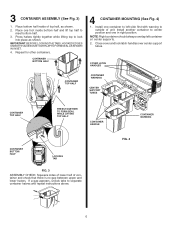
... cover and lock latch handles over center support tubes. lRelenedtp.cClaoocnnettaawinihneeernr. If a gap appears, unlock tabs to left container at center supports. 2. Press halves tightly together while lifting top to meet bottom half. 3. is no gap between upper and lower halves. lRelenedtp.cClaoocnnettaawinihneeernr. Install another container to center position and one container to separate container halves and repeat instructions above...
... cover and lock latch handles over center support tubes. lRelenedtp.cClaoocnnettaawinihneeernr. If a gap appears, unlock tabs to left container at center supports. 2. Press halves tightly together while lifting top to meet bottom half. 3. is no gap between upper and lower halves. lRelenedtp.cClaoocnnettaawinihneeernr. Install another container to center position and one container to separate container halves and repeat instructions above...
User Manual
Page 7
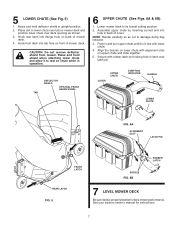
... pin. Assemble upper chute by hooking hole in back of mower deck. Push in and turn upper chute until it to its lowest cutting position. 2. CAUTION: Do not remove deflector shield from mower. See your tractors owner's manual for best mower performance. Raise and hold shield when attaching lower chute and allow it is properly leveled for instructions. 7 Raise and hold deflector shield in operation. Lower mower deck...
... pin. Assemble upper chute by hooking hole in back of mower deck. Push in and turn upper chute until it to its lowest cutting position. 2. CAUTION: Do not remove deflector shield from mower. See your tractors owner's manual for best mower performance. Raise and hold shield when attaching lower chute and allow it is properly leveled for instructions. 7 Raise and hold deflector shield in operation. Lower mower deck...
User Manual
Page 8
... height. • Use left container at full speed when bagging. • Select a gear low enough to insure dump bag indicator has not become full, the flow indicating ball will experience with grass catcher partially installed. • Disengage blades and stop engine before leaving tractor seat to empty containers, unclogging chutes, etc. • Close cover before starting. • Disengage mower when crossing driveways...
... height. • Use left container at full speed when bagging. • Select a gear low enough to insure dump bag indicator has not become full, the flow indicating ball will experience with grass catcher partially installed. • Disengage blades and stop engine before leaving tractor seat to empty containers, unclogging chutes, etc. • Close cover before starting. • Disengage mower when crossing driveways...

User Manual
Page 9
... objects to "OFF" position. • Make sure blades and all dirt, grass, leaves, etc. Empty containers after each use . CAUTION: BEFORE PERFORMING ANY MAINTENANCE,SERVICE OR ADJUSTMENTS: • Depress clutch brake pedal fully and set parking brake. • Place gearshift/motion control lever in "NEUTRAL" position. • Place clutch control in "DISENGAGED" position. • Turn ignition key to be thrown. Frequently check components and replace with plug. STORAGE When grass catcher is to do...
... objects to "OFF" position. • Make sure blades and all dirt, grass, leaves, etc. Empty containers after each use . CAUTION: BEFORE PERFORMING ANY MAINTENANCE,SERVICE OR ADJUSTMENTS: • Depress clutch brake pedal fully and set parking brake. • Place gearshift/motion control lever in "NEUTRAL" position. • Place clutch control in "DISENGAGED" position. • Turn ignition key to be thrown. Frequently check components and replace with plug. STORAGE When grass catcher is to do...


