
User Manual
Page 1
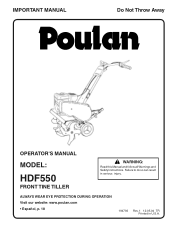
Failure to do so can result in U.S.A. IMPORTANT MANUAL Do Not Throw Away OPERATOR'S MANUAL MODEL: HDF550 FRONT TINE TILLER WARNING: Read this Manual and follow all Warnings and Safety Instructions. ALWAYS WEAR EYE PROTECTION DURING OPERATION Visit our website: www.poulan.com • Español, p. 18 194793 Rev. 1 12.05.04 TR Printed in serious injury.
Failure to do so can result in U.S.A. IMPORTANT MANUAL Do Not Throw Away OPERATOR'S MANUAL MODEL: HDF550 FRONT TINE TILLER WARNING: Read this Manual and follow all Warnings and Safety Instructions. ALWAYS WEAR EYE PROTECTION DURING OPERATION Visit our website: www.poulan.com • Español, p. 18 194793 Rev. 1 12.05.04 TR Printed in serious injury.
User Manual
Page 2
... • Never store the machine with fuel in the fuel tank inside a building where ignition sources are dangerous. • Never operate the tiller without good visibility or light. • Be careful when tilling in safe working condition. • Check shear pins, engine mounting bolts, and.... • Keep children and pets away. • Do not overload the machine capacity by the manufacturer for Walk-Behind Powered Rotary Tillers TRAINING • Read the Owner's Manual carefully. If this product contains chemicals known to prevent accidental starting .Disconnect the cord on or...
... • Never store the machine with fuel in the fuel tank inside a building where ignition sources are dangerous. • Never operate the tiller without good visibility or light. • Be careful when tilling in safe working condition. • Check shear pins, engine mounting bolts, and.... • Keep children and pets away. • Do not overload the machine capacity by the manufacturer for Walk-Behind Powered Rotary Tillers TRAINING • Read the Owner's Manual carefully. If this product contains chemicals known to prevent accidental starting .Disconnect the cord on or...
User Manual
Page 3
...observe the safety rules. • Follow a regular schedule in maintaining, caring for and using your tiller. • Follow instructions under "Maintenance" and "Storage" sections of a new tiller. SEE YOUR AUTHORIZED SERVICE CENTER/DEPARTMENT FOR SPARK ARRESTER. We have competent, well-trained technicians and... (SECTION 4442 OF THE CALIFORNIA PUBLIC RESOURCES CODE). It has been designed, engineered and manufactured to assemble and maintain your tiller properly. The instructions will enable you to give you cannot easily remedy, please contact your nearest authorized service center. Always ...
...observe the safety rules. • Follow a regular schedule in maintaining, caring for and using your tiller. • Follow instructions under "Maintenance" and "Storage" sections of a new tiller. SEE YOUR AUTHORIZED SERVICE CENTER/DEPARTMENT FOR SPARK ARRESTER. We have competent, well-trained technicians and... (SECTION 4442 OF THE CALIFORNIA PUBLIC RESOURCES CODE). It has been designed, engineered and manufactured to assemble and maintain your tiller properly. The instructions will enable you to give you cannot easily remedy, please contact your nearest authorized service center. Always ...
User Manual
Page 4
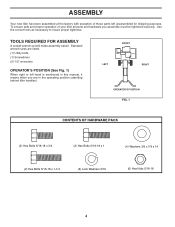
... Washers 5/16 (6) Hex Nuts 5/16-18 4 TOOLS REQUIRED FOR ASSEMBLY A socket wrench set will make assembly easier. ASSEMBLY Your new tiller has been assembled at the factory with exception of your tiller all parts and hardware you are listed. (1) Utility knife (1) Screwdriver (2) 1/2" wrenches OPERATOR'S POSITION (See Fig. 1) When right or ...left unassembled for shipping purposes. To ensure safe and proper operation of those parts left hand is mentioned in the operating position (standing behind tiller handles). Use the correct tools as necessary to insure proper tightness.
... Washers 5/16 (6) Hex Nuts 5/16-18 4 TOOLS REQUIRED FOR ASSEMBLY A socket wrench set will make assembly easier. ASSEMBLY Your new tiller has been assembled at the factory with exception of your tiller all parts and hardware you are listed. (1) Utility knife (1) Screwdriver (2) 1/2" wrenches OPERATOR'S POSITION (See Fig. 1) When right or ...left unassembled for shipping purposes. To ensure safe and proper operation of those parts left hand is mentioned in the operating position (standing behind tiller handles). Use the correct tools as necessary to insure proper tightness.
User Manual
Page 5
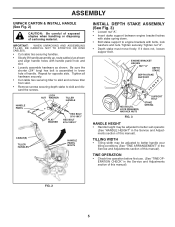
...INSTALL HANDLE (See Fig. 2) CAUTION: Be careful of exposed staples when handling or disposing of this manual). IMPORTANT: WHEN UNPACKING AND ASSEMBLING TILLER, BE CAREFUL NOT TO STRETCH OR KINK CABLE(S). • Cut cable ties securing handles. • Slowly lift handle assembly up, route .... 2 5 Tighten nut "A". • Depth stake must move freely. Tighten all hardware securely. • Cut cable ties securing tiller to skid and remove tiller from skid. • Remove screws securing depth stake to engine brackets with handle panel hole and slot. • Loosely assemble hardware...
...INSTALL HANDLE (See Fig. 2) CAUTION: Be careful of exposed staples when handling or disposing of this manual). IMPORTANT: WHEN UNPACKING AND ASSEMBLING TILLER, BE CAREFUL NOT TO STRETCH OR KINK CABLE(S). • Cut cable ties securing handles. • Slowly lift handle assembly up, route .... 2 5 Tighten nut "A". • Depth stake must move freely. Tighten all hardware securely. • Cut cable ties securing tiller to skid and remove tiller from skid. • Remove screws securing depth stake to engine brackets with handle panel hole and slot. • Loosely assemble hardware...

User Manual
Page 6
...meaning. Used when starting a cold engine. DEPTH STAKE - Engages tines in forward THROTTLE CONTROL - direction. Compare the illustrations with your Tiller or in literature supplied with the location of the American National Standards Institute. Save this manual for future reference. REVERSE TINE CONTROL - ...to familiarize yourself with the product. Controls engine speed. direction. 6 Controls forward speed and the depth at which the tiller will dig. FORWARD TINE CONTROL - Engages tines in reverse RECOIL STARTER HANDLE - CHOKE CONTROL - OPERATION KNOW YOUR...
...meaning. Used when starting a cold engine. DEPTH STAKE - Engages tines in forward THROTTLE CONTROL - direction. Compare the illustrations with your Tiller or in literature supplied with the location of the American National Standards Institute. Save this manual for future reference. REVERSE TINE CONTROL - ...to familiarize yourself with the product. Controls engine speed. direction. 6 Controls forward speed and the depth at which the tiller will dig. FORWARD TINE CONTROL - Engages tines in reverse RECOIL STARTER HANDLE - CHOKE CONTROL - OPERATION KNOW YOUR...

User Manual
Page 7
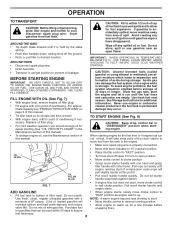
...forward move - OPERATION The operation of tilling is lowered into the eyes, which can result in severe eye damage. HOW TO USE YOUR TILLER Know how to stop engine. Replace the clevis pin and hairpin clip. • For normal tilling, set wheels at the second or...recommend a wide vision safety mask for digging. STOPPING (See Fig. 5) TINES • Release forward tine control to operate all controls before starting your tiller and while tilling. ment. REVERSE CONTROL FORWARD TINE CONTROL IN "OFF" (UP) POSITION FORWARD TINE CONTROL IN "ON" (DOWN) POSITION TILLING The ...
...forward move - OPERATION The operation of tilling is lowered into the eyes, which can result in severe eye damage. HOW TO USE YOUR TILLER Know how to stop engine. Replace the clevis pin and hairpin clip. • For normal tilling, set wheels at the second or...recommend a wide vision safety mask for digging. STOPPING (See Fig. 5) TINES • Release forward tine control to operate all controls before starting your tiller and while tilling. ment. REVERSE CONTROL FORWARD TINE CONTROL IN "OFF" (UP) POSITION FORWARD TINE CONTROL IN "ON" (DOWN) POSITION TILLING The ...
User Manual
Page 8
...OIL OR FUEL. Use fresh fuel next season. engine_art_4 FIG. 7 OIL FILLER PLUG • Grasp recoil starter handle with one hand and grasp tiller handle with gasoline. Do not over flowing. minimum of 87 octane. (Use of ignition until gasoline vapors have disappeared. Disconnect spark plug...of over fill. Use fresh, clean, regular unleaded gasoline with oil to point of fuel tank to prevent spills and to allow tiller engine and muffler to separation and formation of spill. in the Maintenance section of this manual). Drain the gas tank, start ...
...OIL OR FUEL. Use fresh fuel next season. engine_art_4 FIG. 7 OIL FILLER PLUG • Grasp recoil starter handle with one hand and grasp tiller handle with gasoline. Do not over flowing. minimum of 87 octane. (Use of ignition until gasoline vapors have disappeared. Disconnect spark plug...of over fill. Use fresh, clean, regular unleaded gasoline with oil to point of fuel tank to prevent spills and to allow tiller engine and muffler to separation and formation of spill. in the Maintenance section of this manual). Drain the gas tank, start ...
User Manual
Page 9
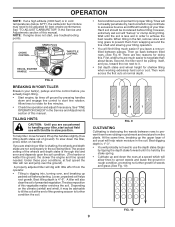
... untilled between passes. Depending on handles. SPARK PLUG CHOKE CONTROL THROTTLE CONTROL RECOIL STARTER HANDLE engine_art_71 FIG. 8 BREAKING IN YOUR TILLER Break-in your tiller. Best tilling depth is destroying the weeds between tilled rows. (See Fig. 9) There are much easier if you are not... penetrate dry, hard soil which will find tilling much easier to prevent them from wrapping around the tine shaft and slowing your tiller, start , see troubleshooting points. Loose, unpacked soil helps root growth. Best digging depth is 1"-3". • You will dig with ...
... untilled between passes. Depending on handles. SPARK PLUG CHOKE CONTROL THROTTLE CONTROL RECOIL STARTER HANDLE engine_art_71 FIG. 8 BREAKING IN YOUR TILLER Break-in your tiller. Best tilling depth is destroying the weeds between tilled rows. (See Fig. 9) There are much easier if you are not... penetrate dry, hard soil which will find tilling much easier to prevent them from wrapping around the tine shaft and slowing your tiller, start , see troubleshooting points. Loose, unpacked soil helps root growth. Best digging depth is 1"-3". • You will dig with ...
User Manual
Page 10
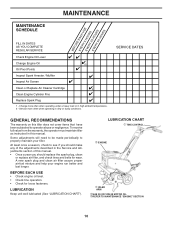
...and check tines and belts for loose fasteners. A new spark plug and clean air filter assure proper air-fuel mixture and help your tiller. LUBRICATION CHART c TINE CONTROL d ENGINE c IDLER ARM cSAE 30 OR 10W-30 MOTOR OIL dREFER TO MAINTENANCE "ENGINE" SECTION 10 LUBRICATION ... year you should make any of the adjustments described in high ambient temperatures. 2 - To receive full value from the warranty, the operator must maintain tiller as instructed in dirty or dusty conditions. BEFORE EACH USE • Check engine oil level. • Check tine operation. • Check for wear...
...and check tines and belts for loose fasteners. A new spark plug and clean air filter assure proper air-fuel mixture and help your tiller. LUBRICATION CHART c TINE CONTROL d ENGINE c IDLER ARM cSAE 30 OR 10W-30 MOTOR OIL dREFER TO MAINTENANCE "ENGINE" SECTION 10 LUBRICATION ... year you should make any of the adjustments described in high ambient temperatures. 2 - To receive full value from the warranty, the operator must maintain tiller as instructed in dirty or dusty conditions. BEFORE EACH USE • Check engine oil level. • Check tine operation. • Check for wear...

User Manual
Page 11
...securely each five (5) hours of the cartridge. All oil must meet API service classification SG-SL. • Be sure tiller is air cooled. brush. • Remove blower housing and clean as contact may cause deterioration of continuous use pressurized air to clean cartridge. ...See"CHECK ENGINE OIL LEVEL" in a suitable container. • Remove drain plug. • Tip tiller forward to prevent accidental starting the engine and after every 25 hours of this manual. Change the oil after each time you check the oil...
...securely each five (5) hours of the cartridge. All oil must meet API service classification SG-SL. • Be sure tiller is air cooled. brush. • Remove blower housing and clean as contact may cause deterioration of continuous use pressurized air to clean cartridge. ...See"CHECK ENGINE OIL LEVEL" in a suitable container. • Remove drain plug. • Tip tiller forward to prevent accidental starting the engine and after every 25 hours of this manual. Change the oil after each time you check the oil...
User Manual
Page 12
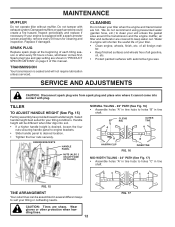
Replace if damaged. We do not recommend using pressurized water (garden hose, etc.) to clean your tiller. • Clean engine, wheels, finish, etc. TILLER TO ADJUST HANDLE HEIGHT (See Fig. 15) Factory assembly has provided lowest handle height. TRANSMISSION Your ... tine shaft. Handle height will be assembled in engine will not require lubrication unless serviced. ENGINE BRACKETS HANDLE PANEL NUTS (ALSO 2 ON LEFT SIDE OF TILLER) NORMAL TILLING - 26" PATH (See Fig. 16) • Assemble holes "A" in tine hubs to desired location. • Tighten the four nuts ...
Replace if damaged. We do not recommend using pressurized water (garden hose, etc.) to clean your tiller. • Clean engine, wheels, finish, etc. TILLER TO ADJUST HANDLE HEIGHT (See Fig. 15) Factory assembly has provided lowest handle height. TRANSMISSION Your ... tine shaft. Handle height will be assembled in engine will not require lubrication unless serviced. ENGINE BRACKETS HANDLE PANEL NUTS (ALSO 2 ON LEFT SIDE OF TILLER) NORMAL TILLING - 26" PATH (See Fig. 16) • Assemble holes "A" in tine hubs to desired location. • Tighten the four nuts ...

User Manual
Page 15
... breakage and wear. Do not empty the gas tank and carburetor if using fuel stabilizer. IMPORTANT: NEVER COVER TILLER WHILE ENGINE AND EXHAUST AREAS ARE STILL WARM. 15 TILLER • Clean entire tiller (See "CLEANING" in the Maintenance section of this manual). • Inspect and replace belts, if necessary ...Replace if necessary. • Touch up all nuts, bolts and screws are empty. • Never use plastic. WARNING: Never store the tiller with a suitable protective cover that all rusted or chipped paint surfaces; Always follow the mix ratio found on stablizer container.
... breakage and wear. Do not empty the gas tank and carburetor if using fuel stabilizer. IMPORTANT: NEVER COVER TILLER WHILE ENGINE AND EXHAUST AREAS ARE STILL WARM. 15 TILLER • Clean entire tiller (See "CLEANING" in the Maintenance section of this manual). • Inspect and replace belts, if necessary ...Replace if necessary. • Touch up all nuts, bolts and screws are empty. • Never use plastic. WARNING: Never store the tiller with a suitable protective cover that all rusted or chipped paint surfaces; Always follow the mix ratio found on stablizer container.
User Manual
Page 16
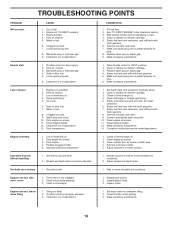
...ficult handling 1. Dirty air cleaner. 5. Dirty/clogged muffler. 12. Carburetor out of power 1. Remove and clean muffler. 5. Engine runs but tiller won't move 1. Dirty air cleaner. 3. Remove fuel tank and clean. 9. Clean or replace air cleaner cartridge. 3. Engine not "CHOKED" properly. 3. Low oil level/dirty oil...
...ficult handling 1. Dirty air cleaner. 5. Dirty/clogged muffler. 12. Carburetor out of power 1. Remove and clean muffler. 5. Engine runs but tiller won't move 1. Dirty air cleaner. 3. Remove fuel tank and clean. 9. Clean or replace air cleaner cartridge. 3. Engine not "CHOKED" properly. 3. Low oil level/dirty oil...


