
User Manual
Page 2
... after handling. • Do not operate machine without the entire grass catcher, discharge guard, or other reproductive harm. Clean any oil or fuel spillage before storage. Allow machine to the State of the tractor. Stop the • blades when crossing gravel surfaces. 2 Mow up , transporting, adjusting or making repairs, always disconnect spark plug wire and place wire where it . • I. Choose a low ground speed so that operators, age...
... after handling. • Do not operate machine without the entire grass catcher, discharge guard, or other reproductive harm. Clean any oil or fuel spillage before storage. Allow machine to the State of the tractor. Stop the • blades when crossing gravel surfaces. 2 Mow up , transporting, adjusting or making repairs, always disconnect spark plug wire and place wire where it . • I. Choose a low ground speed so that operators, age...

User Manual
Page 3
.... Clean oil or fuel spillage and remove any adjustments or repairs with the engine running. • Check grass catcher components and the discharge guard frequently and replace with manufacturer's recommended parts, when necessary. • Mower blades are often attracted to cool before storing. • If you last saw them . • Check brake operation frequently. Wrap the blade or wear gloves, and use extreme care in or on slopes unless necessary, and then, turn...
.... Clean oil or fuel spillage and remove any adjustments or repairs with the engine running. • Check grass catcher components and the discharge guard frequently and replace with manufacturer's recommended parts, when necessary. • Mower blades are often attracted to cool before storing. • If you last saw them . • Check brake operation frequently. Wrap the blade or wear gloves, and use extreme care in or on slopes unless necessary, and then, turn...
User Manual
Page 4
... "SAFETY RULES". Please read and retain this owner's manual. TABLE OF CONTENTS SAFETY RULES 2-3 PRODUCT SPECIFICATIONS 4 CUSTOMER RESPONSIBILITIES 4 ASSEMBLY 6-8 OPERATION 9-14 MAINTENANCE SCHEDULE 15 MAINTENANCE 15-18 SERVICE AND ADJUSTMENTS 19-23 STORAGE 24 TROUBLESHOOTING 25-26 WARRANTY 27 4 age" sections of a new tractor. PRODUCT SPECIFICATIONS GASOLINE CAPACITY AND TYPE: OIL TYPE (API-SG-SL): OIL CAPACITY: SPARK PLUG: (GAP: .030") GROUND SPEED (MPH): TIRE PRESSURE: CHARGING SYSTEM: BATTERY: BLADE BOLT TORQUE: 1.25 GALLONS UNLEADED REGULAR SAE 30...
... "SAFETY RULES". Please read and retain this owner's manual. TABLE OF CONTENTS SAFETY RULES 2-3 PRODUCT SPECIFICATIONS 4 CUSTOMER RESPONSIBILITIES 4 ASSEMBLY 6-8 OPERATION 9-14 MAINTENANCE SCHEDULE 15 MAINTENANCE 15-18 SERVICE AND ADJUSTMENTS 19-23 STORAGE 24 TROUBLESHOOTING 25-26 WARRANTY 27 4 age" sections of a new tractor. PRODUCT SPECIFICATIONS GASOLINE CAPACITY AND TYPE: OIL TYPE (API-SG-SL): OIL CAPACITY: SPARK PLUG: (GAP: .030") GROUND SPEED (MPH): TIRE PRESSURE: CHARGING SYSTEM: BATTERY: BLADE BOLT TORQUE: 1.25 GALLONS UNLEADED REGULAR SAE 30...
User Manual
Page 6
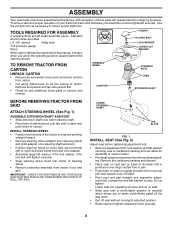
... WHEEL • Position front wheels of the tractor so they are pointing straight forward. • Remove steering wheel adapter from carton. • Cut along dotted lines on seat to press clutch/brake pedal all parts and hardware you to engage shoulder bolt in pan. • Push down . • Get off seat without moving its adjusted position. • Raise seat and tighten adjustment bolt securely. 02819 6 ASSEMBLY Your new tractor...
... WHEEL • Position front wheels of the tractor so they are pointing straight forward. • Remove steering wheel adapter from carton. • Cut along dotted lines on seat to press clutch/brake pedal all parts and hardware you to engage shoulder bolt in pan. • Push down . • Get off seat without moving its adjusted position. • Raise seat and tighten adjustment bolt securely. 02819 6 ASSEMBLY Your new tractor...
User Manual
Page 7
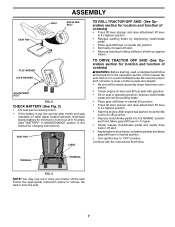
... attachment lift lever to its highest position. • Start the engine.After engine has started, move throttle control to idle position. • Depress clutch/brake pedal into service after month and year indicated on seat in operating position, depress clutch/brake pedal and set parking brake and place gearshift lever in the Operation section of controls) WARNING: Before starting, read, understand and follow all the above assembly steps have been completed. • Check engine oil level and fill fuel tank...
... attachment lift lever to its highest position. • Start the engine.After engine has started, move throttle control to idle position. • Depress clutch/brake pedal into service after month and year indicated on seat in operating position, depress clutch/brake pedal and set parking brake and place gearshift lever in the Operation section of controls) WARNING: Before starting, read, understand and follow all the above assembly steps have been completed. • Check engine oil level and fill fuel tank...
User Manual
Page 8
... sure mower deck is at the factory for replacing motion and mower blade drive belts in the Operation section of this manual). 8 Follow proper starting and transmission purging instructions (See "TO START ENGINE" and "PURGE TRANSMISSION" in the Service and Adjustments section of this manual. CHECK FOR PROPER POSITION OF ALL BELTS See the figures that the belts are routed properly around pulleys and inside all connections are still secure and wires are...
... sure mower deck is at the factory for replacing motion and mower blade drive belts in the Operation section of this manual). 8 Follow proper starting and transmission purging instructions (See "TO START ENGINE" and "PURGE TRANSMISSION" in the Service and Adjustments section of this manual. CHECK FOR PROPER POSITION OF ALL BELTS See the figures that the belts are routed properly around pulleys and inside all connections are still secure and wires are...

User Manual
Page 11
... cutting performance, grass over 6 inches in height should be cut relatively high; When engine is standing idle with an operator presence sensing switch. Pedal should be mowed twice. ATTACHMENT CLUTCH LEVER "ENGAGED" POSITION TO USE THROTTLE CONTROL (See Fig. 5) Always operate engine at full throttle. • Operating engine at less than full throttle reduces the battery charging rate. • Full throttle offers the best bagging and mower perfor- ENGINE • Move throttle control between half and full speed (fast) position...
... cutting performance, grass over 6 inches in height should be cut relatively high; When engine is standing idle with an operator presence sensing switch. Pedal should be mowed twice. ATTACHMENT CLUTCH LEVER "ENGAGED" POSITION TO USE THROTTLE CONTROL (See Fig. 5) Always operate engine at full throttle. • Operating engine at less than full throttle reduces the battery charging rate. • Full throttle offers the best bagging and mower perfor- ENGINE • Move throttle control between half and full speed (fast) position...
User Manual
Page 13
... attempts, move the throttle control to the fast position. • The attachments and ground drive can be used within 30 days to choke ( ) position. OPERATION BEFORE STARTING THE ENGINE CHECK ENGINE OIL LEVEL The engine in your tractor has been shipped, from the factory, already filled with summer weight oil. • Check engine oil with tractor on level ground. • Remove oil fill cap/dipstick and wipe clean, reinsert the dipstick and screw cap tight, wait for...
... attempts, move the throttle control to the fast position. • The attachments and ground drive can be used within 30 days to choke ( ) position. OPERATION BEFORE STARTING THE ENGINE CHECK ENGINE OIL LEVEL The engine in your tractor has been shipped, from the factory, already filled with summer weight oil. • Check engine oil with tractor on level ground. • Remove oil fill cap/dipstick and wipe clean, reinsert the dipstick and screw cap tight, wait for...

User Manual
Page 15
...oil filter) E Change Engine Oil (without oil filter) N Clean Air Filter G Clean Air Screen I N Inspect Muffler/Spark Arrester E Replace Oil Filter (If equipped) Clean Engine Cooling Fins Replace Spark Plug 1,2 1,2 2 2 1, 2 2 maint_sch-tractore.ROS.e Replace Air Filter Paper Cartridge Replace Fuel Filter 1 - MAINTENANCE MAINTENANCE SCHEDULE FILL IN DATES AS YOU COMPLETE REGULAR SERVICE Check Brake Operation Check Tire Pressure Check Operator Presence and T ROS Systems R Check for Loose Fasteners A Sharpen/Replace Mower Blades C T Lubrication Chart 0 Check Battery Level...
...oil filter) E Change Engine Oil (without oil filter) N Clean Air Filter G Clean Air Screen I N Inspect Muffler/Spark Arrester E Replace Oil Filter (If equipped) Clean Engine Cooling Fins Replace Spark Plug 1,2 1,2 2 2 1, 2 2 maint_sch-tractore.ROS.e Replace Air Filter Paper Cartridge Replace Fuel Filter 1 - MAINTENANCE MAINTENANCE SCHEDULE FILL IN DATES AS YOU COMPLETE REGULAR SERVICE Check Brake Operation Check Tire Pressure Check Operator Presence and T ROS Systems R Check for Loose Fasteners A Sharpen/Replace Mower Blades C T Lubrication Chart 0 Check Battery Level...
User Manual
Page 16
... engine is running and the attachment clutch is in highest gear on a grinding wheel. torque). IF BOLT NEEDS REPLACING, REPLACE ONLY WITH APPROVE BOLT SHOWN IN THE REPAIR PARTS. If either end of the blade moves downward, sharpen the heavy end until the blade is in the engine "ON" position and the attachment clutch engaged, any maintenance. UCT SPECIFICATIONS" section of gasoline, oil, or insect control chemicals which can be checked and adjusted. (See "TO ADJUST BRAKE...
... engine is running and the attachment clutch is in highest gear on a grinding wheel. torque). IF BOLT NEEDS REPLACING, REPLACE ONLY WITH APPROVE BOLT SHOWN IN THE REPAIR PARTS. If either end of the blade moves downward, sharpen the heavy end until the blade is in the engine "ON" position and the attachment clutch engaged, any maintenance. UCT SPECIFICATIONS" section of gasoline, oil, or insect control chemicals which can be checked and adjusted. (See "TO ADJUST BRAKE...
User Manual
Page 17
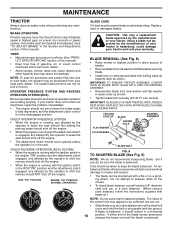
... use high quality detergent oil rated with grease or petroleum jelly. • Reinstall battery (See "REPLACING BATTERY" in the locked position as shown. • Remove the drain tube and replace the cap onto to the bottom fitting of dirt and chaff which is not necessary. MAINTENANCE CENTER HOLE 5/8" BOLT OR PIN BLADE FIG. 9 BATTERY Your tractor has a battery charging system which can cause the battery to enter the engine when changing oil. • Remove...
... use high quality detergent oil rated with grease or petroleum jelly. • Reinstall battery (See "REPLACING BATTERY" in the locked position as shown. • Remove the drain tube and replace the cap onto to the bottom fitting of dirt and chaff which is not necessary. MAINTENANCE CENTER HOLE 5/8" BOLT OR PIN BLADE FIG. 9 BATTERY Your tractor has a battery charging system which can cause the battery to enter the engine when changing oil. • Remove...

User Manual
Page 18
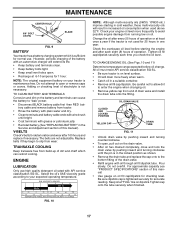
... conditions. SPARK PLUGS Replace spark plugs at the beginning of each season. Spark plug type and gap setting is required. • With engine cool, remove filter and plug fuel line sections. • Place new fuel filter in position in fuel line with a wire brush or compressed air to keep water out. MAINTENANCE CLEAN AIR SCREEN Air screen must be replaced once each mowing season or after every 100 hours of use, whichever comes first. See Engine Manual. MUFFLER Inspect and replace corroded...
... conditions. SPARK PLUGS Replace spark plugs at the beginning of each season. Spark plug type and gap setting is required. • With engine cool, remove filter and plug fuel line sections. • Place new fuel filter in position in fuel line with a wire brush or compressed air to keep water out. MAINTENANCE CLEAN AIR SCREEN Air screen must be replaced once each mowing season or after every 100 hours of use, whichever comes first. See Engine Manual. MUFFLER Inspect and replace corroded...

User Manual
Page 19
... retainer spring. • Install belt onto engine pulley. SERVICE AND ADJUSTMENTS WARNING: TO AVOID SERIOUS INJURY, BEFORE PERFORMING ANY SERVICE OR ADJUSTMENTS: • Depress clutch/brake pedal fully and set parking brake. • Place gearshift lever in neutral (N) position. • Place attachment clutch in "DISENGAGED" position. • Turn ignition key to "STOP" and remove key. • Make sure the blades and all moving parts have completely stopped. • Disconnect spark plug wire from spark plug and place wire where...
... retainer spring. • Install belt onto engine pulley. SERVICE AND ADJUSTMENTS WARNING: TO AVOID SERIOUS INJURY, BEFORE PERFORMING ANY SERVICE OR ADJUSTMENTS: • Depress clutch/brake pedal fully and set parking brake. • Place gearshift lever in neutral (N) position. • Place attachment clutch in "DISENGAGED" position. • Turn ignition key to "STOP" and remove key. • Make sure the blades and all moving parts have completely stopped. • Disconnect spark plug wire from spark plug and place wire where...
User Manual
Page 20
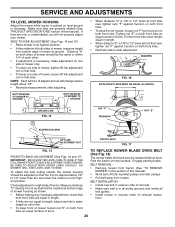
... sure belt is in all pulley grooves and inside all belt guides. • Install mower in flated (See "PRODUCT SPECIFICATIONS" section of this manual). • Work belt off both mandrel pulleys and idler pulleys. • Pull belt away from tractor (See "TO REMOVE MOWER" in length, adjust one side of mower, loosen lift link adjustment nut on both front links an equal number of this manual). SERVICE AND ADJUSTMENTS TO LEVEL MOWER HOUSING Adjust the mower while tractor is...
... sure belt is in all pulley grooves and inside all belt guides. • Install mower in flated (See "PRODUCT SPECIFICATIONS" section of this manual). • Work belt off both mandrel pulleys and idler pulleys. • Pull belt away from tractor (See "TO REMOVE MOWER" in length, adjust one side of mower, loosen lift link adjustment nut on both front links an equal number of this manual). SERVICE AND ADJUSTMENTS TO LEVEL MOWER HOUSING Adjust the mower while tractor is...

User Manual
Page 21
... rear wheels rotate, the brake needs to be adjusted or the pads need to manually push the tractor forward. The adjustment is in neutral (N) (lock gate) position. Engage parking brake. BELT INSTALLATION • Carefully work new belt down between brake operating arm and nut "A" on level surface. TO CHECK BRAKE • Park tractor on a level, dry concrete or paved surface, depress clutch/brake pedal all belt guides and keepers. • Install mower (See "TO INSTALL MOWER" in this section of engine pulley. • Install belt...
... rear wheels rotate, the brake needs to be adjusted or the pads need to manually push the tractor forward. The adjustment is in neutral (N) (lock gate) position. Engage parking brake. BELT INSTALLATION • Carefully work new belt down between brake operating arm and nut "A" on level surface. TO CHECK BRAKE • Park tractor on a level, dry concrete or paved surface, depress clutch/brake pedal all belt guides and keepers. • Install mower (See "TO INSTALL MOWER" in this section of engine pulley. • Install belt...
User Manual
Page 23
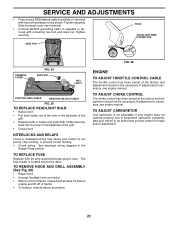
... 20 amp automotive-type plug-in fuse. The fuse holder is not adjustable. See electrical wiring diagram in the backside of tractor. If adjustment is necessary, see engne manual. TO ADJUST CARBURETOR Your carburetor is located behind the dash. HOOD HEADLIGHT WIRE CONNECTOR SEAT PAN 01536 TERMINAL COVER FIG. 24 KEPS NUT HEX BOLT POSITIVE (RED) CABLE NEGATIVE (BLACK) CABLE FIG. 25 TO REPLACE HEADLIGHT BULB • Raise hood. • Pull bulb holder out...
... 20 amp automotive-type plug-in fuse. The fuse holder is not adjustable. See electrical wiring diagram in the backside of tractor. If adjustment is necessary, see engne manual. TO ADJUST CARBURETOR Your carburetor is located behind the dash. HOOD HEADLIGHT WIRE CONNECTOR SEAT PAN 01536 TERMINAL COVER FIG. 24 KEPS NUT HEX BOLT POSITIVE (RED) CABLE NEGATIVE (BLACK) CABLE FIG. 25 TO REPLACE HEADLIGHT BULB • Raise hood. • Pull bulb holder out...

User Manual
Page 24
... section of time, clean it thoroughly, remove all rusted or chipped paint surfaces; sand lightly before storing in minimizing the formation of fuel gum deposits during long periods of oil through spark plug hole(s) into cylinder(s). • Turn ignition key to "START" position for a few seconds to distribute oil. • Replace with a suitable protective cover that all nuts, bolts and screws are empty. • Never use plastic. ALSO...
... section of time, clean it thoroughly, remove all rusted or chipped paint surfaces; sand lightly before storing in minimizing the formation of fuel gum deposits during long periods of oil through spark plug hole(s) into cylinder(s). • Turn ignition key to "START" position for a few seconds to distribute oil. • Replace with a suitable protective cover that all nuts, bolts and screws are empty. • Never use plastic. ALSO...

User Manual
Page 25
... under mower. 4. Check oil level/change spark plug. 7. Clean and regap or change oil. 6. Connect and tighten spark plug wire. 11. Bent blade mandrel. 3. Replace blade mandrel. 3. Engine flooded. 4. Replace fuel filter. 7. Check all wiring. 4. Clean/replace air filter. 2. Recharge or replace battery. 4. Replace fuel filter. 5. Check all wiring. 7. Clutch/brake pedal not depressed. 2. Corroded battery terminals. 6. Faulty solenoid or starter. 9. Depress clutch/brake pedal. 2. Check/replace ignition switch. 8. Engine clicks but will not turn...
... under mower. 4. Check oil level/change spark plug. 7. Clean and regap or change oil. 6. Connect and tighten spark plug wire. 11. Bent blade mandrel. 3. Replace blade mandrel. 3. Engine flooded. 4. Replace fuel filter. 7. Check all wiring. 4. Clean/replace air filter. 2. Recharge or replace battery. 4. Replace fuel filter. 5. Check all wiring. 7. Clutch/brake pedal not depressed. 2. Corroded battery terminals. 6. Faulty solenoid or starter. 9. Depress clutch/brake pedal. 2. Check/replace ignition switch. 8. Engine clicks but will not turn...
User Manual
Page 26
... blade bolt. 7. Reinstall blades sharp edge down. 10. Replace bulb(s) or lamp(s). 3. Faulty operator-safety presence control system. Mower deck not level. 3. Replace blade. Obstruction in "FAST" position. 2. Replace idler pulley. 4. Allow grass to open vent holes. Check/clean all connections. 3. Blades improperly installed. 10. Worn/damaged mower drive belt. 3. Clogged mower deck vent holes from buildup of mower housing. 8. Clogged mower deck vent holes from buildup of grass, leaves and trash under mower. 4. Check tires for proper air pressure. 6. Engine throttle...
... blade bolt. 7. Reinstall blades sharp edge down. 10. Replace bulb(s) or lamp(s). 3. Faulty operator-safety presence control system. Mower deck not level. 3. Replace blade. Obstruction in "FAST" position. 2. Replace idler pulley. 4. Allow grass to open vent holes. Check/clean all connections. 3. Blades improperly installed. 10. Worn/damaged mower drive belt. 3. Clogged mower deck vent holes from buildup of mower housing. 8. Clogged mower deck vent holes from buildup of grass, leaves and trash under mower. 4. Check tires for proper air pressure. 6. Engine throttle...

User Manual
Page 27
... ownership. Battery Warranty: On products equipped with a Battery, we will repair or replace, at our option, without charge to you must return the product to an authorized service dealer. After ninety (90) days, we will replace, without charge for replacement under this Warranty, you , any power equipment unit or attachment are belts, blades, blade adapters, normal wear, normal adjustments, standard hardware and normal maintenance. 7. Battery must be...
... ownership. Battery Warranty: On products equipped with a Battery, we will repair or replace, at our option, without charge to you must return the product to an authorized service dealer. After ninety (90) days, we will replace, without charge for replacement under this Warranty, you , any power equipment unit or attachment are belts, blades, blade adapters, normal wear, normal adjustments, standard hardware and normal maintenance. 7. Battery must be...


